2010 MERCEDES-BENZ C350S change time
[x] Cancel search: change timePage 23 of 364
Rhode Island, and Vermont Emission
Control System Warranty
R State Warranty Enforcement Laws (Lemon
Laws)
Important notice for California retail
buyers and lessees of Mercedes-Benz
automobiles
Under California law you may be entitled to a
replacement of your vehicle or a refund of the
purchase price or lease price, if after a
reasonable number of repair attempts
Mercedes-Benz USA, LLC and/or its
authorized repair or service facilities fail to fix
one or more substantial defects or
malfunctions in the vehicle that are covered
by its express warranty. During the period of
18 months from original delivery of the
vehicle or the accumulation of 18 000 miles
(approximately 29 000 km) on the odometer
of the vehicle, whichever occurs first, a
reasonable number of repair attempts is
presumed for a retail buyer or lessee if one or
more of the following occurs:
(1)the same substantial defect or
malfunction results in a condition that is
likely to cause death or serious bodily
injury if the vehicle is driven, that defect
or malfunction has been subject to repair
two or more times, and you have directly
notified Mercedes-Benz USA, LLC in
writing of the need for its repair,(2)the same substantial defect or
malfunction of a less serious nature than
category (1) has been subject to repair
four or more times and you have directly
notified us in writing of the need for its
repair, or(3)the vehicle is out of service by reason of
repair of the same or different substantial
defects or malfunctions for a cumulative
total of more than 30 calendar days.
Written notification should not be sent to a
dealer, it should be addressed to
Mercedes-Benz USA, LLC
Customer Assistance Center
One Mercedes Drive
Montvale, NJ 07645-0350
Maintenance
The Maintenance Booklet describes all the
necessary maintenance work which should
be performed at regular intervals.
Always have the Maintenance Booklet with
you when you take the vehicle to an
authorized Mercedes-Benz Center for
service. The service advisor will record each
service in the booklet for you.
Roadside Assistance
The Mercedes-Benz Roadside Assistance
Program provides factory-trained technical
help in the event of a breakdown. Calls to the
toll-free Roadside Assistance number
1-800-FOR-MERCedes (1-800-367-6372)
(in the USA) 1-800-387-0100 (in Canada)
will be answered by Mercedes-Benz
Customer Assistance Representatives
24 hours a day, 365 days a year.
For additional information refer to the
Mercedes-Benz Roadside Assistance
Program brochure (in the USA) or the
Roadside Assistance section of the Service
and Warranty Information Booklet (in
Canada) in your vehicle literature portfolio.
Change of address or ownership
If you change your address, be sure to send
in the “Change of Address Notice” found in
the Service and Warranty Information
Booklet, or simply call the Mercedes-Benz
Customer Assistance Center (in the USA) at
1-800-FOR-MERCedes (1-800-367-6372), or
Customer Service (in Canada) at
1-800-387-0100. This will assist us in
Introduction21204_AKB; 5; 23, en-USd2ureepe,Version: 2.11.8.12009-07-16T17:54:06+02:00 - Seite 21Z
Page 41 of 364
replaced and to have any malfunctioning air
bags repaired. This will help to make sure the
air bags will continue to provide supplemental
crash protection for occupants.
Safety guidelines for the seat belt,
Emergency Tensioning Device (ETD)
and air bag GWarning!
R Damaged seat belts or seat belts that have
been subjected to stress in an accident
must be replaced. Their anchoring points
must also be checked. Only use seat belts
installed or supplied by an authorized
Mercedes-Benz Center.
R Air bags and pyrotechnic Emergency
Tensioning Devices (ETDs) contain
perchlorate material, which may require
special handling and regard for the
environment. Check with your local
government’s disposal guidelines.
California residents, see
www.dtsc.ca.gov/HazardousWaste/
Perchlorate/index.cfm .
R Air bags and ETDs are designed to function
on a one-time-only basis. An air bag or ETD
that has deployed must be replaced.
R Do not pass seat belts over sharp edges.
They could tear.
R Do not make any modification that could
change the effectiveness of the seat belts.
R Do not bleach or dye seat belts as this may
severely weaken them. In a crash they may
not be able to provide adequate protection.
R No modifications of any kind may be made
to any components or wiring of the SRS.
R Do no change or remove any component or
part of the SRS.
R Do not install additional trim material, seat
covers, badges, etc. over the steering
wheel hub, front passenger front air bag
cover, outboard sides of the seat
backrests, door trim panels, or door frame
trims.
R Do not install additional electrical/
electronic equipment on or near SRS
components and wiring.
R Keep area between air bags and occupants
free of objects (e.g. packages, purses,
umbrellas, etc.).
R Do not hang items such as coat hangers
from the coat hooks or handles over the
door. These items may be thrown around in
the vehicle and cause head and other
injuries when the window curtain air bag is
deployed.
R Air bag system components will be hot after
an air bag has inflated. Do not touch them.
R Never place your feet on the instrument
panel, dashboard, or on the seat. Always
keep both feet on the floor in front of the
seat.
R Improper repair work on the SRS creates a
risk of rendering the SRS inoperative or
causing unintended air bag deployment.
Work on the SRS must therefore only be
performed by qualified technicians.
Contact an authorized Mercedes-Benz
Center.
R For your protection and the protection of
others, when scrapping the air bag unit or
ETD, our safety instructions must be
followed. These instructions are available
from any authorized Mercedes-Benz
Center.
R Given the considerable deployment speed,
required inflation volume, and the material
of the air bags, there is the possibility of
abrasions or other, potentially more serious
injuries resulting from air bag deployment.
If you sell your vehicle, we strongly
recommend that you inform the subsequent
owner that the vehicle is equipped with SRS.
Also refer them to the applicable section in
the Operator’s Manual.Occupant safety39Safety and security204_AKB; 5; 23, en-USd2ureepe,Version: 2.11.8.12009-07-16T17:54:06+02:00 - Seite 39Z
Page 57 of 364
Unsecured or improperly positioned cargo
increases a child’s risk of injury in the event
of
R strong braking maneuvers
R sudden changes of direction
R an accident
Infant and child restraint systemsGObserve Safety notes, see page 54.
We recommend all infants and children be
properly restrained at all times while the
vehicle is in motion.
Canada only:
Only use a BabySmart™ compatible child
restraint for the front passenger seat in this
vehicle.
All lap/shoulder belts except the driver’s seat
belt have special seat belt retractors for
secure fastening of child restraints.
To fasten a child restraint, follow the child
restraint manufacturer’s instructions for
mounting.
To activate the special seat belt retractor:
XPull the shoulder belt out completely and
let it retract.
During seat belt retraction, a ratcheting
sound can be heard to indicate that the
special seat belt retractor is activated.
The seat belt is now locked.XPush down on child restraint to take up any
slack.
To deactivate the special seat belt retractor:
XRelease the seat belt buckle and let the
seat belt retract completely.
The seat belt can then again be used in the
usual manner.
To deactivate the special seat belt retractor
for the front passenger seat, the front
passenger seat must be in the most backward
position.
GWarning!
Never release the seat belt buckle while the
vehicle is in motion, since the special seat belt
retractor will be deactivated.
i Information on child seats with mounting
fittings for tether anchorages
( Y page 57).
For information on LATCH-type (ISOFIX)
child seat anchors ( Y page 58).
The use of infant or child restraints is required
by law in all 50 states, the District of
Columbia, the U.S. territories and all
Canadian provinces.
Infants and small children should be seated
in an appropriate infant or child restraint
system. They must be properly secured in
accordance with the manufacturer’s
instructions for the child restraint. All infant
or child restraint systems must comply with
U.S. Federal Motor Vehicle Safety Standards
213 and 225 and Canadian Motor Vehicle
Safety Standards 213 and 210.2.
A statement by the child restraint
manufacturer of compliance with these
standards can be found on the instruction
label on the restraint and in the instruction
manual provided with the restraint.
When using any infant restraint, toddler
restraint, or booster seat, make sure to
carefully read and follow all manufacturer’s
instructions for installation and use.
Please read and observe warning labels
affixed to the inside of the vehicle and to
infant or child restraints.
GWarning!
According to accident statistics, children are
safer when properly restrained in the rear
seating positions than in the front seating
position. Thus, we strongly recommend that
children be placed in the rear seats whenever
possible. Regardless of seating position,
children 12 years old and under must be
seated and properly secured in an appropriate
Occupant safety55Safety and security204_AKB; 5; 23, en-USd2ureepe,Version: 2.11.8.12009-07-16T17:54:06+02:00 - Seite 55Z
Page 95 of 364
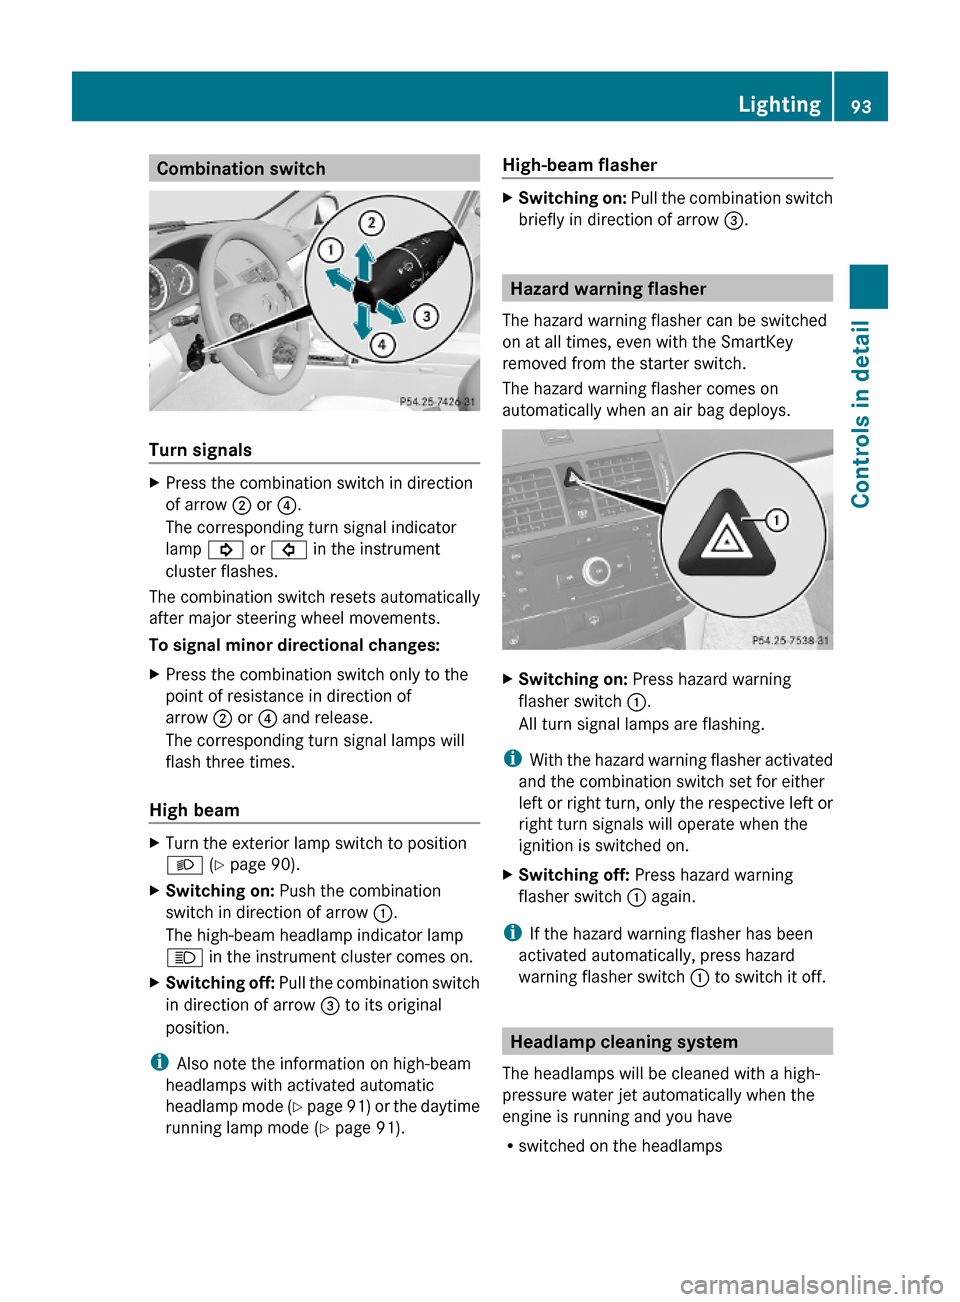
Combination switch
Turn signals
XPress the combination switch in direction
of arrow ; or ?.
The corresponding turn signal indicator
lamp ! or # in the instrument
cluster flashes.
The combination switch resets automatically
after major steering wheel movements.
To signal minor directional changes:
XPress the combination switch only to the
point of resistance in direction of
arrow ; or ? and release.
The corresponding turn signal lamps will
flash three times.
High beam
XTurn the exterior lamp switch to position
L (Y page 90).
XSwitching on: Push the combination
switch in direction of arrow :.
The high-beam headlamp indicator lamp
K in the instrument cluster comes on.
XSwitching off: Pull the combination switch
in direction of arrow = to its original
position.
iAlso note the information on high-beam
headlamps with activated automatic
headlamp mode (Y page 91) or the daytime
running lamp mode (Y page 91).
High-beam flasher XSwitching on: Pull the combination switch
briefly in direction of arrow =.
Hazard warning flasher
The hazard warning flasher can be switched
on at all times, even with the SmartKey
removed from the starter switch.
The hazard warning flasher comes on
automatically when an air bag deploys.
XSwitching on: Press hazard warning
flasher switch :.
All turn signal lamps are flashing.
iWith the hazard warning flasher activated
and the combination switch set for either
left or right turn, only the respective left or
right turn signals will operate when the
ignition is switched on.
XSwitching off: Press hazard warning
flasher switch : again.
iIf the hazard warning flasher has been
activated automatically, press hazard
warning flasher switch : to switch it off.
Headlamp cleaning system
The headlamps will be cleaned with a high-
pressure water jet automatically when the
engine is running and you have
Rswitched on the headlamps
Lighting93Controls in detail204_AKB; 5; 23, en-USd2ureepe,Version: 2.11.8.12009-07-16T17:54:06+02:00 - Seite 93Z
Page 99 of 364
the presence of water sprayed on the
windshield, and windshield wipers may be
damaged as a result.
! Vehicles with rain sensor: If you have set
intermittent wiping, dirt on the surface of
the rain sensor or optical effects may cause
the windshield wipers to wipe in an
undesired fashion. This could then damage
the windshield wiper blades or scratch the
windshield. You should therefore switch off
the windshield wipers when weather
conditions are dry.
Vehicles with rain sensor: Intermittent wiping
interval is dependent on the wetness of the
windshield. After the initial wipe, pauses
between wipes are controlled by the rain
sensor automatically.XTurn the combination switch to position
Ä or Å .
Intermittent wiping starts with selected
wiping interval.
Intermittent wiping is interrupted when the
vehicle is at a standstill and a front door is
opened. This protects persons getting into or
out of the vehicle from being sprayed.
Intermittent wiping will be continued when all
doors are closed and
R the clutch pedal is depressed (vehicles with
manual transmission)
or
R the automatic transmission is in drive
position D or reverse gear R (vehicles with
automatic transmission)
or
R the wiper setting is changed using the
combination switch
Single wipe
XPress the combination switch briefly in
direction of arrow B to the resistance
point.
The windshield wipers wipe one time
without washer fluid.Wiping with washer fluidXPress the combination switch in direction
of arrow B past the resistance point.
The windshield wipers operate with washer
fluid.
i To prevent smears on the windshield or
noisy/chattering wiper blades, wipe with
washer fluid every now and then even when
it is raining.
For information on filling up the washer
reservoir, see “Washer system and headlamp
cleaning system” ( Y page 228).
For information on cleaning the headlamps
with washer fluid, see “Headlamp cleaning
system” ( Y page 93).
Problems with wipers
! If anything blocks the windshield wipers
(leaves, snow, etc.), switch them off
immediately.
For safety reasons, do the following before
attempting to remove any blockage:
R Stop the vehicle in a safe location.
R Remove the SmartKey from the starter
switch.
or
R Turn off the engine by pressing the
KEYLESS-GO start/stop button and
open the driver’s door (with the driver’s
door open, starter switch is in position
0 , same as with SmartKey removed from
starter switch).
R Engage the parking brake.
R Remove blockage.
R Turn the windshield wipers on again.
Wipers97Controls in detail204_AKB; 5; 23, en-USd2ureepe,Version: 2.11.8.12009-07-16T17:54:06+02:00 - Seite 97Z
Page 115 of 364
XBriefly press the gear selector lever to the
left in the D- direction.
or
XBriefly pull left gearshift control :.
The automatic transmission will shift into
the next lower gear as permitted by the
shift program. This action simultaneously
limits the gear range of the automatic
transmission.
iTo avoid overrevving the engine when
downshifting, the automatic transmission
will not shift into a lower gear if the engine’s
maximum speed would be exceeded.
Extending gear range
XBriefly press the gear selector lever to the
right in the D+ direction.
or
XBriefly pull right gearshift control ;.
The automatic transmission will shift into
the next higher gear as permitted by the
shift program. This action simultaneously
extends the gear range of the automatic
transmission.
iIf you press on the accelerator pedal
when the engine has reached the
revolution limit of the current gear range,
the automatic transmission will upshift
beyond any gear range limit selected.
Canceling gear range limit
XPress and hold the gear selector lever to
the right in the D+ direction until the gear
range indicator disappears from the
multifunction display.
or
XPull and hold right gearshift control ; until
the gear range indicator disappears from
the multifunction display.
The automatic transmission will shift from
the current gear range directly into drive
position D.
Shifting into optimal gear range XPress and hold the gear selector lever to
the left in the D- direction.
or
XPull and hold left gearshift control :.
The automatic transmission will select the
gear range suited for optimal acceleration
and deceleration automatically. This will
involve shifting down one or more gears.
Manual shift program
The manual shift program is available on
vehicles with dynamic handling package and
on C 63 AMG only.
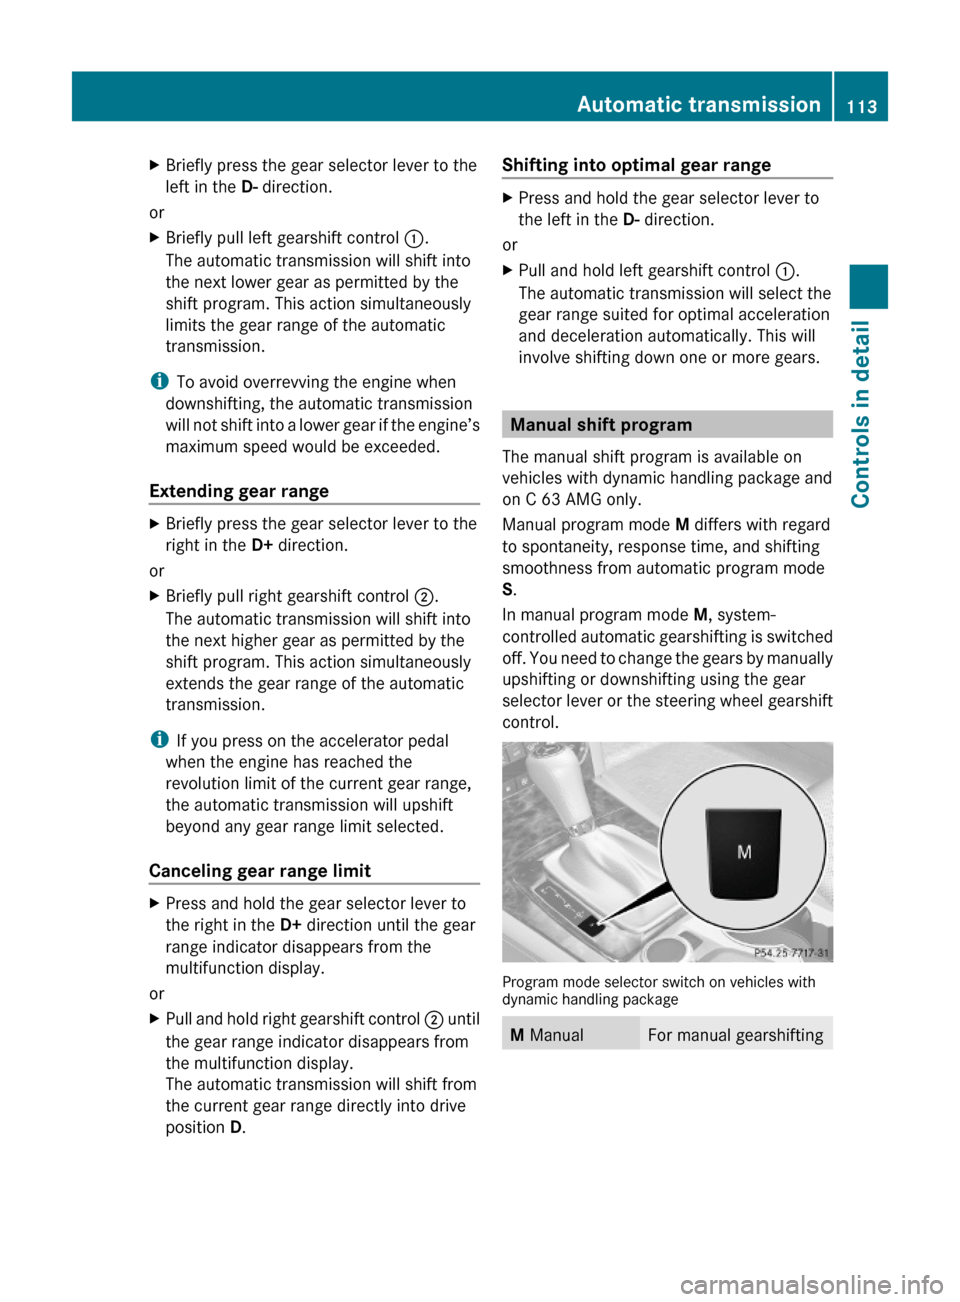
Manual program mode M differs with regard
to spontaneity, response time, and shifting
smoothness from automatic program mode
S.
In manual program mode M, system-
controlled automatic gearshifting is switched
off. You need to change the gears by manually
upshifting or downshifting using the gear
selector lever or the steering wheel gearshift
control.
Program mode selector switch on vehicles withdynamic handling package
M ManualFor manual gearshiftingAutomatic transmission113Controls in detail204_AKB; 5; 23, en-USd2ureepe,Version: 2.11.8.12009-07-16T17:54:06+02:00 - Seite 113Z
Page 133 of 364
XPress button : or 9 to select a
submenu.
Scroll down with button :, scroll up with
button 9.
With the selection marker on the desired
submenu, use the button a to access the
individual functions within that submenu.
Once within the submenu, you can use button
9 to move to the next function or
button : to move to the previous function
within that submenu.
The following lists show what settings can be
changed within the various menus. Detailed
instructions on making individual settings can
be found on the following pages.
Instrument cluster submenu
RSelecting speedometer display mode
(Y page 131)
RShowing or hiding additional
speedometer13 (Y page 132)
RPermanent display14 (speed display or
outside temperature) (Y page 132)
Time/Date submenu
RSetting the time (Y page 132)
RSetting the date (Y page 133)
Lights submenu
RSwitching daytime running lamp mode on
or off (USA only) (Y page 133)
RSwitching locator lighting on or off
(Y page 134)
RSwitching interior lighting delayed shut-off
on or off (Y page 135)
Vehicle submenu
RSwitching automatic central locking on or
off (Y page 135)
Convenience submenu
RActivating easy-entry/exit feature
(Y page 136)
RSwitching fold-in function for exterior rear
view mirrors on or off (Canada only)
(Y page 136)
Instrument cluster submenu
Access the Instr. Cluster submenu via
the Settings menu. Use the Instr.
Cluster submenu to change the instrument
cluster display settings.
The following functions are available:
RSelecting speedometer display mode
(Y page 131)
RShowing or hiding additional
speedometer15 (Y page 132)
RPermanent display16 (speed display or
outside temperature) (Y page 132)
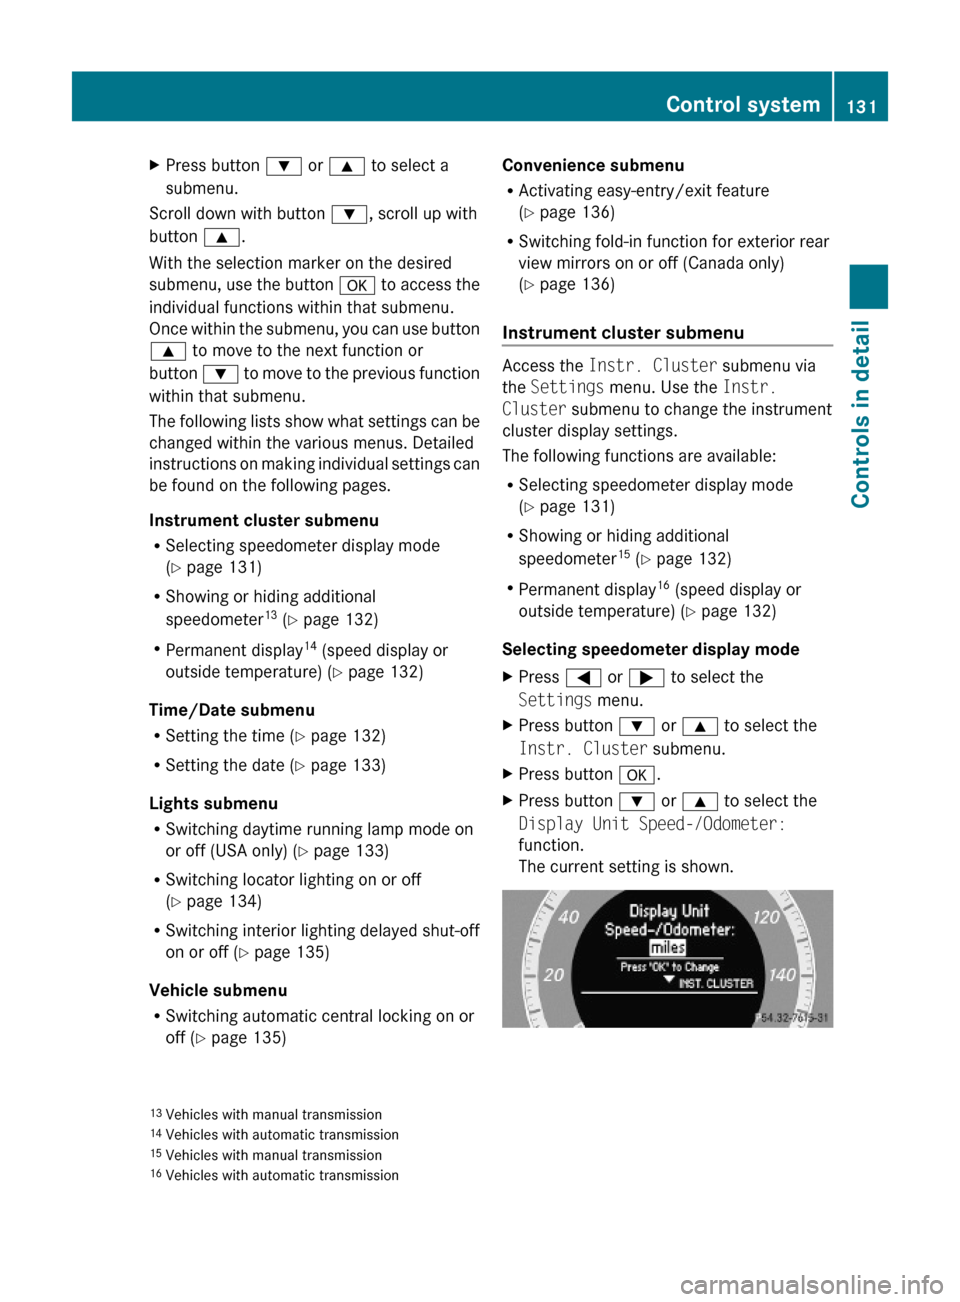
Selecting speedometer display mode
XPress = or ; to select the
Settings menu.
XPress button : or 9 to select the
Instr. Cluster submenu.
XPress button a.XPress button : or 9 to select the
Display Unit Speed-/Odometer:
function.
The current setting is shown.
13Vehicles with manual transmission14Vehicles with automatic transmission15Vehicles with manual transmission16Vehicles with automatic transmission
Control system131Controls in detail204_AKB; 5; 23, en-USd2ureepe,Version: 2.11.8.12009-07-16T17:54:06+02:00 - Seite 131Z
Page 134 of 364

XPress button a to change the setting.
Depending on the previous setting the
Display Unit Speed-/Odometer: will be
set to miles or km.
The selected display unit is valid for:
ROdometer and trip odometer
RTrip computer
RDigital speedometer in the trip menu
RCruise control
RNavigation displays
Showing or hiding additional
speedometer (vehicles with manual
transmission)
You can have an additional digital
speedometer shown on the multifunction
display. The speed is shown in the unit of
kilometers/hour (USA) or miles/hour
(Canada).
XPress button = or ; to select the
Settings menu.
XPress button : or 9 to select the
Instr. Cluster submenu.
XPress button a.XPress button : or 9 to select the
Additional Speedometer function.
The current setting is shown.
XPress button a to change the current
status.
Depending on the previous status, the
additional speedometer will be switched
On or Off.
Permanent display (vehicles with
automatic transmission)
You can use the Permanent Display:
function to choose to display either the
outside temperature or the speed in
kilometers (USA) or miles (Canada)
permanently.
XPress button = or ; to select the
Settings menu.
XPress button : or 9 to select the
Instr. Cluster submenu.
XPress button a.XPress button : or 9 to select the
Permanent Display: function.
The current setting is shown.
XPress button a to change the current
status.
Depending on the previous status, the
Permanent Display: will be switched
between Outside temperature or
Speedometer (km/h) (USA)/
Speedometer (miles) (Canada).
Time/Date submenu
Access the Time/Date submenu via the
Settings menu. Use the Time/Date
submenu to change the time and date display
settings.
The following functions are available:
RSetting the time (Y page 132)
RSetting the date (Y page 133)
Setting the time
This function is not available if your vehicle is
equipped with the COMAND system and
navigation module.
132Control systemControls in detail
204_AKB; 5; 23, en-USd2ureepe,Version: 2.11.8.12009-07-16T17:54:06+02:00 - Seite 132