2010 MERCEDES-BENZ C350S buttons
[x] Cancel search: buttonsPage 126 of 364
RSETUP (Y page 124)
RRACETIMER (Y page 124)
ROverall analysis (Y page 125)
RLap analysis (Y page 126)
SETUP
XPress button = or ; to select the
AMG menu.
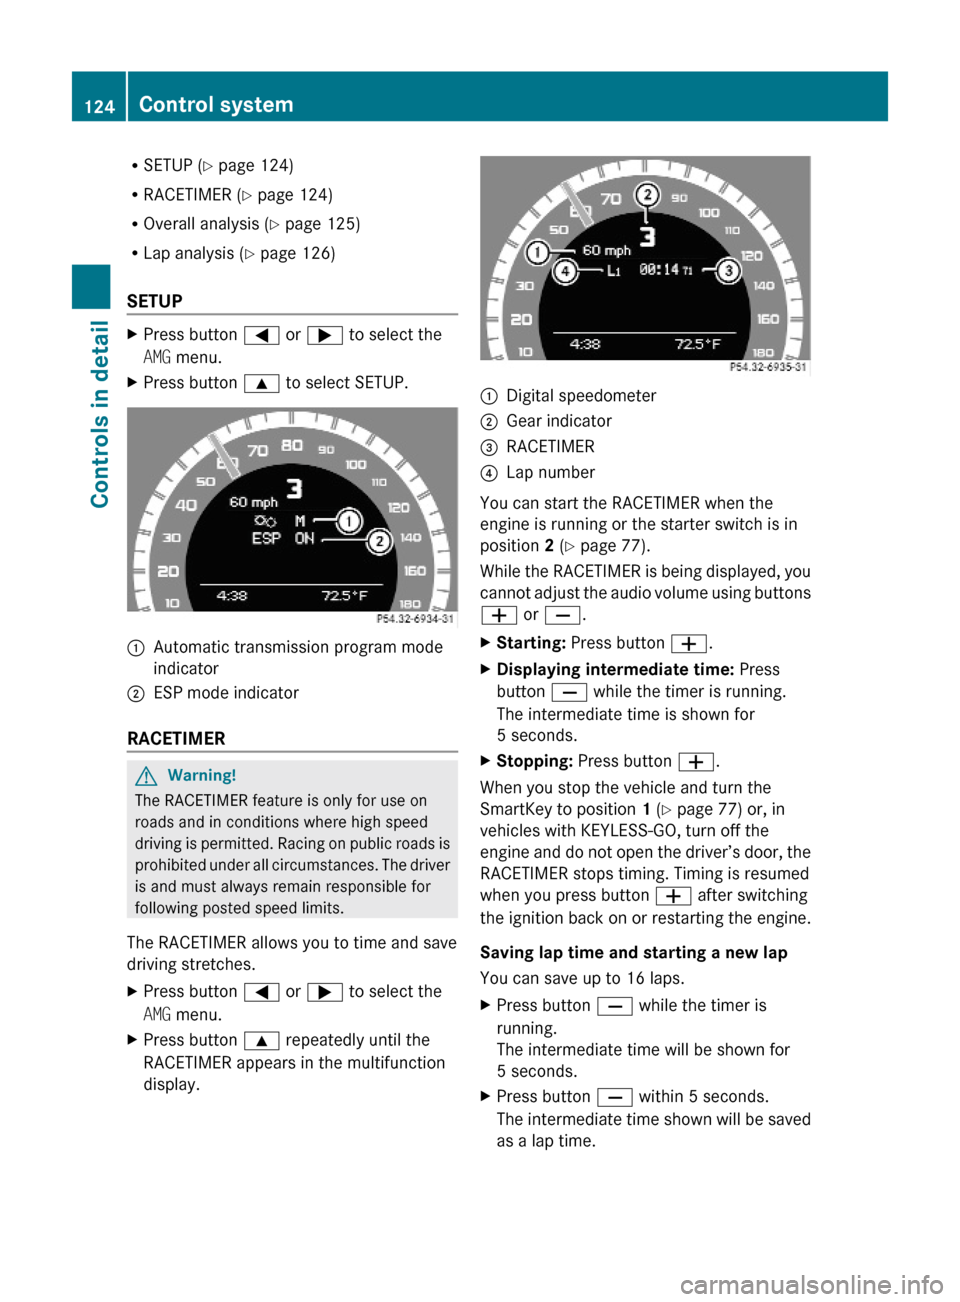
XPress button 9 to select SETUP.:Automatic transmission program mode
indicator
;ESP mode indicator
RACETIMER
GWarning!
The RACETIMER feature is only for use on
roads and in conditions where high speed
driving is permitted. Racing on public roads is
prohibited under all circumstances. The driver
is and must always remain responsible for
following posted speed limits.
The RACETIMER allows you to time and save
driving stretches.
XPress button = or ; to select the
AMG menu.
XPress button 9 repeatedly until the
RACETIMER appears in the multifunction
display.
:Digital speedometer;Gear indicator=RACETIMER?Lap number
You can start the RACETIMER when the
engine is running or the starter switch is in
position 2 (Y page 77).
While the RACETIMER is being displayed, you
cannot adjust the audio volume using buttons
W or X.
XStarting: Press button W.XDisplaying intermediate time: Press
button X while the timer is running.
The intermediate time is shown for
5 seconds.
XStopping: Press button W.
When you stop the vehicle and turn the
SmartKey to position 1 (Y page 77) or, in
vehicles with KEYLESS-GO, turn off the
engine and do not open the driver’s door, the
RACETIMER stops timing. Timing is resumed
when you press button W after switching
the ignition back on or restarting the engine.
Saving lap time and starting a new lap
You can save up to 16 laps.
XPress button X while the timer is
running.
The intermediate time will be shown for
5 seconds.
XPress button X within 5 seconds.
The intermediate time shown will be saved
as a lap time.
124Control systemControls in detail
204_AKB; 5; 23, en-USd2ureepe,Version: 2.11.8.12009-07-16T17:54:06+02:00 - Seite 124
Page 138 of 364
Activating easy-entry/exit feature
Use this function to activate and deactivate
the easy-entry/exit feature (Y page 85).
GWarning!
You must make sure no one can become
trapped or injured by the moving steering
wheel when the easy-entry/exit feature is
activated.
To stop steering wheel movement, move
steering wheel adjustment stalk or press one
of the memory position buttons.
Do not leave children unattended in the
vehicle, or with access to an unlocked vehicle.
Children could open the driver’s door and
unintentionally activate the easy-entry/exit
feature, which could result in an accident
and/or serious personal injury.
XPress button = or ; to select the
Settings menu.
XPress button : or 9 to select the
Convenience submenu.
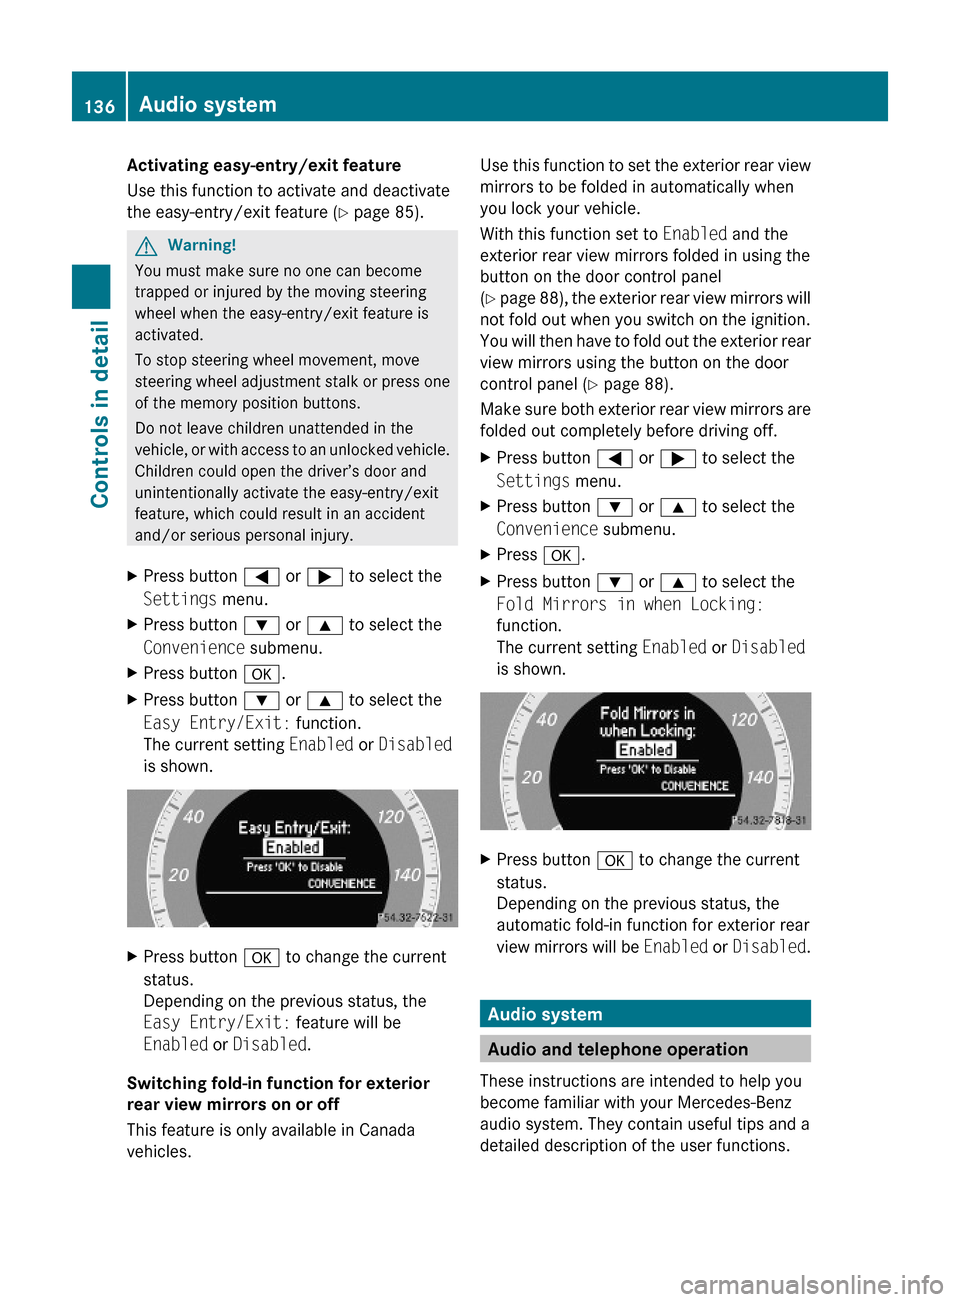
XPress button a.XPress button : or 9 to select the
Easy Entry/Exit: function.
The current setting Enabled or Disabled
is shown.
XPress button a to change the current
status.
Depending on the previous status, the
Easy Entry/Exit: feature will be
Enabled or Disabled.
Switching fold-in function for exterior
rear view mirrors on or off
This feature is only available in Canada
vehicles.
Use this function to set the exterior rear view
mirrors to be folded in automatically when
you lock your vehicle.
With this function set to Enabled and the
exterior rear view mirrors folded in using the
button on the door control panel
(Y page 88), the exterior rear view mirrors will
not fold out when you switch on the ignition.
You will then have to fold out the exterior rear
view mirrors using the button on the door
control panel (Y page 88).
Make sure both exterior rear view mirrors are
folded out completely before driving off.
XPress button = or ; to select the
Settings menu.
XPress button : or 9 to select the
Convenience submenu.
XPress a.XPress button : or 9 to select the
Fold Mirrors in when Locking:
function.
The current setting Enabled or Disabled
is shown.
XPress button a to change the current
status.
Depending on the previous status, the
automatic fold-in function for exterior rear
view mirrors will be Enabled or Disabled.
Audio system
Audio and telephone operation
These instructions are intended to help you
become familiar with your Mercedes-Benz
audio system. They contain useful tips and a
detailed description of the user functions.
136Audio systemControls in detail
204_AKB; 5; 23, en-USd2ureepe,Version: 2.11.8.12009-07-16T17:54:06+02:00 - Seite 136
Page 140 of 364
The audio system consists of the following:
RAudio control unit
RAudio display
RAudio controller with buttons k and
2
In addition, the audio system can also be
operated with the multifunction steering
wheel (Y page 118).
In these instructions, the keypad (right side
of audio control unit) and the function buttons
are referred to as “buttons”.
Audio control unit
With the audio control unit you can
Rswitch the audio system on/off
Radjust the volume
Rselect the operating modes
Renter telephone numbers and accept,
reject, initiate and end telephone calls
Rload and eject CDs
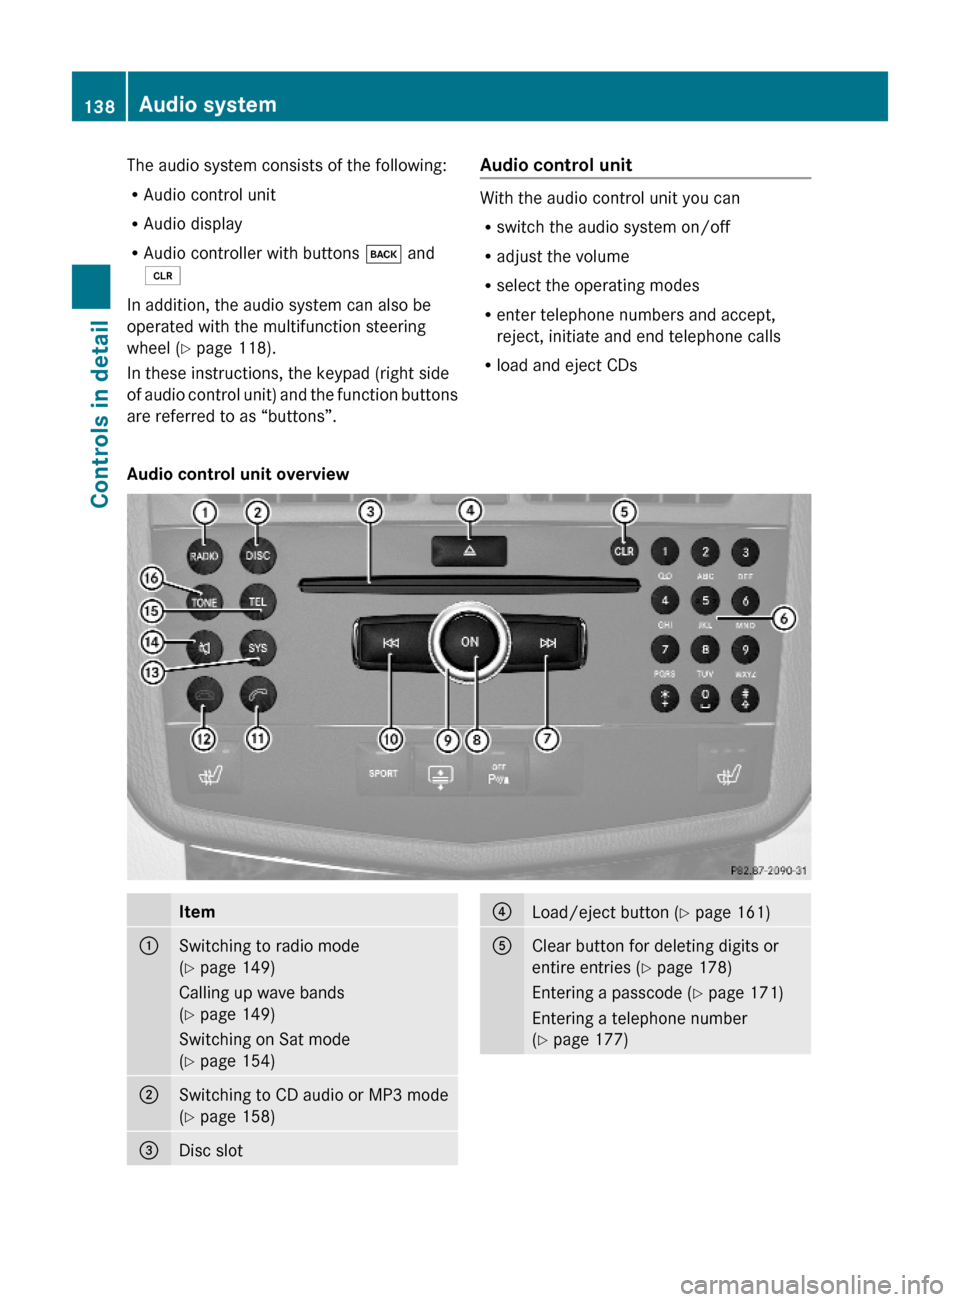
Audio control unit overviewItem:Switching to radio mode
(Y page 149)
Calling up wave bands
(Y page 149)
Switching on Sat mode
(Y page 154)
;Switching to CD audio or MP3 mode
(Y page 158)
=Disc slot?Load/eject button (Y page 161)AClear button for deleting digits or
entire entries (Y page 178)
Entering a passcode (Y page 171)
Entering a telephone number
(Y page 177)
138Audio systemControls in detail
204_AKB; 5; 23, en-USd2ureepe,Version: 2.11.8.12009-07-16T17:54:06+02:00 - Seite 138
Page 142 of 364
XOpening: Press opening button :.
Audio display cover ; opens, the audio
display is visible, and the audio system
switched on.
XClosing: Press audio display cover ;
down until it engages.
If the audio system is still switched on, you
can continue to listen to the radio or a CD
and operate the device via the buttons on
the audio control panel as well as the
buttons on the multifunction steering
wheel.
iYou cannot operate the audio system via
the audio controller when audio display
cover ; is closed.
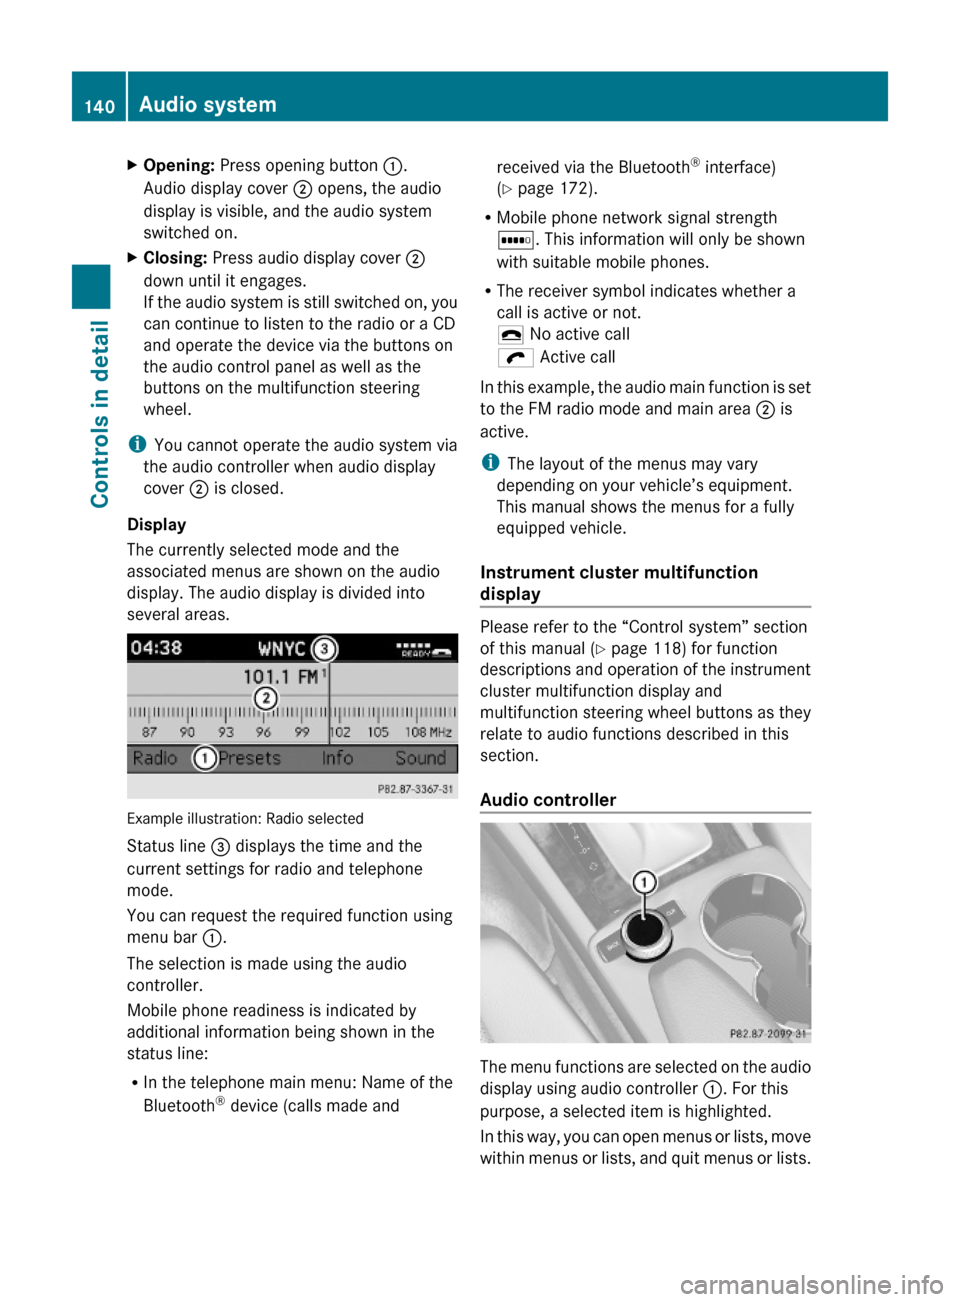
Display
The currently selected mode and the
associated menus are shown on the audio
display. The audio display is divided into
several areas.
Example illustration: Radio selected
Status line = displays the time and the
current settings for radio and telephone
mode.
You can request the required function using
menu bar :.
The selection is made using the audio
controller.
Mobile phone readiness is indicated by
additional information being shown in the
status line:
RIn the telephone main menu: Name of the
Bluetooth® device (calls made and
received via the Bluetooth® interface)
(Y page 172).
RMobile phone network signal strength
r. This information will only be shown
with suitable mobile phones.
RThe receiver symbol indicates whether a
call is active or not.
¢ No active call
ö Active call
In this example, the audio main function is set
to the FM radio mode and main area ; is
active.
iThe layout of the menus may vary
depending on your vehicle’s equipment.
This manual shows the menus for a fully
equipped vehicle.
Instrument cluster multifunction
display
Please refer to the “Control system” section
of this manual (Y page 118) for function
descriptions and operation of the instrument
cluster multifunction display and
multifunction steering wheel buttons as they
relate to audio functions described in this
section.
Audio controller
The menu functions are selected on the audio
display using audio controller :. For this
purpose, a selected item is highlighted.
In this way, you can open menus or lists, move
within menus or lists, and quit menus or lists.
140Audio systemControls in detail
204_AKB; 5; 23, en-USd2ureepe,Version: 2.11.8.12009-07-16T17:54:06+02:00 - Seite 140
Page 152 of 364
Selecting a station/channel
The following functions are available:
RStation search function
RChannel list (Weather Band/satellite radio)
RStation memory (except Weather Band)
RManual frequency entry (except Weather
Band/satellite radio)
For using satellite radio see (Y page 152).
The station search proceeds in the following
frequency increments:
R200 kHz in FM range
R10 kHz in AM range
Tuning to a station/channel via station/
channel search function
iThe search function searches for the next
receivable station in the FM or AM wave
band. In Weather Band (WB) the search
function switches to the next channel in the
channel list. For tuning to a station/
channel you can also use the buttons on
the multifunction steering wheel, see
Audio menu (Y page 126).
XPress button $ on audio control unit
repeatedly until the FM/AM/WB wave
band is selected.
XSlide XVY or rotate cVd when the main
area in the basic menu is active.
Depending on the direction in which the
controller is being slid or rotated, the
system searches upward or downward and
stops at the next station/channel.
or
XPress button E or F on audio control
unit.
Depending on the pressed button, the
system searches downward or upward and
stops at the next station/channel.
Selecting a station using station memory
iThis function is not available for Weather
Band.
XPress button $ on audio control unit
repeatedly until desired wave band has
been selected.
XSelect Presets.
or
XPress W when the main area is selected.
The memory menu appears. The dot # in
front of a memory position indicates that
the currently selected station is saved
there.
XSelect a station in the memory menu by
rotating cVd or sliding ZVÆ and press
W.
or
XPress desired station button k to
x, with the keypad in audio control unit
briefly.
Tuning to a station by entering the
frequency manually
iThis function is not available for Weather
Band/satellite radio.
X$ Q Radio Q Enter Frequency
The menu for manual frequency entry
appears.
or
XPress button l on the keypad in audio
control unit briefly.
The Enter Frequency submenu appears.
150Audio systemControls in detail
204_AKB; 5; 23, en-USd2ureepe,Version: 2.11.8.12009-07-16T17:54:06+02:00 - Seite 150
Page 153 of 364
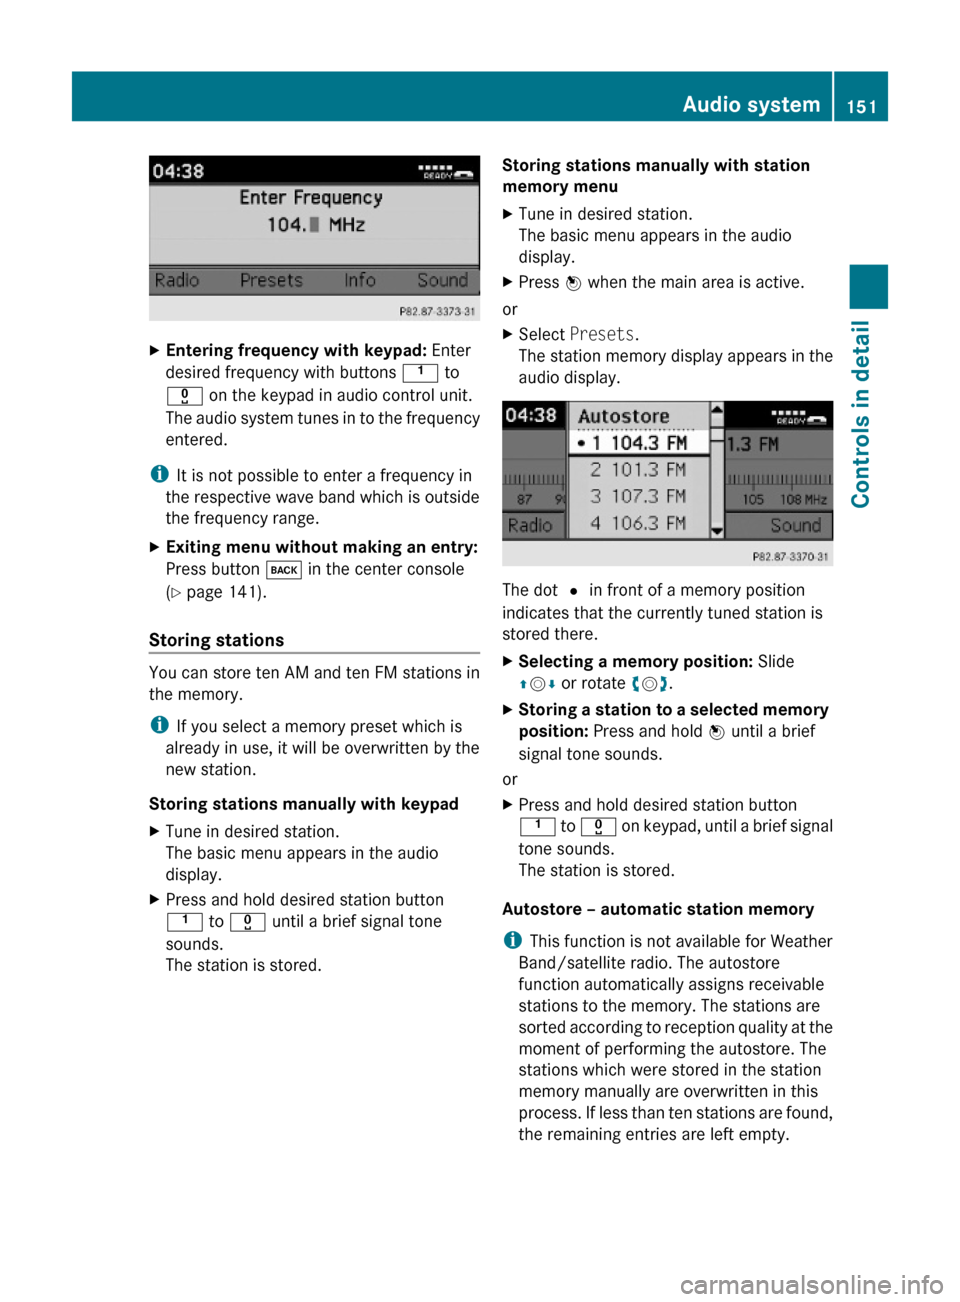
XEntering frequency with keypad: Enter
desired frequency with buttons k to
x on the keypad in audio control unit.
The audio system tunes in to the frequency
entered.
iIt is not possible to enter a frequency in
the respective wave band which is outside
the frequency range.
XExiting menu without making an entry:
Press button k in the center console
(Y page 141).
Storing stations
You can store ten AM and ten FM stations in
the memory.
iIf you select a memory preset which is
already in use, it will be overwritten by the
new station.
Storing stations manually with keypad
XTune in desired station.
The basic menu appears in the audio
display.
XPress and hold desired station button
k to x until a brief signal tone
sounds.
The station is stored.
Storing stations manually with station
memory menu
XTune in desired station.
The basic menu appears in the audio
display.
XPress W when the main area is active.
or
XSelect Presets.
The station memory display appears in the
audio display.
The dot # in front of a memory position
indicates that the currently tuned station is
stored there.
XSelecting a memory position: Slide
ZVÆ or rotate cVd.
XStoring a station to a selected memory
position: Press and hold W until a brief
signal tone sounds.
or
XPress and hold desired station button
k to x on keypad, until a brief signal
tone sounds.
The station is stored.
Autostore – automatic station memory
iThis function is not available for Weather
Band/satellite radio. The autostore
function automatically assigns receivable
stations to the memory. The stations are
sorted according to reception quality at the
moment of performing the autostore. The
stations which were stored in the station
memory manually are overwritten in this
process. If less than ten stations are found,
the remaining entries are left empty.
Audio system151Controls in detail204_AKB; 5; 23, en-USd2ureepe,Version: 2.11.8.12009-07-16T17:54:06+02:00 - Seite 151Z
Page 157 of 364
XCalling up category list: $
(repeatedly, if necessary) Q Cat .
or
XIn Sat mode, slide XV Y or rotate cV d until
Cat. is highlighted and press W.
The category list appears.XSelecting a category: Slide ZV Æ or rotate
c V d.XSetting the selected category: Press W.
The selected program category
(alphabetical order) will appear in the audio
display. The last tuned channel in the new
category will begin to play.
When searching, tuning in, or selecting
from the channel list, the All Channels
option accesses all of your subscribed
channels.
i When you select the category All
Channels , you have access to all the
channels you subscribed to, regardless of
category.
Tuning in channels
You have the following selection options:
R the channel search function
R the manual channel number entry
R the channel list
R the channel presets
Tuning in channels using channel search
function
XSlide XV Y or rotate cV d when the main
area in the basic menu is active.
Depending on the direction in which the
controller is being slid or rotated, the
system searches upward or downward and
stops at the next subscribed channel.
or
XPress button E or F on audio control
unit.
Depending on the pressed button, the
system searches upward or downward and
stops at the next subscribed channel.i Which channels are available depends on
which channels you have subscribed to and
the program category you have selected
( Y page 154). For tuning in channels you
can also use the buttons on the
multifunction steering wheel, see “Audio
menu” ( Y page 126).
Tuning in channels using manual channel
number entryX$ (repeatedly, if necessary) Q Sat
Q Enter Channel .
The menu for manual channel number entry
appears.
or
XIn Sat mode, press button l on the
keypad in audio control unit briefly.XChannel number entry with keypad:
Enter desired channel number with buttons
k to x with the keypad in audio
control unit briefly.
Further operation depends on whether the
selected channel number is valid or if the
channel is included in your subscription.
XExiting menu without making an entry:
Press button k in the center console
( Y page 141).
Channel number is valid and channel is
included in subscription: The audio system
tunes in the channel entered.
Channel number is invalid: The message
Invalid Channel appears in the audio
display.
XThe message disappears automatically or
press W to close the message.
Channel number is valid, but channel is
not included in subscription: The message
Call SIRIUS to activate: appears
( Y page 153).
XPress W to close the message in the audio
display.Audio system155Controls in detail204_AKB; 5; 23, en-USd2ureepe,Version: 2.11.8.12009-07-16T17:54:06+02:00 - Seite 155Z
Page 166 of 364
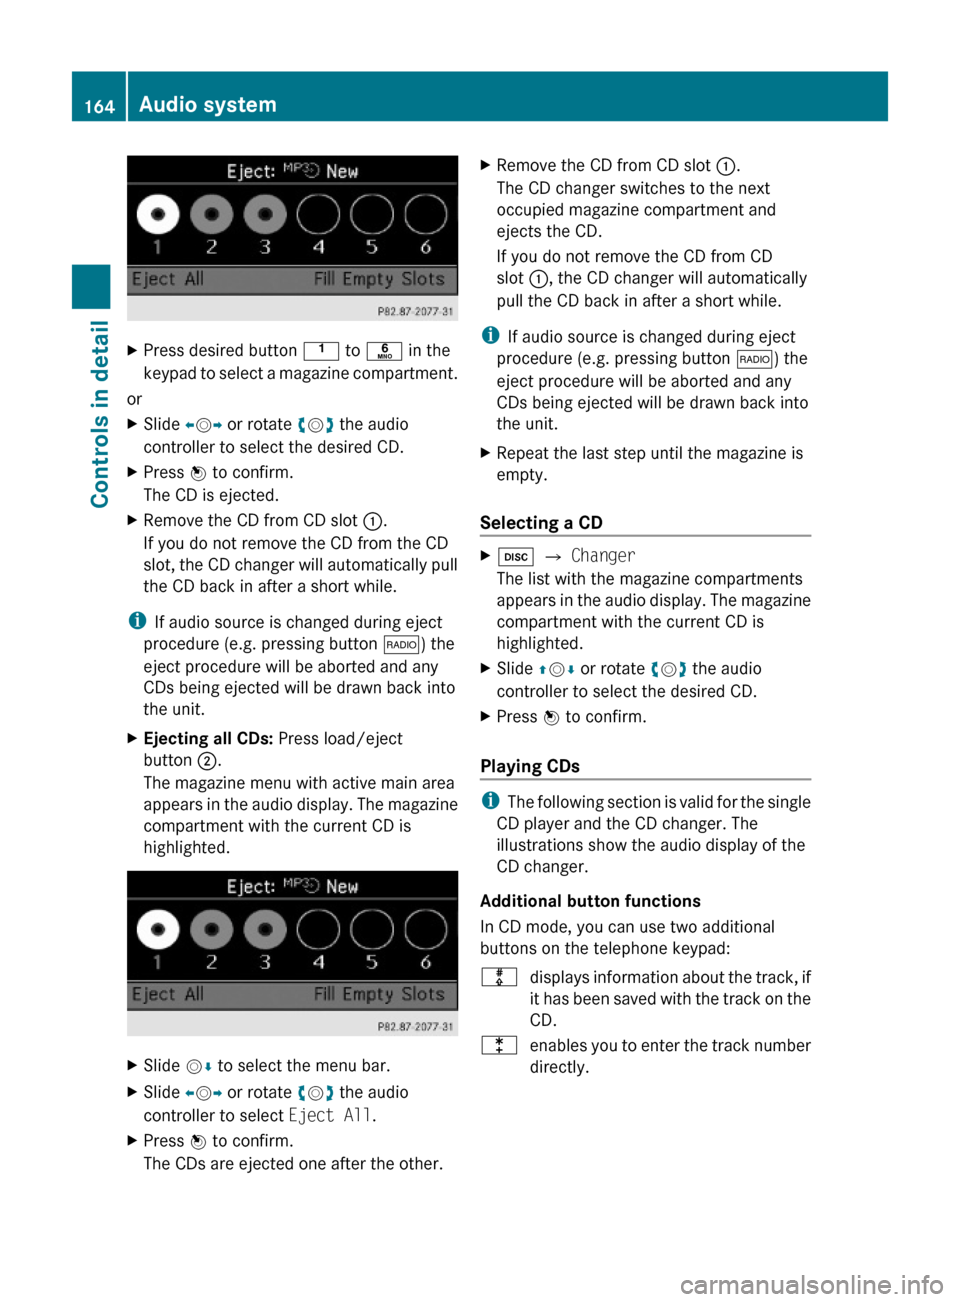
XPress desired button k to p in the
keypad to select a magazine compartment.
or
XSlide XVY or rotate cVd the audio
controller to select the desired CD.
XPress W to confirm.
The CD is ejected.
XRemove the CD from CD slot :.
If you do not remove the CD from the CD
slot, the CD changer will automatically pull
the CD back in after a short while.
iIf audio source is changed during eject
procedure (e.g. pressing button $) the
eject procedure will be aborted and any
CDs being ejected will be drawn back into
the unit.
XEjecting all CDs: Press load/eject
button ;.
The magazine menu with active main area
appears in the audio display. The magazine
compartment with the current CD is
highlighted.
XSlide VÆ to select the menu bar.XSlide XVY or rotate cVd the audio
controller to select Eject All.
XPress W to confirm.
The CDs are ejected one after the other.
XRemove the CD from CD slot :.
The CD changer switches to the next
occupied magazine compartment and
ejects the CD.
If you do not remove the CD from CD
slot :, the CD changer will automatically
pull the CD back in after a short while.
iIf audio source is changed during eject
procedure (e.g. pressing button $) the
eject procedure will be aborted and any
CDs being ejected will be drawn back into
the unit.
XRepeat the last step until the magazine is
empty.
Selecting a CD
Xh Q Changer
The list with the magazine compartments
appears in the audio display. The magazine
compartment with the current CD is
highlighted.
XSlide ZVÆ or rotate cVd the audio
controller to select the desired CD.
XPress W to confirm.
Playing CDs
iThe following section is valid for the single
CD player and the CD changer. The
illustrations show the audio display of the
CD changer.
Additional button functions
In CD mode, you can use two additional
buttons on the telephone keypad:
mdisplays information about the track, if
it has been saved with the track on the
CD.
lenables you to enter the track number
directly.
164Audio systemControls in detail
204_AKB; 5; 23, en-USd2ureepe,Version: 2.11.8.12009-07-16T17:54:06+02:00 - Seite 164