2010 MERCEDES-BENZ C350S trunk release
[x] Cancel search: trunk releasePage 10 of 364

Electrical system
Improper work on or
modifications ................................... 22
Power outlets ................................. 210
Electrical system (Technical data)
see Vehicle specification
Electronic Stability Program
see ESP ®
Electronic Traction System
see ETS/4-ETS
Emergency, in case of
First aid kit ..................................... 268
Flat tire .......................................... 317
Hazard warning flasher ....................93
Roadside Assistance ................ 21, 214
Towing the vehicle .........................325
Emergency calls
Tele Aid .......................................... 212
Telephone ...................................... 173
Emergency operations
Remote door lock (Tele Aid) ........... 216
Remote door unlock (Tele Aid) .......215
Trunk lid, emergency release ...........76
Emergency Tensioning Device
see ETD
Emission control ............................... 258
Information label ............................ 333
System warranties ...........................20
Engine
Break-in recommendations ............222
Cleaning ......................................... 262
Compartment ................................ 224
Malfunction indicator lamp ............305
Messages in the multifunction
display ........................................... 288
Number .......................................... 333
Starting .......................................... 101
Turning off ..................................... 106
Engine (Technical data)
see Vehicle specification
Engine coolant
see Coolant
Engine oil
Adding ........................................... 226
Additives ........................................ 353
Checking level ............................... 226
Consumption ................................. 225Messages in the multifunction
display ........................................... 291
Oil dipstick ..................................... 226
Recommended engine oils and oil
filter ............................................... 353
ESP ®
(Electronic Stability
Program) .............................................. 62
ETS/4-ETS ....................................... 63
Messages in the multifunction
display ........................... 280, 281, 283
Warning lamp ................................. 302
ETD (Emergency Tensioning
Device) ................................................. 52
Safety guidelines ............................. 39
Ethanol fuel (E85) .............................. 355
ETS/4-ETS (Electronic Traction
System) ................................................ 63
Express operation
Panorama roof ............................... 200
Power windows ................................ 98
Tilt/sliding sunroof ........................196
Exterior lamp switch ........................... 90
Exterior rear view mirrors .................. 86
Fold-in function ................................ 88
Parking position ............................... 87
Power-folding ................................... 88
Switching fold-in function on or
off .................................................. 136
Exterior view of vehicle ...................... 26
F
Fastening the seat belts ..................... 50
First aid kit ......................................... 268
Flat tire ............................................... 317
Lowering the vehicle ......................321
Mounting the spare wheel .............318
Preparing the vehicle .....................318
Spare wheel ........................... 317, 349
Flexible Fuel Vehicles ....................... 355
Floormats ........................................... 220
Fluids
Automatic transmission fluid .........350
Brake fluid ..................................... 351
Capacities ...................................... 349
Engine coolant ............................... 351
Engine oil ....................................... 350
Manual transmission oil .................350
8Index204_AKB; 5; 23, en-USd2ureepe,Version: 2.11.8.12009-07-16T17:54:06+02:00 - Seite 8
Page 19 of 364

Tire inflation pressure
Checking ........................................ 232
Important notes on ........................231
Label on the inside of fuel filler
flap ................................................ 231
Placard on driver’s door B-pillar .....238
Tire labeling ....................................... 246
Tire load rating .................................. 251
Tire ply composition and material
used .................................................... 252
Tire pressure loss warning system . 233
Tires ........................................... 229, 344
Advanced Tire Pressure
Monitoring System (Advanced
TPMS) ............................................ 234
Air pressure ................................... 230
Care and maintenance ...................243
Cleaning ......................................... 244
Direction of rotation, spinning .......242
Important notes on tire inflation
pressure ........................................ 231
Inflation pressure ........................... 232
Information placard .......................238
Inspection ...................................... 243
Labeling ......................................... 246
Load index ............................. 246, 251
Load rating .................................... 251
Messages in the multifunction
display ................................... 276, 296
Ply composition and material
used ............................................... 252
Problems under-/overinflation ......232
Retreads ........................................ 229
Rims and tires (technical data) ......344
Rotation ......................................... 245
Service life ..................................... 243
Sizes .............................................. 344
Snow chains .................................. 253
Speed rating .......................... 247, 252
Storing ........................................... 244
Temperature .......................... 231, 245
Terminology ................................... 250
Tire Identification Number .............252
Tire pressure loss warning system . 233
TPMS low tire pressure/
malfunction telltale ........................306
Traction ................................. 244, 252
Tread ............................................. 252Tread depth ........................... 243, 252
Treadwear ...................................... 244
Treadwear indicators .............243, 252
Vehicle maximum load on ..............252
Wear pattern .................................. 245
Winter tires ............................ 252, 344
Tire speed rating ....................... 247, 252
Top tether see Children in the vehicle
Total load limit ................................... 252
Towing
Towing eye bolt .............................. 326
Vehicle ........................................... 325
Towing eye bolt ................................. 326
Traction ...................................... 244, 252
Transfer case ..................................... 116
Transmission see Automatic transmission or
Manual transmission
Transmission fluid level .................... 227
Transmission gear selector lever see Gear selector lever
Transmission positions .................... 109
Traveling abroad ............................... 257
Tread (tires) ....................................... 252
Tread depth (tires) .................... 243, 252
Treadwear .......................................... 244
Treadwear indicators (tires) .... 243, 252
Trip menu ........................................... 121
Trunk
Closing ............................................. 76
Fuse box ........................................ 329
Messages in the multifunction
display ........................................... 286
Opening ........................................... 75
Tie-down rings ............................... 203
Trunk lid emergency release ............76
Unlocking manually .......................309
Valet locking .................................... 77
Turning off the engine ...................... 106
Turn signals ......................................... 93
Cleaning lenses ............................. 263
Indicator lamps ................................ 28
Messages in the multifunction
display ........................................... 296
Replacing bulbs ............................. 314Index17204_AKB; 5; 23, en-USd2ureepe,Version: 2.11.8.12009-07-16T17:54:06+02:00 - Seite 17
Page 69 of 364
DeactivatingXSwitch on the ignition.
iStarting the engine will also deactivate
the immobilizer.
In the event that the engine cannot be
started (yet the vehicle’s battery is
charged), the system is not operational.
Contact an authorized Mercedes-Benz
Center or call 1-800-FOR-MERCedes (in the
USA) or 1-800-387-0100 (in Canada).
Anti-theft alarm system
Once the alarm system has been armed, a
visual and audible alarm is triggered when
someone opens
Ra door
Rthe trunk
Rthe hood
The alarm will stay on even if the activating
element, a door, for example, is closed
immediately.
The alarm system will also be triggered when
Rthe vehicle is opened with the mechanical
key
Ra door is opened from the inside
Rthe trunk is opened with the emergency
release button
To cancel the alarm after it has been
triggered, see “Canceling the alarm”
(Y page 68).
iIf the alarm stays on for more than
30 seconds, the Tele Aid system initiates a
call to the Customer Assistance Center
automatically. The Tele Aid system will
initiate the call provided that
Ryou have subscribed to the Tele Aid
service
Rthe Tele Aid service has been activated
properly
Rthe necessary mobile phone, power
supply and GPS coverage are available
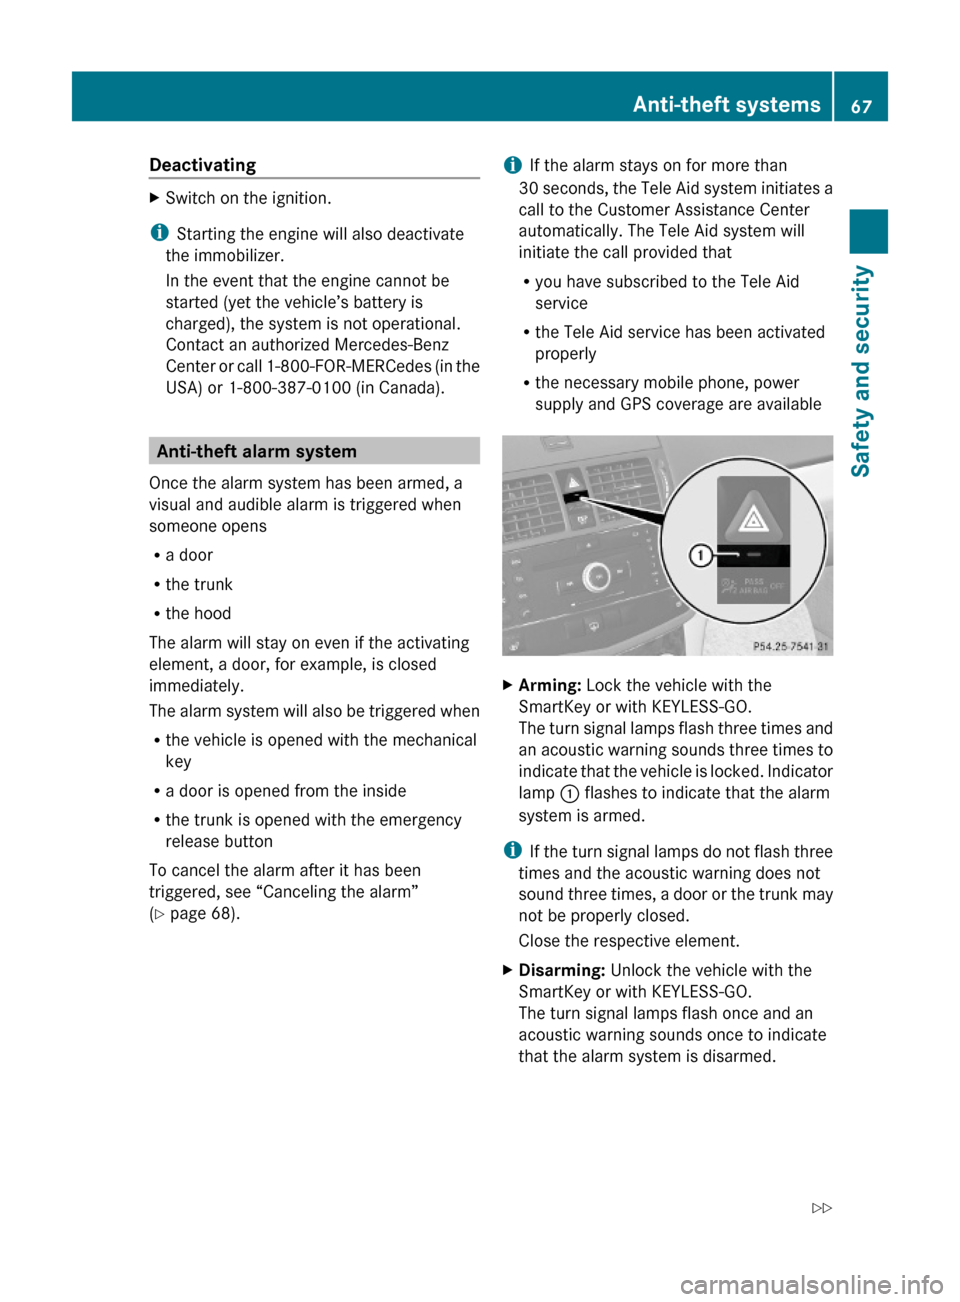
XArming: Lock the vehicle with the
SmartKey or with KEYLESS-GO.
The turn signal lamps flash three times and
an acoustic warning sounds three times to
indicate that the vehicle is locked. Indicator
lamp : flashes to indicate that the alarm
system is armed.
iIf the turn signal lamps do not flash three
times and the acoustic warning does not
sound three times, a door or the trunk may
not be properly closed.
Close the respective element.
XDisarming: Unlock the vehicle with the
SmartKey or with KEYLESS-GO.
The turn signal lamps flash once and an
acoustic warning sounds once to indicate
that the alarm system is disarmed.
Anti-theft systems67Safety and security204_AKB; 5; 23, en-USd2ureepe,Version: 2.11.8.12009-07-16T17:54:06+02:00 - Seite 67Z
Page 78 of 364
A minimum height clearance of 5.9 ft (1.80 m)
is required to open the trunk lid.
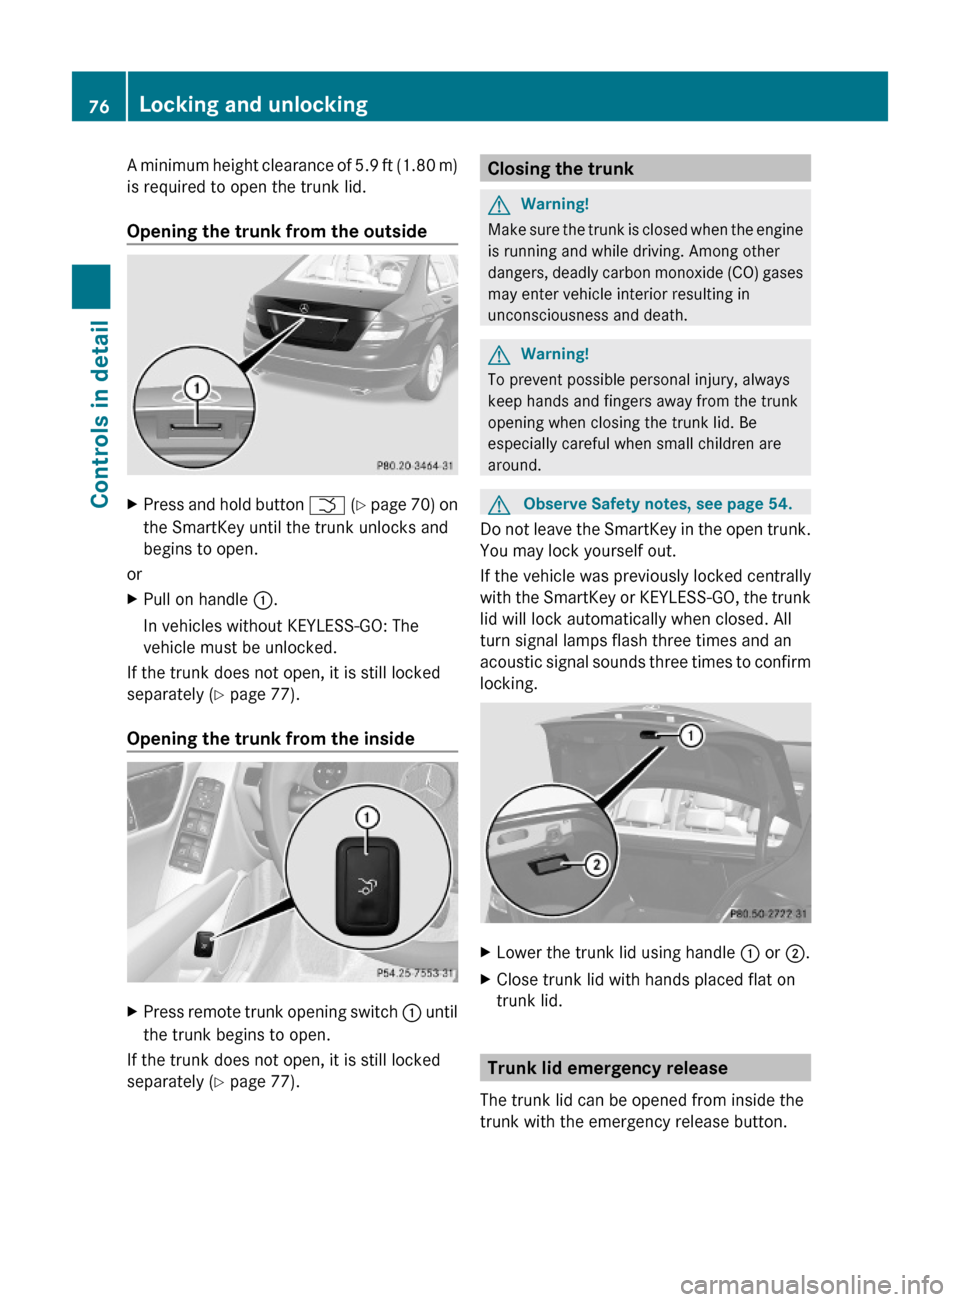
Opening the trunk from the outside
XPress and hold button F (Y page 70) on
the SmartKey until the trunk unlocks and
begins to open.
or
XPull on handle :.
In vehicles without KEYLESS-GO: The
vehicle must be unlocked.
If the trunk does not open, it is still locked
separately (Y page 77).
Opening the trunk from the inside
XPress remote trunk opening switch : until
the trunk begins to open.
If the trunk does not open, it is still locked
separately (Y page 77).
Closing the trunkGWarning!
Make sure the trunk is closed when the engine
is running and while driving. Among other
dangers, deadly carbon monoxide (CO) gases
may enter vehicle interior resulting in
unconsciousness and death.
GWarning!
To prevent possible personal injury, always
keep hands and fingers away from the trunk
opening when closing the trunk lid. Be
especially careful when small children are
around.
GObserve Safety notes, see page 54.
Do not leave the SmartKey in the open trunk.
You may lock yourself out.
If the vehicle was previously locked centrally
with the SmartKey or KEYLESS-GO, the trunk
lid will lock automatically when closed. All
turn signal lamps flash three times and an
acoustic signal sounds three times to confirm
locking.
XLower the trunk lid using handle : or ;.XClose trunk lid with hands placed flat on
trunk lid.
Trunk lid emergency release
The trunk lid can be opened from inside the
trunk with the emergency release button.
76Locking and unlockingControls in detail
204_AKB; 5; 23, en-USd2ureepe,Version: 2.11.8.12009-07-16T17:54:06+02:00 - Seite 76
Page 79 of 364
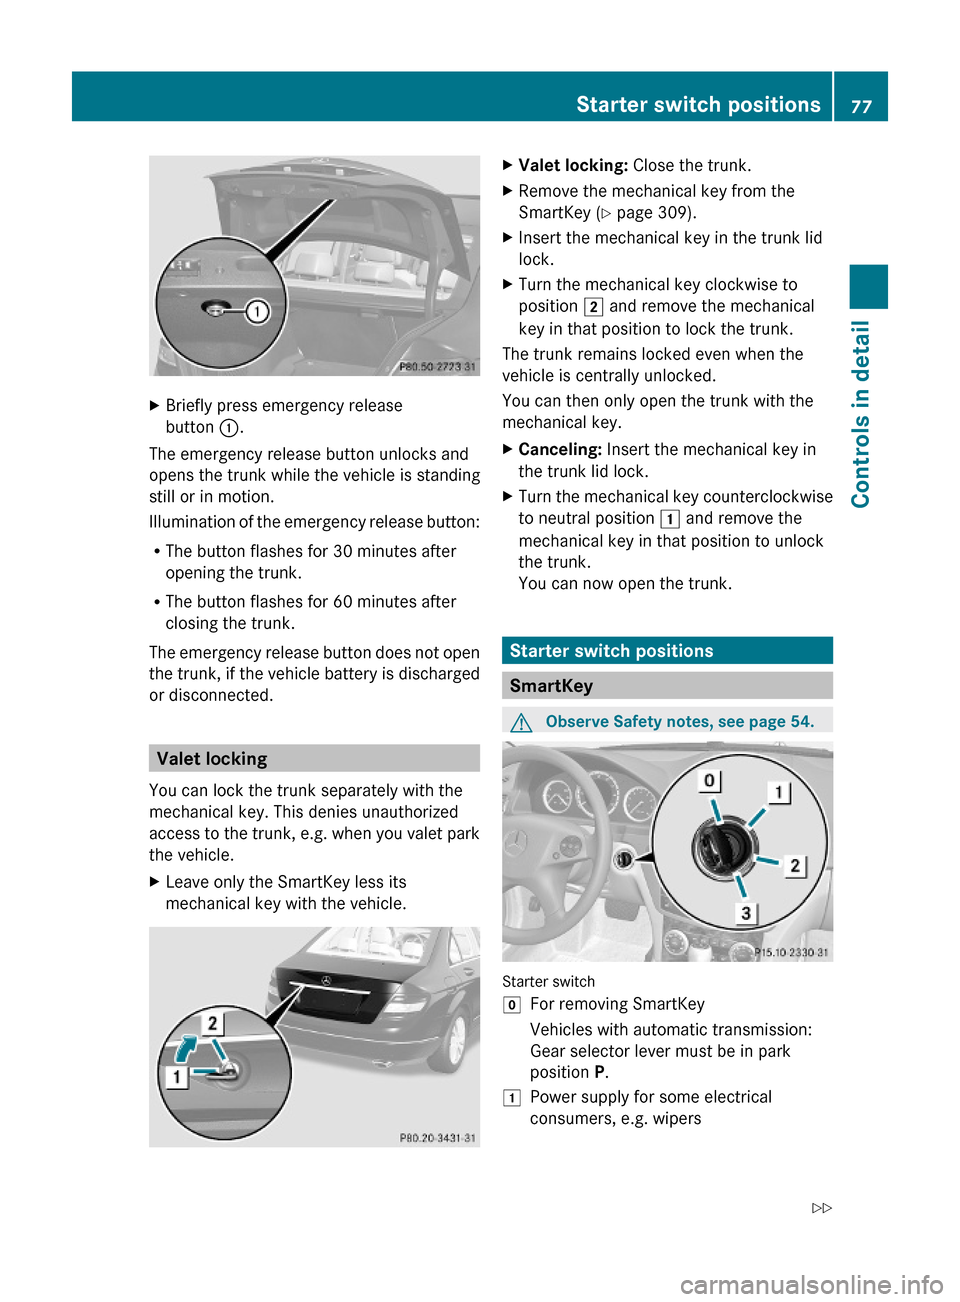
XBriefly press emergency release
button :.
The emergency release button unlocks and
opens the trunk while the vehicle is standing
still or in motion.
Illumination of the emergency release button:
RThe button flashes for 30 minutes after
opening the trunk.
RThe button flashes for 60 minutes after
closing the trunk.
The emergency release button does not open
the trunk, if the vehicle battery is discharged
or disconnected.
Valet locking
You can lock the trunk separately with the
mechanical key. This denies unauthorized
access to the trunk, e.g. when you valet park
the vehicle.
XLeave only the SmartKey less its
mechanical key with the vehicle.
XValet locking: Close the trunk.XRemove the mechanical key from the
SmartKey (Y page 309).
XInsert the mechanical key in the trunk lid
lock.
XTurn the mechanical key clockwise to
position 2 and remove the mechanical
key in that position to lock the trunk.
The trunk remains locked even when the
vehicle is centrally unlocked.
You can then only open the trunk with the
mechanical key.
XCanceling: Insert the mechanical key in
the trunk lid lock.
XTurn the mechanical key counterclockwise
to neutral position 1 and remove the
mechanical key in that position to unlock
the trunk.
You can now open the trunk.
Starter switch positions
SmartKey
GObserve Safety notes, see page 54.
Starter switch
gFor removing SmartKeyVehicles with automatic transmission:
Gear selector lever must be in park
position P.
1Power supply for some electrical
consumers, e.g. wipers
Starter switch positions77Controls in detail204_AKB; 5; 23, en-USd2ureepe,Version: 2.11.8.12009-07-16T17:54:06+02:00 - Seite 77Z
Page 206 of 364
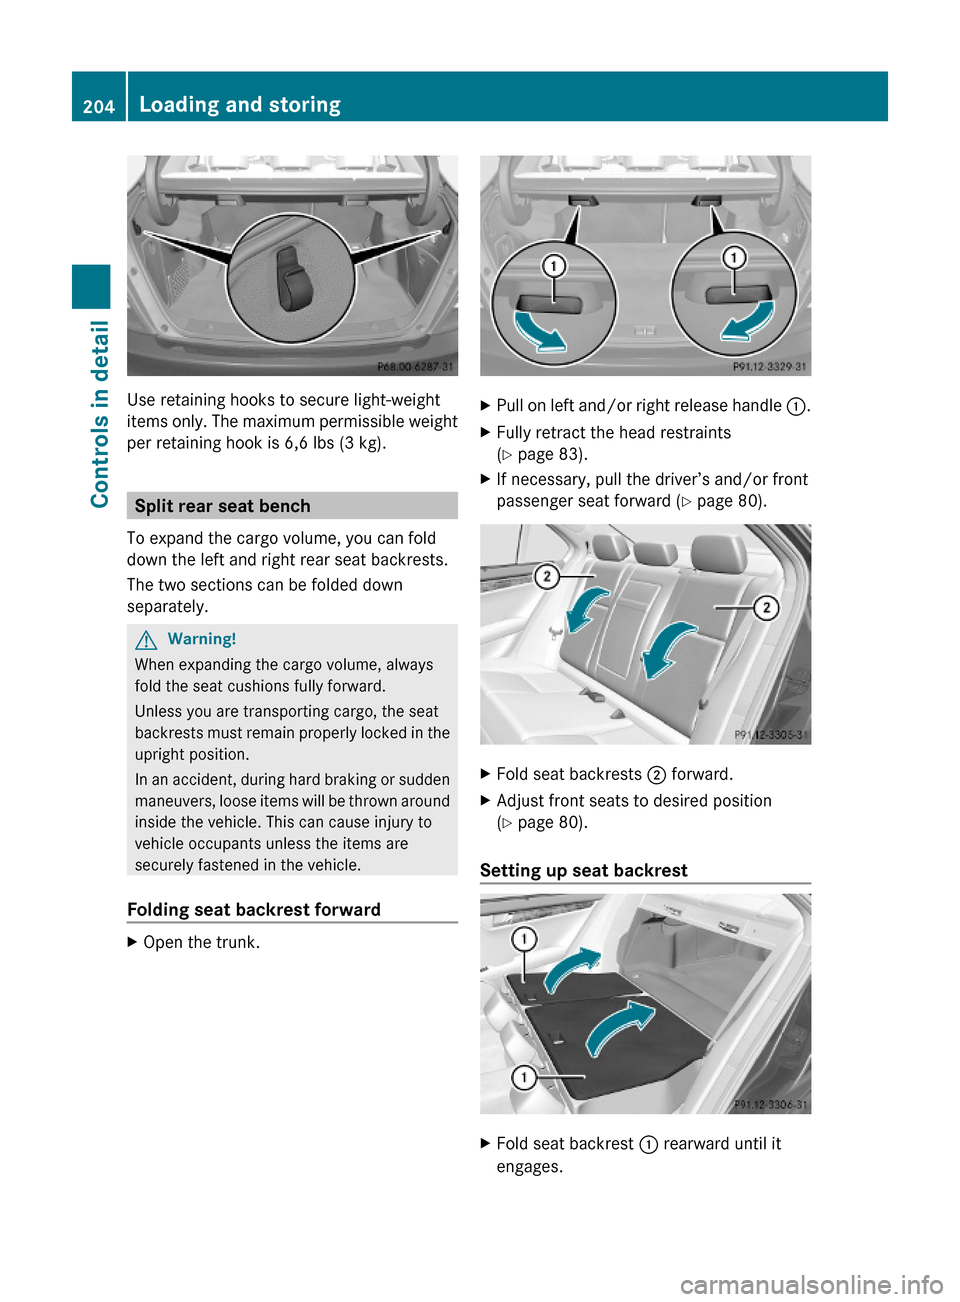
Use retaining hooks to secure light-weight
items only. The maximum permissible weight
per retaining hook is 6,6 lbs (3 kg).
Split rear seat bench
To expand the cargo volume, you can fold
down the left and right rear seat backrests.
The two sections can be folded down
separately.
GWarning!
When expanding the cargo volume, always
fold the seat cushions fully forward.
Unless you are transporting cargo, the seat
backrests must remain properly locked in the
upright position.
In an accident, during hard braking or sudden
maneuvers, loose items will be thrown around
inside the vehicle. This can cause injury to
vehicle occupants unless the items are
securely fastened in the vehicle.
Folding seat backrest forward
XOpen the trunk.XPull on left and/or right release handle :.XFully retract the head restraints
(Y page 83).
XIf necessary, pull the driver’s and/or front
passenger seat forward (Y page 80).
XFold seat backrests ; forward.XAdjust front seats to desired position
(Y page 80).
Setting up seat backrest
XFold seat backrest : rearward until it
engages.
204Loading and storingControls in detail
204_AKB; 5; 23, en-USd2ureepe,Version: 2.11.8.12009-07-16T17:54:06+02:00 - Seite 204
Page 207 of 364
! Make sure that the seat belt is not
pinched.
XCheck for secure locking by pushing and
pulling on the seat backrest.
XAdjust head restraints, if necessary
(Y page 83).
XAdjust front seats to desired position
(Y page 80).
GWarning!
Always lock the seat backrest in its upright
position when the rear seat bench is
occupied, or the extended cargo volume is not
in use.
Check for secure locking by pushing and
pulling on the seat backrest.
In an accident, during hard braking or sudden
maneuvers, loose items will be thrown around
inside the vehicle. This can cause injury to
vehicle occupants unless the items are
securely fastened in the vehicle.
To help avoid personal injury during a collision
or sudden maneuver, exercise care when
transporting cargo.
iTo prevent unauthorized persons from
access to the trunk, always lock the seat
backrests in its upright position.
Front storage compartments
GWarning!
To help avoid personal injury during a collision
or sudden maneuver, exercise care when
storing objects in the vehicle. Put luggage or
cargo in the trunk if possible.
Do not pile luggage or cargo higher than the
seat backrests.
Keep compartment lids closed. This will help
to prevent stored objects from being thrown
about and injuring vehicle occupants during
Rbraking
Rvehicle maneuvers
Ran accident
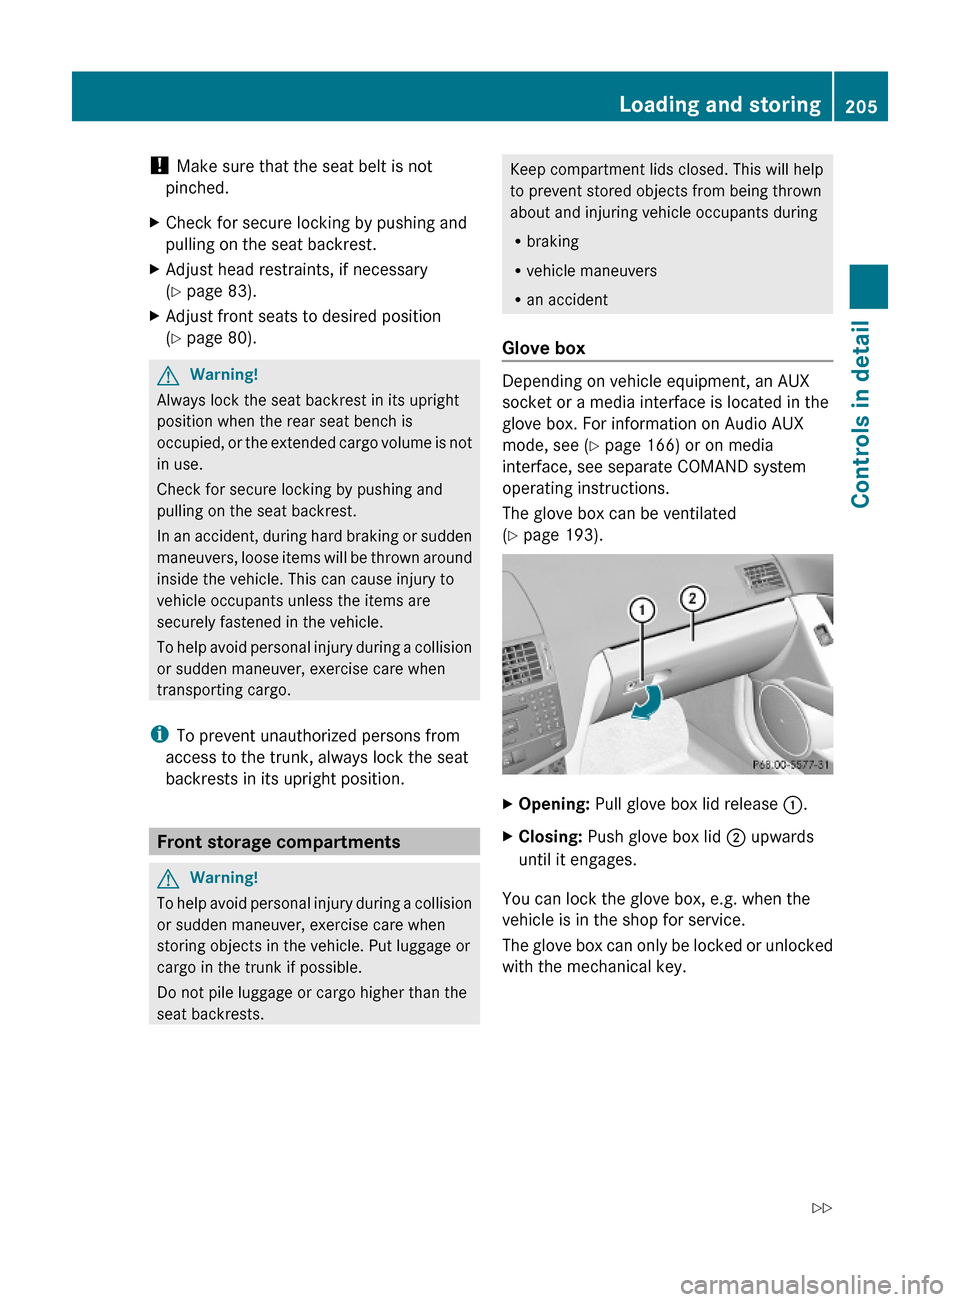
Glove box
Depending on vehicle equipment, an AUX
socket or a media interface is located in the
glove box. For information on Audio AUX
mode, see (Y page 166) or on media
interface, see separate COMAND system
operating instructions.
The glove box can be ventilated
(Y page 193).
XOpening: Pull glove box lid release :.XClosing: Push glove box lid ; upwards
until it engages.
You can lock the glove box, e.g. when the
vehicle is in the shop for service.
The glove box can only be locked or unlocked
with the mechanical key.
Loading and storing205Controls in detail204_AKB; 5; 23, en-USd2ureepe,Version: 2.11.8.12009-07-16T17:54:06+02:00 - Seite 205Z
Page 208 of 364
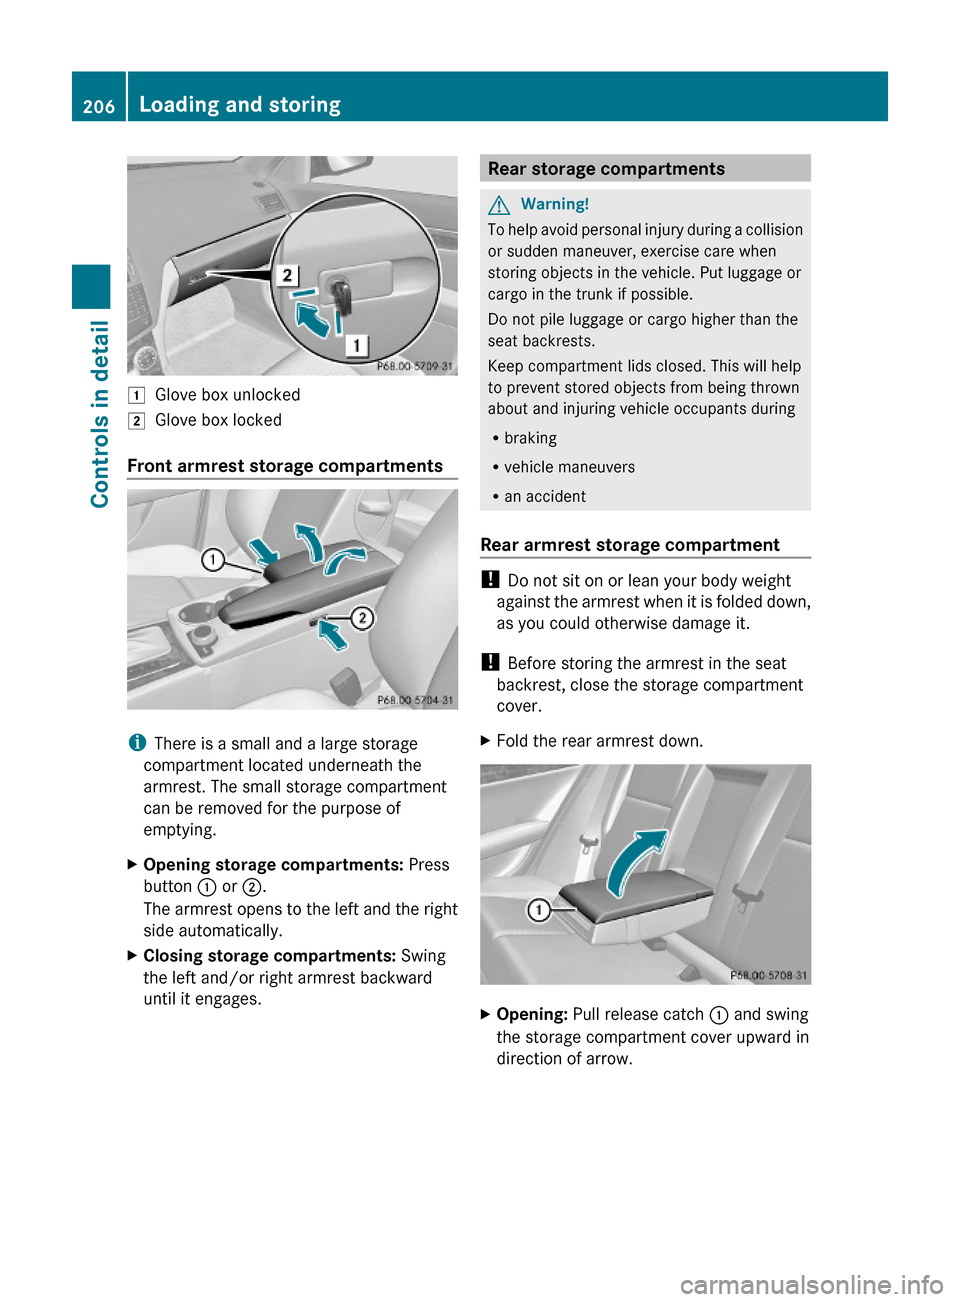
1Glove box unlocked2Glove box locked
Front armrest storage compartments
iThere is a small and a large storage
compartment located underneath the
armrest. The small storage compartment
can be removed for the purpose of
emptying.
XOpening storage compartments: Press
button : or ;.
The armrest opens to the left and the right
side automatically.
XClosing storage compartments: Swing
the left and/or right armrest backward
until it engages.
Rear storage compartmentsGWarning!
To help avoid personal injury during a collision
or sudden maneuver, exercise care when
storing objects in the vehicle. Put luggage or
cargo in the trunk if possible.
Do not pile luggage or cargo higher than the
seat backrests.
Keep compartment lids closed. This will help
to prevent stored objects from being thrown
about and injuring vehicle occupants during
Rbraking
Rvehicle maneuvers
Ran accident
Rear armrest storage compartment
! Do not sit on or lean your body weight
against the armrest when it is folded down,
as you could otherwise damage it.
! Before storing the armrest in the seat
backrest, close the storage compartment
cover.
XFold the rear armrest down.XOpening: Pull release catch : and swing
the storage compartment cover upward in
direction of arrow.
206Loading and storingControls in detail
204_AKB; 5; 23, en-USd2ureepe,Version: 2.11.8.12009-07-16T17:54:06+02:00 - Seite 206