2010 MERCEDES-BENZ C300 4MATIC door lock
[x] Cancel search: door lockPage 218 of 364
XContact the Customer Assistance Center
at 1-800-FOR-MERCedes
(1-800-367-6372) (USA only) or
1-888-923-8367 (Canada only).
You will be asked to provide your password.XThen return to your vehicle at the time
arranged with the Customer Assistance
Center and pull the trunk lid handle for a
minimum of 20 seconds until the indicator
lamp in the SOS button is flashing.
The message Connecting Call appears in
the multifunction display.
As an alternative, you may unlock the vehicle
via Internet in the “My Tele Aid” section of
“Owner’s Online”, using your ID and password
(USA only).
i The remote door unlock feature is
available if the relevant cellular phone
network is available.
The SOS button will flash and the message
Connecting Call will appear in the
multifunction display to indicate receipt of
the door unlock command.
If the trunk lid handle was pulled for more
than 20 seconds before door unlock
authorization was received, you must wait
15 minutes before pulling the trunk lid
handle again.
Remote door lock
If you have forgotten to lock your vehicle and
are no longer near it, you can have it locked
remotely through the Customer Assistance
Center.
The vehicle can be remotely locked within
four days after the ignition has been switched
off.
XContact the Customer Assistance Center
at 1-800-FOR-MERCedes
(1-800-367-6372) (USA only) or
1-888-923-8367 (Canada only).
You will be asked to provide your password.
When you are inside your vehicle the next
time and switch on the ignition, the message
Tele Aid Doors locked by remote
control will appear on the multifunction
display.
i The remote door lock feature is available
if the relevant cellular phone network is
available and data connection is possible.
Stolen Vehicle Recovery Services
In the event your vehicle was stolen:
XReport the incident to the police.
The police will issue a numbered incident
report.XPass this number on to the Customer
Assistance Center along with your
password.
The Customer Assistance Center will then
attempt to covertly contact the vehicle’s
Tele Aid system. Once the vehicle is
located, the Customer Assistance Center
will contact the local law enforcement and
you. The vehicle’s location will only be
provided to law enforcement.
i If the anti-theft alarm stays on for more
than 30 seconds, the Tele Aid system will
notify the Customer Assistance Center
automatically.
Garage door opener
The integrated remote control can operate up
to three separately controlled devices
compatible with HomeLink ®
or some other
systems.
GWarning!
Before programming the integrated remote
control to a garage door opener or gate
operator, make sure people and objects are
out of the way of the device to prevent
potential harm or damage. When
programming a garage door opener, the door
moves up or down. When programming a gate
operator, the gate opens or closes.
Do not use the integrated remote control with
any garage door opener that lacks safety stop
216Useful featuresControls in detail
204_AKB; 5; 23, en-USd2ureepe,Version: 2.11.8.12009-07-16T17:54:06+02:00 - Seite 216
Page 226 of 364
For more information, see also “Practical
hints” ( Y page 305).XRemove the SmartKey from the starter
switch.
KEYLESS-GO: Open the driver’s door. This
puts the starter switch in position 0, same
as with the SmartKey removed from the
starter switch. The driver’s door then can
be closed again.XOpening: Press fuel filler flap : at the
point indicated by the arrow.XTurn fuel filler cap ; counterclockwise.XTake off fuel filler cap ;.
!
The fuel filler cap is tethered to the fuel
filler neck. Do not drop the cap. It could
damage the vehicle paint finish.
XPlace fuel filler cap ; in direction of arrow
into holder =.XFully insert filler nozzle unit and refuel.XOnly fill your tank until the filler nozzle unit
cuts out – do not top off or overfill .XClosing: Turn fuel filler cap ; clockwise
until it audibly engages.
i Close the fuel filler flap before locking the
vehicle. Otherwise the flap locking pin will
prevent closing the fuel filler flap.
XClose fuel filler flap :.
Check regularly and before a long trip
For information on quantities and
requirements of operating agents, see “Fuels,
coolants, lubricants, etc.” ( Y page 349).
Check the following:
R Engine oil level ( Y page 225)
R Tire inflation pressure ( Y page 232)
R Coolant level ( Y page 227)
R Vehicle lighting ( Y page 313)
R
Washer system and headlamp cleaning
system ( Y page 228)
R Brake fluid ( Y page 228)
Engine compartment
Hood
GWarning!
Do not pull the release lever while the vehicle
is in motion. Otherwise the hood could be
forced open by passing air flow.
This could cause the hood to come loose and
injure you and/or others.
Opening
GWarning!
Do not open the hood when the engine is
overheated. You could be seriously injured.
Observe the coolant temperature gauge to
determine whether the engine may be
overheated. If you see flames or smoke
coming from the engine compartment, move
away from the vehicle. Wait until the engine
has cooled. If necessary, call the fire
department.
GWarning!
You could be injured when the hood is open –
even when the engine is turned off.
Parts of the engine can become very hot. To
prevent burns, let the engine cool completely
before touching any components on the
vehicle. Comply with all relevant safety
precautions.
GWarning!
To help prevent personal injury, stay clear of
moving parts when the hood is open and the
engine is running.
The radiator fan may continue to run for
approximately 30 seconds or may even
restart after the engine has been turned off.
Stay clear of fan blades.
224Engine compartmentOperation
204_AKB; 5; 23, en-USd2ureepe,Version: 2.11.8.12009-07-16T17:54:06+02:00 - Seite 224
Page 262 of 364
XSwitch on the ignition.
The standard display of the control system
appears ( Y page 121).XPress button = or ; on the
multifunction steering wheel to select the
Service menu.XPress button : or 9 to select
ASSYST PLUS .XPress button a on the multifunction
steering wheel to confirm.
The maintenance service indicator display
with the maintenance service deadline
appears in the multifunction display.
i If the battery was disconnected, the days
of disconnection will not be included in the
count shown by the maintenance service
indicator. To arrive at the true maintenance
service deadline, you will need to subtract
these days from the days shown in the
maintenance service indicator message or
maintenance service indicator display.
Resetting the maintenance service
indicator
In the event that the maintenance service on
your vehicle is not carried out at an authorized
Mercedes-Benz Center, you can have the
maintenance service indicator reset.
The automotive maintenance facility carrying
out the maintenance service will find the
information for resetting the maintenance
service indicator in the maintenance-relevant
literature for your vehicle.
Such literature is available at any authorized
Mercedes-Benz Center or directly from
Mercedes-Benz.
! If the maintenance service indicator was
reset inadvertently, have an authorized
Mercedes-Benz Center correct it.
Only reset the maintenance service
indicator if the proper maintenance service
has been performed. Not following the
proper maintenance service as described
in the Maintenance Booklet will result in
engine damage and/or other vehicle
damage not covered by the Mercedes-Benz
Limited Warranty.
Vehicle care
Cleaning and care of the vehicle
Notes
Regular and proper care will help to maintain
the value of your vehicle.
GWarning!
Many cleaning products can be hazardous.
Some are poisonous, others are flammable.
Always follow the instructions on the
particular container. Always open your
vehicle’s doors or windows when cleaning the
inside.
Never use fluids or solvents that are not
designed for cleaning your vehicle.
Always lock away cleaning products and keep
them out of reach of children.
! When cleaning the vehicle, do not use
scouring agents. Never apply strong force
and only use a soft, wet cloth or sponge.
Otherwise you may scratch or damage the
surface to be cleaned.
While in operation, even while parked, your
vehicle is subjected to varying external
influences which, if gone unchecked, can
attack the paintwork as well as the vehicle
underbody and cause lasting damage.
Such damage is caused not only by extreme
and varying climatic conditions, but also by:
R Air pollution
R Road salt
R Tar
R Gravel and stone chipping
260Vehicle careOperation
204_AKB; 5; 23, en-USd2ureepe,Version: 2.11.8.12009-07-16T17:54:06+02:00 - Seite 260
Page 263 of 364
To avoid paint damage, you should
immediately remove:
R Grease and oil
R Fuel
R Coolant
R Brake fluid
R Bird droppings
R Insects
R Tree resins etc.
Frequent washing reduces and/or eliminates
the aggressiveness and potency of the above
adverse influences.
More frequent washings are necessary to
deal with unfavorable conditions:
R near the ocean
R in industrial areas (smoke, exhaust
emissions)
R during winter operation
You should check your vehicle from time to
time for stone chipping or other damage. Any
damage should be repaired as soon as
possible to prevent corrosion.
In doing so, do not neglect the underbody of
the vehicle. A prerequisite for a thorough
check is a washing of the underbody followed
by a thorough inspection. Damaged areas
need to be re-undercoated.
Your vehicle has been treated at the factory
with a wax-base rustproofing in the body
cavities which will last for the lifetime of the
vehicle. Post-production treatment is neither
necessary nor recommended by Mercedes-
Benz because of the possibility of
incompatibility between materials used in the
production process and others applied later.
We have selected vehicle-care products and
compiled recommendations which are
specially matched to our vehicles and which
always reflect the latest technology. You can
obtain Mercedes-Benz approved vehicle-care
products at an authorized Mercedes-Benz
Center.Scratches, corrosive deposits, corrosion or
damage due to negligent or incorrect care
cannot always be removed or repaired with
the vehicle-care products recommended
here. In such cases it is best to seek aid at an
authorized Mercedes-Benz Center.
The following topics deal with the cleaning
and care of your vehicle and give important
“how-to” information as well as references to
Mercedes-Benz approved vehicle-care
products.
Power washer
! Follow the instructions provided by the
power washer manufacturer on
maintaining a distance between the vehicle
and the nozzle of the power washer.
Never use a round nozzle to power-wash
tires. The intense jet of water can result in
damage to the tire.
Always replace a damaged tire.
Always keep the jet of water moving across
the surface. Do not aim directly at electrical
parts, electrical connectors, seals, or other
rubber parts.
i Vehicles with KEYLESS-GO:
If a door handle is hit by a strong jet of
water, and a SmartKey is within
approximately 3 ft (1 m) of the vehicle, it
could be inadvertently locked or unlocked.
Tar stains
Quickly remove tar stains before they dry and
become more difficult to remove. A tar
remover is recommended.
Paintwork, painted body components
! Affixing stickers, magnets, adhesive tape
or similar materials to painted body
components may damage the paintwork.
Mercedes-Benz approved Paint Care should
be applied when water drops on the paint
surface do not “bead up”. This should
Vehicle care261Operation204_AKB; 5; 23, en-USd2ureepe,Version: 2.11.8.12009-07-16T17:54:06+02:00 - Seite 261Z
Page 264 of 364
normally be done every 3 to 5 months,
depending on the climate and washing
detergent used.
Mercedes-Benz approved Paint Cleaner
should be applied if the paint surface shows
signs of embedded dirt (i.e. loss of gloss).
Do not apply any of these products or wax if
your vehicle is parked in the sun or if the hood
is still hot.XUse the appropriate MB-Touch-Up Stick for
quick and provisional repairs of minor paint
damage (i.e. chips from stones, vehicle
doors, etc.).
Engine cleaning
Prior to cleaning the engine compartment,
make sure to protect electrical components
and connectors from contact with water and
cleaning agents.
Corrosion protection, such as MB
Anticorrosion Wax should be applied to the
engine compartment after every engine
cleaning. Before applying, all control linkage
bushings and joints should be lubricated. The
poly-V-belt and all pulleys should be
protected from any wax.
Vehicle washing
In the winter, thoroughly remove all traces of
road salt as soon as possible.
When washing the vehicle underbody, do not
forget to clean the inner sides of the wheels.
i Vehicles with KEYLESS-GO:
If a door handle is hit by a strong jet of
water, and a SmartKey is within
approximately 3 ft (1 m) of the vehicle, it
could be inadvertently locked or unlocked.
Hand-wash
XDo not use hot water or wash your vehicle
in direct sunlight.XOnly use a soft, wet cloth or sponge to
clean the vehicle.XOnly use a mild vehicle wash detergent,
such as Mercedes-Benz approved Car
Shampoo.XThoroughly spray the vehicle with a
diffused jet of water.XDo not spray directly towards the
ventilation intake.XUse plenty of water and rinse the sponge
and chamois frequently.XRinse with clean water and dry with a
chamois thoroughly.
Do not allow cleaning agents to dry on the
finish.
Automatic car wash
You can have your vehicle washed in an
automatic car wash from the start. Brushless
car washes are preferable.
XTo protect the filter system, activate the air
recirculation mode using button g on
the climate control panel.
! Do not clean your vehicle in an automatic
touchless car wash which uses caustic
spray. Caustic spray will damage the paint
or ornamental moldings.
If the vehicle is very dirty, prewash it before
running it through the automatic car wash.
! Make sure the combination switch is set
to wiper setting $. Otherwise, the rain
sensor could activate and cause the wipers
to move unintentionally. This may lead to
vehicle damage.
Due to the width of the vehicle, fold in
exterior rear view mirrors prior to running
the vehicle through an automatic car wash
to prevent damage to the mirrors.
Vehicles with automatic transmission:
XWhen taking the vehicle through an
automatic conveyor-type car wash:
Make sure the automatic transmission
remains in neutral position N.
When leaving the automatic car wash, make
sure the mirrors are folded out.
262Vehicle careOperation
204_AKB; 5; 23, en-USd2ureepe,Version: 2.11.8.12009-07-16T17:54:06+02:00 - Seite 262
Page 288 of 364
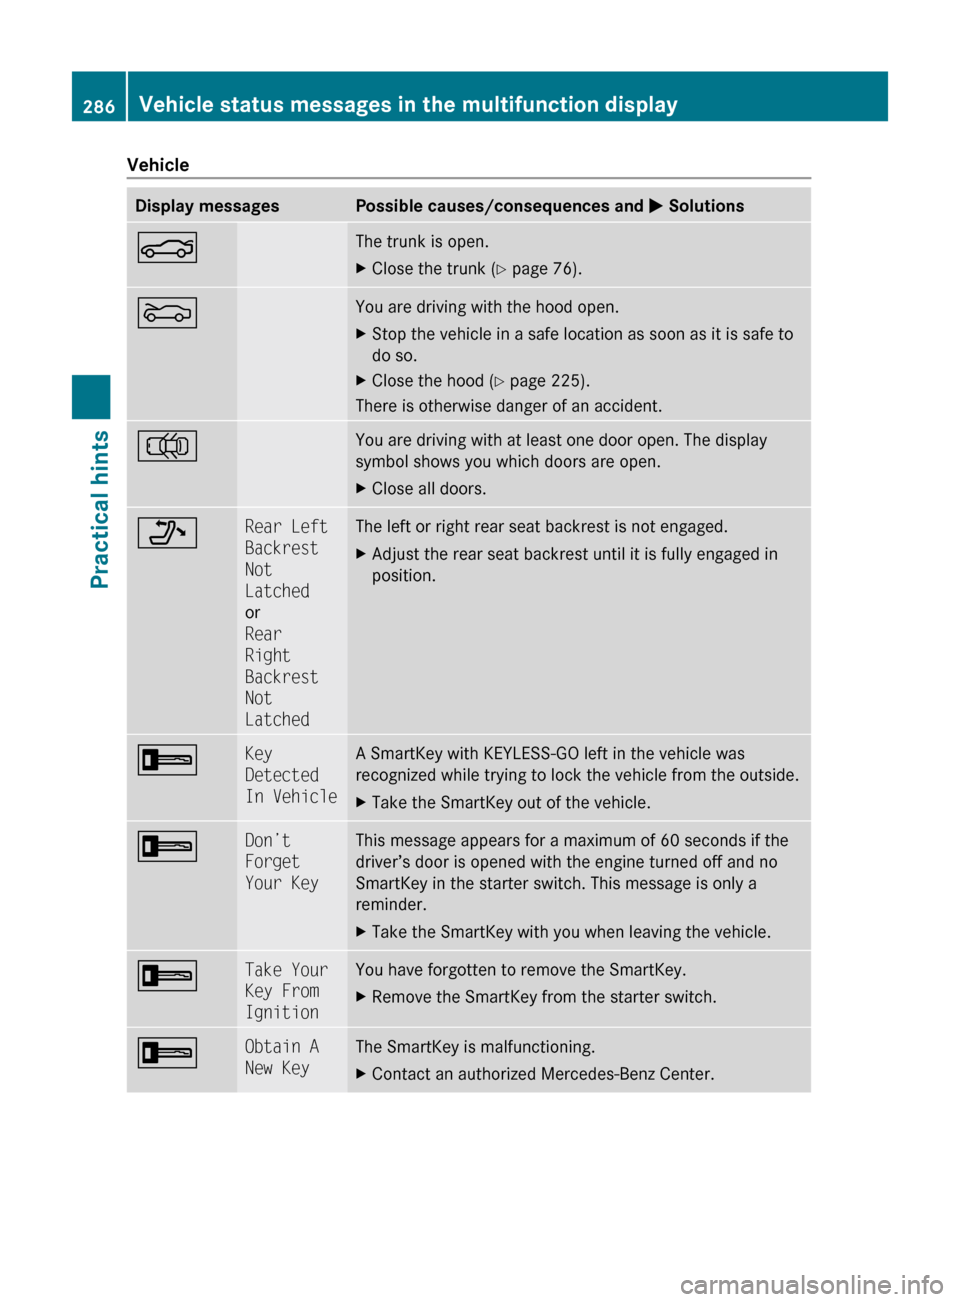
VehicleDisplay messagesPossible causes/consequences and M SolutionsNThe trunk is open.XClose the trunk ( Y page 76).MYou are driving with the hood open.XStop the vehicle in a safe location as soon as it is safe to
do so.XClose the hood ( Y page 225).
There is otherwise danger of an accident.
;You are driving with at least one door open. The display
symbol shows you which doors are open.XClose all doors._Rear Left
Backrest
Not
Latched
or
Rear
Right
Backrest
Not
LatchedThe left or right rear seat backrest is not engaged.XAdjust the rear seat backrest until it is fully engaged in
position.+Key
Detected
In VehicleA SmartKey with KEYLESS-GO left in the vehicle was
recognized while trying to lock the vehicle from the outside.XTake the SmartKey out of the vehicle.+Don’t
Forget
Your KeyThis message appears for a maximum of 60 seconds if the
driver’s door is opened with the engine turned off and no
SmartKey in the starter switch. This message is only a
reminder.XTake the SmartKey with you when leaving the vehicle.+Take Your
Key From
IgnitionYou have forgotten to remove the SmartKey.XRemove the SmartKey from the starter switch.+Obtain A
New KeyThe SmartKey is malfunctioning.XContact an authorized Mercedes-Benz Center.286Vehicle status messages in the multifunction displayPractical hints
204_AKB; 5; 23, en-USd2ureepe,Version: 2.11.8.12009-07-16T17:54:06+02:00 - Seite 286
Page 289 of 364
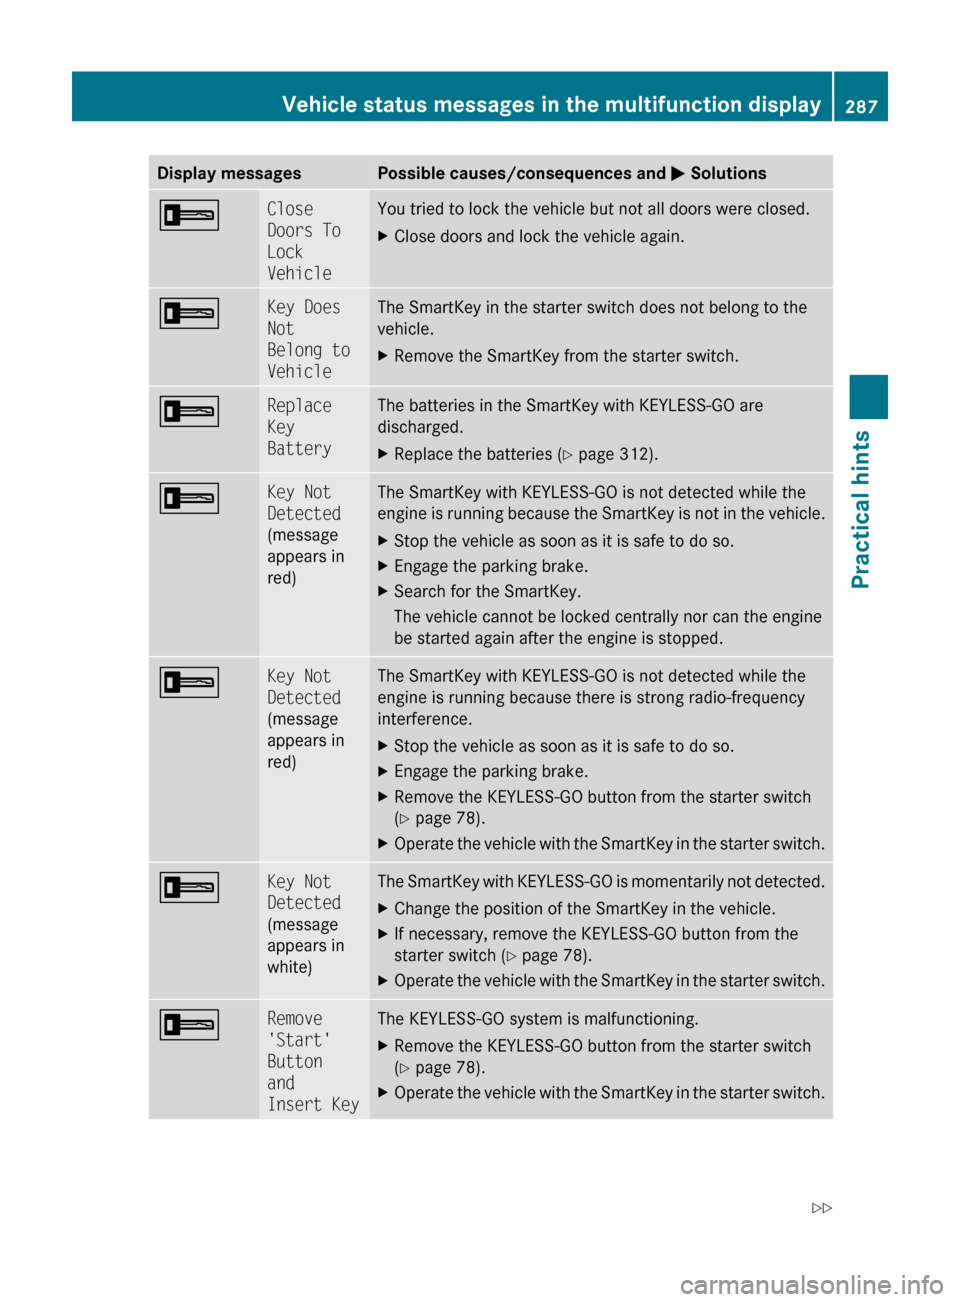
Display messagesPossible causes/consequences and M Solutions+Close
Doors To
Lock
VehicleYou tried to lock the vehicle but not all doors were closed.XClose doors and lock the vehicle again.+Key Does
Not
Belong to
VehicleThe SmartKey in the starter switch does not belong to the
vehicle.XRemove the SmartKey from the starter switch.+Replace
Key
BatteryThe batteries in the SmartKey with KEYLESS-GO are
discharged.XReplace the batteries ( Y page 312).+Key Not
Detected
(message
appears in
red)The SmartKey with KEYLESS-GO is not detected while the
engine is running because the SmartKey is not in the vehicle.XStop the vehicle as soon as it is safe to do so.XEngage the parking brake.XSearch for the SmartKey.
The vehicle cannot be locked centrally nor can the engine
be started again after the engine is stopped.+Key Not
Detected
(message
appears in
red)The SmartKey with KEYLESS-GO is not detected while the
engine is running because there is strong radio-frequency
interference.XStop the vehicle as soon as it is safe to do so.XEngage the parking brake.XRemove the KEYLESS-GO button from the starter switch
( Y page 78).XOperate the vehicle with the SmartKey in the starter switch.+Key Not
Detected
(message
appears in
white)The SmartKey with KEYLESS-GO is momentarily not detected.XChange the position of the SmartKey in the vehicle.XIf necessary, remove the KEYLESS-GO button from the
starter switch ( Y page 78).XOperate the vehicle with the SmartKey in the starter switch.+Remove
'Start'
Button
and
Insert KeyThe KEYLESS-GO system is malfunctioning.XRemove the KEYLESS-GO button from the starter switch
( Y page 78).XOperate the vehicle with the SmartKey in the starter switch.Vehicle status messages in the multifunction display287Practical hints204_AKB; 5; 23, en-USd2ureepe,Version: 2.11.8.12009-07-16T17:54:06+02:00 - Seite 287Z
Page 311 of 364
GWarning!
If the 45 indicator lamp does not
illuminate or remains out with the weight of a
typical 12-month-old child in a standard child
restraint or less on the front passenger seat,
do not transport a child on the front
passenger seat until the system has been
repaired.
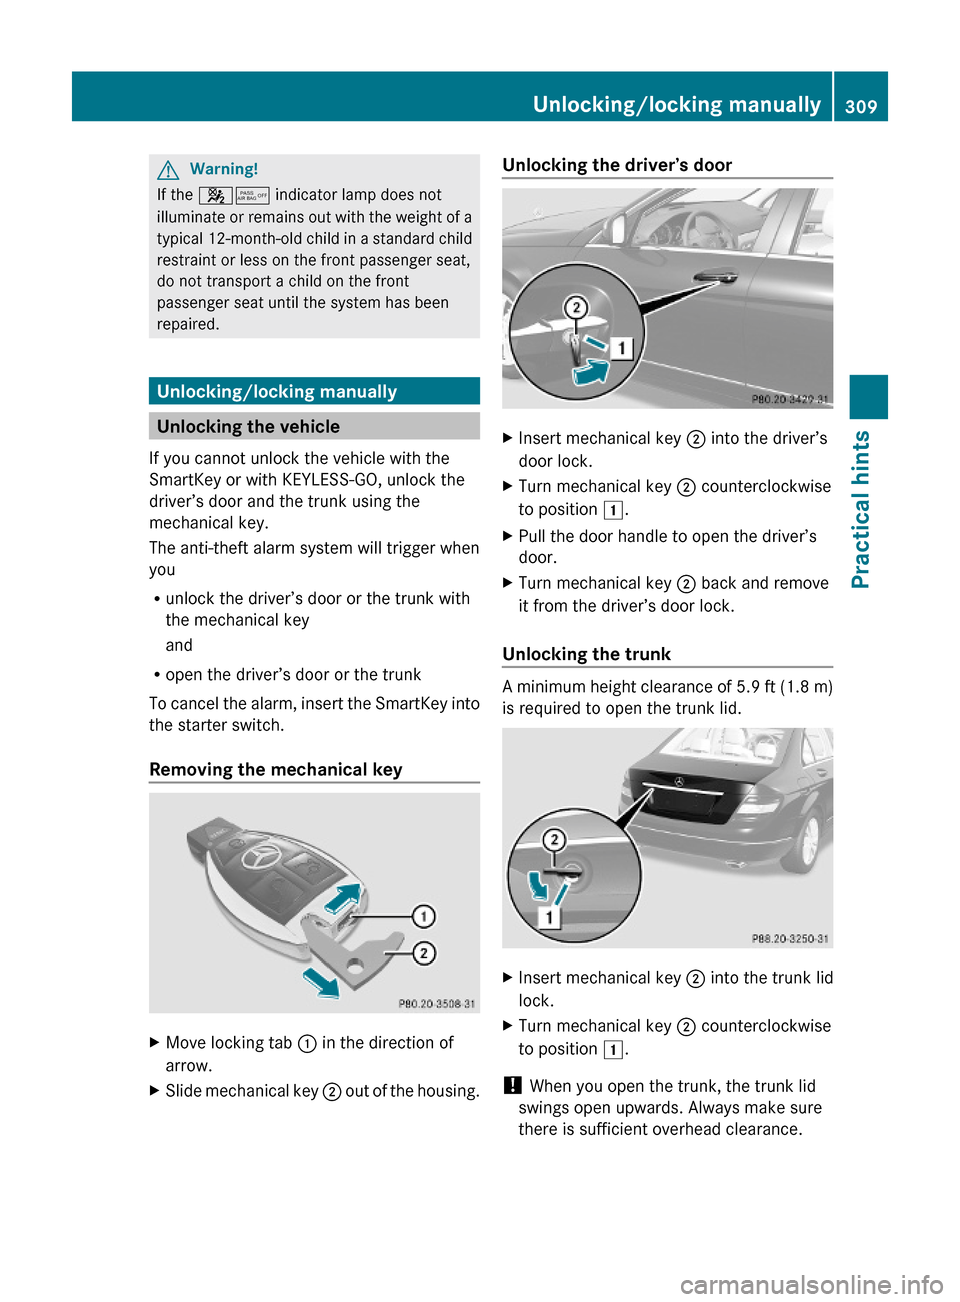
Unlocking/locking manually
Unlocking the vehicle
If you cannot unlock the vehicle with the
SmartKey or with KEYLESS-GO, unlock the
driver’s door and the trunk using the
mechanical key.
The anti-theft alarm system will trigger when
you
Runlock the driver’s door or the trunk with
the mechanical key
and
Ropen the driver’s door or the trunk
To cancel the alarm, insert the SmartKey into
the starter switch.
Removing the mechanical key
XMove locking tab : in the direction of
arrow.
XSlide mechanical key ; out of the housing.Unlocking the driver’s doorXInsert mechanical key ; into the driver’s
door lock.
XTurn mechanical key ; counterclockwise
to position 1.
XPull the door handle to open the driver’s
door.
XTurn mechanical key ; back and remove
it from the driver’s door lock.
Unlocking the trunk
A minimum height clearance of 5.9 ft (1.8 m)
is required to open the trunk lid.
XInsert mechanical key ; into the trunk lid
lock.
XTurn mechanical key ; counterclockwise
to position 1.
! When you open the trunk, the trunk lid
swings open upwards. Always make sure
there is sufficient overhead clearance.
Unlocking/locking manually309Practical hints204_AKB; 5; 23, en-USd2ureepe,Version: 2.11.8.12009-07-16T17:54:06+02:00 - Seite 309Z