2010 MERCEDES-BENZ C300 4MATIC To car
[x] Cancel search: To carPage 176 of 364
Placing a “911” emergency call with the
mobile phone locked
iIf the mobile phone is locked, you only can
make an emergency call on the mobile
phone itself, without the use of the audio
control unit.
Phone book
You can save telephone numbers in the audio
system’s phone book.
iThese entries are retained even if you use
the audio system with another mobile
phone. You should delete these entries
before handing over or selling your vehicle.
Receiving business cards (vCards)
You can import business cards (vCards) from
external Bluetooth® phones into your audio
system’s phone book. To do this:
RBluetooth® must be activated on the audio
system and on the external Bluetooth®
phone (see the operating instructions of
the mobile phone).
RThe external Bluetooth® phone must be
able to send vCards via Bluetooth® (see the
operating instructions of the mobile
phone).
RThe external Bluetooth® phone in the
vehicle must be switched on and
authorized.
iIf you switch to a different mode while
vCards are being received (e.g., press
button $), reception of vCards will be
aborted.
X% Q Tel Q Receive Business
Card(s).
XPress W to confirm.XWait until the message Ready to
Receive - Received: 0 appears.
XImporting: Start the data transfer on the
external Bluetooth® phone (“Export
business cards (vCards)”, see the operating
instructions of the mobile phone).
The audio system imports the data for the
business cards and displays the number of
business cards received.
iSelect Back or switch to a different mode
to abort reception.
XEnding reception: Press W.
or
XPress button k in the center console
(Y page 141).
Deleting external Data
X% Q Tel Q Delete External
Data.
A prompt appears asking whether the data
should be deleted.
XSelect Yes or No.
If you select Yes all personal data are then
deleted from the phone book.
Opening the phone book
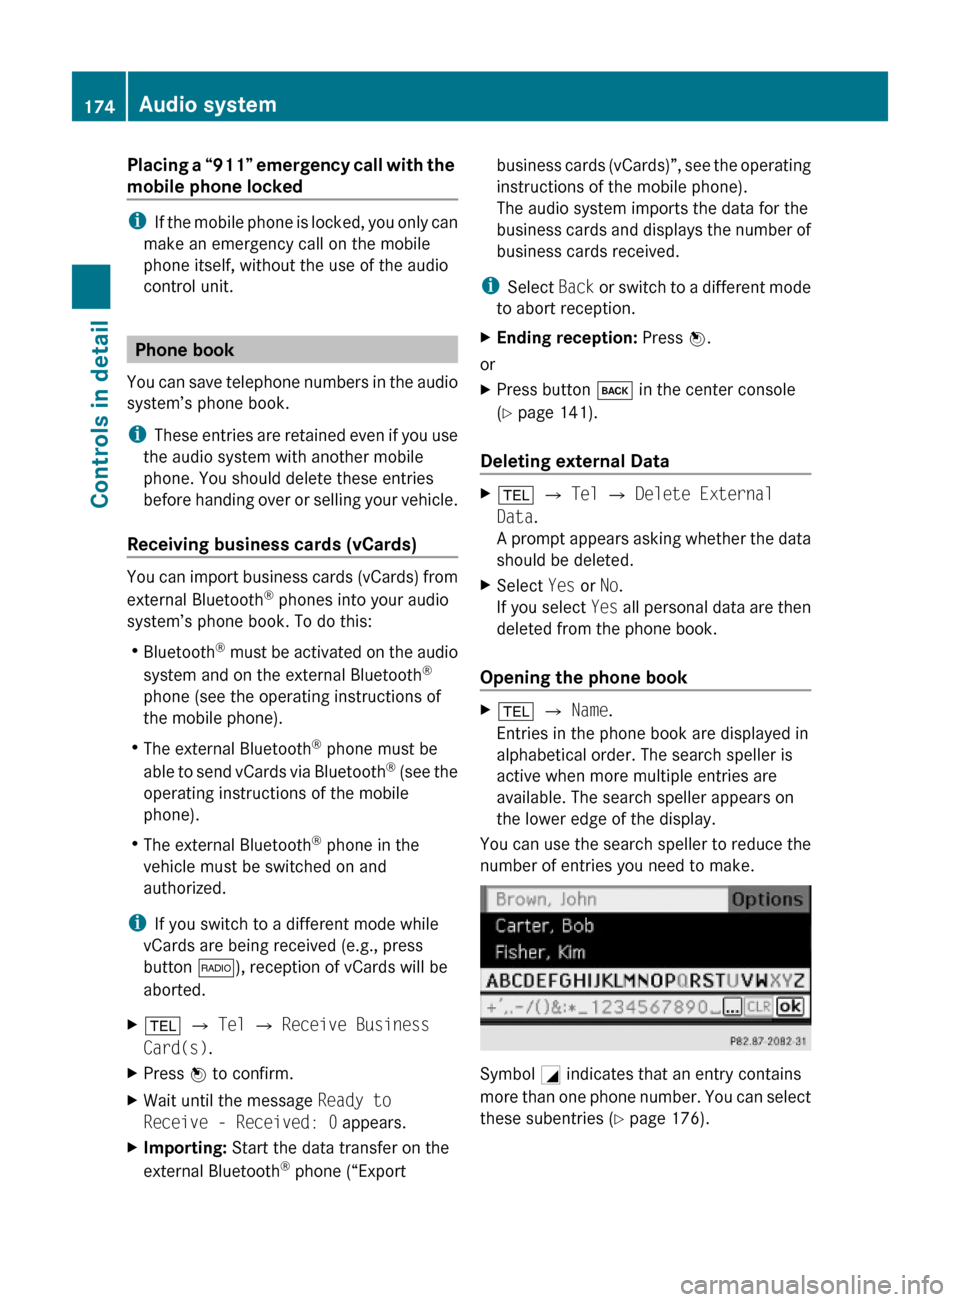
X% Q Name.
Entries in the phone book are displayed in
alphabetical order. The search speller is
active when more multiple entries are
available. The search speller appears on
the lower edge of the display.
You can use the search speller to reduce the
number of entries you need to make.
Symbol G indicates that an entry contains
more than one phone number. You can select
these subentries (Y page 176).
174Audio systemControls in detail
204_AKB; 5; 23, en-USd2ureepe,Version: 2.11.8.12009-07-16T17:54:06+02:00 - Seite 174
Page 178 of 364
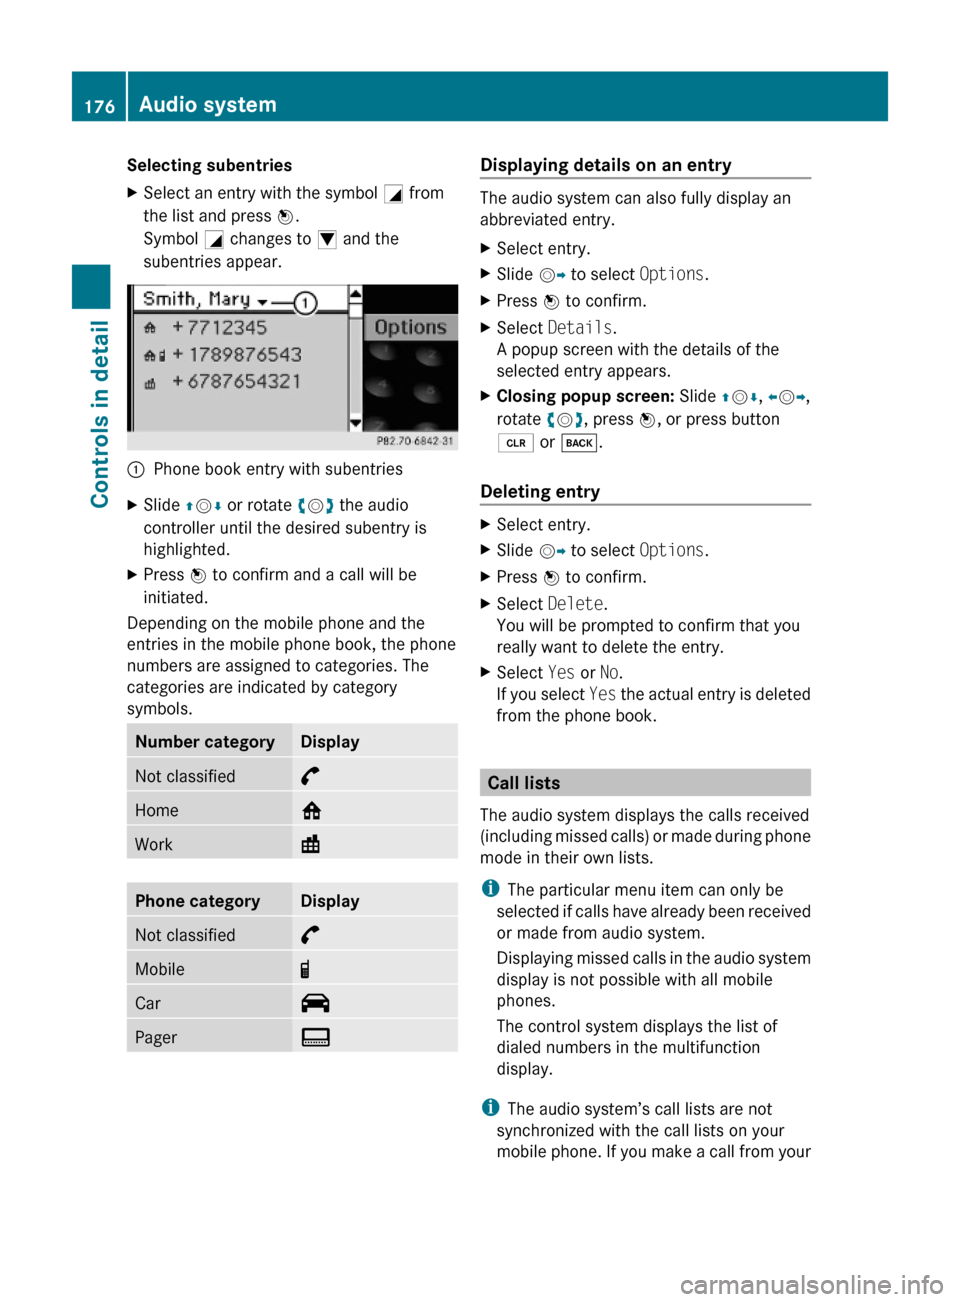
Selecting subentriesXSelect an entry with the symbol G from
the list and press W.
Symbol G changes to I and the
subentries appear.
:Phone book entry with subentriesXSlide ZVÆ or rotate cVd the audio
controller until the desired subentry is
highlighted.
XPress W to confirm and a call will be
initiated.
Depending on the mobile phone and the
entries in the mobile phone book, the phone
numbers are assigned to categories. The
categories are indicated by category
symbols.
Number categoryDisplayNot classified°Home@Work\Phone categoryDisplayNot classified°Mobile¢Car^PagerïDisplaying details on an entry
The audio system can also fully display an
abbreviated entry.
XSelect entry.XSlide VY to select Options.XPress W to confirm.XSelect Details.
A popup screen with the details of the
selected entry appears.
XClosing popup screen: Slide ZVÆ, XVY,
rotate cVd, press W, or press button
2 or k.
Deleting entry
XSelect entry.XSlide VY to select Options.XPress W to confirm.XSelect Delete.
You will be prompted to confirm that you
really want to delete the entry.
XSelect Yes or No.
If you select Yes the actual entry is deleted
from the phone book.
Call lists
The audio system displays the calls received
(including missed calls) or made during phone
mode in their own lists.
iThe particular menu item can only be
selected if calls have already been received
or made from audio system.
Displaying missed calls in the audio system
display is not possible with all mobile
phones.
The control system displays the list of
dialed numbers in the multifunction
display.
iThe audio system’s call lists are not
synchronized with the call lists on your
mobile phone. If you make a call from your
176Audio systemControls in detail
204_AKB; 5; 23, en-USd2ureepe,Version: 2.11.8.12009-07-16T17:54:06+02:00 - Seite 176
Page 185 of 364
Setting stored speed (Resume
function) GWarning!
The set speed stored in memory should only
be set again if prevailing road conditions and
legal speed limits permit. Possible
acceleration or deceleration differences
arising from returning to the preset speed
could cause an accident and/or serious injury
to you and others.
XBriefly pull the cruise control lever in
direction of arrow ?.
If no speed is stored, the current speed is
set and stored.XRemove your foot from the accelerator
pedal.
The last stored speed is deleted from memory
when the engine is turned off.
Hill-start assist system
On uphill grades, the hill-start assist system
maintains the pressure in the brake system
for approximately 1 second after you have
released the brake pedal. Therefore, you can
start off smoothly without the vehicle moving
immediately after releasing the brake pedal.
GWarning!
The hill-start assist system is not designed to
function as a parking brake. It does not
prevent the vehicle from moving when parked
on an incline.
Always engage the parking brake in addition
to shifting the automatic transmission into
park position P (manual transmission: shift
into 1st gear or reverse gear R).
XDepress the brake pedal.XManual transmission: Shift into 1st gear
or reverse gear R.XSlowly release the clutch pedal, removing
your foot from the brake pedal at the sametime, and carefully depress the accelerator
pedal.XAutomatic transmission: Shift into drive
position D or reverse position R.XRelease the brake pedal.XCarefully depress the accelerator pedal.
The hill-start assist system is inactive
R when starting off on a level road or downhill
grades
R with the automatic transmission in neutral
position N
R with the parking brake engaged
R if the ESP ®
has switched off due to a
malfunction
All-wheel drive (4MATIC)
In vehicles with all-wheel drive (4MATIC),
both axles are powered at all times when the
vehicle is being operated. The 4MATIC
improves traction in conjunction with the
ESP ®
( Y page 62) and the Electronic Traction
System (ETS/4-ETS) ( Y page 63).
GWarning!
If a drive wheel is spinning due to insufficient
traction:
R While driving off, apply as little throttle as
possible.
R While driving, ease up on the accelerator
pedal.
R Adapt your speed and driving style to the
prevailing road conditions.
Failure to observe these guidelines could
cause the vehicle to skid.
The 4MATIC cannot prevent accidents
resulting from excessive speed.
! Do not tow with one axle raised. Doing so
could damage the transfer case, which is
not covered by the Mercedes-Benz Limited
Warranty. All wheels must be on or off the
Driving systems183Controls in detail204_AKB; 5; 23, en-USd2ureepe,Version: 2.11.8.12009-07-16T17:54:06+02:00 - Seite 183Z
Page 187 of 364

Parktronic system (Parking assist)
This feature is only available in Canada
vehicles.
The Parktronic system is an electronic
parking aid with ultrasonic sensors designed
to assist the driver during parking maneuvers.
The Parktronic system indicates the relative
distance between the vehicle and an obstacle
visually and audibly.
The Parktronic system is activated
automatically when
Ryou switch on the ignition
and
Ryou release the parking brake
and
Rvehicles with automatic transmission: the
automatic transmission is in drive position
D, reverse gear R, or neutral position N
The Parktronic system deactivates at speeds
above approximately 11 mph (18 km/h). At
lower speeds, the Parktronic system
activates again.
The Parktronic system also deactivates when
you shift the automatic transmission into
park position P or engage the parking brake.
The Parktronic system monitors the
surroundings of your vehicle with six sensors
in the front bumper and four sensors in the
rear bumper.
Example illustration, sensors in the front bumper
To function properly, sensors : must be free
of dirt, ice, snow and slush. Clean
sensors : regularly. Be careful not to
scratch or damage sensors :, see “Cleaning
the driving systems sensors” (Y page 263).
GWarning!
The Parktronic is a supplemental system. It is
not intended to, nor does it replace, the need
for extreme care. The responsibility during
parking and other critical maneuvers always
remains with the driver.
GWarning!
Make sure no persons or animals are in or
near the area in which you are parking/
maneuvering. Otherwise, they could be
injured.
! Special attention must be paid to objects
with smooth surfaces or low silhouettes
(e.g. trailer couplings, painted posts,
elevated crossbars or road curbs). Such
objects may not be detected by the system
and can damage the vehicle.
During parking maneuvers, pay special
attention to objects located above or below
the height of the sensors (e.g. street curbs,
painted posts, or trailer hitches etc.). The
Parktronic system will not detect such
objects at close range and damage to your
vehicle or the object may result.
! Ultrasonic signals from outside sources
(e.g. truck air brakes, car wash, or
jackhammers) may impair the operation of
the Parktronic system.
Range of the sensors
Driving systems185Controls in detail204_AKB; 5; 23, en-USd2ureepe,Version: 2.11.8.12009-07-16T17:54:06+02:00 - Seite 185Z
Page 189 of 364

Automatic transmission:Current
transmission
position
Warning indicatorDFront area activatedR or NFront and rear area
activated
As your vehicle approaches an object, one or
more distance segments will illuminate,
depending on the distance. When the seventh
distance segment illuminates, you have
reached the minimum distance.
RFront area: An intermittent acoustic
warning will sound as the first red distance
segment illuminates and a constant
acoustic warning lasting a maximum of
2 seconds will sound for the second red
distance segment. Vehicles with automatic
transmission: The signal is canceled when
the automatic transmission is shifted into
park position P or the parking brake is
engaged. Vehicles with manual
transmission: The signal is canceled when
the parking brake is engaged.
RRear area: An intermittent acoustic
warning will sound as the first red distance
segment illuminates and a constant
acoustic warning lasting a maximum of
2 seconds will sound for the second red
distance segment. Vehicles with automatic
transmission: The signal is canceled when
the automatic transmission is shifted into
drive position D, or park position P, or the
parking brake is engaged. Vehicles with
manual transmission: The signal is
canceled when the manual transmission is
shifted into neutral position, or in a forward
gear, or the parking brake is engaged.
Switching the Parktronic system on/
off
The Parktronic system switches on
automatically when the ignition is switched
on.
XSwitching off: Press Parktronic
switch :.
Indicator lamp ; comes on.
XSwitching on: Press Parktronic switch :
again.
Parktronic system malfunction
There is a malfunction in the Parktronic
system, if only the red distance segments
illuminate and an acoustic warning sounds.
The Parktronic system will switch off
automatically after 20 seconds and indicator
lamp ; in Parktronic switch : comes on.
XHave the Parktronic system checked at an
authorized Mercedes-Benz Center as soon
as possible.
If only the red distance segments illuminate
and no acoustic warning sounds, the
Parktronic system sensors are dirty (e.g. dirt,
ice, snow and slush). Another cause could be
interference from other radio or ultrasonic
signals (e.g. truck air brakes, car wash, or
jackhammers). The Parktronic system will
switch off automatically after 20 seconds and
indicator lamp ; in Parktronic switch :
comes on.
Driving systems187Controls in detail204_AKB; 5; 23, en-USd2ureepe,Version: 2.11.8.12009-07-16T17:54:06+02:00 - Seite 187Z
Page 190 of 364

XSwitch off the ignition.XClean the Parktronic system sensors
(Y page 263).
XSwitch on the ignition.
or
XCheck the Parktronic system operation at
another location to rule out interference
from outside radio or ultrasonic signals.
Rear view camera
The rear view camera is an optical parking aid.
The area behind the vehicle appears in the
COMAND system display as a mirror image,
like in the rear view mirror.
GWarning!
Make sure no persons or animals are in or
near the area in which you are parking/
maneuvering. Otherwise, they could be
injured.
GWarning!
The rear view camera is only an aid and may
display obstacles
Rfrom a distorted perspective
Rinaccurately
Rmay not display obstacles at all
The rear view camera does not relieve you of
the responsibility to be cautious. Take care
and pay careful attention. The rear view
camera may not show objects which are
Rvery close to the rear bumper
Runder the rear bumper
Rabove the trunk handle
You are responsible for safety at all times and
must continue to pay attention to the
immediate surroundings when parking and
maneuvering. This includes the area behind,
in front of, and beside the vehicle. Otherwise
you could endanger yourself and/or others.
GWarning!
The rear view camera either will not function
or will not function to its full capability if
Rthe trunk lid is open
Rit is raining very hard, snowing or foggy
Rit is night or you are parking/maneuvering
your vehicle in an area where it is very dark
Rthe camera is exposed to a very bright white
light
Rthe immediate surroundings are
illuminated with fluorescent light (the
COMAND system display can flicker)
Rthere is a sudden change in temperature,
e.g. if you drive into a heated garage from
the cold (lens condensation)
Rthe camera lens is dirty or covered
Rthe rear of your vehicle is damaged
In this case, have the position and setting
of the camera checked by a qualified
specialist workshop. Mercedes-Benz
recommends that you contact a Mercedes-
Benz Center for this purpose.
Do not use the rear view camera in these
situations. Otherwise you could injure
yourself or others and/or damage property
including your vehicle while parking/
maneuvering.
Camera lens : must be free of dirt, ice,
snow, and slush to function properly. Clean
the camera lens regularly. Being careful not
to scratch or damage the camera lens, see
188Driving systemsControls in detail
204_AKB; 5; 23, en-USd2ureepe,Version: 2.11.8.12009-07-16T17:54:06+02:00 - Seite 188
Page 204 of 364
XSwitch on the ignition.XPush and hold the roof panel switch in
direction of arrow ; (Y page 199) until the
roller sunblinds are fully retracted.
XPush and hold the roof panel switch in
direction of arrow ; until the tilt/sliding
panel is opened approximately 4 inch
(10 cm).
XPull and hold the roof panel switch in
direction of arrow = until the tilt/sliding
panel is fully closed.
XKeep holding the roof panel switch in
direction of arrow = for approximately
1 second.
XPull and hold the roof panel switch in
direction of arrow = (Y page 199) until the
roller sunblinds are fully extended.
XKeep holding the roof panel switch in
direction of arrow = for approximately
1 second.
XCheck the express operation feature of the
tilt/sliding panel (Y page 200).
If the tilt/sliding panel opens completely,
the roof is synchronized. Otherwise repeat
the above steps.
Loading and storing
Loading instructions
GWarning!
Always fasten items being carried as securely
as possible using fastening materials
appropriate for the weight and size of the
load.
In an accident, during hard braking or sudden
maneuvers, loose items will be thrown around
inside the vehicle. This can cause injury to
vehicle occupants unless the items are
securely fastened in the vehicle.
To help avoid personal injury during a collision
or sudden maneuver, exercise care when
transporting cargo. Do not pile luggage or
cargo higher than the seat backrests.
The trunk is the preferred place to carry
objects. Do not place anything on the rear-
window shelf.
Never drive a vehicle with the trunk open.
Deadly carbon monoxide (CO) gases may
enter vehicle interior resulting in
unconsciousness and death.
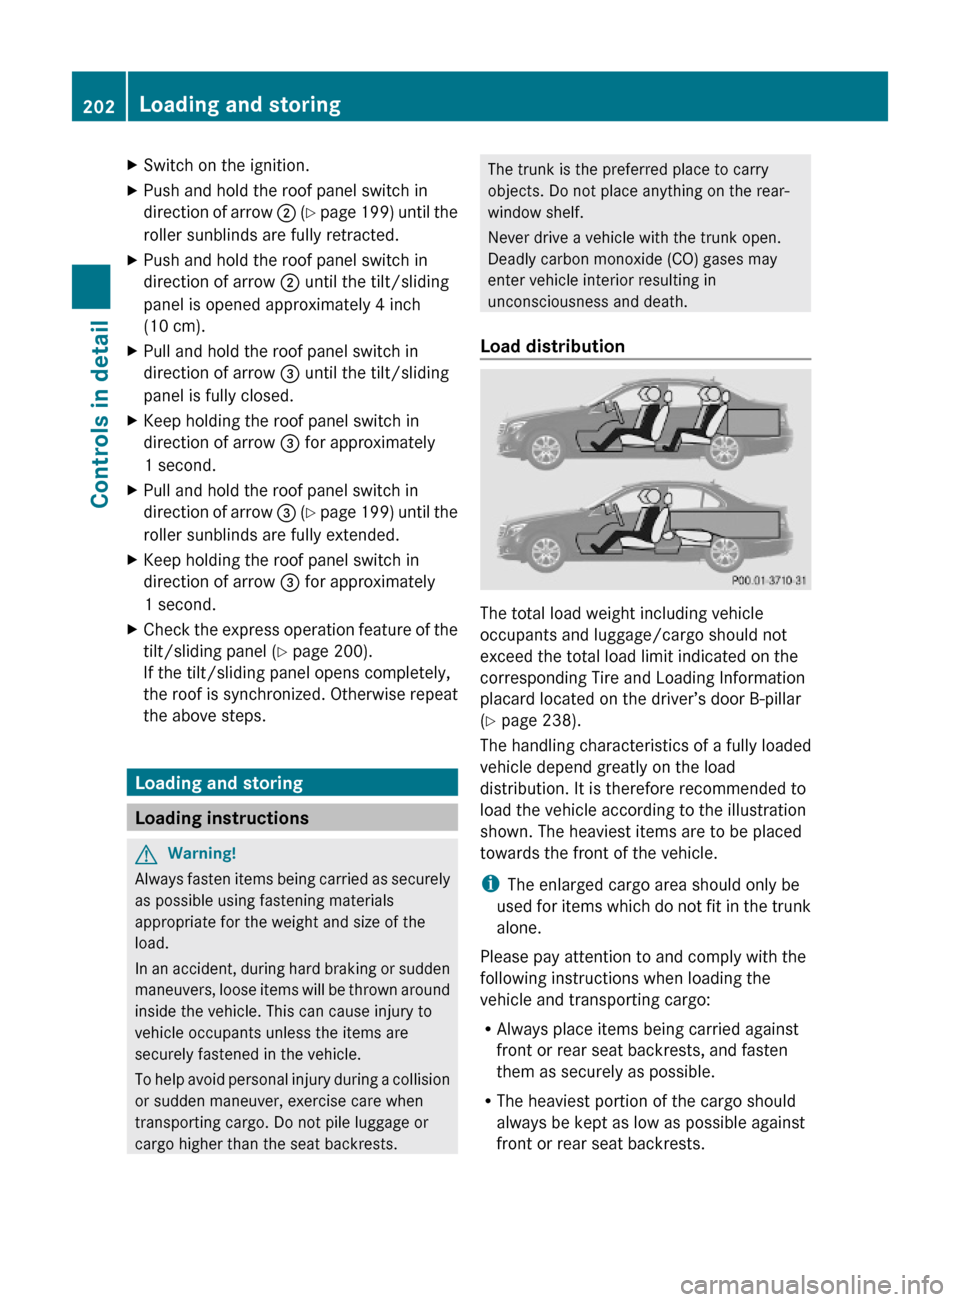
Load distribution
The total load weight including vehicle
occupants and luggage/cargo should not
exceed the total load limit indicated on the
corresponding Tire and Loading Information
placard located on the driver’s door B-pillar
(Y page 238).
The handling characteristics of a fully loaded
vehicle depend greatly on the load
distribution. It is therefore recommended to
load the vehicle according to the illustration
shown. The heaviest items are to be placed
towards the front of the vehicle.
iThe enlarged cargo area should only be
used for items which do not fit in the trunk
alone.
Please pay attention to and comply with the
following instructions when loading the
vehicle and transporting cargo:
RAlways place items being carried against
front or rear seat backrests, and fasten
them as securely as possible.
RThe heaviest portion of the cargo should
always be kept as low as possible against
front or rear seat backrests.
202Loading and storingControls in detail
204_AKB; 5; 23, en-USd2ureepe,Version: 2.11.8.12009-07-16T17:54:06+02:00 - Seite 202
Page 205 of 364
Roof rack
For information about further roof rack
equipment, contact an authorized Mercedes-
Benz Center.
GWarning!
Only use roof racks approved by Mercedes-
Benz for your vehicle model to avoid damage
to the vehicle.
Follow the manufacturer’s installation
instructions. Otherwise, an improperly
attached roof rack system or its load could
become detached from the vehicle.
Do not exceed the maximum roof load of
220 lb (100 kg).
Take into consideration that when the roof
rack is loaded, the handling characteristics
are different from those when operating the
vehicle without the roof rack loaded.
Make sure
Ryou can raise the power tilt/sliding sunroof
or the panorama roof with tilt/sliding panel
completely
Ryou can open the trunk completely
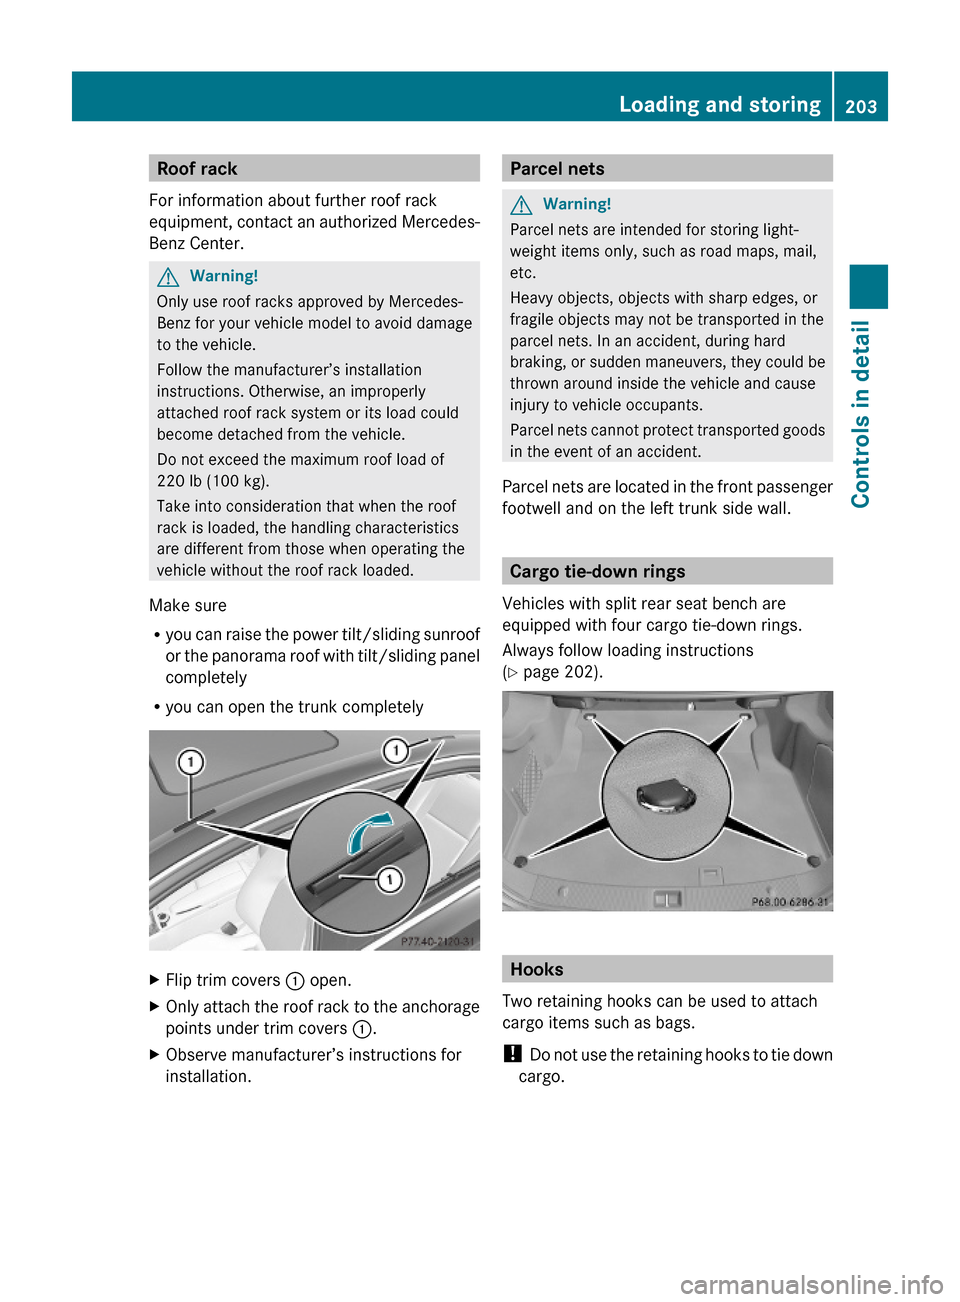
XFlip trim covers : open.XOnly attach the roof rack to the anchorage
points under trim covers :.
XObserve manufacturer’s instructions for
installation.Parcel netsGWarning!
Parcel nets are intended for storing light-
weight items only, such as road maps, mail,
etc.
Heavy objects, objects with sharp edges, or
fragile objects may not be transported in the
parcel nets. In an accident, during hard
braking, or sudden maneuvers, they could be
thrown around inside the vehicle and cause
injury to vehicle occupants.
Parcel nets cannot protect transported goods
in the event of an accident.
Parcel nets are located in the front passenger
footwell and on the left trunk side wall.
Cargo tie-down rings
Vehicles with split rear seat bench are
equipped with four cargo tie-down rings.
Always follow loading instructions
(Y page 202).
Hooks
Two retaining hooks can be used to attach
cargo items such as bags.
! Do not use the retaining hooks to tie down
cargo.
Loading and storing203Controls in detail204_AKB; 5; 23, en-USd2ureepe,Version: 2.11.8.12009-07-16T17:54:06+02:00 - Seite 203Z