2010 MERCEDES-BENZ C300 4MATIC ECO mode
[x] Cancel search: ECO modePage 179 of 364
mobile phone and only use the audio
system’s hands-free device, these calls will
not be listed.
Calling up the list
X% Q Call Lists.XSelect Calls Received or Calls
Dialed.
The appropriate list appears.
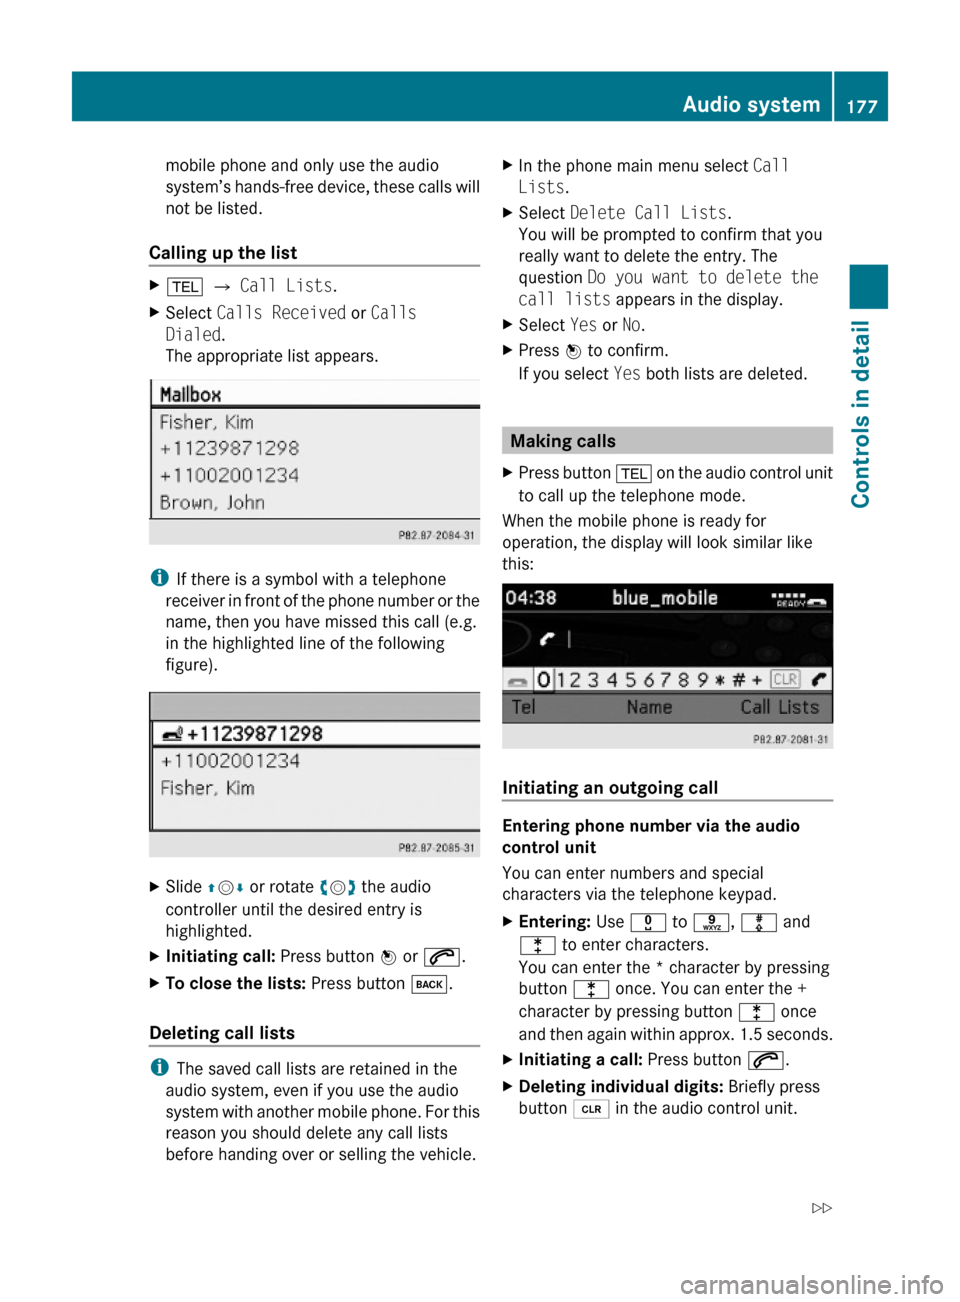
iIf there is a symbol with a telephone
receiver in front of the phone number or the
name, then you have missed this call (e.g.
in the highlighted line of the following
figure).
XSlide ZVÆ or rotate cVd the audio
controller until the desired entry is
highlighted.
XInitiating call: Press button W or 6.XTo close the lists: Press button k.
Deleting call lists
iThe saved call lists are retained in the
audio system, even if you use the audio
system with another mobile phone. For this
reason you should delete any call lists
before handing over or selling the vehicle.
XIn the phone main menu select Call
Lists.
XSelect Delete Call Lists.
You will be prompted to confirm that you
really want to delete the entry. The
question Do you want to delete the
call lists appears in the display.
XSelect Yes or No.XPress W to confirm.
If you select Yes both lists are deleted.
Making calls
XPress button % on the audio control unit
to call up the telephone mode.
When the mobile phone is ready for
operation, the display will look similar like
this:
Initiating an outgoing call
Entering phone number via the audio
control unit
You can enter numbers and special
characters via the telephone keypad.
XEntering: Use x to s, m and
l to enter characters.
You can enter the * character by pressing
button l once. You can enter the +
character by pressing button l once
and then again within approx. 1.5 seconds.
XInitiating a call: Press button 6.XDeleting individual digits: Briefly press
button 2 in the audio control unit.
Audio system177Controls in detail204_AKB; 5; 23, en-USd2ureepe,Version: 2.11.8.12009-07-16T17:54:06+02:00 - Seite 177Z
Page 182 of 364
Sending DTMF tones
iThis function is not possible with all
mobile phones.
Answering machines or other devices can be
controlled via DTMF tones, e.g. for remote
query functions.
XTransmitting individual characters:
During a call select the required
characters.
or
XPress the corresponding button on the
audio control unit.
Every selected character is transmitted
immediately.
XTransmitting a phone number of a
phone book entry as a sequence of
characters: Select Name.
XSelect the desired phone book entry.
The entry is transmitted immediately as a
sequence of characters.
XSwitching back to call display: Select
Back.
Driving systems
Introduction
This section describes the following driving
systems of your vehicle:
RCruise control
RHill-start assist system
RAll-wheel drive (4MATIC)
RDynamic handling package with sport
driving mode
RParktronic system, Canada only
RRear view camera
The driving safety systems ABS, Adaptive
Brake, BAS, EBP and ESP® are described in
the “Safety and security” section
(Y page 60).
Cruise control
The cruise control maintains the speed you
set for your vehicle automatically.
The use of the cruise control is recommended
for driving at a constant speed for extended
periods of time.
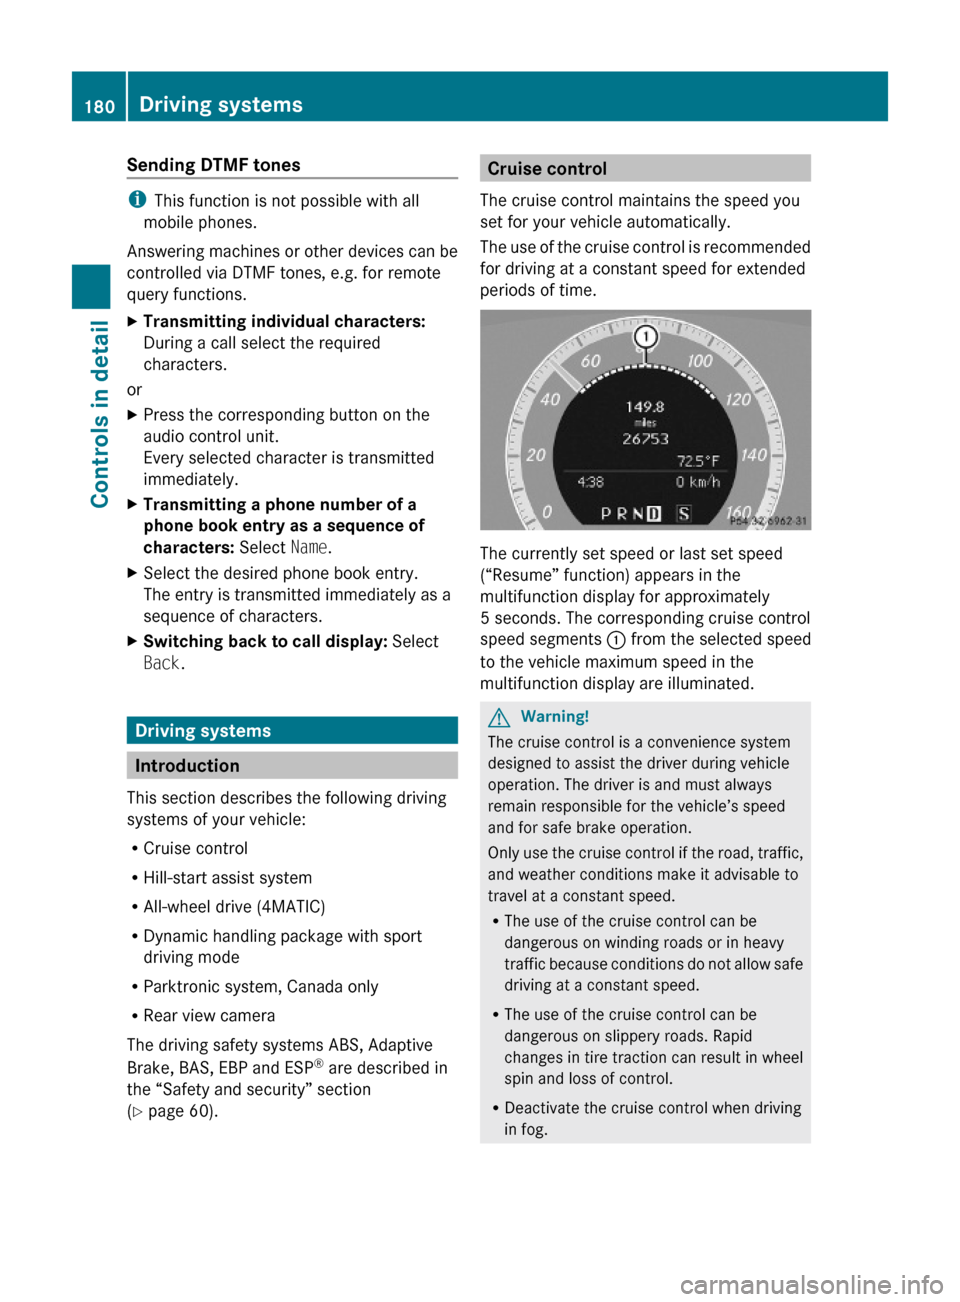
The currently set speed or last set speed
(“Resume” function) appears in the
multifunction display for approximately
5 seconds. The corresponding cruise control
speed segments : from the selected speed
to the vehicle maximum speed in the
multifunction display are illuminated.
GWarning!
The cruise control is a convenience system
designed to assist the driver during vehicle
operation. The driver is and must always
remain responsible for the vehicle’s speed
and for safe brake operation.
Only use the cruise control if the road, traffic,
and weather conditions make it advisable to
travel at a constant speed.
RThe use of the cruise control can be
dangerous on winding roads or in heavy
traffic because conditions do not allow safe
driving at a constant speed.
RThe use of the cruise control can be
dangerous on slippery roads. Rapid
changes in tire traction can result in wheel
spin and loss of control.
RDeactivate the cruise control when driving
in fog.
180Driving systemsControls in detail
204_AKB; 5; 23, en-USd2ureepe,Version: 2.11.8.12009-07-16T17:54:06+02:00 - Seite 180
Page 192 of 364
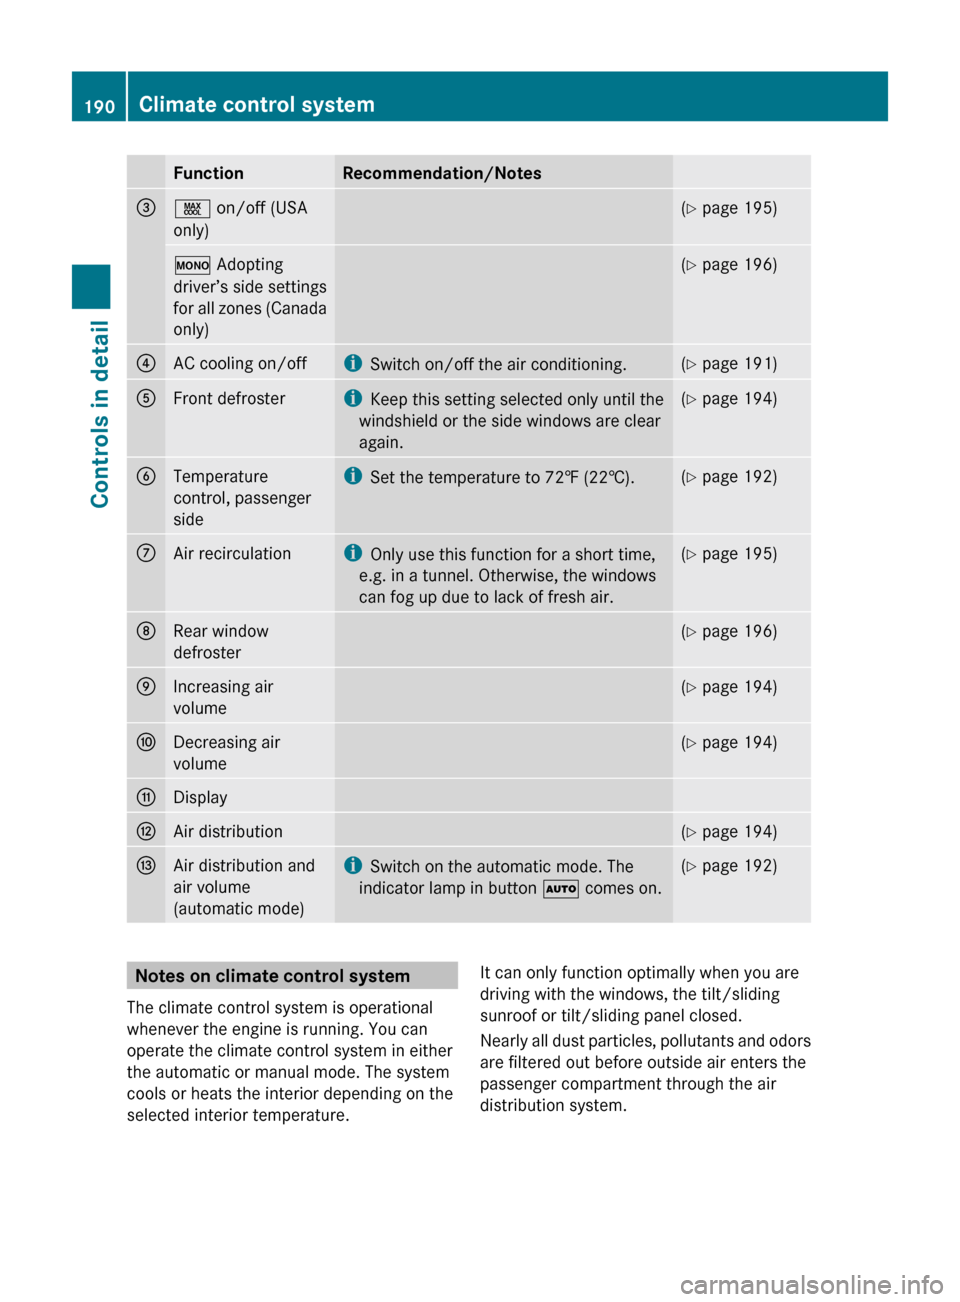
FunctionRecommendation/Notes=Ù on/off (USA
only)( Y page 195)º Adopting
driver’s side settings
for all zones (Canada
only)( Y page 196)?AC cooling on/offi
Switch on/off the air conditioning.(Y page 191)AFront defrosteri
Keep this setting selected only until the
windshield or the side windows are clear
again.( Y page 194)BTemperature
control, passenger
sidei Set the temperature to 72‡ (22†).(Y page 192)CAir recirculationi
Only use this function for a short time,
e.g. in a tunnel. Otherwise, the windows
can fog up due to lack of fresh air.( Y page 195)DRear window
defroster( Y page 196)EIncreasing air
volume( Y page 194)FDecreasing air
volume( Y page 194)GDisplayHAir distribution(Y page 194)IAir distribution and
air volume
(automatic mode)i Switch on the automatic mode. The
indicator lamp in button à comes on.(Y page 192)Notes on climate control system
The climate control system is operational
whenever the engine is running. You can
operate the climate control system in either
the automatic or manual mode. The system
cools or heats the interior depending on the
selected interior temperature.It can only function optimally when you are
driving with the windows, the tilt/sliding
sunroof or tilt/sliding panel closed.
Nearly all dust particles, pollutants and odors
are filtered out before outside air enters the
passenger compartment through the air
distribution system.190Climate control systemControls in detail
204_AKB; 5; 23, en-USd2ureepe,Version: 2.11.8.12009-07-16T17:54:06+02:00 - Seite 190
Page 193 of 364
GWarning!
Severe conditions (e.g. strong air pollution)
may require replacement of the filter before
its scheduled replacement interval. A clogged
filter will reduce the air volume to the interior
and the windows could fog up, impairing
visibility and endangering you and others.
Have a clogged filter replaced as soon as
possible at an authorized Mercedes-Benz
Center.
The air conditioning will not engage (no
cooling) if the A/C mode ( Y page 191) is
deactivated.
GWarning!
Follow the recommended settings for heating
and cooling given on the following pages.
Otherwise the windows could fog up,
impairing visibility and endangering you and
others.
XKeep the air intake grille in front of the
windshield free of snow and debris.
Do not obstruct air flow by placing objects on
the air flow-through exhaust slots below the
rear window.
i If the vehicle interior is hot, ventilate the
interior before driving off, see “Summer
opening feature” ( Y page 99). The climate
control will then adjust the interior
temperature to the set value much faster.
Deactivating the climate control
system
GWarning!
When the climate control system is
deactivated, the outside air supply and
circulation are also deactivated. Only choose
this setting for a short time. Otherwise the
windows could fog up, impairing visibility and
endangering you and others.
XDeactivating: Press button ^.
The indicator lamp in the button comes on.XReactivating: Press button ^.
The indicator lamp in the button goes out.
The previous settings are once again in
effect.
or
XPress button Ã.
The indicator lamp in the button comes on.
Air volume and air distribution are adjusted
automatically.
Air conditioning
The air conditioning is operational while the
engine is running and cools the interior air to
the temperature set by the operator. In
addition, the air conditioning dehumidifies
the interior air and helps prevent window
fogging.
GWarning!
If you deactivate the air conditioning, the
vehicle will not be cooled when weather
conditions are warm. The windows can fog up
more quickly. Window fogging may impair
visibility and endanger you and others.
i Condensated water may drip out from
underneath the vehicle. This is normal and
not an indication of a malfunction.
The air conditioning uses the refrigerant
R134a. This refrigerant is free of CFCs which
are harmful to the ozone layer.
Deactivating
It is possible to deactivate the air
conditioning. The interior air will then no
longer be cooled or dehumidified.
XPress button ¿.
The indicator lamp in the button goes out.
The cooling function switches off after a
short delay.Climate control system191Controls in detail204_AKB; 5; 23, en-USd2ureepe,Version: 2.11.8.12009-07-16T17:54:06+02:00 - Seite 191Z
Page 205 of 364
Roof rack
For information about further roof rack
equipment, contact an authorized Mercedes-
Benz Center.
GWarning!
Only use roof racks approved by Mercedes-
Benz for your vehicle model to avoid damage
to the vehicle.
Follow the manufacturer’s installation
instructions. Otherwise, an improperly
attached roof rack system or its load could
become detached from the vehicle.
Do not exceed the maximum roof load of
220 lb (100 kg).
Take into consideration that when the roof
rack is loaded, the handling characteristics
are different from those when operating the
vehicle without the roof rack loaded.
Make sure
Ryou can raise the power tilt/sliding sunroof
or the panorama roof with tilt/sliding panel
completely
Ryou can open the trunk completely
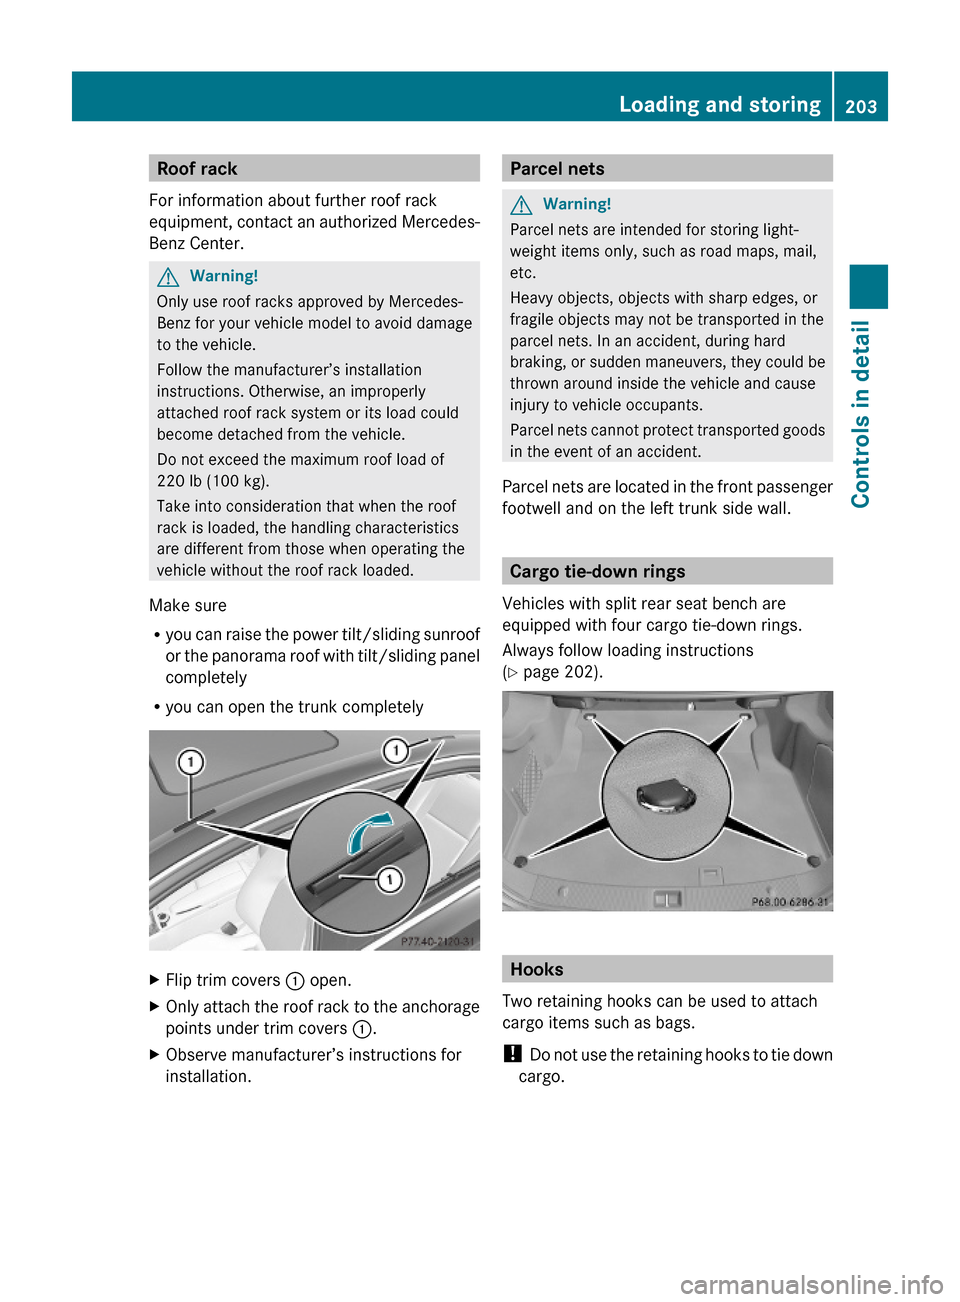
XFlip trim covers : open.XOnly attach the roof rack to the anchorage
points under trim covers :.
XObserve manufacturer’s instructions for
installation.Parcel netsGWarning!
Parcel nets are intended for storing light-
weight items only, such as road maps, mail,
etc.
Heavy objects, objects with sharp edges, or
fragile objects may not be transported in the
parcel nets. In an accident, during hard
braking, or sudden maneuvers, they could be
thrown around inside the vehicle and cause
injury to vehicle occupants.
Parcel nets cannot protect transported goods
in the event of an accident.
Parcel nets are located in the front passenger
footwell and on the left trunk side wall.
Cargo tie-down rings
Vehicles with split rear seat bench are
equipped with four cargo tie-down rings.
Always follow loading instructions
(Y page 202).
Hooks
Two retaining hooks can be used to attach
cargo items such as bags.
! Do not use the retaining hooks to tie down
cargo.
Loading and storing203Controls in detail204_AKB; 5; 23, en-USd2ureepe,Version: 2.11.8.12009-07-16T17:54:06+02:00 - Seite 203Z
Page 215 of 364
1-800-FOR-MERCedes (1-800-367-6372)
(USA only) or 1-888-923-8367 (Canada
only).
An emergency call is initiated automatically
following an accident in which the Emergency
Tensioning Devices (ETDs) or air bags have
deployed.
i An automatically initiated Tele Aid
emergency call cannot be canceled.
An emergency call can also be initiated
manually (Y page 213).
Once the emergency call is in progress, the
indicator lamp in the SOS button will begin to
flash. The message Connecting Call
appears in the multifunction display and the
COMAND system is muted. When the
connection is established, the message
Call Connected appears in the
multifunction display.
All information relevant to the emergency,
such as the location of the vehicle
(determined by the GPS satellite location
system), vehicle model, identification number
and color are generated.
A voice connection between the Customer
Assistance Center and the occupants of the
vehicle will be established automatically soon
after the emergency call has been initiated.
The Customer Assistance Center will attempt
to determine the nature of the emergency
more precisely, provided they can speak to
an occupant of the vehicle.
iIf no vehicle occupant responds, an
ambulance will be sent to the vehicle
immediately.
GWarning!
If the indicator lamp in the SOS button is
flashing continuously and there was no voice
connection to the Customer Assistance
Center established, then the Tele Aid system
could not initiate an emergency call (e.g. the
relevant cellular phone network is not
available).
The message Call Failed appears in the
multifunction display for approximately
10 seconds.
Should this occur, assistance must be
summoned by other means.
iThe “911” emergency call system is a
public service. Using it without due cause
is a criminal offense.
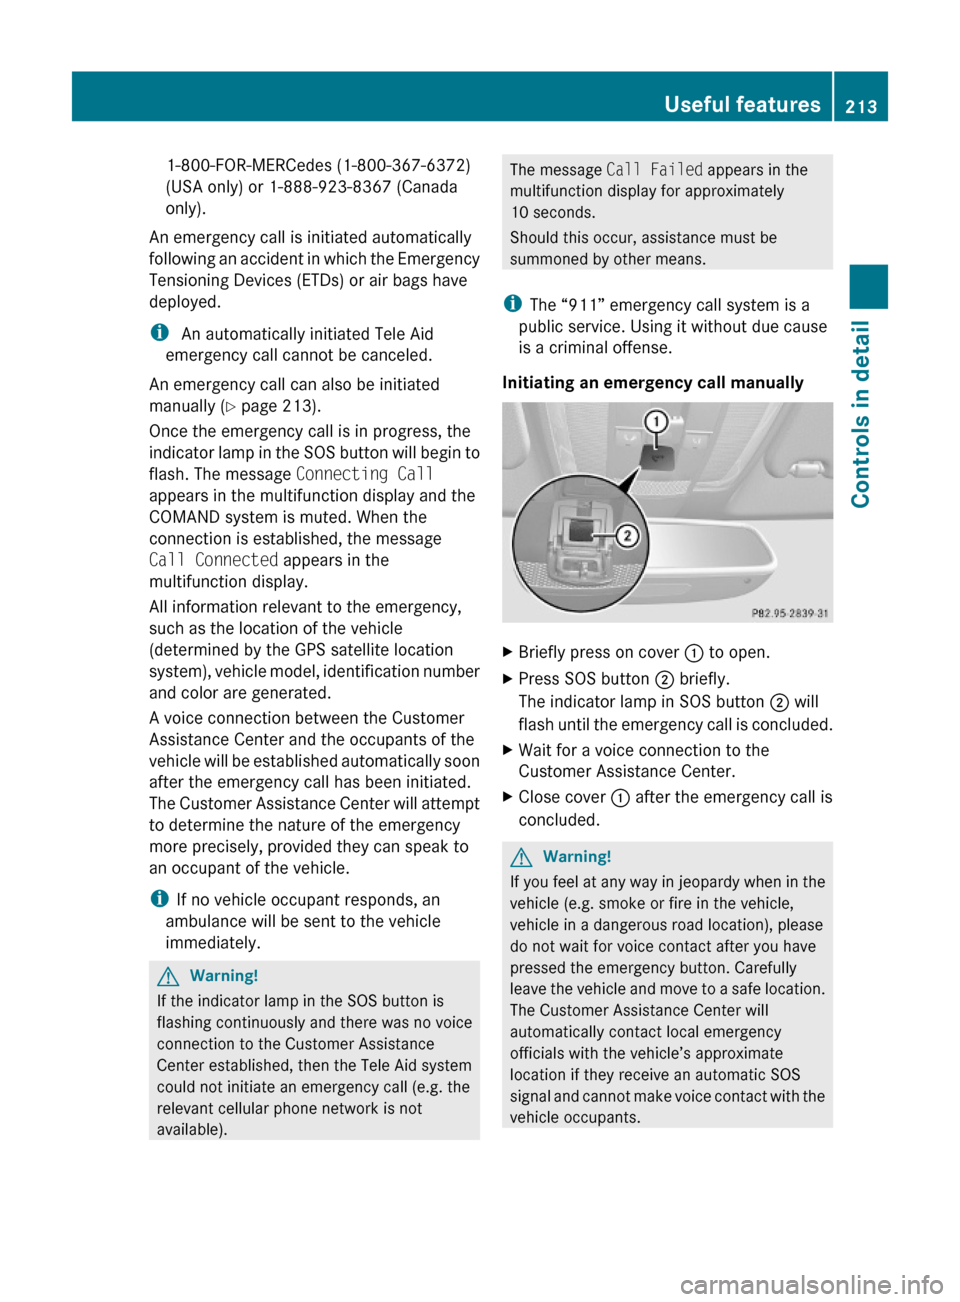
Initiating an emergency call manually
XBriefly press on cover : to open.XPress SOS button ; briefly.
The indicator lamp in SOS button ; will
flash until the emergency call is concluded.
XWait for a voice connection to the
Customer Assistance Center.
XClose cover : after the emergency call is
concluded.
GWarning!
If you feel at any way in jeopardy when in the
vehicle (e.g. smoke or fire in the vehicle,
vehicle in a dangerous road location), please
do not wait for voice contact after you have
pressed the emergency button. Carefully
leave the vehicle and move to a safe location.
The Customer Assistance Center will
automatically contact local emergency
officials with the vehicle’s approximate
location if they receive an automatic SOS
signal and cannot make voice contact with the
vehicle occupants.
Useful features213Controls in detail204_AKB; 5; 23, en-USd2ureepe,Version: 2.11.8.12009-07-16T17:54:06+02:00 - Seite 213Z
Page 216 of 364
XTerminating calls: Press button ~ on
the multifunction steering wheel.
or
XPress the respective button for ending a
telephone call on the audio system or the
COMAND system.
Roadside Assistance button
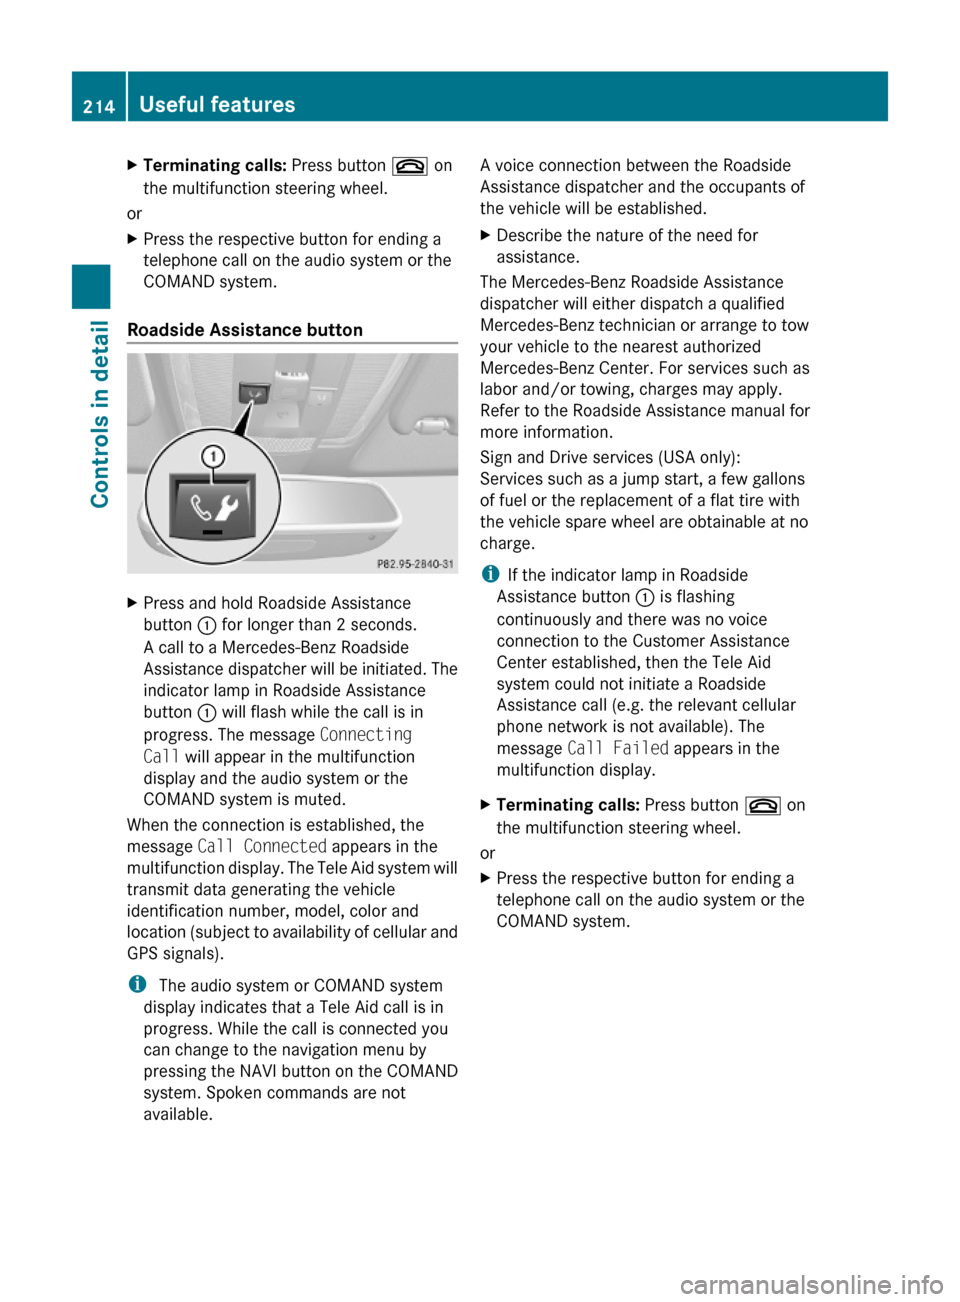
XPress and hold Roadside Assistance
button : for longer than 2 seconds.
A call to a Mercedes-Benz Roadside
Assistance dispatcher will be initiated. The
indicator lamp in Roadside Assistance
button : will flash while the call is in
progress. The message Connecting
Call will appear in the multifunction
display and the audio system or the
COMAND system is muted.
When the connection is established, the
message Call Connected appears in the
multifunction display. The Tele Aid system will
transmit data generating the vehicle
identification number, model, color and
location (subject to availability of cellular and
GPS signals).
i The audio system or COMAND system
display indicates that a Tele Aid call is in
progress. While the call is connected you
can change to the navigation menu by
pressing the NAVI button on the COMAND
system. Spoken commands are not
available.
A voice connection between the Roadside
Assistance dispatcher and the occupants of
the vehicle will be established.
XDescribe the nature of the need for
assistance.
The Mercedes-Benz Roadside Assistance
dispatcher will either dispatch a qualified
Mercedes-Benz technician or arrange to tow
your vehicle to the nearest authorized
Mercedes-Benz Center. For services such as
labor and/or towing, charges may apply.
Refer to the Roadside Assistance manual for
more information.
Sign and Drive services (USA only):
Services such as a jump start, a few gallons
of fuel or the replacement of a flat tire with
the vehicle spare wheel are obtainable at no
charge.
iIf the indicator lamp in Roadside
Assistance button : is flashing
continuously and there was no voice
connection to the Customer Assistance
Center established, then the Tele Aid
system could not initiate a Roadside
Assistance call (e.g. the relevant cellular
phone network is not available). The
message Call Failed appears in the
multifunction display.
XTerminating calls: Press button ~ on
the multifunction steering wheel.
or
XPress the respective button for ending a
telephone call on the audio system or the
COMAND system.
214Useful featuresControls in detail
204_AKB; 5; 23, en-USd2ureepe,Version: 2.11.8.12009-07-16T17:54:06+02:00 - Seite 214
Page 219 of 364
and reverse features as required by U.S.
federal safety standards (this includes any
garage door opener model manufactured
before April 1, 1982). A garage door that
cannot detect an object - signaling the door
to stop and reverse - does not meet current
U.S. federal safety standards.
When programming a garage door opener,
park vehicle outside the garage.
Do not run the engine while programming the
integrated remote control. Inhalation of
exhaust gas is hazardous to your health. All
exhaust gas contains carbon monoxide (CO),
and inhaling it can cause unconsciousness
and possible death.
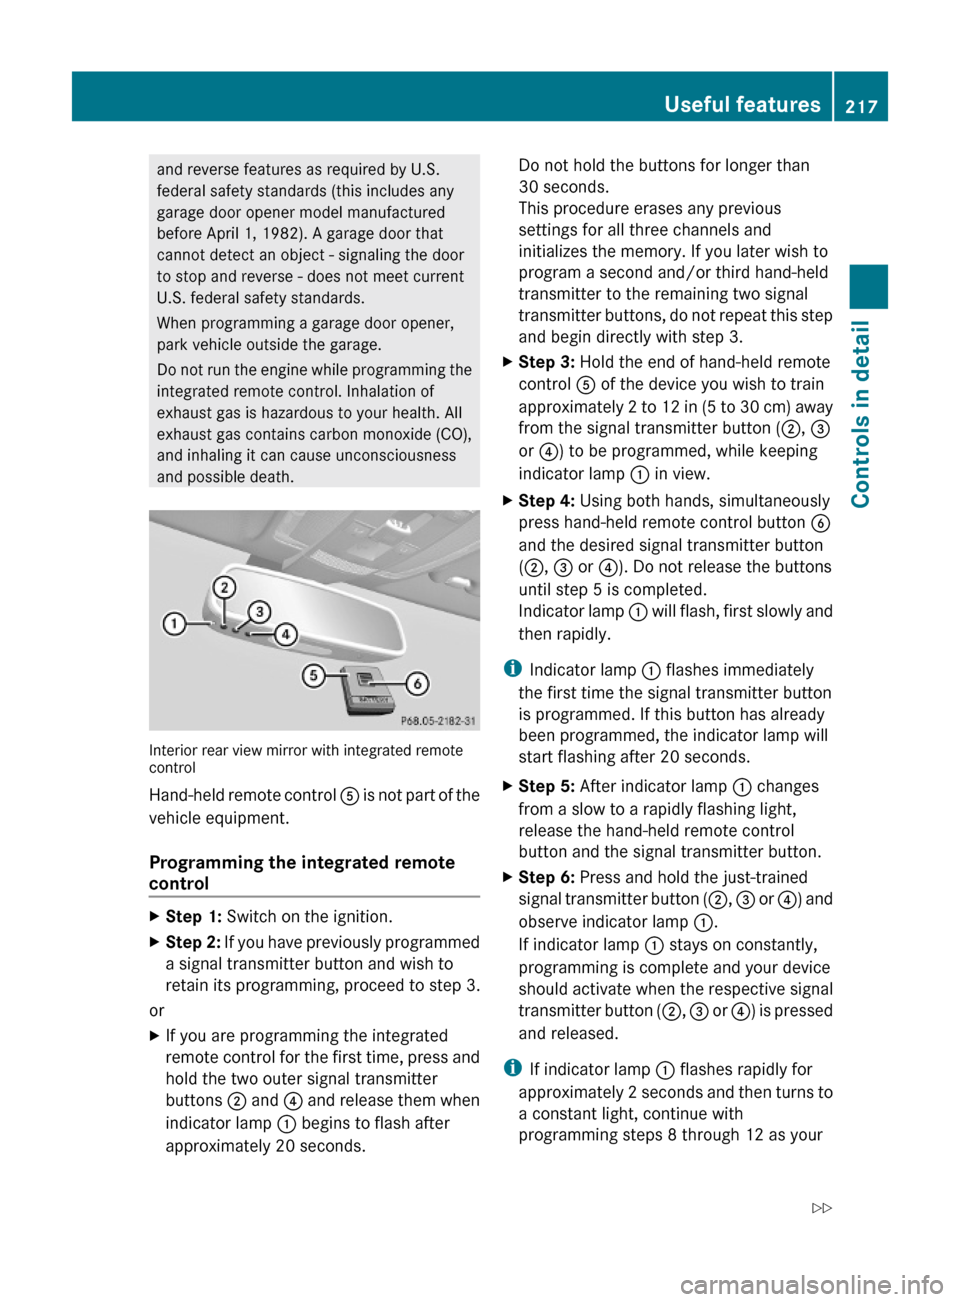
Interior rear view mirror with integrated remotecontrol
Hand-held remote control A is not part of the
vehicle equipment.
Programming the integrated remote
control
XStep 1: Switch on the ignition.XStep 2: If you have previously programmed
a signal transmitter button and wish to
retain its programming, proceed to step 3.
or
XIf you are programming the integrated
remote control for the first time, press and
hold the two outer signal transmitter
buttons ; and ? and release them when
indicator lamp : begins to flash after
approximately 20 seconds.
Do not hold the buttons for longer than
30 seconds.
This procedure erases any previous
settings for all three channels and
initializes the memory. If you later wish to
program a second and/or third hand-held
transmitter to the remaining two signal
transmitter buttons, do not repeat this step
and begin directly with step 3.
XStep 3: Hold the end of hand-held remote
control A of the device you wish to train
approximately 2 to 12 in (5 to 30 cm) away
from the signal transmitter button (;, =
or ?) to be programmed, while keeping
indicator lamp : in view.
XStep 4: Using both hands, simultaneously
press hand-held remote control button B
and the desired signal transmitter button
(;, = or ?). Do not release the buttons
until step 5 is completed.
Indicator lamp : will flash, first slowly and
then rapidly.
iIndicator lamp : flashes immediately
the first time the signal transmitter button
is programmed. If this button has already
been programmed, the indicator lamp will
start flashing after 20 seconds.
XStep 5: After indicator lamp : changes
from a slow to a rapidly flashing light,
release the hand-held remote control
button and the signal transmitter button.
XStep 6: Press and hold the just-trained
signal transmitter button (;, = or ?) and
observe indicator lamp :.
If indicator lamp : stays on constantly,
programming is complete and your device
should activate when the respective signal
transmitter button (;, = or ?) is pressed
and released.
iIf indicator lamp : flashes rapidly for
approximately 2 seconds and then turns to
a constant light, continue with
programming steps 8 through 12 as your
Useful features217Controls in detail204_AKB; 5; 23, en-USd2ureepe,Version: 2.11.8.12009-07-16T17:54:06+02:00 - Seite 217Z