2010 MERCEDES-BENZ C300 4MATIC windshield
[x] Cancel search: windshieldPage 227 of 364
GWarning!
The engine is equipped with a transistorized
ignition system. Because of the high voltage
it is dangerous to touch any components
(ignition coils, spark plug sockets, diagnostic
socket) of the ignition system
Rwith the engine running
Rwhile starting the engine
Rwhen the ignition is switched on and the
engine is turned manually
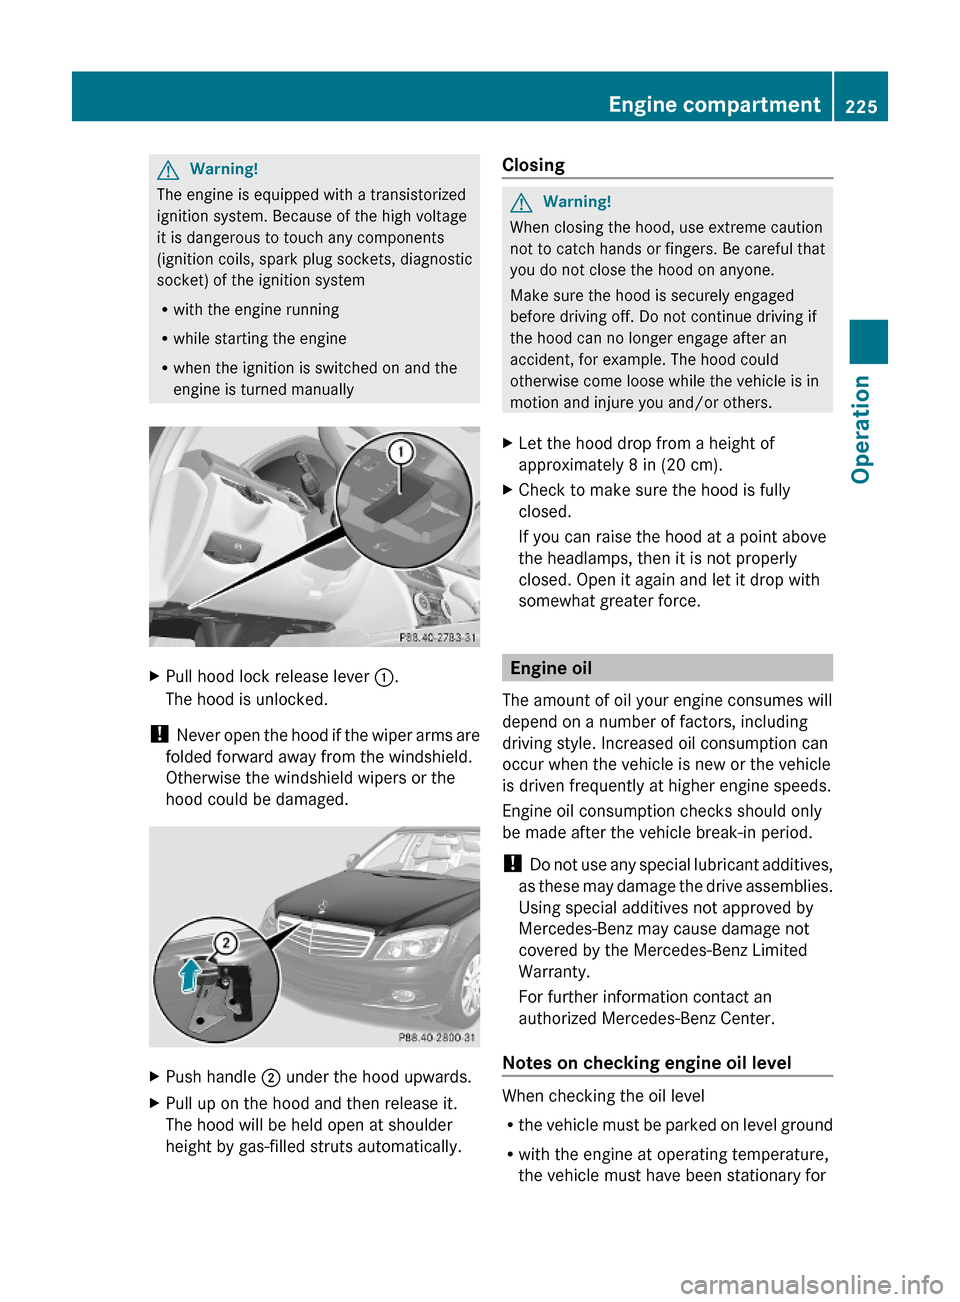
XPull hood lock release lever :.
The hood is unlocked.
! Never open the hood if the wiper arms are
folded forward away from the windshield.
Otherwise the windshield wipers or the
hood could be damaged.
XPush handle ; under the hood upwards.XPull up on the hood and then release it.
The hood will be held open at shoulder
height by gas-filled struts automatically.
ClosingGWarning!
When closing the hood, use extreme caution
not to catch hands or fingers. Be careful that
you do not close the hood on anyone.
Make sure the hood is securely engaged
before driving off. Do not continue driving if
the hood can no longer engage after an
accident, for example. The hood could
otherwise come loose while the vehicle is in
motion and injure you and/or others.
XLet the hood drop from a height of
approximately 8 in (20 cm).
XCheck to make sure the hood is fully
closed.
If you can raise the hood at a point above
the headlamps, then it is not properly
closed. Open it again and let it drop with
somewhat greater force.
Engine oil
The amount of oil your engine consumes will
depend on a number of factors, including
driving style. Increased oil consumption can
occur when the vehicle is new or the vehicle
is driven frequently at higher engine speeds.
Engine oil consumption checks should only
be made after the vehicle break-in period.
! Do not use any special lubricant additives,
as these may damage the drive assemblies.
Using special additives not approved by
Mercedes-Benz may cause damage not
covered by the Mercedes-Benz Limited
Warranty.
For further information contact an
authorized Mercedes-Benz Center.
Notes on checking engine oil level
When checking the oil level
Rthe vehicle must be parked on level ground
Rwith the engine at operating temperature,
the vehicle must have been stationary for
Engine compartment225Operation204_AKB; 5; 23, en-USd2ureepe,Version: 2.11.8.12009-07-16T17:54:06+02:00 - Seite 225Z
Page 230 of 364
The coolant level is correct if the level
Rfor cold coolant: reaches marking bar
= in coolant expansion tank ;
Rfor warm coolant: is approximately 0.6 in
(1.5 cm) higher
XAdd coolant as required.XScrew cap : back on and tighten it.
For more information on coolant, see the
“Technical data” section (Y page 351) and
(Y page 356).
Washer system and headlamp
cleaning system
GWarning!
Washer solvent/antifreeze is highly
flammable. Do not spill washer solvent/
antifreeze on hot engine parts, because it may
ignite and burn. You could be seriously
burned.
! Always use washer solvent/antifreeze
where temperatures may fall below
freezing point. Failure to do so could result
in damage to the washer system/fluid
reservoir.
! Only use washer fluid which is suitable for
plastic lenses. Improper washer fluid can
damage the plastic lenses of the
headlamps.
! Do not use distilled or deionized water in
the washer fluid reservoir. Otherwise, the
washer fluid level sensor could be
damaged.
Fluid for the washer system and the headlamp
cleaning system is supplied from the washer
fluid reservoir.
During all seasons, use MB Windshield
Washer Concentrate “MB SummerFit”. Mix it
with water or premixed washer solvent/
antifreeze depending on the ambient
temperature (Y page 358).
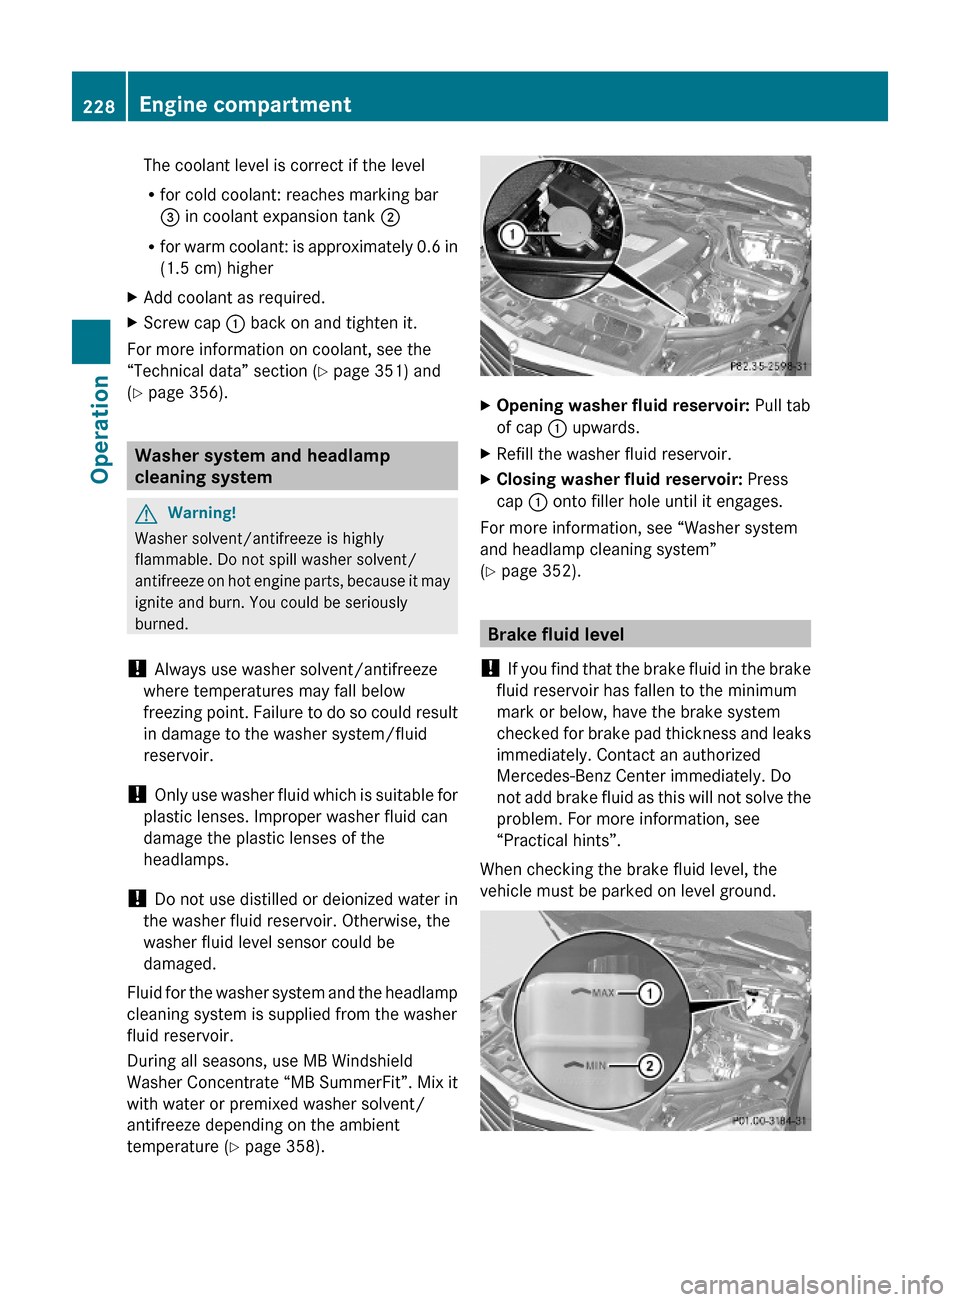
XOpening washer fluid reservoir: Pull tab
of cap : upwards.
XRefill the washer fluid reservoir.XClosing washer fluid reservoir: Press
cap : onto filler hole until it engages.
For more information, see “Washer system
and headlamp cleaning system”
(Y page 352).
Brake fluid level
! If you find that the brake fluid in the brake
fluid reservoir has fallen to the minimum
mark or below, have the brake system
checked for brake pad thickness and leaks
immediately. Contact an authorized
Mercedes-Benz Center immediately. Do
not add brake fluid as this will not solve the
problem. For more information, see
“Practical hints”.
When checking the brake fluid level, the
vehicle must be parked on level ground.
228Engine compartmentOperation
204_AKB; 5; 23, en-USd2ureepe,Version: 2.11.8.12009-07-16T17:54:06+02:00 - Seite 228
Page 265 of 364
After running the vehicle through an
automatic car wash, wipe any wax off of the
windshield and the wiper blade inserts. This
will prevent smears and reduce wiping noise
which can be caused by residual wax on the
windshield.
Ornamental moldings
XFor regular cleaning and care of ornamental
moldings, use a damp cloth.
! Do not use chrome cleaner on ornamental
moldings. Although ornamental moldings
may have chrome appearance, they could
be made of anodized aluminum that will be
damaged when cleaned with chrome
cleaner. Instead, use a damp cloth to clean
those ornamental moldings.
For very dirty ornamental moldings of
which you are sure are chrome-plated, use
a chrome cleaner. If in doubt whether an
ornamental molding is chrome-plated,
contact an authorized Mercedes-Benz
Center.
Headlamps, brake lamps, tail lamps,
side markers, turn signal lenses
XUse a mild vehicle wash detergent, such as
Mercedes-Benz approved Car Shampoo,
with plenty of water.
! Only use window cleaning solutions that
are suitable for plastic lamp lenses.
Window cleaning solutions which are not
suitable may damage the plastic lamp
lenses of the headlamps. Therefore, do not
use abrasives, solvents or cleaners that
contain solvents.
Cleaning the driving system sensors
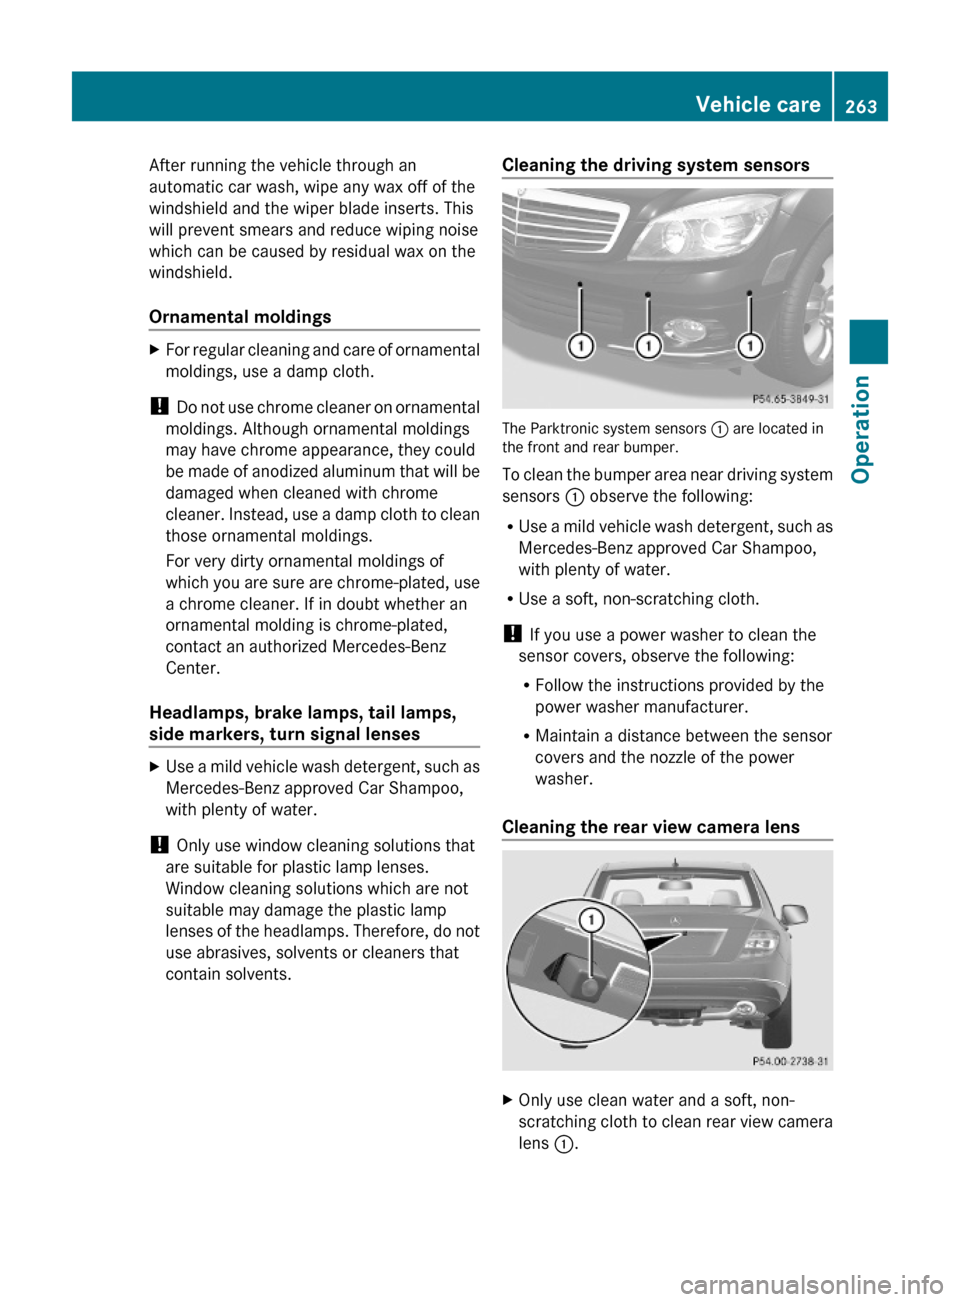
The Parktronic system sensors : are located inthe front and rear bumper.
To clean the bumper area near driving system
sensors : observe the following:
RUse a mild vehicle wash detergent, such as
Mercedes-Benz approved Car Shampoo,
with plenty of water.
RUse a soft, non-scratching cloth.
! If you use a power washer to clean the
sensor covers, observe the following:
RFollow the instructions provided by the
power washer manufacturer.
RMaintain a distance between the sensor
covers and the nozzle of the power
washer.
Cleaning the rear view camera lens
XOnly use clean water and a soft, non-
scratching cloth to clean rear view camera
lens :.
Vehicle care263Operation204_AKB; 5; 23, en-USd2ureepe,Version: 2.11.8.12009-07-16T17:54:06+02:00 - Seite 263Z
Page 266 of 364
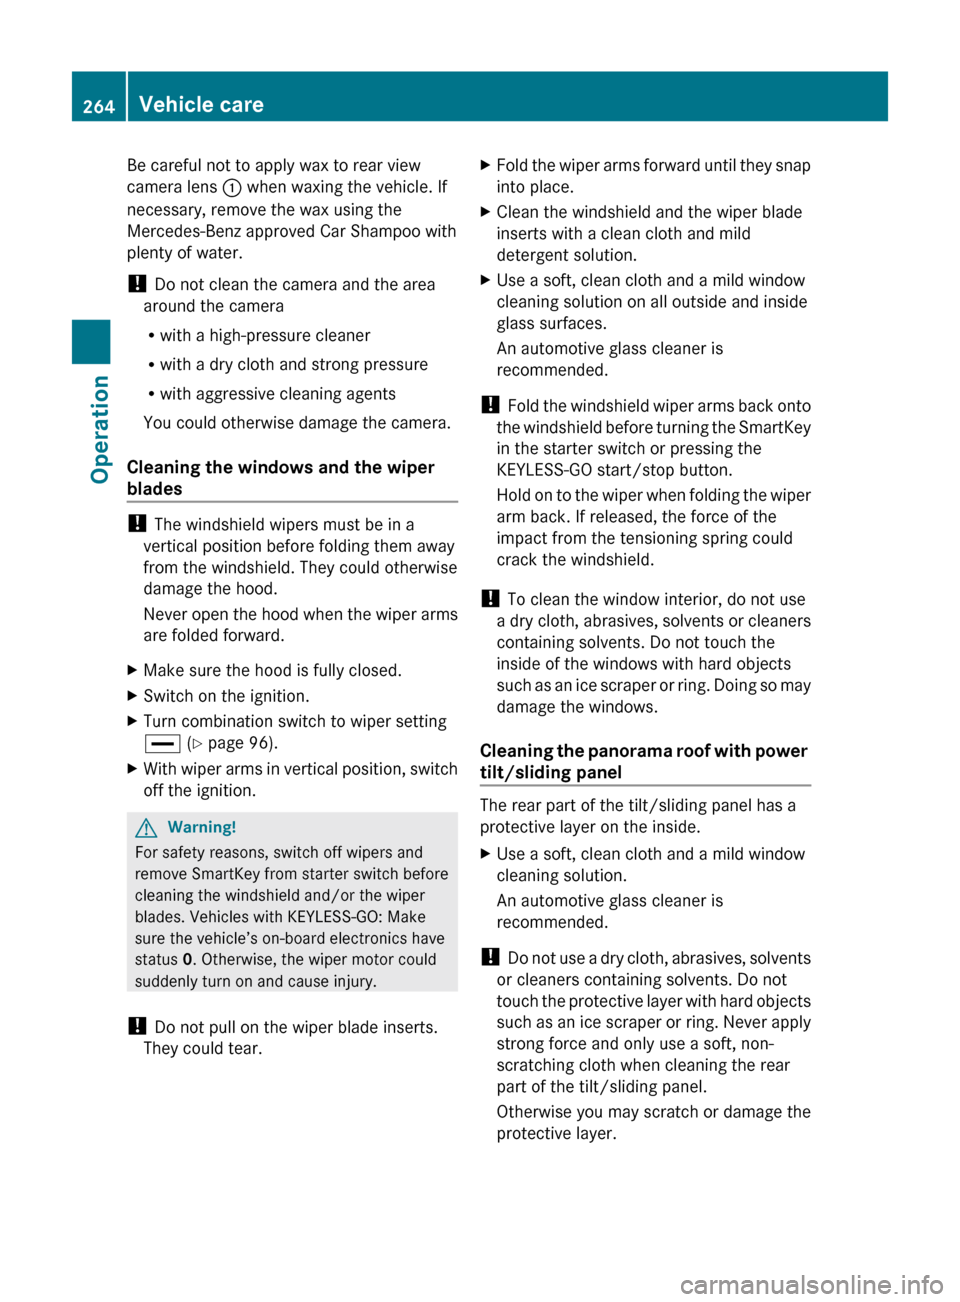
Be careful not to apply wax to rear view
camera lens : when waxing the vehicle. If
necessary, remove the wax using the
Mercedes-Benz approved Car Shampoo with
plenty of water.
! Do not clean the camera and the area
around the camera
R with a high-pressure cleaner
R with a dry cloth and strong pressure
R with aggressive cleaning agents
You could otherwise damage the camera.
Cleaning the windows and the wiper
blades
! The windshield wipers must be in a
vertical position before folding them away
from the windshield. They could otherwise
damage the hood.
Never open the hood when the wiper arms
are folded forward.
XMake sure the hood is fully closed.XSwitch on the ignition.XTurn combination switch to wiper setting
° (Y page 96).XWith wiper arms in vertical position, switch
off the ignition.GWarning!
For safety reasons, switch off wipers and
remove SmartKey from starter switch before
cleaning the windshield and/or the wiper
blades. Vehicles with KEYLESS-GO: Make
sure the vehicle’s on-board electronics have
status 0. Otherwise, the wiper motor could
suddenly turn on and cause injury.
! Do not pull on the wiper blade inserts.
They could tear.
XFold the wiper arms forward until they snap
into place.XClean the windshield and the wiper blade
inserts with a clean cloth and mild
detergent solution.XUse a soft, clean cloth and a mild window
cleaning solution on all outside and inside
glass surfaces.
An automotive glass cleaner is
recommended.
! Fold the windshield wiper arms back onto
the windshield before turning the SmartKey
in the starter switch or pressing the
KEYLESS-GO start/stop button.
Hold on to the wiper when folding the wiper
arm back. If released, the force of the
impact from the tensioning spring could
crack the windshield.
! To clean the window interior, do not use
a dry cloth, abrasives, solvents or cleaners
containing solvents. Do not touch the
inside of the windows with hard objects
such as an ice scraper or ring. Doing so may
damage the windows.
Cleaning the panorama roof with power
tilt/sliding panel
The rear part of the tilt/sliding panel has a
protective layer on the inside.
XUse a soft, clean cloth and a mild window
cleaning solution.
An automotive glass cleaner is
recommended.
! Do not use a dry cloth, abrasives, solvents
or cleaners containing solvents. Do not
touch the protective layer with hard objects
such as an ice scraper or ring. Never apply
strong force and only use a soft, non-
scratching cloth when cleaning the rear
part of the tilt/sliding panel.
Otherwise you may scratch or damage the
protective layer.
264Vehicle careOperation
204_AKB; 5; 23, en-USd2ureepe,Version: 2.11.8.12009-07-16T17:54:06+02:00 - Seite 264
Page 319 of 364
GWarning!
Wiper blades are components that are subject
to wear and tear. Replace the wiper blades
twice a year, preferably in the spring and fall.
Otherwise the windshield will not be wiped
properly. As a result, you may not be able to
observe surrounding traffic conditions and
could cause an accident.
! Never open the hood when a wiper arm is
folded forward.
Hold on to the wiper when folding a wiper
arm back. If released, the force of the
impact from the tensioning spring could
crack the windshield.
Do not allow a wiper arm to contact the
windshield glass without a wiper blade
inserted.
Mercedes-Benz recommends that you have
this work carried out at an authorized
Mercedes-Benz Center.
XRemove the SmartKey from the starter
switch.
Vehicles with KEYLESS-GO:
XMake sure the vehicle’s on-board
electronics have status 0 (Y page 78).
Removing wiper blades
! Do not pull on the wiper blade inserts.
They could tear.
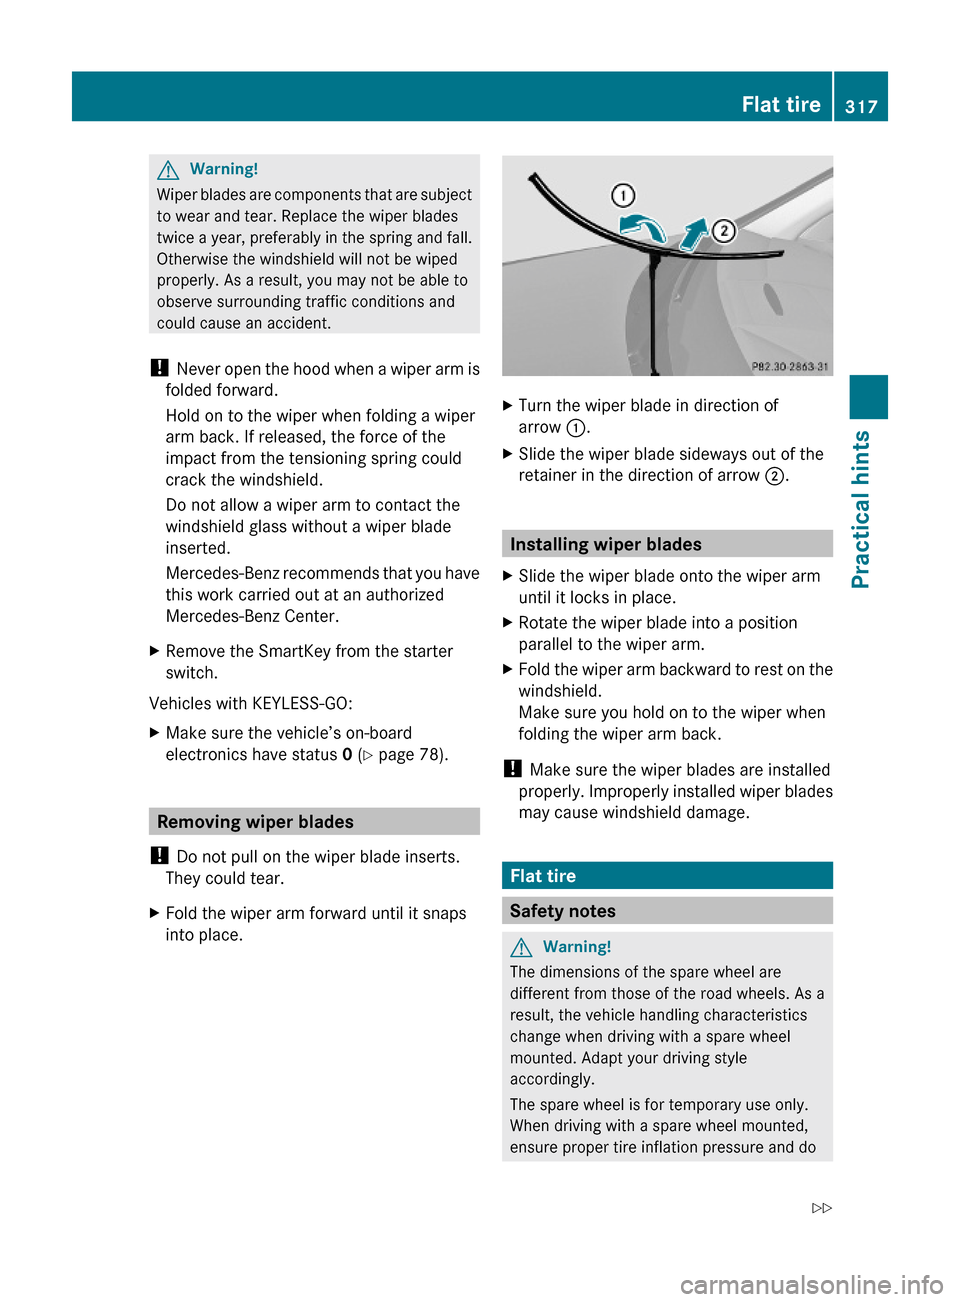
XFold the wiper arm forward until it snaps
into place.
XTurn the wiper blade in direction of
arrow :.
XSlide the wiper blade sideways out of the
retainer in the direction of arrow ;.
Installing wiper blades
XSlide the wiper blade onto the wiper arm
until it locks in place.
XRotate the wiper blade into a position
parallel to the wiper arm.
XFold the wiper arm backward to rest on the
windshield.
Make sure you hold on to the wiper when
folding the wiper arm back.
! Make sure the wiper blades are installed
properly. Improperly installed wiper blades
may cause windshield damage.
Flat tire
Safety notes
GWarning!
The dimensions of the spare wheel are
different from those of the road wheels. As a
result, the vehicle handling characteristics
change when driving with a spare wheel
mounted. Adapt your driving style
accordingly.
The spare wheel is for temporary use only.
When driving with a spare wheel mounted,
ensure proper tire inflation pressure and do
Flat tire317Practical hints204_AKB; 5; 23, en-USd2ureepe,Version: 2.11.8.12009-07-16T17:54:06+02:00 - Seite 317Z
Page 335 of 364
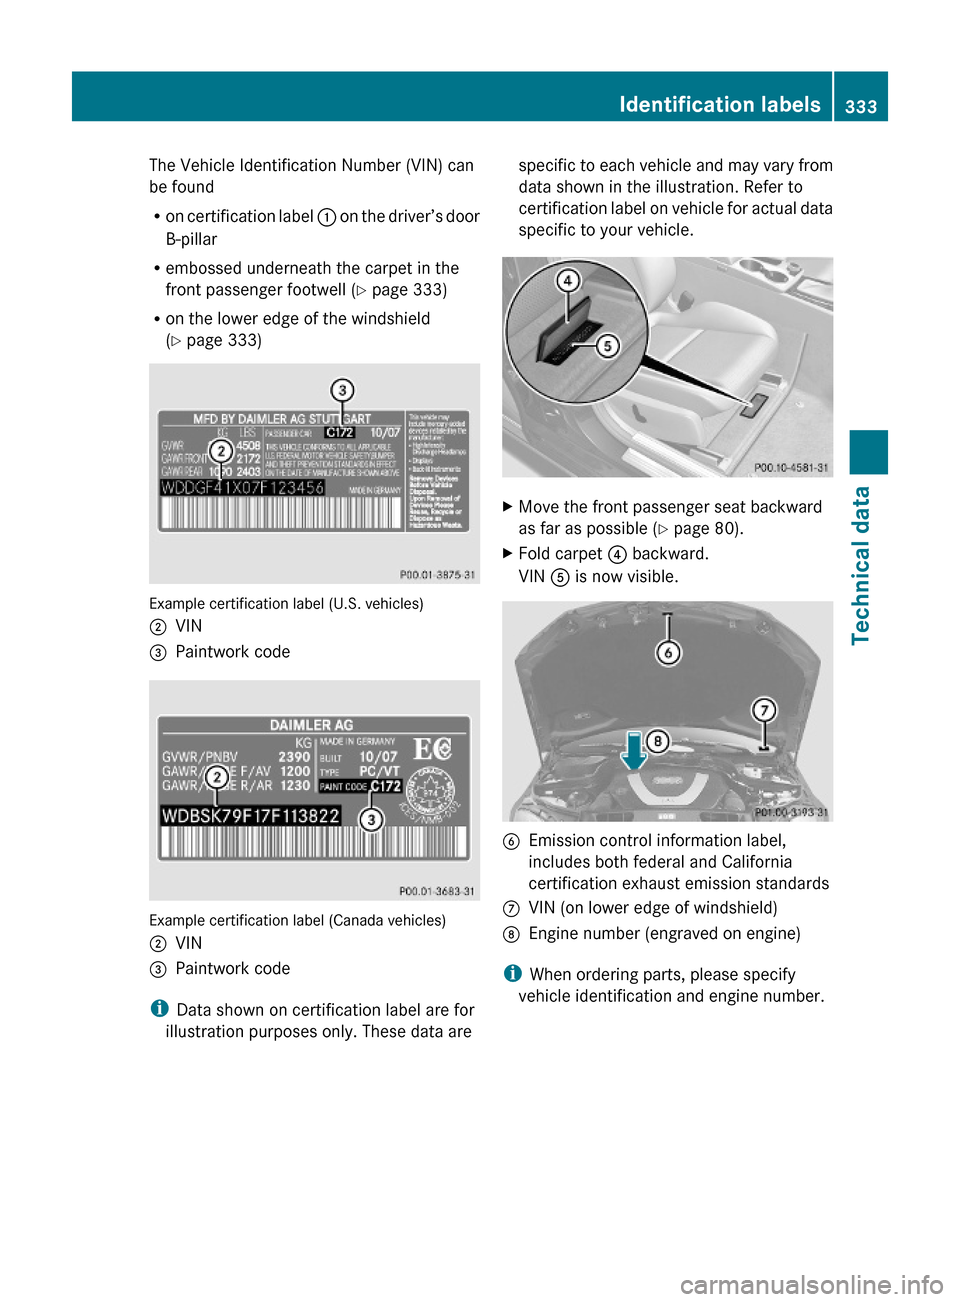
The Vehicle Identification Number (VIN) can
be found
Ron certification label : on the driver’s door
B-pillar
Rembossed underneath the carpet in the
front passenger footwell (Y page 333)
Ron the lower edge of the windshield
(Y page 333)
Example certification label (U.S. vehicles)
;VIN=Paintwork code
Example certification label (Canada vehicles)
;VIN=Paintwork code
iData shown on certification label are for
illustration purposes only. These data are
specific to each vehicle and may vary from
data shown in the illustration. Refer to
certification label on vehicle for actual data
specific to your vehicle.
XMove the front passenger seat backward
as far as possible (Y page 80).
XFold carpet ? backward.
VIN A is now visible.
BEmission control information label,
includes both federal and California
certification exhaust emission standards
CVIN (on lower edge of windshield)DEngine number (engraved on engine)
iWhen ordering parts, please specify
vehicle identification and engine number.
Identification labels333Technical data204_AKB; 5; 23, en-USd2ureepe,Version: 2.11.8.12009-07-16T17:54:06+02:00 - Seite 333Z
Page 354 of 364
![MERCEDES-BENZ C300 4MATIC 2010 W204 Owners Manual ModelCapacityFuels, coolants,
lubricants, etc.Fuel tankAll models17.4 US gal (66.0 l)Premium unleaded
gasoline (Minimum
Posted Octane 91
[Avg. of
96 RON/86 MON])
C 300, all models
(with automatic
tra MERCEDES-BENZ C300 4MATIC 2010 W204 Owners Manual ModelCapacityFuels, coolants,
lubricants, etc.Fuel tankAll models17.4 US gal (66.0 l)Premium unleaded
gasoline (Minimum
Posted Octane 91
[Avg. of
96 RON/86 MON])
C 300, all models
(with automatic
tra](/manual-img/4/3535/w960_3535-353.png)
ModelCapacityFuels, coolants,
lubricants, etc.Fuel tankAll models17.4 US gal (66.0 l)Premium unleaded
gasoline (Minimum
Posted Octane 91
[Avg. of
96 RON/86 MON])
C 300, all models
(with automatic
transmission):
Flexible Fuel
Vehicles (identified
by a label reading
Premium
gasoline or E85
only! on the fuel
filler flap).
Alternative fuel:
Ethanol fuel (E85)Fuel tank
reserveAll models,
except C 63 AMGapprox. 2.1 US gal (8.0 l)C 63 AMGapprox. 3.7 US gal (14.0 l)Air
conditioning
systemAll models—R134a refrigerant
and special
PAG lubricant oil
(never R 12)Washer
systemC 250 64
C 250 Sport 64
C 250 4MATIC 64
C 250 4MATIC Sport 644.2 US qt (4.0 l)MB Windshield
Washer
Concentrate 68
( Y page 358)
Washer fluid mixing
ratio ( Y page 358)C 300
C 300 Sport 65
C 350
C 350 Sport 653.7 US qt (3.5 l)Washer
system and
headlamp
cleaning
systemC 300 4MATIC
C 300 4MATIC Sport 65
C 350 4MATIC 64
C 63 AMG6.3 US qt (6.0 l)64 Canada only.
68 Mixed with water or commercially available premixed washer solvent/antifreeze.
65 USA only.352Fuels, coolants, lubricants, etc.Technical data
204_AKB; 5; 23, en-USd2ureepe,Version: 2.11.8.12009-07-16T17:54:06+02:00 - Seite 352
Page 360 of 364
Washer system and headlamp
cleaning systemGWarning!
Washer solvent/antifreeze is highly
flammable. Do not spill washer solvent/
antifreeze on hot engine parts, because it may
ignite and burn. You could be seriously
burned.
XUse MB Windshield Washer Concentrate
“MB SummerFit”.XMix with water for temperatures above
freezing point.XMix with commercially available premixed
washer solvent/antifreeze for
temperatures below freezing point.
Washer fluid mixing ratio
For temperatures above the freezing point:
1 part “MB SummerFit” to 100 parts water
(1.34 fl oz [40 ml] “MB SummerFit” to 1 gal
[4.0 l] water)
For temperatures below freezing point:
1 part “MB SummerFit” to 100 parts solvent
(1.34 fl oz [40 ml] “MB SummerFit” to 1 gal
[4.0 l] solvent)
358Fuels, coolants, lubricants, etc.Technical data
204_AKB; 5; 23, en-USd2ureepe,Version: 2.11.8.12009-07-16T17:54:06+02:00 - Seite 358