2010 MERCEDES-BENZ C300 4MATIC esc
[x] Cancel search: escPage 108 of 364
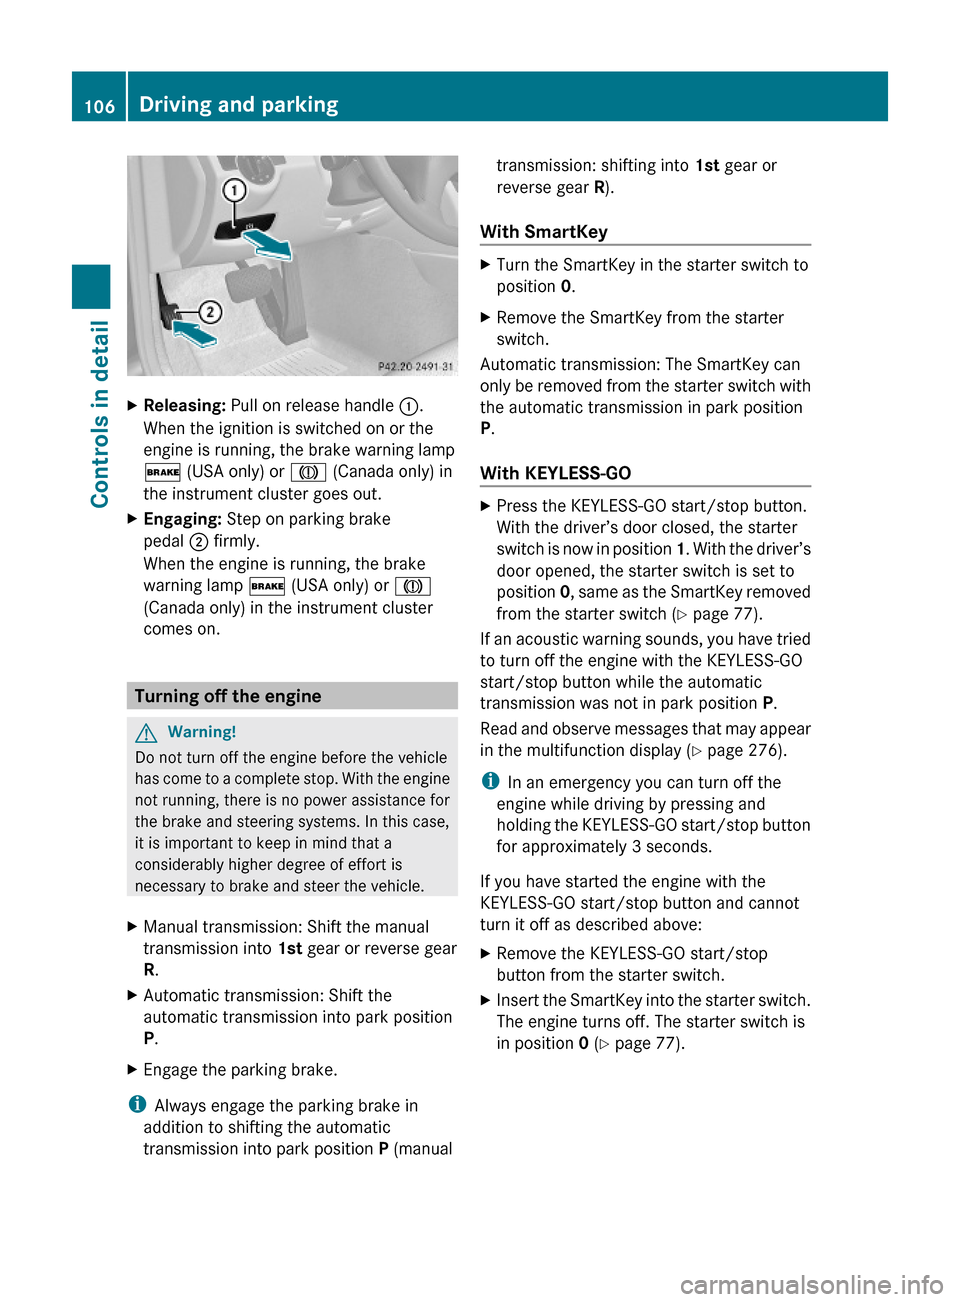
XReleasing: Pull on release handle :.
When the ignition is switched on or the
engine is running, the brake warning lamp
$ (USA only) or J (Canada only) in
the instrument cluster goes out.
XEngaging: Step on parking brake
pedal ; firmly.
When the engine is running, the brake
warning lamp $ (USA only) or J
(Canada only) in the instrument cluster
comes on.
Turning off the engine
GWarning!
Do not turn off the engine before the vehicle
has come to a complete stop. With the engine
not running, there is no power assistance for
the brake and steering systems. In this case,
it is important to keep in mind that a
considerably higher degree of effort is
necessary to brake and steer the vehicle.
XManual transmission: Shift the manual
transmission into 1st gear or reverse gear
R.
XAutomatic transmission: Shift the
automatic transmission into park position
P.
XEngage the parking brake.
iAlways engage the parking brake in
addition to shifting the automatic
transmission into park position P (manual
transmission: shifting into 1st gear or
reverse gear R).
With SmartKey
XTurn the SmartKey in the starter switch to
position 0.
XRemove the SmartKey from the starter
switch.
Automatic transmission: The SmartKey can
only be removed from the starter switch with
the automatic transmission in park position
P.
With KEYLESS-GO
XPress the KEYLESS-GO start/stop button.
With the driver’s door closed, the starter
switch is now in position 1. With the driver’s
door opened, the starter switch is set to
position 0, same as the SmartKey removed
from the starter switch (Y page 77).
If an acoustic warning sounds, you have tried
to turn off the engine with the KEYLESS-GO
start/stop button while the automatic
transmission was not in park position P.
Read and observe messages that may appear
in the multifunction display (Y page 276).
iIn an emergency you can turn off the
engine while driving by pressing and
holding the KEYLESS-GO start/stop button
for approximately 3 seconds.
If you have started the engine with the
KEYLESS-GO start/stop button and cannot
turn it off as described above:
XRemove the KEYLESS-GO start/stop
button from the starter switch.
XInsert the SmartKey into the starter switch.
The engine turns off. The starter switch is
in position 0 (Y page 77).
106Driving and parkingControls in detail
204_AKB; 5; 23, en-USd2ureepe,Version: 2.11.8.12009-07-16T17:54:06+02:00 - Seite 106
Page 138 of 364
Activating easy-entry/exit feature
Use this function to activate and deactivate
the easy-entry/exit feature (Y page 85).
GWarning!
You must make sure no one can become
trapped or injured by the moving steering
wheel when the easy-entry/exit feature is
activated.
To stop steering wheel movement, move
steering wheel adjustment stalk or press one
of the memory position buttons.
Do not leave children unattended in the
vehicle, or with access to an unlocked vehicle.
Children could open the driver’s door and
unintentionally activate the easy-entry/exit
feature, which could result in an accident
and/or serious personal injury.
XPress button = or ; to select the
Settings menu.
XPress button : or 9 to select the
Convenience submenu.
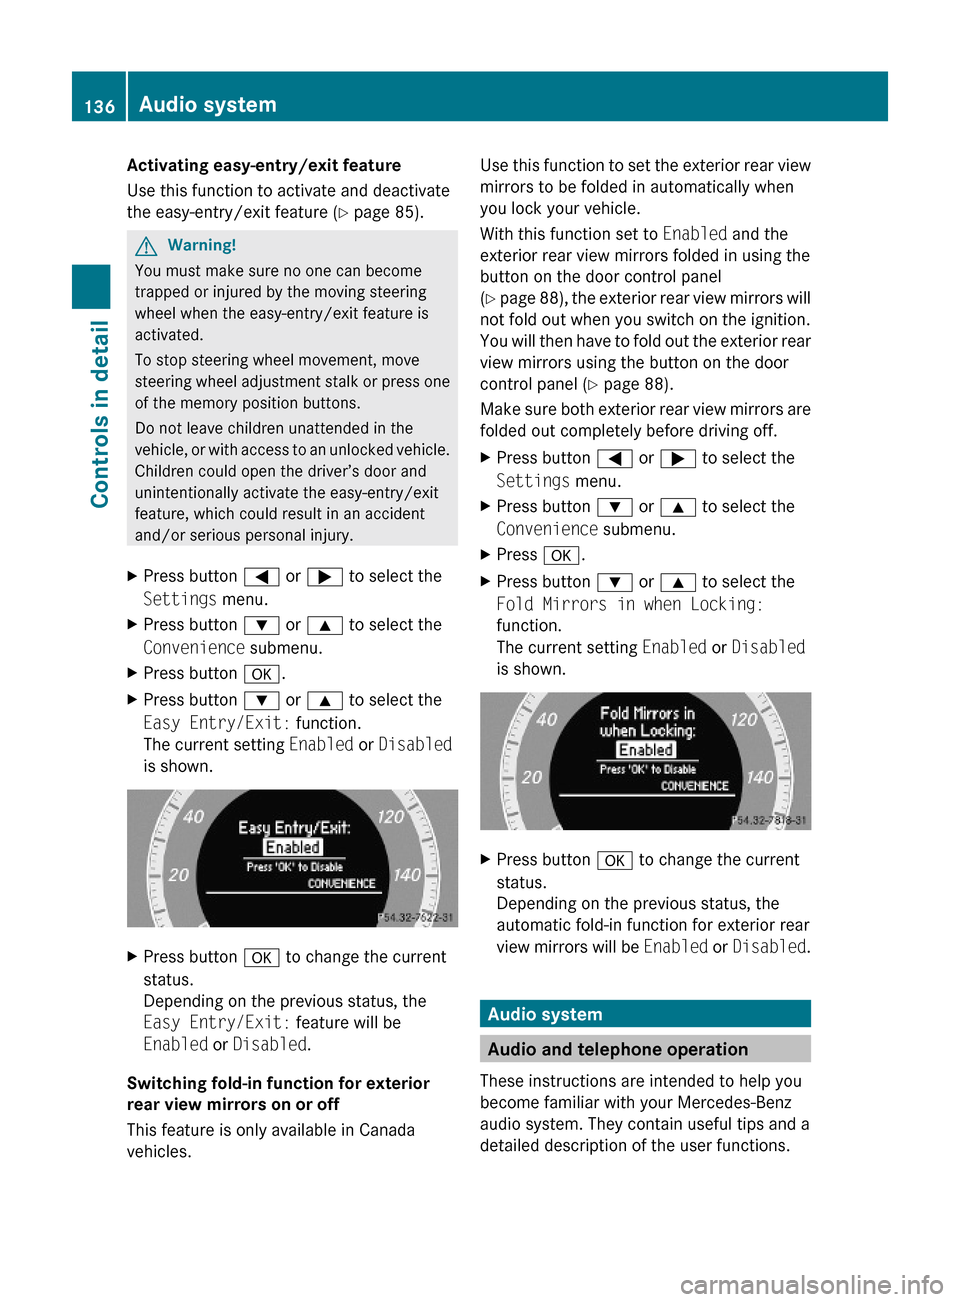
XPress button a.XPress button : or 9 to select the
Easy Entry/Exit: function.
The current setting Enabled or Disabled
is shown.
XPress button a to change the current
status.
Depending on the previous status, the
Easy Entry/Exit: feature will be
Enabled or Disabled.
Switching fold-in function for exterior
rear view mirrors on or off
This feature is only available in Canada
vehicles.
Use this function to set the exterior rear view
mirrors to be folded in automatically when
you lock your vehicle.
With this function set to Enabled and the
exterior rear view mirrors folded in using the
button on the door control panel
(Y page 88), the exterior rear view mirrors will
not fold out when you switch on the ignition.
You will then have to fold out the exterior rear
view mirrors using the button on the door
control panel (Y page 88).
Make sure both exterior rear view mirrors are
folded out completely before driving off.
XPress button = or ; to select the
Settings menu.
XPress button : or 9 to select the
Convenience submenu.
XPress a.XPress button : or 9 to select the
Fold Mirrors in when Locking:
function.
The current setting Enabled or Disabled
is shown.
XPress button a to change the current
status.
Depending on the previous status, the
automatic fold-in function for exterior rear
view mirrors will be Enabled or Disabled.
Audio system
Audio and telephone operation
These instructions are intended to help you
become familiar with your Mercedes-Benz
audio system. They contain useful tips and a
detailed description of the user functions.
136Audio systemControls in detail
204_AKB; 5; 23, en-USd2ureepe,Version: 2.11.8.12009-07-16T17:54:06+02:00 - Seite 136
Page 142 of 364
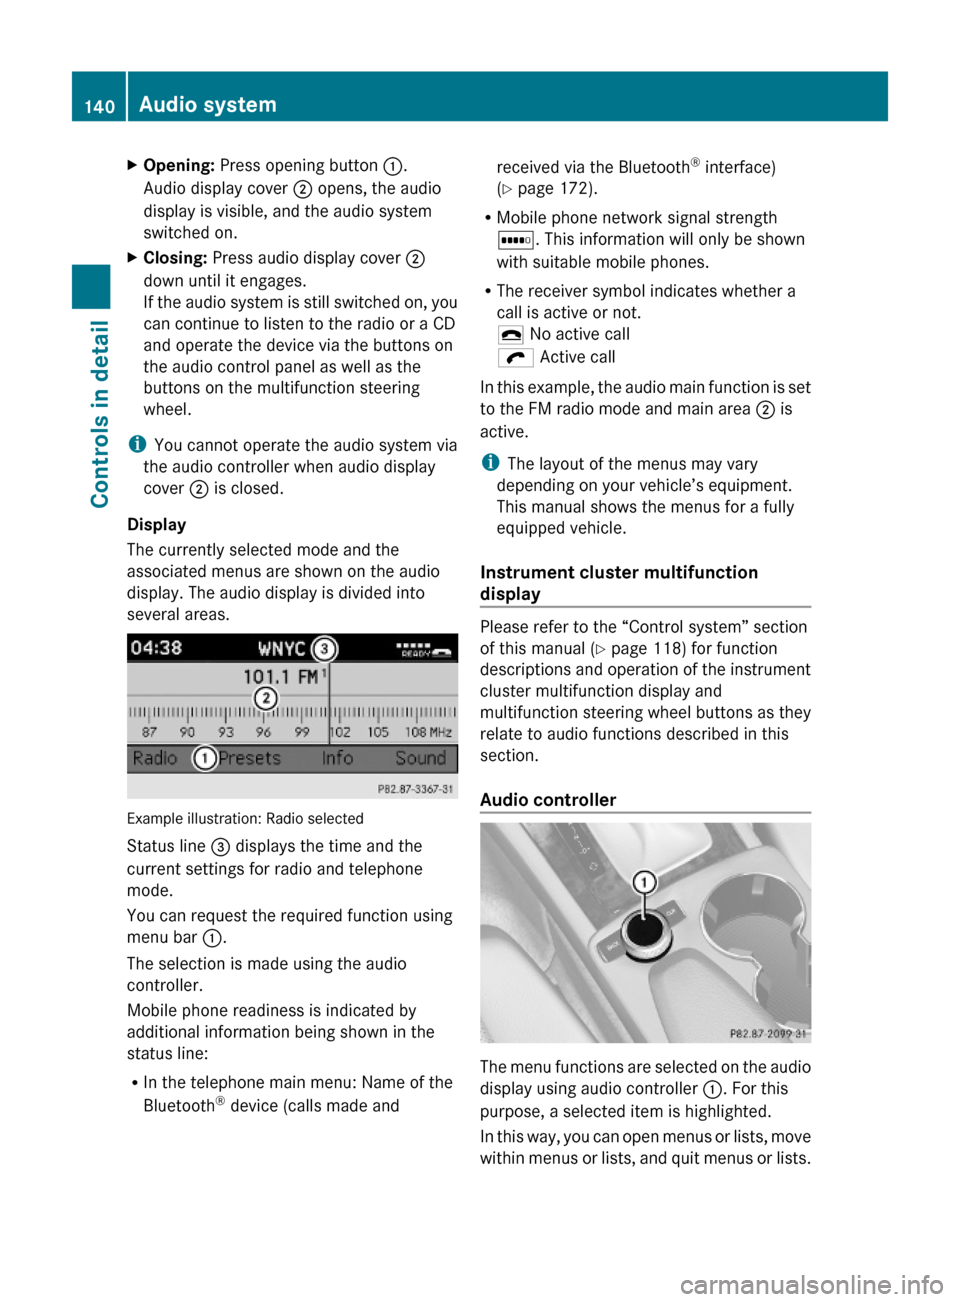
XOpening: Press opening button :.
Audio display cover ; opens, the audio
display is visible, and the audio system
switched on.
XClosing: Press audio display cover ;
down until it engages.
If the audio system is still switched on, you
can continue to listen to the radio or a CD
and operate the device via the buttons on
the audio control panel as well as the
buttons on the multifunction steering
wheel.
iYou cannot operate the audio system via
the audio controller when audio display
cover ; is closed.
Display
The currently selected mode and the
associated menus are shown on the audio
display. The audio display is divided into
several areas.
Example illustration: Radio selected
Status line = displays the time and the
current settings for radio and telephone
mode.
You can request the required function using
menu bar :.
The selection is made using the audio
controller.
Mobile phone readiness is indicated by
additional information being shown in the
status line:
RIn the telephone main menu: Name of the
Bluetooth® device (calls made and
received via the Bluetooth® interface)
(Y page 172).
RMobile phone network signal strength
r. This information will only be shown
with suitable mobile phones.
RThe receiver symbol indicates whether a
call is active or not.
¢ No active call
ö Active call
In this example, the audio main function is set
to the FM radio mode and main area ; is
active.
iThe layout of the menus may vary
depending on your vehicle’s equipment.
This manual shows the menus for a fully
equipped vehicle.
Instrument cluster multifunction
display
Please refer to the “Control system” section
of this manual (Y page 118) for function
descriptions and operation of the instrument
cluster multifunction display and
multifunction steering wheel buttons as they
relate to audio functions described in this
section.
Audio controller
The menu functions are selected on the audio
display using audio controller :. For this
purpose, a selected item is highlighted.
In this way, you can open menus or lists, move
within menus or lists, and quit menus or lists.
140Audio systemControls in detail
204_AKB; 5; 23, en-USd2ureepe,Version: 2.11.8.12009-07-16T17:54:06+02:00 - Seite 140
Page 145 of 364
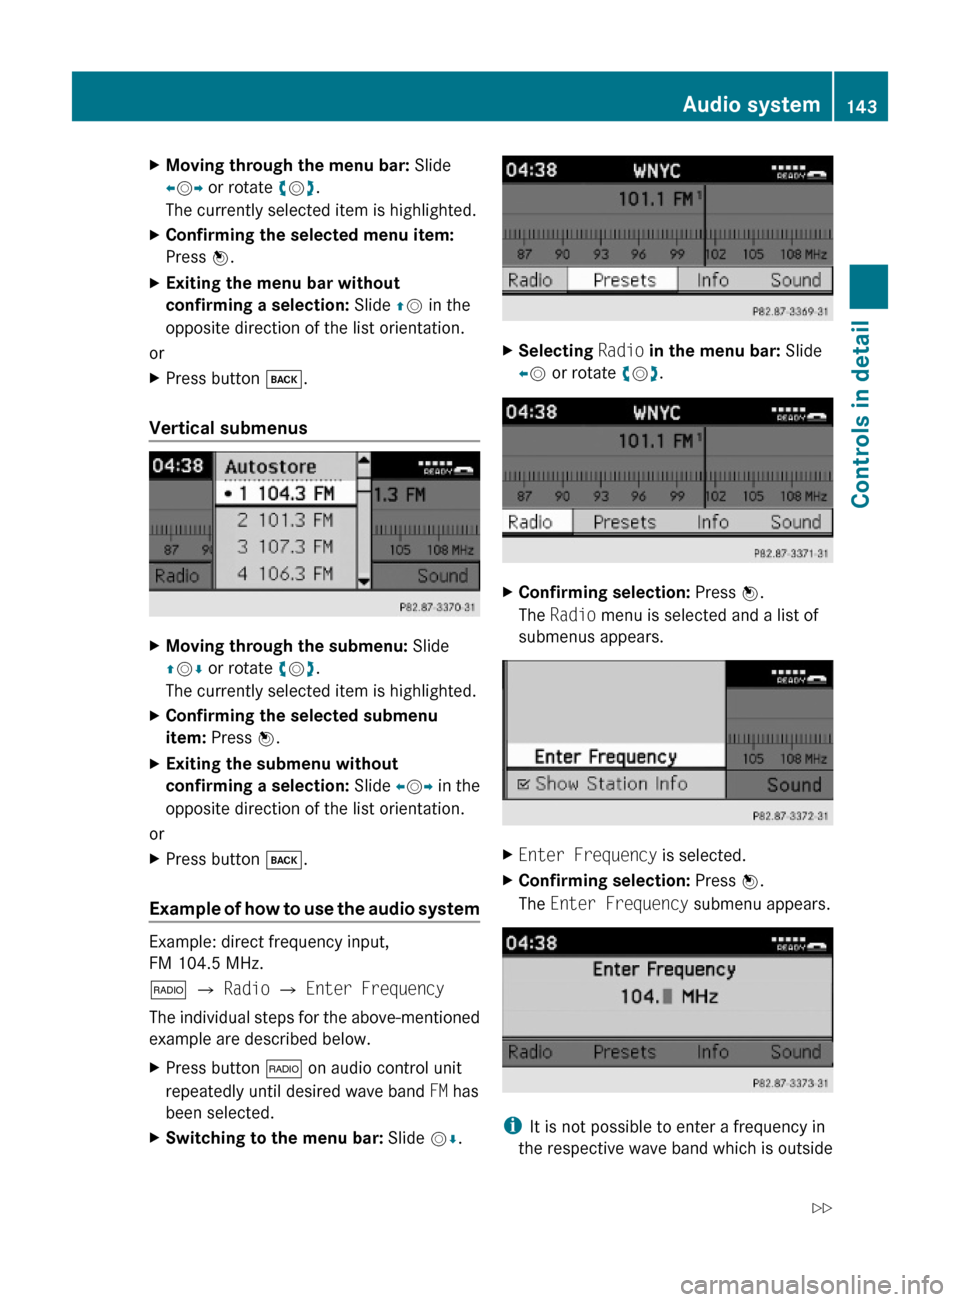
XMoving through the menu bar: Slide
XVY or rotate cVd.
The currently selected item is highlighted.
XConfirming the selected menu item:
Press W.
XExiting the menu bar without
confirming a selection: Slide ZV in the
opposite direction of the list orientation.
or
XPress button k.
Vertical submenus
XMoving through the submenu: Slide
ZVÆ or rotate cVd.
The currently selected item is highlighted.
XConfirming the selected submenu
item: Press W.
XExiting the submenu without
confirming a selection: Slide XVY in the
opposite direction of the list orientation.
or
XPress button k.
Example of how to use the audio system
Example: direct frequency input,
FM 104.5 MHz.
$ Q Radio Q Enter Frequency
The individual steps for the above-mentioned
example are described below.
XPress button $ on audio control unit
repeatedly until desired wave band FM has
been selected.
XSwitching to the menu bar: Slide VÆ.XSelecting Radio in the menu bar: Slide
XV or rotate cVd.
XConfirming selection: Press W.
The Radio menu is selected and a list of
submenus appears.
XEnter Frequency is selected.XConfirming selection: Press W.
The Enter Frequency submenu appears.
iIt is not possible to enter a frequency in
the respective wave band which is outside
Audio system143Controls in detail204_AKB; 5; 23, en-USd2ureepe,Version: 2.11.8.12009-07-16T17:54:06+02:00 - Seite 143Z
Page 146 of 364
the frequency range. Frequencies within
the current frequency range, but outside
the current frequency step width are
rounded to the next lower allowed
frequency.
XEnter 1045 with the keypad on the audio
control unit.
The audio system tunes in to the frequency
entered.
Operation
In the following description, an operation step
is described as in the example below.
X$ Q Radio Q Enter Frequency
is the short for
XPress button $ on audio control unit
repeatedly until desired wave band has
been selected.
XSlide VÆ.XSlide XV or rotate cVd the audio
controller to select Radio.
XPress the audio controller W.
The Radio menu is selected and a list of
submenus appears.
XSlide ZV or rotate cVd the audio
controller to select Enter Frequency.
XPress the audio controller W.
The Enter Frequency submenu appears
in the audio display.
Switching audio system on or off
XSwitching on: Press push button q.
or
XOpen the audio display cover.
or
XIf the audio system was on as you switched
off the ignition, turn the SmartKey in the
starter switch to position 1.
The audio system will come back on with
the last selected function.
iIf the audio system is switched on without
the SmartKey in the starter switch, it will
automatically switch off again after
approximately 30 minutes.
XSwitching off: Press push button q.
or
XTurn the SmartKey in the starter switch to
position 0 and remove SmartKey from
starter switch.
iShould excessively high temperatures
occur while the audio system is being
operated, Temperature Too High -
Device switching off now. will appear
in the audio display, after which the audio
system will be switched off for a cooling-
down period.
iWhen you switch off the audio system,
you also switch off the currently playing
audio source. Also, telephone operation via
the audio control unit is not possible.
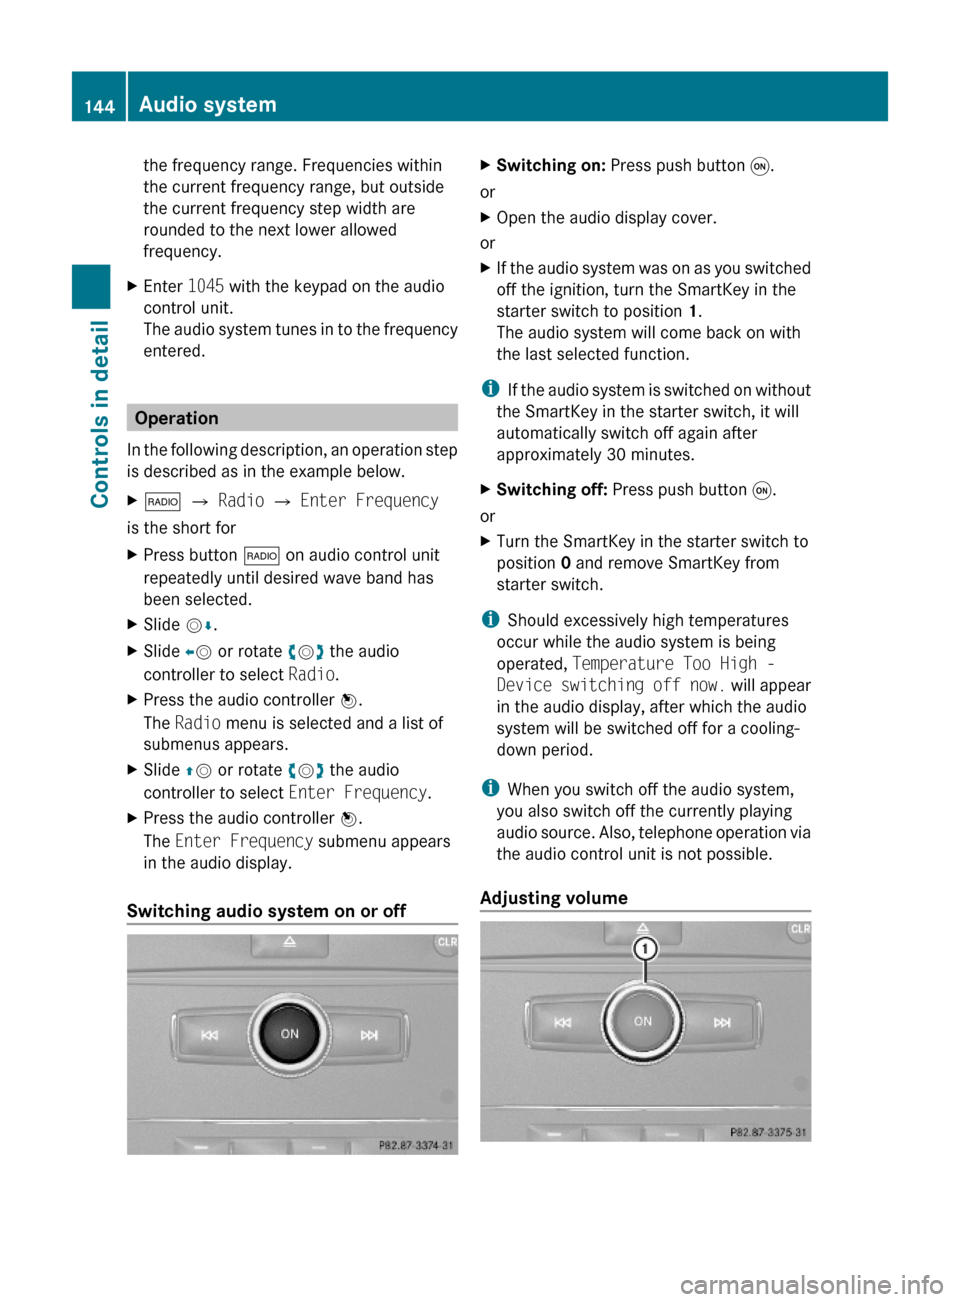
Adjusting volume
144Audio systemControls in detail
204_AKB; 5; 23, en-USd2ureepe,Version: 2.11.8.12009-07-16T17:54:06+02:00 - Seite 144
Page 154 of 364
XPress button $ on audio control unit
repeatedly until desired wave band has
been selected.
The basic menu appears in the audio
display.XPress W when the main area is active.
or
XSelect Presets .
The station memory display appears in the
audio display.XSlide ZV Æ or rotate cV d to select
Autostore .XPress W.
The audio system searches for receivable
stations. A corresponding message is
displayed. The available stations are
automatically stored in the station
memory. The first received station will be
automatically played.XCanceling storage procedure: Select
Cancel and press W while the message
Rewriting Memory... is being displayed.
Displaying information
You can display program information or other
additional information when provided by the
radio station you are listening to.
X$ Q Info (if available).
The available information appears. The
content and scope of the information
depends on the radio station.XClosing screen: Slide XV Y, rotate cV d,
press W or press button k.
Satellite radio
GWarning!
Please devote your attention first and
foremost to the traffic situation you are in.
Before your journey, please familiarize
yourself with the radio functions.
Only use the audio system when road and
traffic conditions permit you to do so.
Otherwise you could be involved in an
accident in which you or others could be
injured.
Submenu overview
i The components and operating principles
of the audio system can be found on
( Y page 137) and ( Y page 143).
MenuSubmenuSatChannel ListEnter ChannelServicePresetsStation presetsInfoInformation menu (if
available)Category (Cat.)All channelsSelect categorySoundTrebleBassBalance/FaderSurround Sound
Satellite radio
i Additional satellite radio equipment and a
subscription to SIRIUS XM Satellite Radio
service provider are required for the
satellite radio operation described in this
chapter.
Contact an authorized Mercedes-Benz
Center for details and availability for your
vehicle.
SIRIUS XM Satellite Radio provides over
130 channels of digital-quality radio,
including 100 % commercial-free music,
sports, news and entertainment. SIRIUS XM
Satellite Radio uses a fleet of high-power
152Audio systemControls in detail
204_AKB; 5; 23, en-USd2ureepe,Version: 2.11.8.12009-07-16T17:54:06+02:00 - Seite 152
Page 155 of 364
satellites to broadcast 24 hours per day,
coast to coast, in the contiguous U. S. and
Canada.
This diverse, satellite-delivered programming
is available for a monthly subscription fee.
For more information and service availability
call the SIRIUS XM Service Center at
1-888-539-7474 (Y page 157), or visit
www.sirius.com (USA) or
www.siriuscanada.ca (Canada).
iNote that categories and channels shown
in illustrations are dependent on
programming content delivered by the
service provider. Programming content is
subject to change. Therefore, channels and
categories shown in illustrations and
descriptions contained in this manual may
differ from the channels and categories
delivered by the service provider.
iSatellite radio service may be unavailable
or interrupted from time to time for a
variety of reasons, such as environmental
or topographic conditions and other things
we cannot control. Service might also not
be available in certain places (e.g. in
tunnels, parking garages, under leafy trees,
or within or next to buildings) or near other
obstructions. In such situations, the
satellite radio’s main menu shows the No
Service screen. At this point, the radio’s
functions are restricted.
Subscribing to satellite radio
XPress button $ on audio control unit
repeatedly until Sat is selected.
The following conditions are possible:
RSatellite radio service is not activated
(only the preview channel is displayed).
RSatellite radio service is activated.
iIf a satellite receiver is not installed or not
properly installed:
The message Device Unavailable will
appear.
If the satellite radio service is not activated,
the “SIRIUS Preview” display appears.
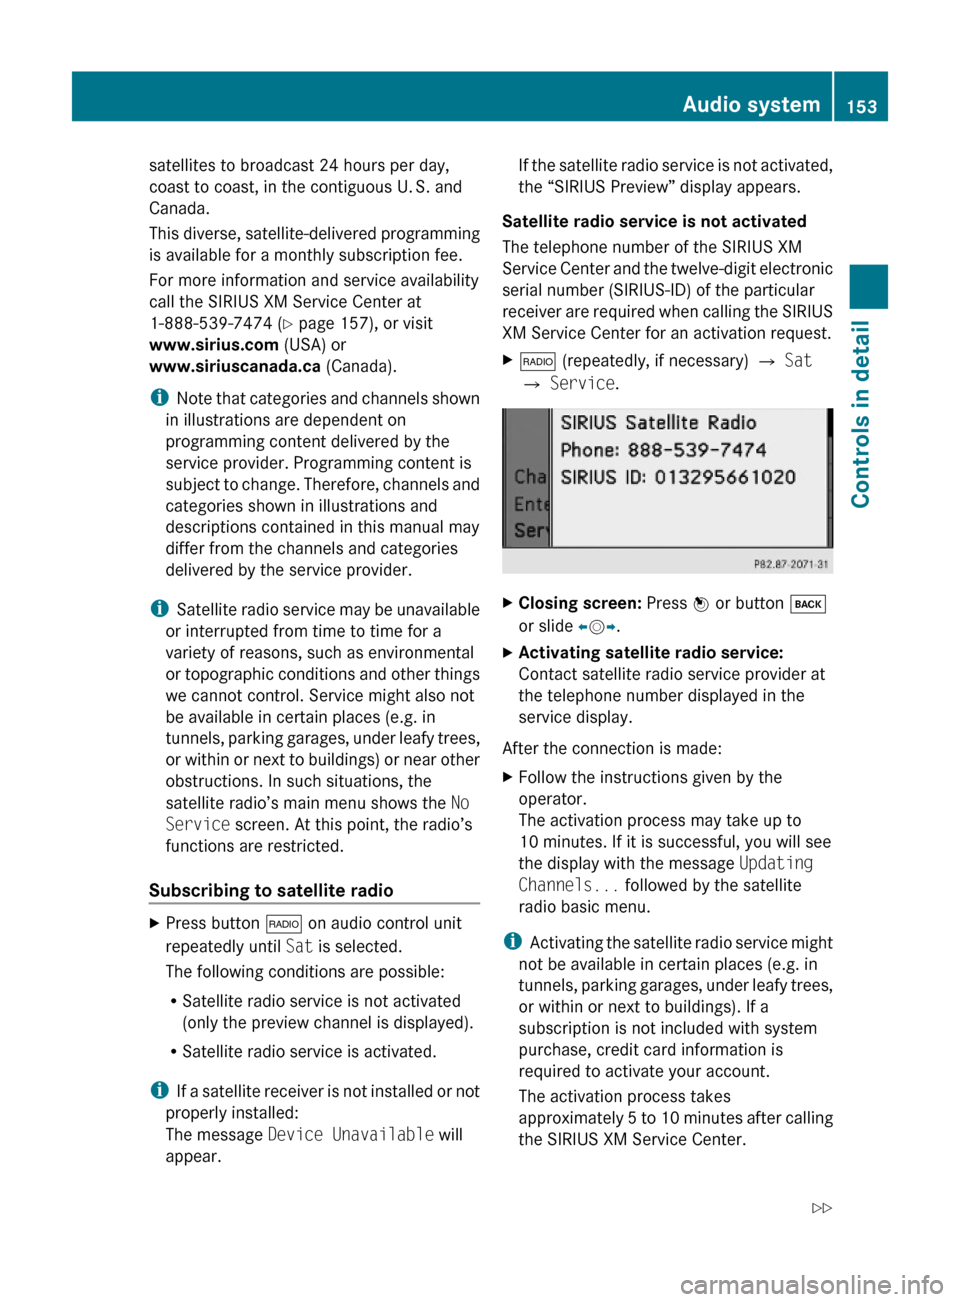
Satellite radio service is not activated
The telephone number of the SIRIUS XM
Service Center and the twelve-digit electronic
serial number (SIRIUS-ID) of the particular
receiver are required when calling the SIRIUS
XM Service Center for an activation request.
X$ (repeatedly, if necessary) Q Sat
Q Service.
XClosing screen: Press W or button k
or slide XVY.
XActivating satellite radio service:
Contact satellite radio service provider at
the telephone number displayed in the
service display.
After the connection is made:
XFollow the instructions given by the
operator.
The activation process may take up to
10 minutes. If it is successful, you will see
the display with the message Updating
Channels... followed by the satellite
radio basic menu.
iActivating the satellite radio service might
not be available in certain places (e.g. in
tunnels, parking garages, under leafy trees,
or within or next to buildings). If a
subscription is not included with system
purchase, credit card information is
required to activate your account.
The activation process takes
approximately 5 to 10 minutes after calling
the SIRIUS XM Service Center.
Audio system153Controls in detail204_AKB; 5; 23, en-USd2ureepe,Version: 2.11.8.12009-07-16T17:54:06+02:00 - Seite 153Z
Page 156 of 364
If a satellite receiver is not installed or not
properly installed: The message Device
Unavailable will appear.
iIt is also possible to activate the satellite
radio service online. To do so please visit
SIRIUS XM Satellite Radio’s website at
www.sirius.com (USA) or
www.siriuscanada.ca (Canada).
Preview Channel
iIf the satellite radio service has not been
subscribed to, only the preview channel is
available. You cannot tune in another
channel. If you try to do this, the message
Call SIRIUS to activate: appears.
Satellite radio service is activated
The basic satellite radio menu appears. You
will hear the last tuned channel, provided that
it can be received.
Switching on Sat mode
For important subscription information see
“Subscribing to satellite radio” (Y page 153).
XPress button $ on audio control unit
repeatedly until Sat is selected.
The message No Service will appear when
the signal is not available. After the audio
system acquires the signal, the satellite
radio basic menu will appear. The last
tuned station will begin to play.
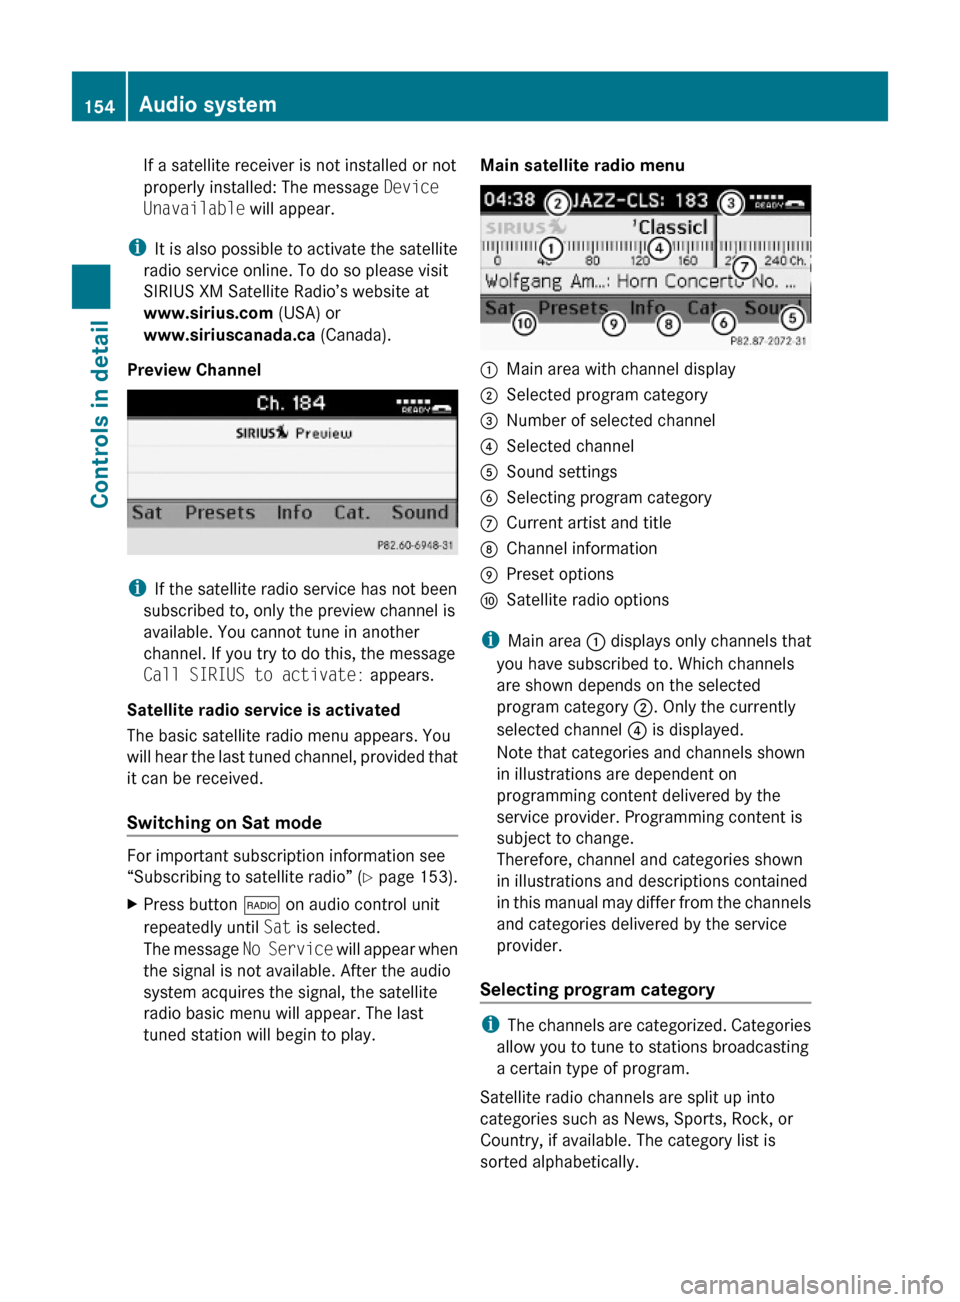
Main satellite radio menu:Main area with channel display;Selected program category=Number of selected channel?Selected channelASound settingsBSelecting program categoryCCurrent artist and titleDChannel informationEPreset optionsFSatellite radio options
iMain area : displays only channels that
you have subscribed to. Which channels
are shown depends on the selected
program category ;. Only the currently
selected channel ? is displayed.
Note that categories and channels shown
in illustrations are dependent on
programming content delivered by the
service provider. Programming content is
subject to change.
Therefore, channel and categories shown
in illustrations and descriptions contained
in this manual may differ from the channels
and categories delivered by the service
provider.
Selecting program category
iThe channels are categorized. Categories
allow you to tune to stations broadcasting
a certain type of program.
Satellite radio channels are split up into
categories such as News, Sports, Rock, or
Country, if available. The category list is
sorted alphabetically.
154Audio systemControls in detail
204_AKB; 5; 23, en-USd2ureepe,Version: 2.11.8.12009-07-16T17:54:06+02:00 - Seite 154