2010 MERCEDES-BENZ C300 4MATIC center console
[x] Cancel search: center consolePage 157 of 364
XCalling up category list: $
(repeatedly, if necessary) Q Cat .
or
XIn Sat mode, slide XV Y or rotate cV d until
Cat. is highlighted and press W.
The category list appears.XSelecting a category: Slide ZV Æ or rotate
c V d.XSetting the selected category: Press W.
The selected program category
(alphabetical order) will appear in the audio
display. The last tuned channel in the new
category will begin to play.
When searching, tuning in, or selecting
from the channel list, the All Channels
option accesses all of your subscribed
channels.
i When you select the category All
Channels , you have access to all the
channels you subscribed to, regardless of
category.
Tuning in channels
You have the following selection options:
R the channel search function
R the manual channel number entry
R the channel list
R the channel presets
Tuning in channels using channel search
function
XSlide XV Y or rotate cV d when the main
area in the basic menu is active.
Depending on the direction in which the
controller is being slid or rotated, the
system searches upward or downward and
stops at the next subscribed channel.
or
XPress button E or F on audio control
unit.
Depending on the pressed button, the
system searches upward or downward and
stops at the next subscribed channel.i Which channels are available depends on
which channels you have subscribed to and
the program category you have selected
( Y page 154). For tuning in channels you
can also use the buttons on the
multifunction steering wheel, see “Audio
menu” ( Y page 126).
Tuning in channels using manual channel
number entryX$ (repeatedly, if necessary) Q Sat
Q Enter Channel .
The menu for manual channel number entry
appears.
or
XIn Sat mode, press button l on the
keypad in audio control unit briefly.XChannel number entry with keypad:
Enter desired channel number with buttons
k to x with the keypad in audio
control unit briefly.
Further operation depends on whether the
selected channel number is valid or if the
channel is included in your subscription.
XExiting menu without making an entry:
Press button k in the center console
( Y page 141).
Channel number is valid and channel is
included in subscription: The audio system
tunes in the channel entered.
Channel number is invalid: The message
Invalid Channel appears in the audio
display.
XThe message disappears automatically or
press W to close the message.
Channel number is valid, but channel is
not included in subscription: The message
Call SIRIUS to activate: appears
( Y page 153).
XPress W to close the message in the audio
display.Audio system155Controls in detail204_AKB; 5; 23, en-USd2ureepe,Version: 2.11.8.12009-07-16T17:54:06+02:00 - Seite 155Z
Page 165 of 364
XPress button h, or load/eject
button ; (Y page 161) on the audio
control unit to finish the loading process.
The CD changer plays the disc if it has been
inserted correctly and is permissible.
XInterrupting loading procedure: Press
load/eject button ; again.
or
XPress button k in the center console
(Y page 141).
XFilling an empty magazine
compartment: Press load/eject
button ;.
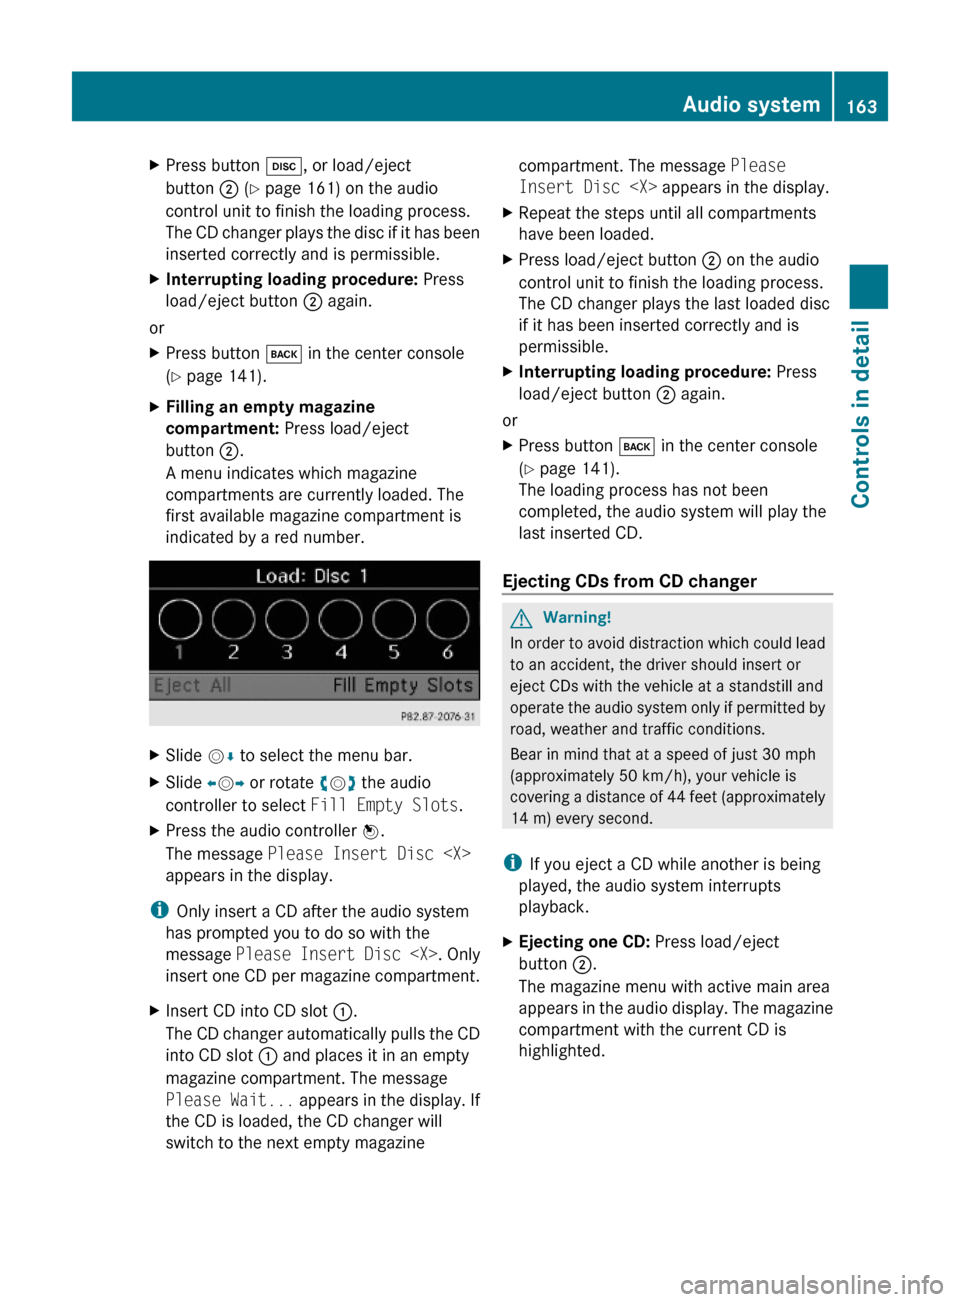
A menu indicates which magazine
compartments are currently loaded. The
first available magazine compartment is
indicated by a red number.
XSlide VÆ to select the menu bar.XSlide XVY or rotate cVd the audio
controller to select Fill Empty Slots.
XPress the audio controller W.
The message Please Insert Disc
appears in the display.
iOnly insert a CD after the audio system
has prompted you to do so with the
message Please Insert Disc
insert one CD per magazine compartment.
XInsert CD into CD slot :.
The CD changer automatically pulls the CD
into CD slot : and places it in an empty
magazine compartment. The message
Please Wait... appears in the display. If
the CD is loaded, the CD changer will
switch to the next empty magazine
compartment. The message Please
Insert Disc
XRepeat the steps until all compartments
have been loaded.
XPress load/eject button ; on the audio
control unit to finish the loading process.
The CD changer plays the last loaded disc
if it has been inserted correctly and is
permissible.
XInterrupting loading procedure: Press
load/eject button ; again.
or
XPress button k in the center console
(Y page 141).
The loading process has not been
completed, the audio system will play the
last inserted CD.
Ejecting CDs from CD changer
GWarning!
In order to avoid distraction which could lead
to an accident, the driver should insert or
eject CDs with the vehicle at a standstill and
operate the audio system only if permitted by
road, weather and traffic conditions.
Bear in mind that at a speed of just 30 mph
(approximately 50 km/h), your vehicle is
covering a distance of 44 feet (approximately
14 m) every second.
iIf you eject a CD while another is being
played, the audio system interrupts
playback.
XEjecting one CD: Press load/eject
button ;.
The magazine menu with active main area
appears in the audio display. The magazine
compartment with the current CD is
highlighted.
Audio system163Controls in detail204_AKB; 5; 23, en-USd2ureepe,Version: 2.11.8.12009-07-16T17:54:06+02:00 - Seite 163Z
Page 170 of 364
iThe functions and services available to
you while using the mobile phone depend
on your service provider and the type of
mobile phone you are using. Also see
separate operating manual of your mobile
phone for instructions on how to use your
mobile phone.
When the mobile phone is connected via the
Bluetooth ®
interface to the audio system, you
can operate the mobile phone using the
following devices:
R Audio system ( Y page 177)
- Audio controller
- Audio control unit
R Buttons 6 and ~ on the
multifunction steering wheel ( Y page 118)
R Mobile phone keypad or similar input
device
Please note that these functions are only
available with Mercedes-Benz approved
mobile phones.
TEL MenuMenuFunctionTelephoneBluetooth ®
PhonesReceive Business
Card(s) (vCards)Delete external dataNamePhone bookCall lists
Microphone off/
onCall Lists or Mic On/
Mic OffDelete Call Lists
General notes
Making calls via Bluetooth ®
interface
The audio system telephone function via the
Bluetooth ®
interface is available in
conjunction with a Bluetooth ®
enabled
mobile phone.
With a suitable mobile phone, you can use the
hands-free device and receive electronic
business cards (vCards) via the Bluetooth ®
interface.
Calls disconnected while the vehicle is in
motion
Interruptions to the connection may occur if
R there is insufficient mobile network
coverage
R you move from one mobile network
transmitter/receiver area (mobile network
cell) into another and no channels are free
or the cell is full
R you are using a SIM card that is not
compatible with the available network
R when using a mobile phone with
“Twincard”, the mobile phone is
simultaneously logged into the network
with the second SIM card
Operating options
i The components and operating principles
of the audio system can be found on
( Y page 137) and ( Y page 143).
When the mobile phone is connected via the
Bluetooth ®
interface to the audio system, you
can operate the mobile phone using the
following devices:
R Buttons 6 and ~ and keypad on
audio control unit ( Y page 138)
R Audio controller in center console
( Y page 140)
R Multifunction steering wheel ( Y page 118)
Please note that these functions are only
available with Mercedes-Benz approved
mobile phones. Please contact an authorized
Mercedes-Benz Center for information on
features available for your mobile phone of
choice.
i In order for the functions described in this
section to work correctly, the Bluetooth ®
telephone must be linked to the audio168Audio systemControls in detail
204_AKB; 5; 23, en-USd2ureepe,Version: 2.11.8.12009-07-16T17:54:06+02:00 - Seite 168
Page 173 of 364
iThe passcode is any one- to sixteen-digit
number, which you can set yourself. For the
quality of coding of the connection it is
recommend to use a passcode of at least
four digits. You must enter the same
passcode into the audio system and the
device to be authorized. Also refer to the
operating instructions of the mobile phone.
On the audio system, you can enter the
passcode via the digits in the on-screen menu
bar or via the telephone keypad in the audio
control unit.
With the audio controller:XEntering passcode: Select the digits in the
menu bar one by one, by sliding XV Y or
rotating cV d the audio controller.XPress W to confirm each digit.XConfirming passcode: Select ¬ in the
menu bar and press W to confirm.XDeleting digits: Select 2 in the menu
bar and briefly press W to delete one digit,
or press and hold W to delete all entered
digits.XCanceling entry: Press button k in the
center console ( Y page 141).
With keypad on audio control unit:
XEntering passcode: Press the desired
numbers on the keypad.XConfirming passcode: Press button
6 or button m in the audio control
unit to confirm.XDeleting digits: Briefly press button
2 in the audio control unit to delete one
number, or press and hold button 2 to
delete all entered numbers.XCanceling entry: Press button k in the
center console ( Y page 141).
Entering passcode into the mobile phone
If a Bluetooth ®
connection is established
successfully, you will be prompted to enter a
code into the mobile phone (see mobile
phone operating instructions).
XEnter the same passcode on the mobile
phone as you did on the audio system.
i You may need to confirm the authorizing
on the mobile phone. Check your mobile
phone display.
If the message Authorization
Procedure Unsuccessful appears on the
audio system display, you may have
exceeded the preset period for
authorization. Repeat the process.
The device is authorized. You can now make
calls via the audio system hands-free device
using the authorized mobile phone.
External authorization
If the audio system cannot find your mobile
phone, this may be due to special security
settings on your mobile phone. In this case,
you can check whether, conversely, your
mobile phone can find the audio system. The
audio system’s Bluetooth ®
device name is
“MB Bluetooth”.
X% Q Tel Q Bluetooth Phones
Q Update Q Options Q External
Authorization .
The message Ready for External
Authorization appears.XStart Bluetooth®
search procedure on the
mobile phone (see mobile phone operating
instructions).XSelect the audio system (“MB Bluetooth”)
at your mobile phone.XWhen prompted to do so, enter the
passcode on the mobile phone and then on
the audio system.
Displaying details on a mobile phone
X% Q Tel Q Bluetooth Phones .XSelect the mobile phone from the list.Audio system171Controls in detail204_AKB; 5; 23, en-USd2ureepe,Version: 2.11.8.12009-07-16T17:54:06+02:00 - Seite 171Z
Page 176 of 364
Placing a “911” emergency call with the
mobile phone locked
iIf the mobile phone is locked, you only can
make an emergency call on the mobile
phone itself, without the use of the audio
control unit.
Phone book
You can save telephone numbers in the audio
system’s phone book.
iThese entries are retained even if you use
the audio system with another mobile
phone. You should delete these entries
before handing over or selling your vehicle.
Receiving business cards (vCards)
You can import business cards (vCards) from
external Bluetooth® phones into your audio
system’s phone book. To do this:
RBluetooth® must be activated on the audio
system and on the external Bluetooth®
phone (see the operating instructions of
the mobile phone).
RThe external Bluetooth® phone must be
able to send vCards via Bluetooth® (see the
operating instructions of the mobile
phone).
RThe external Bluetooth® phone in the
vehicle must be switched on and
authorized.
iIf you switch to a different mode while
vCards are being received (e.g., press
button $), reception of vCards will be
aborted.
X% Q Tel Q Receive Business
Card(s).
XPress W to confirm.XWait until the message Ready to
Receive - Received: 0 appears.
XImporting: Start the data transfer on the
external Bluetooth® phone (“Export
business cards (vCards)”, see the operating
instructions of the mobile phone).
The audio system imports the data for the
business cards and displays the number of
business cards received.
iSelect Back or switch to a different mode
to abort reception.
XEnding reception: Press W.
or
XPress button k in the center console
(Y page 141).
Deleting external Data
X% Q Tel Q Delete External
Data.
A prompt appears asking whether the data
should be deleted.
XSelect Yes or No.
If you select Yes all personal data are then
deleted from the phone book.
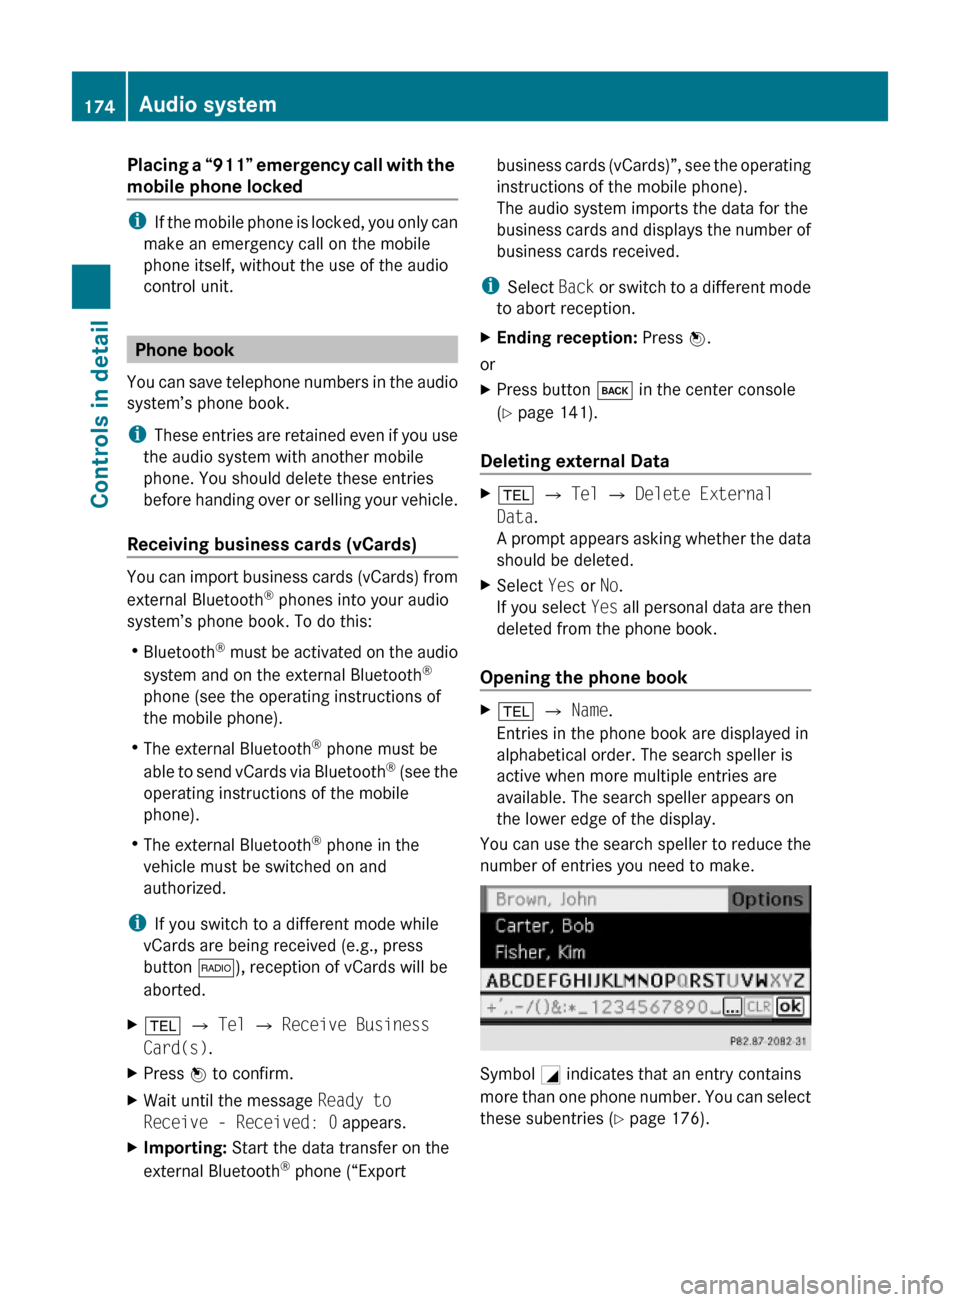
Opening the phone book
X% Q Name.
Entries in the phone book are displayed in
alphabetical order. The search speller is
active when more multiple entries are
available. The search speller appears on
the lower edge of the display.
You can use the search speller to reduce the
number of entries you need to make.
Symbol G indicates that an entry contains
more than one phone number. You can select
these subentries (Y page 176).
174Audio systemControls in detail
204_AKB; 5; 23, en-USd2ureepe,Version: 2.11.8.12009-07-16T17:54:06+02:00 - Seite 174
Page 196 of 364
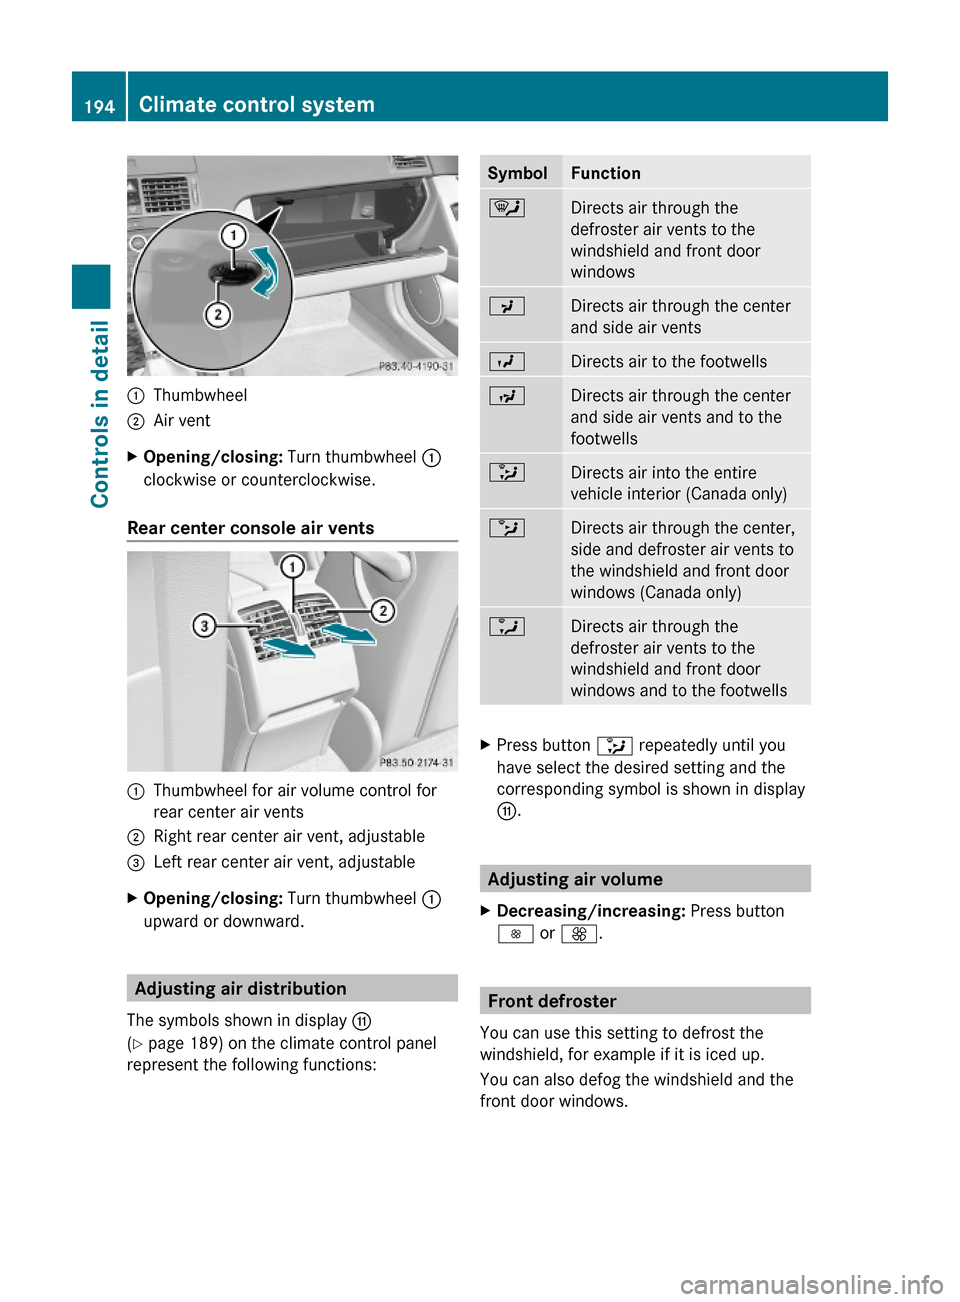
:Thumbwheel;Air ventXOpening/closing: Turn thumbwheel :
clockwise or counterclockwise.
Rear center console air vents
:Thumbwheel for air volume control for
rear center air vents
;Right rear center air vent, adjustable=Left rear center air vent, adjustableXOpening/closing: Turn thumbwheel :
upward or downward.
Adjusting air distribution
The symbols shown in display G
(Y page 189) on the climate control panel
represent the following functions:
SymbolFunction¯Directs air through the
defroster air vents to the
windshield and front door
windows
PDirects air through the center
and side air vents
ODirects air to the footwellsNDirects air through the center
and side air vents and to the
footwells
_Directs air into the entire
vehicle interior (Canada only)
bDirects air through the center,
side and defroster air vents to
the windshield and front door
windows (Canada only)
aDirects air through the
defroster air vents to the
windshield and front door
windows and to the footwells
XPress button _ repeatedly until you
have select the desired setting and the
corresponding symbol is shown in display
G.
Adjusting air volume
XDecreasing/increasing: Press button
I or K.
Front defroster
You can use this setting to defrost the
windshield, for example if it is iced up.
You can also defog the windshield and the
front door windows.
194Climate control systemControls in detail
204_AKB; 5; 23, en-USd2ureepe,Version: 2.11.8.12009-07-16T17:54:06+02:00 - Seite 194
Page 209 of 364
Storage bags GWarning!
Storage bags are intended for storing light-
weight items only.
Heavy objects, objects with sharp edges or
fragile objects may not be transported in the
storage bag. In an accident, during hard
braking, or sudden maneuvers, they could be
thrown around inside the vehicle and cause
injury to vehicle occupants.
Storage bags cannot protect transported
goods in the event of an accident.
Storage bags are located on the back of the
front seats.
Useful features
Cup holders
GWarning!
In order to help prevent spilling liquids on
vehicle occupants and/or vehicle equipment,
only use containers that fit into the cup
holder. Use lids on open containers and do
not fill containers to a height where the
contents, especially hot liquids, could spill
during braking, vehicle maneuvers, or in an
accident. Liquids spilled on vehicle occupants
may cause serious personal injury. Liquids
spilled on vehicle equipment may cause
damage not covered by the Mercedes-Benz
Limited Warranty.
When not in use, keep the cup holder closed.
An open cup holder may cause injury to you
or others when contacted during braking,
vehicle maneuvers, or in an accident.
Keep in mind that objects placed in the cup
holder may come loose during braking,
vehicle maneuvers, or in an accident and be
thrown around in the vehicle interior. Objects
thrown around in the vehicle interior may
cause an accident and/or serious personal
injury.
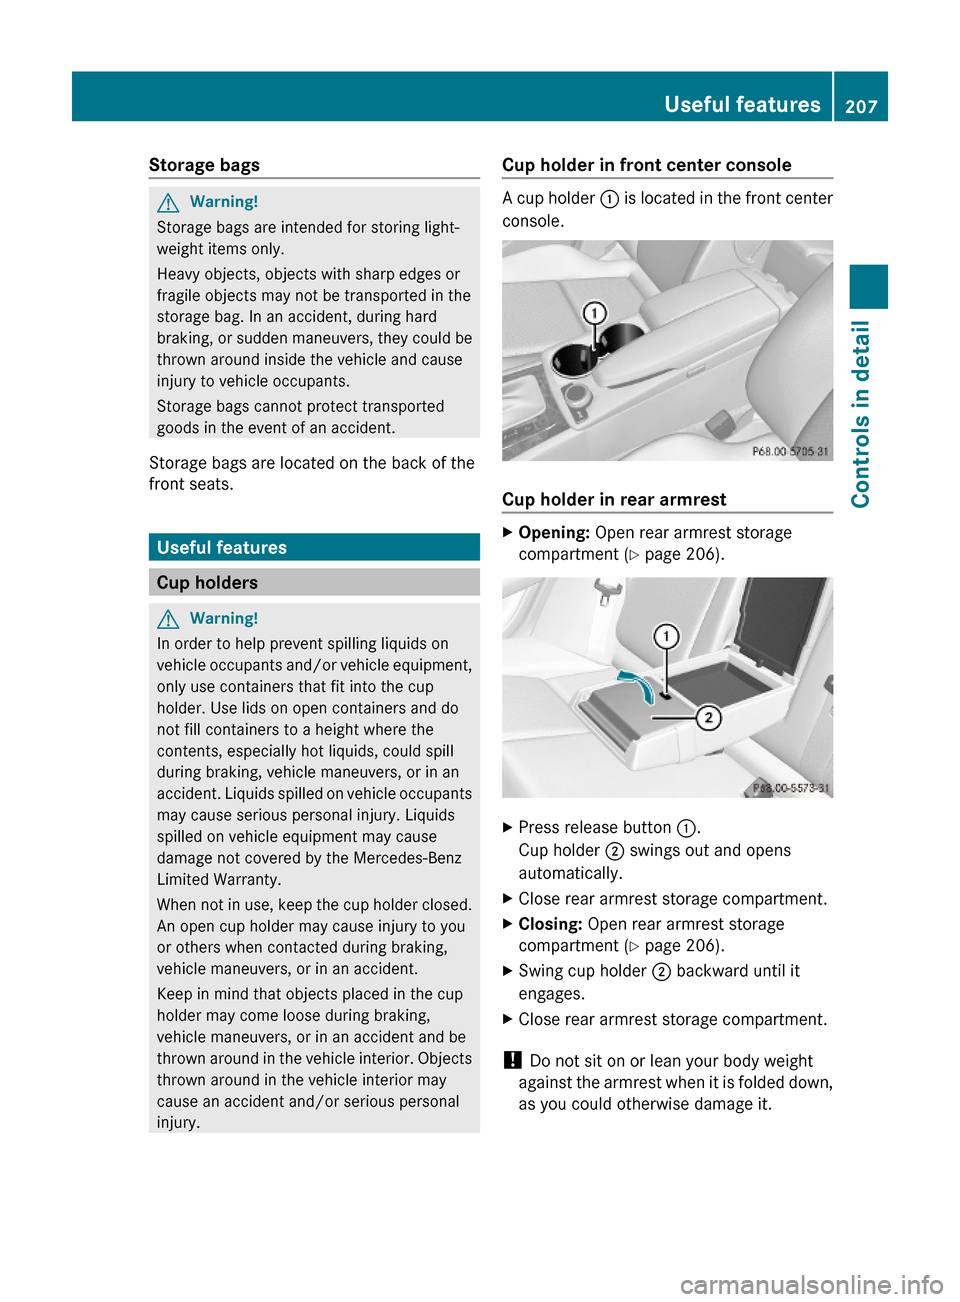
Cup holder in front center console
A cup holder : is located in the front center
console.
Cup holder in rear armrest
XOpening: Open rear armrest storage
compartment (Y page 206).
XPress release button :.
Cup holder ; swings out and opens
automatically.
XClose rear armrest storage compartment.XClosing: Open rear armrest storage
compartment (Y page 206).
XSwing cup holder ; backward until it
engages.
XClose rear armrest storage compartment.
! Do not sit on or lean your body weight
against the armrest when it is folded down,
as you could otherwise damage it.
Useful features207Controls in detail204_AKB; 5; 23, en-USd2ureepe,Version: 2.11.8.12009-07-16T17:54:06+02:00 - Seite 207Z
Page 211 of 364
XSwitch on the ignition.XExtending/Retracting: Press rear
window sunshade switch : briefly.
Ashtrays
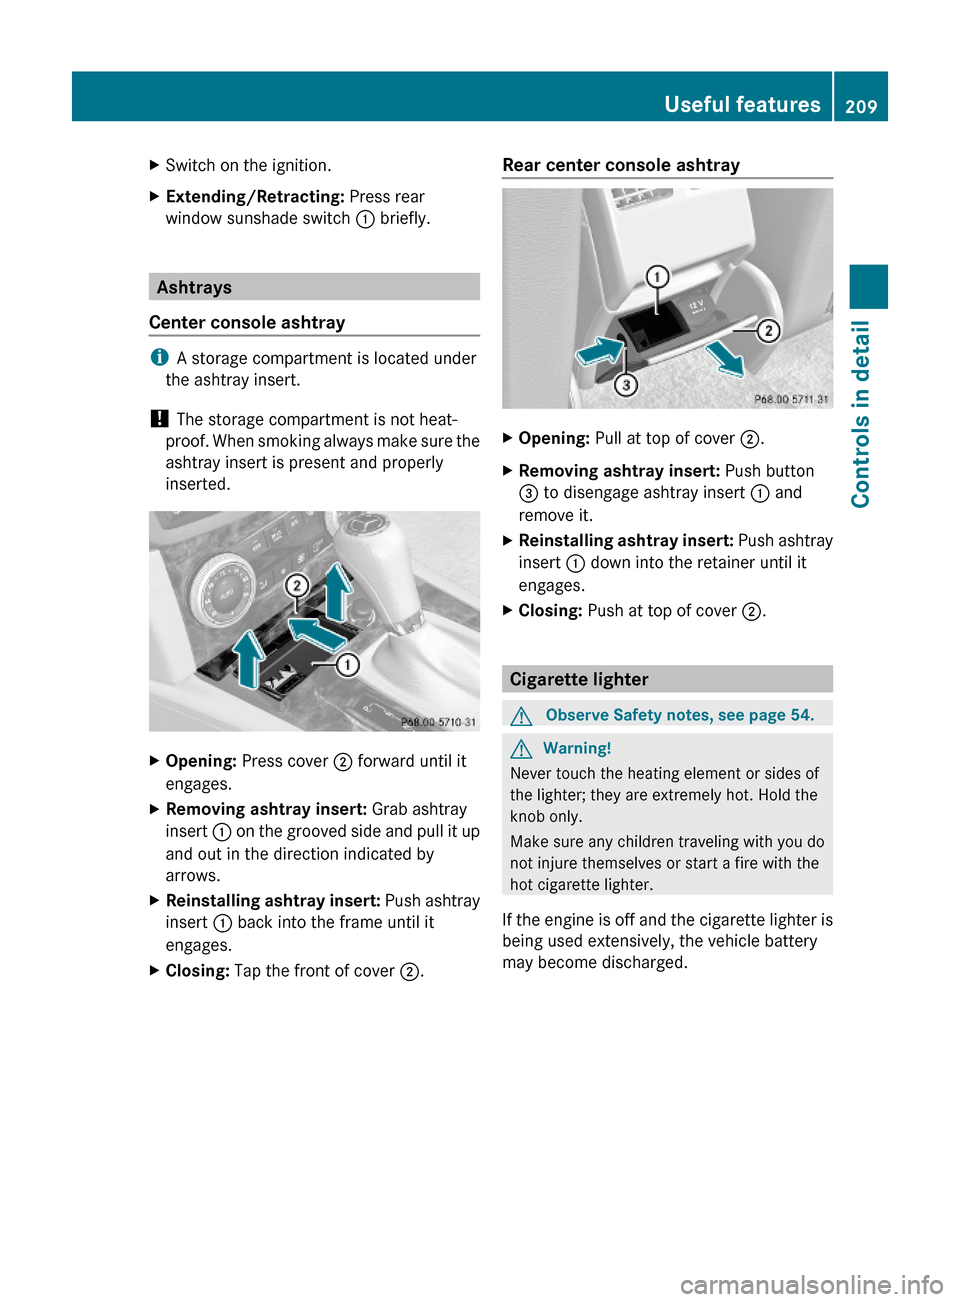
Center console ashtray
iA storage compartment is located under
the ashtray insert.
! The storage compartment is not heat-
proof. When smoking always make sure the
ashtray insert is present and properly
inserted.
XOpening: Press cover ; forward until it
engages.
XRemoving ashtray insert: Grab ashtray
insert : on the grooved side and pull it up
and out in the direction indicated by
arrows.
XReinstalling ashtray insert: Push ashtray
insert : back into the frame until it
engages.
XClosing: Tap the front of cover ;.Rear center console ashtray XOpening: Pull at top of cover ;.XRemoving ashtray insert: Push button
= to disengage ashtray insert : and
remove it.
XReinstalling ashtray insert: Push ashtray
insert : down into the retainer until it
engages.
XClosing: Push at top of cover ;.
Cigarette lighter
GObserve Safety notes, see page 54.GWarning!
Never touch the heating element or sides of
the lighter; they are extremely hot. Hold the
knob only.
Make sure any children traveling with you do
not injure themselves or start a fire with the
hot cigarette lighter.
If the engine is off and the cigarette lighter is
being used extensively, the vehicle battery
may become discharged.
Useful features209Controls in detail204_AKB; 5; 23, en-USd2ureepe,Version: 2.11.8.12009-07-16T17:54:06+02:00 - Seite 209Z