2010 MERCEDES-BENZ C300 4MATIC battery
[x] Cancel search: batteryPage 79 of 364
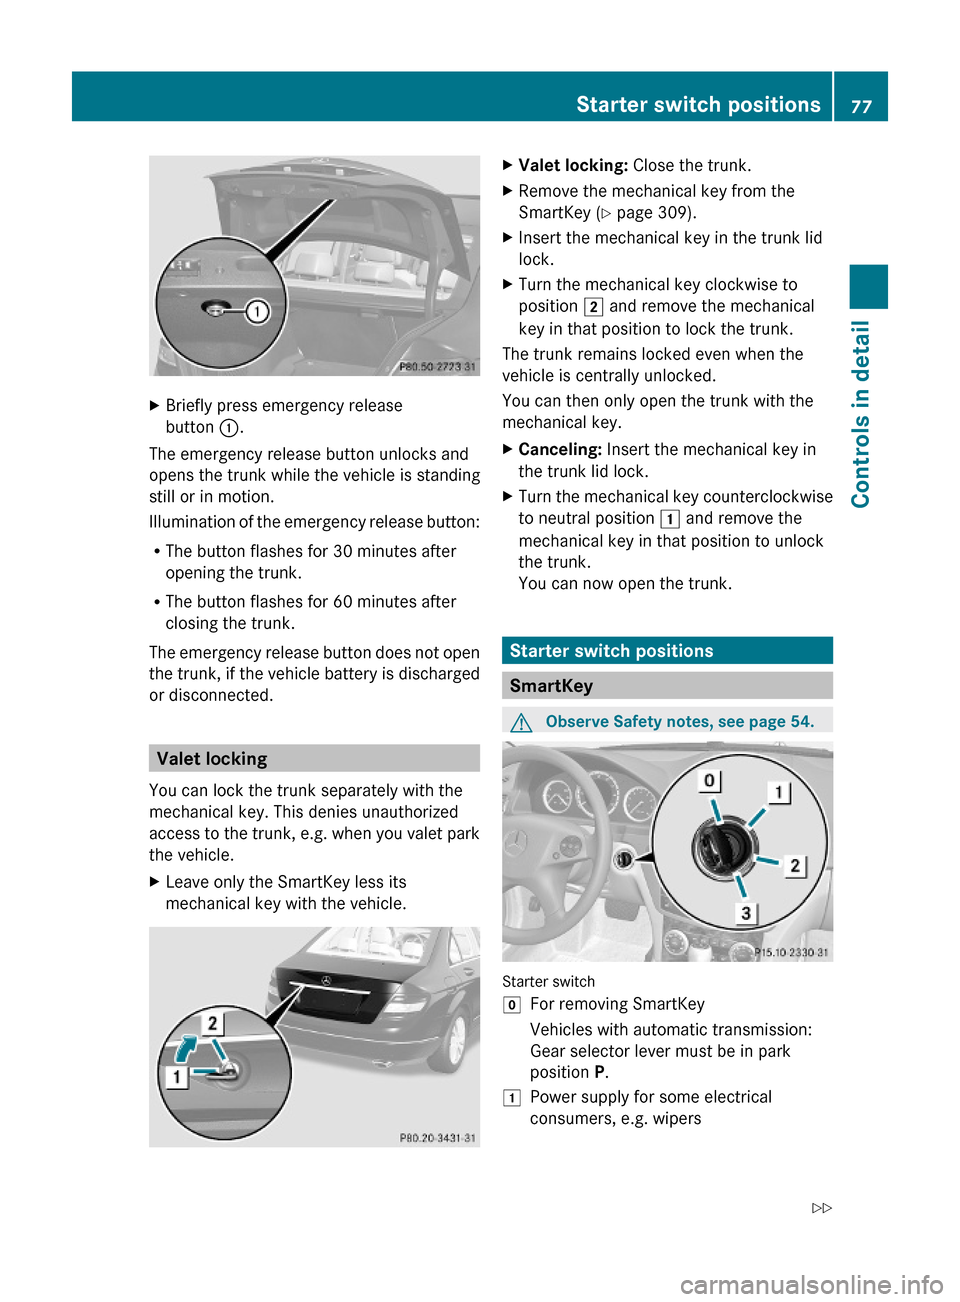
XBriefly press emergency release
button :.
The emergency release button unlocks and
opens the trunk while the vehicle is standing
still or in motion.
Illumination of the emergency release button:
RThe button flashes for 30 minutes after
opening the trunk.
RThe button flashes for 60 minutes after
closing the trunk.
The emergency release button does not open
the trunk, if the vehicle battery is discharged
or disconnected.
Valet locking
You can lock the trunk separately with the
mechanical key. This denies unauthorized
access to the trunk, e.g. when you valet park
the vehicle.
XLeave only the SmartKey less its
mechanical key with the vehicle.
XValet locking: Close the trunk.XRemove the mechanical key from the
SmartKey (Y page 309).
XInsert the mechanical key in the trunk lid
lock.
XTurn the mechanical key clockwise to
position 2 and remove the mechanical
key in that position to lock the trunk.
The trunk remains locked even when the
vehicle is centrally unlocked.
You can then only open the trunk with the
mechanical key.
XCanceling: Insert the mechanical key in
the trunk lid lock.
XTurn the mechanical key counterclockwise
to neutral position 1 and remove the
mechanical key in that position to unlock
the trunk.
You can now open the trunk.
Starter switch positions
SmartKey
GObserve Safety notes, see page 54.
Starter switch
gFor removing SmartKeyVehicles with automatic transmission:
Gear selector lever must be in park
position P.
1Power supply for some electrical
consumers, e.g. wipers
Starter switch positions77Controls in detail204_AKB; 5; 23, en-USd2ureepe,Version: 2.11.8.12009-07-16T17:54:06+02:00 - Seite 77Z
Page 80 of 364
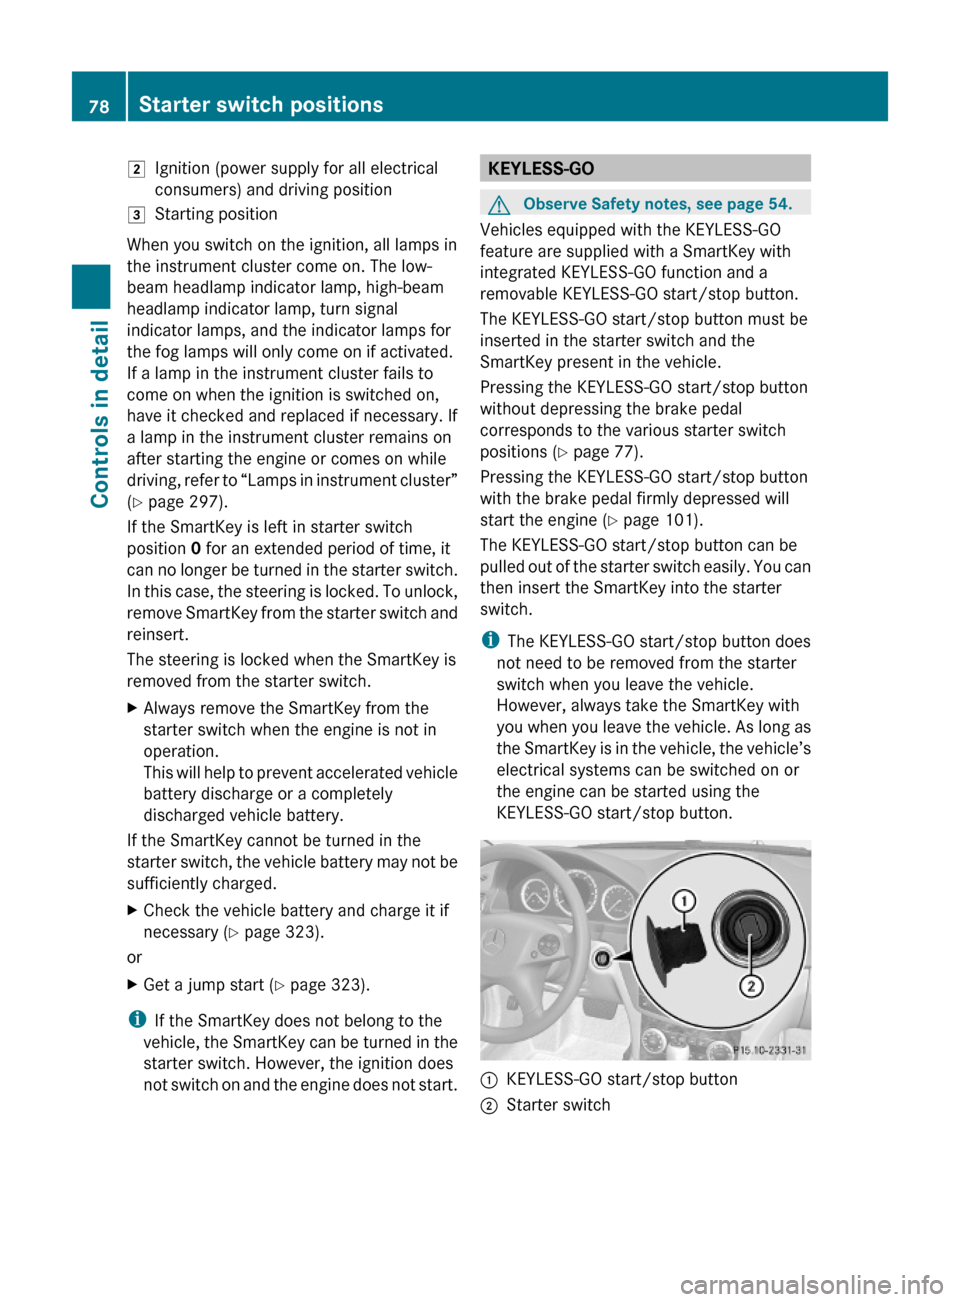
2Ignition (power supply for all electrical
consumers) and driving position
3Starting position
When you switch on the ignition, all lamps in
the instrument cluster come on. The low-
beam headlamp indicator lamp, high-beam
headlamp indicator lamp, turn signal
indicator lamps, and the indicator lamps for
the fog lamps will only come on if activated.
If a lamp in the instrument cluster fails to
come on when the ignition is switched on,
have it checked and replaced if necessary. If
a lamp in the instrument cluster remains on
after starting the engine or comes on while
driving, refer to “Lamps in instrument cluster”
(Y page 297).
If the SmartKey is left in starter switch
position 0 for an extended period of time, it
can no longer be turned in the starter switch.
In this case, the steering is locked. To unlock,
remove SmartKey from the starter switch and
reinsert.
The steering is locked when the SmartKey is
removed from the starter switch.
XAlways remove the SmartKey from the
starter switch when the engine is not in
operation.
This will help to prevent accelerated vehicle
battery discharge or a completely
discharged vehicle battery.
If the SmartKey cannot be turned in the
starter switch, the vehicle battery may not be
sufficiently charged.
XCheck the vehicle battery and charge it if
necessary (Y page 323).
or
XGet a jump start (Y page 323).
iIf the SmartKey does not belong to the
vehicle, the SmartKey can be turned in the
starter switch. However, the ignition does
not switch on and the engine does not start.
KEYLESS-GOGObserve Safety notes, see page 54.
Vehicles equipped with the KEYLESS-GO
feature are supplied with a SmartKey with
integrated KEYLESS-GO function and a
removable KEYLESS-GO start/stop button.
The KEYLESS-GO start/stop button must be
inserted in the starter switch and the
SmartKey present in the vehicle.
Pressing the KEYLESS-GO start/stop button
without depressing the brake pedal
corresponds to the various starter switch
positions (Y page 77).
Pressing the KEYLESS-GO start/stop button
with the brake pedal firmly depressed will
start the engine (Y page 101).
The KEYLESS-GO start/stop button can be
pulled out of the starter switch easily. You can
then insert the SmartKey into the starter
switch.
iThe KEYLESS-GO start/stop button does
not need to be removed from the starter
switch when you leave the vehicle.
However, always take the SmartKey with
you when you leave the vehicle. As long as
the SmartKey is in the vehicle, the vehicle’s
electrical systems can be switched on or
the engine can be started using the
KEYLESS-GO start/stop button.
:KEYLESS-GO start/stop button;Starter switch78Starter switch positionsControls in detail
204_AKB; 5; 23, en-USd2ureepe,Version: 2.11.8.12009-07-16T17:54:06+02:00 - Seite 78
Page 90 of 364
XShift the automatic transmission into
reverse gear R (manual transmission to
reverse gear).
The passenger-side exterior rear view
mirror moves to the preset parking
position.XAdjust the passenger-side exterior rear
view mirror with adjustment button = so
that you see the rear wheel and the road
curb.
The exterior rear view mirror parking
position is stored.
Vehicles with memory function: You can also
store the parking position using the memory
button M ? :
XSwitch on the ignition.XPress button ;, to select the passenger-
side exterior rear view mirror.XAdjust the passenger-side exterior rear
view mirror with adjustment button = so
that you see the rear wheel and the road
curb.XPress memory button M ? and within
3 seconds, press one of the arrows of
adjustment button =.
The parking position is stored if the exterior
rear view mirror does not move.
i If the exterior rear view mirror does move,
repeat the above steps. After the setting is
stored, you can move the exterior rear view
mirror again.
Calling up the parking position
XSwitch on the ignition.XPress button ;, to select the passenger-
side exterior rear view mirror.XShift the automatic transmission into
reverse gear R (manual transmission to
reverse gear).
The passenger-side exterior rear view
mirror moves to the stored parking
position.The passenger-side exterior rear view mirror
returns to its previously stored driving
position
R 10 seconds after you have put the gear
selector lever out of reverse gear R (manual
transmission out of reverse)
R immediately once your vehicle exceeds a
speed of approximately 6 mph (10 km/h)
R immediately when you press button : to
select the driver’s side exterior rear view
mirror
Power-folding exterior rear view
mirrors
This feature is only available in Canada
vehicles.
! Before you drive the vehicle through an
automatic car wash, fold in the exterior rear
view mirrors. Otherwise they may get
damaged.
Folding in and out automatically
The function must be activated in the
Convenience submenu ( Y page 136).
The exterior rear view mirrors fold in
automatically as soon as the vehicle is locked
from the outside.
The exterior rear view mirrors fold out
automatically as soon as the vehicle is
unlocked and the driver’s or front passenger
door is subsequently opened.
Resetting the automatic exterior rear
view mirror fold-in function
You need to reset the automatic exterior rear
view mirror fold-in function whenever the
battery was disconnected or discharged.
88MirrorsControls in detail
204_AKB; 5; 23, en-USd2ureepe,Version: 2.11.8.12009-07-16T17:54:06+02:00 - Seite 88
Page 93 of 364
! Failure to switch off the parking lamps
when leaving the vehicle may result in a
discharged battery.
Low-beam headlamps
The low-beam headlamps can be switched on
and off with the exterior lamp switch.
XSwitch on the ignition.XSwitching on: Turn the exterior lamp
switch to position L.
The following lamps come on:
R Low-beam headlamps
R Tail lamps
R Parking lamps
R License plate lamps
R Side marker lamps
R Instrument panel lamps
R Green indicator lamp L in the
instrument clusterXSwitching off: Turn the exterior lamp
switch to position $.
Automatic headlamp mode
The following lamps come on and go out
automatically depending on the brightness of
the ambient light:
R Low-beam headlamps
R Tail lamps
R Parking lamps
R License plate lamps
R Side marker lamps
GWarning!
If the exterior lamp switch is set to c, the
headlamps will not automatically come on
under foggy conditions.
To minimize risk to you and to others, activate
headlamps by turning exterior lamp switch to
L when driving or when traffic and/or
ambient lighting conditions require you to do
so.
In low ambient lighting conditions, only switch
from position c to L with the vehicle
at a standstill in a safe location. Switching
from c to L will briefly switch off the
headlamps. Doing so while driving in low
ambient lighting conditions may result in an
accident.
The automatic headlamp feature is only an aid
to the driver. The driver is responsible for the
operation of the vehicle’s lights at all times.XSwitching on: Turn the exterior lamp
switch to position c.
The following lamps come on and go out
depending on the brightness of the ambient
light with the SmartKey in starter switch
position 1 or the KEYLESS-GO start/stop
button pressed once:
R Tail lamps
R Parking lamps
R License plate lamps
R Side marker lamps
When the engine is running, the low-beam
headlamps will also come on and turn off
automatically.
Canada only: High-beam headlamps are only
available in low ambient lighting conditions.
Daytime running lamp mode
In Canada, the daytime running lamp mode is
mandatory and therefore in a constant mode.
In the USA, the daytime running lamp mode
is deactivated by default.
XActivate the daytime running lamp mode
using the control system, see “Switching
daytime running lamp mode on or off (USA
only)” ( Y page 133).XTurn the exterior lamp switch to position
$ or c .
When the engine is running, the low-beam
headlamps come on.Lighting91Controls in detail204_AKB; 5; 23, en-USd2ureepe,Version: 2.11.8.12009-07-16T17:54:06+02:00 - Seite 91Z
Page 97 of 364
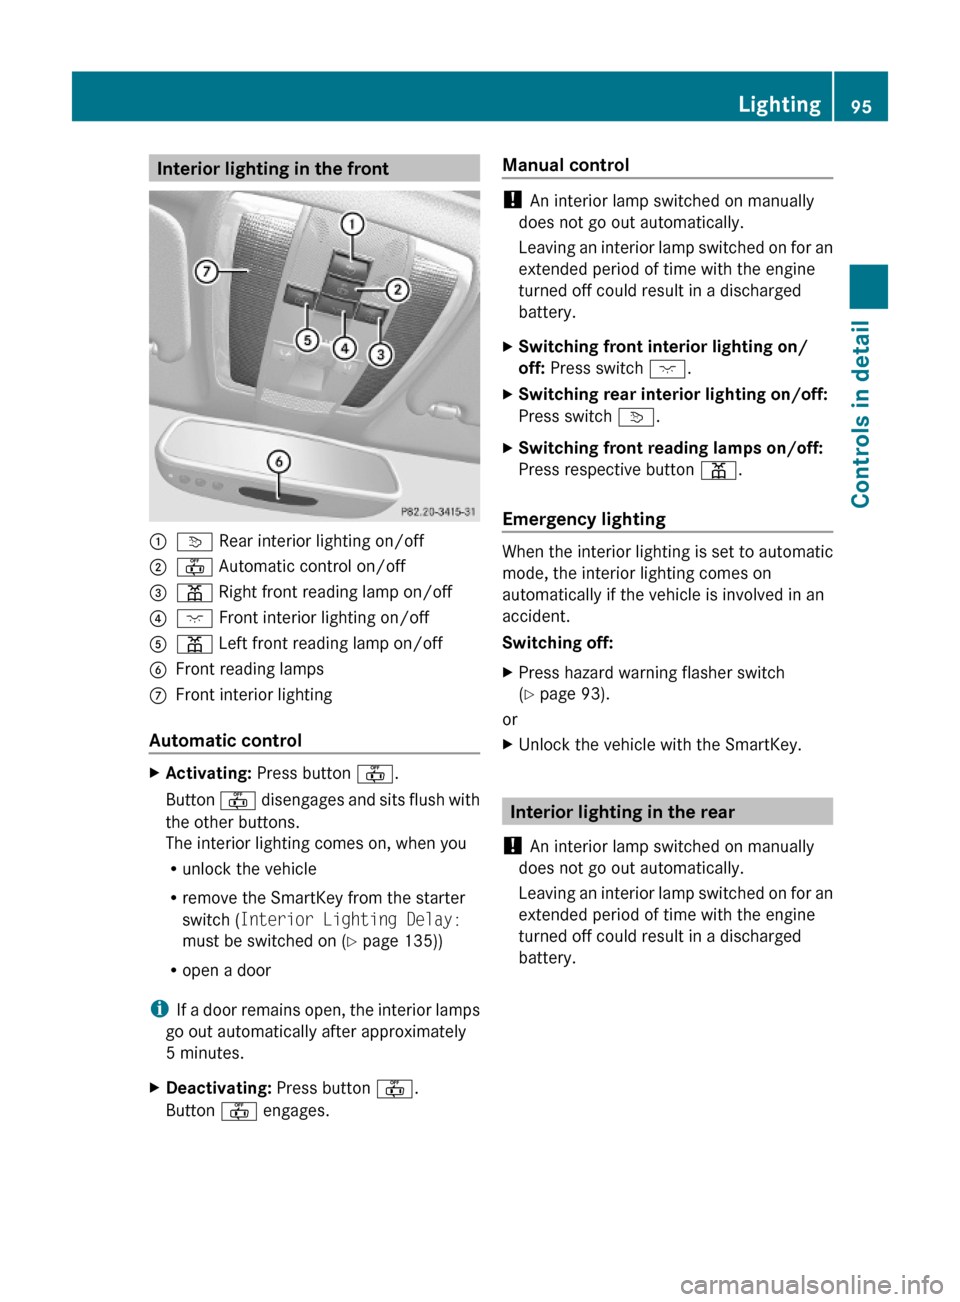
Interior lighting in the front:v Rear interior lighting on/off;~ Automatic control on/off=p Right front reading lamp on/off?c Front interior lighting on/off Ap Left front reading lamp on/offBFront reading lamps CFront interior lighting
Automatic control
XActivating: Press button ~.
Button ~ disengages and sits flush with
the other buttons.
The interior lighting comes on, when you
Runlock the vehicle
Rremove the SmartKey from the starter
switch (Interior Lighting Delay:
must be switched on (Y page 135))
Ropen a door
iIf a door remains open, the interior lamps
go out automatically after approximately
5 minutes.
XDeactivating: Press button ~.
Button ~ engages.
Manual control
! An interior lamp switched on manually
does not go out automatically.
Leaving an interior lamp switched on for an
extended period of time with the engine
turned off could result in a discharged
battery.
XSwitching front interior lighting on/
off: Press switch c.
XSwitching rear interior lighting on/off:
Press switch v.
XSwitching front reading lamps on/off:
Press respective button p.
Emergency lighting
When the interior lighting is set to automatic
mode, the interior lighting comes on
automatically if the vehicle is involved in an
accident.
Switching off:
XPress hazard warning flasher switch
(Y page 93).
or
XUnlock the vehicle with the SmartKey.
Interior lighting in the rear
! An interior lamp switched on manually
does not go out automatically.
Leaving an interior lamp switched on for an
extended period of time with the engine
turned off could result in a discharged
battery.
Lighting95Controls in detail204_AKB; 5; 23, en-USd2ureepe,Version: 2.11.8.12009-07-16T17:54:06+02:00 - Seite 95Z
Page 104 of 364
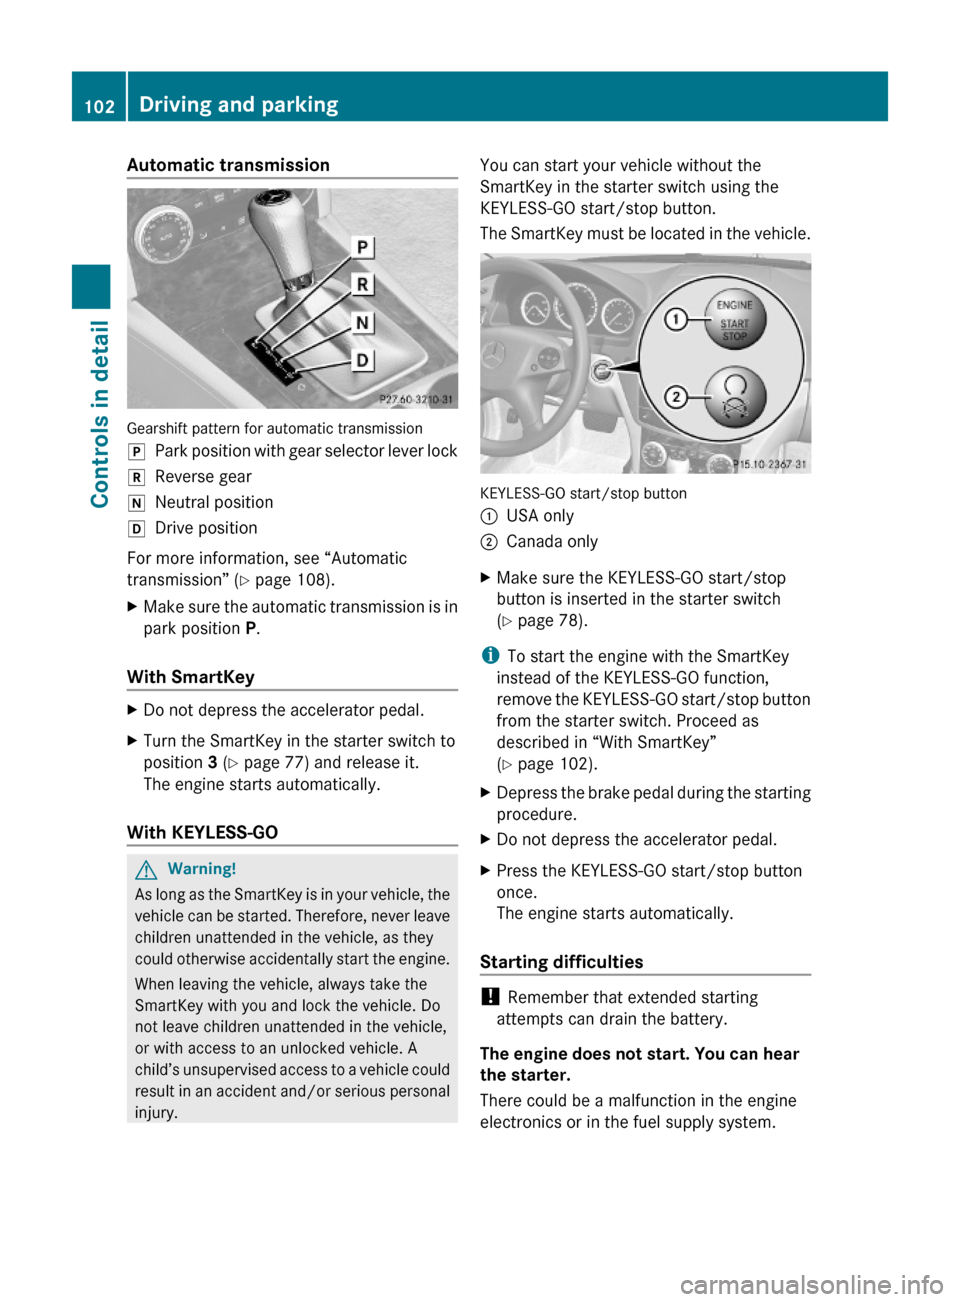
Automatic transmission
Gearshift pattern for automatic transmission
jPark position with gear selector lever lockkReverse geariNeutral positionhDrive position
For more information, see “Automatic
transmission” (Y page 108).
XMake sure the automatic transmission is in
park position P.
With SmartKey
XDo not depress the accelerator pedal.XTurn the SmartKey in the starter switch to
position 3 (Y page 77) and release it.
The engine starts automatically.
With KEYLESS-GO
GWarning!
As long as the SmartKey is in your vehicle, the
vehicle can be started. Therefore, never leave
children unattended in the vehicle, as they
could otherwise accidentally start the engine.
When leaving the vehicle, always take the
SmartKey with you and lock the vehicle. Do
not leave children unattended in the vehicle,
or with access to an unlocked vehicle. A
child’s unsupervised access to a vehicle could
result in an accident and/or serious personal
injury.
You can start your vehicle without the
SmartKey in the starter switch using the
KEYLESS-GO start/stop button.
The SmartKey must be located in the vehicle.
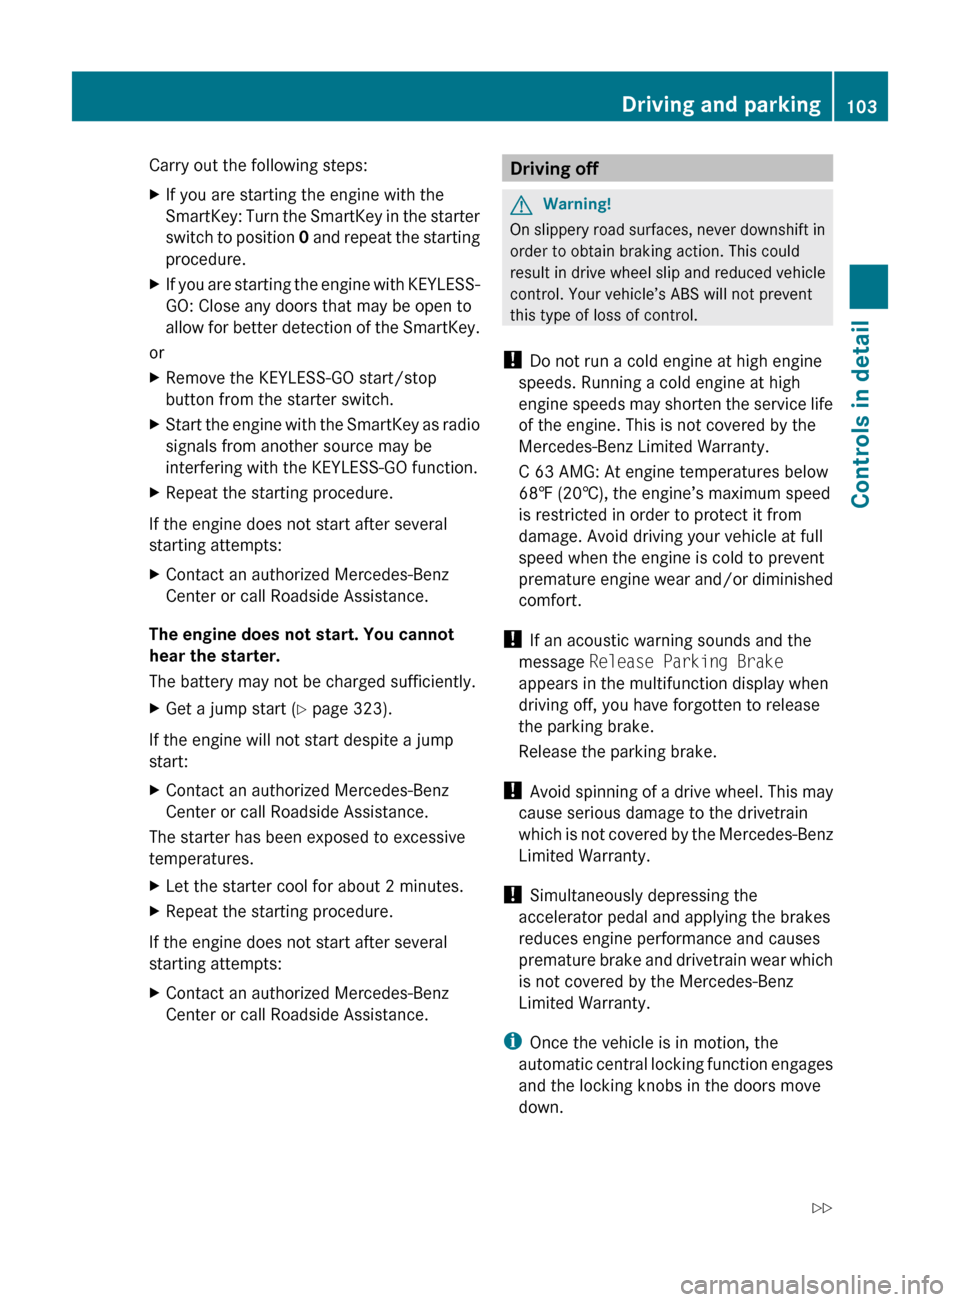
KEYLESS-GO start/stop button
:USA only;Canada onlyXMake sure the KEYLESS-GO start/stop
button is inserted in the starter switch
(Y page 78).
iTo start the engine with the SmartKey
instead of the KEYLESS-GO function,
remove the KEYLESS-GO start/stop button
from the starter switch. Proceed as
described in “With SmartKey”
(Y page 102).
XDepress the brake pedal during the starting
procedure.
XDo not depress the accelerator pedal.XPress the KEYLESS-GO start/stop button
once.
The engine starts automatically.
Starting difficulties
! Remember that extended starting
attempts can drain the battery.
The engine does not start. You can hear
the starter.
There could be a malfunction in the engine
electronics or in the fuel supply system.
102Driving and parkingControls in detail
204_AKB; 5; 23, en-USd2ureepe,Version: 2.11.8.12009-07-16T17:54:06+02:00 - Seite 102
Page 105 of 364
Carry out the following steps:XIf you are starting the engine with the
SmartKey: Turn the SmartKey in the starter
switch to position 0 and repeat the starting
procedure.XIf you are starting the engine with KEYLESS-
GO: Close any doors that may be open to
allow for better detection of the SmartKey.
or
XRemove the KEYLESS-GO start/stop
button from the starter switch.XStart the engine with the SmartKey as radio
signals from another source may be
interfering with the KEYLESS-GO function.XRepeat the starting procedure.
If the engine does not start after several
starting attempts:
XContact an authorized Mercedes-Benz
Center or call Roadside Assistance.
The engine does not start. You cannot
hear the starter.
The battery may not be charged sufficiently.
XGet a jump start ( Y page 323).
If the engine will not start despite a jump
start:
XContact an authorized Mercedes-Benz
Center or call Roadside Assistance.
The starter has been exposed to excessive
temperatures.
XLet the starter cool for about 2 minutes.XRepeat the starting procedure.
If the engine does not start after several
starting attempts:
XContact an authorized Mercedes-Benz
Center or call Roadside Assistance.Driving offGWarning!
On slippery road surfaces, never downshift in
order to obtain braking action. This could
result in drive wheel slip and reduced vehicle
control. Your vehicle’s ABS will not prevent
this type of loss of control.
! Do not run a cold engine at high engine
speeds. Running a cold engine at high
engine speeds may shorten the service life
of the engine. This is not covered by the
Mercedes-Benz Limited Warranty.
C 63 AMG: At engine temperatures below
68‡ (20†), the engine’s maximum speed
is restricted in order to protect it from
damage. Avoid driving your vehicle at full
speed when the engine is cold to prevent
premature engine wear and/or diminished
comfort.
! If an acoustic warning sounds and the
message Release Parking Brake
appears in the multifunction display when
driving off, you have forgotten to release
the parking brake.
Release the parking brake.
! Avoid spinning of a drive wheel. This may
cause serious damage to the drivetrain
which is not covered by the Mercedes-Benz
Limited Warranty.
! Simultaneously depressing the
accelerator pedal and applying the brakes
reduces engine performance and causes
premature brake and drivetrain wear which
is not covered by the Mercedes-Benz
Limited Warranty.
i Once the vehicle is in motion, the
automatic central locking function engages
and the locking knobs in the doors move
down.
Driving and parking103Controls in detail204_AKB; 5; 23, en-USd2ureepe,Version: 2.11.8.12009-07-16T17:54:06+02:00 - Seite 103Z
Page 194 of 364
Activating
Moist air can fog up the windows. You can
dehumidify the interior air with the air
conditioning.
XPress button ¿.
The indicator lamp in the button comes on.
i The evaporator will be vented when the
air conditioning has been in use.
Approximately 1 hour after locking the
vehicle, the blower switches on
automatically. The blower will run for
30 minutes at its lowest level. The blower
noise is normal and not an indication of a
malfunction. When you unlock the vehicle
in the meantime, venting will be
interrupted. If the vehicle battery is low,
automatic evaporator venting will not occur
in order to preserve the battery.
Automatic mode
When operating the climate control system in
automatic mode, the interior air temperature,
air volume and air distribution are adjusted
automatically.
In automatic mode, cooling with
dehumidification is switched on. This function
can be switched off if necessary.
GWarning!
If you deactivate the air conditioning, the
vehicle will not be cooled when weather
conditions are warm. The windows can fog up
more quickly. Window fogging may impair
visibility and endanger you and others.
XSet the desired temperature
( Y page 192).XActivating: Press button Ã.
The indicator lamp in the button comes on.
The air volume and air distribution are
adjusted automatically.XDeactivating: Press button I, K or
_ .
The indicator lamp in button à goes out.
The automatic operation of air volume and
air distribution switches off. The symbols of
air distribution or air volume appear in
display G (Y page 189).XAdjust air distribution ( Y page 194).XAdjust air volume ( Y page 194).
Setting temperature
You can adjust the air temperature on each
side of the passenger compartment. You
should raise or lower the temperature setting
in small increments, preferably starting at
72‡ (22†).
You can adjust the air temperature on each
side of the passenger compartment. You
should raise or lower the temperature setting
in small increments, preferably starting at
72‡ (22†).
XIncreasing/decreasing: Turn
temperature controls : and B
( Y page 189) slightly clockwise or
counterclockwise.
Adjusting air vents
GWarning!
When operating the climate control, the air
that enters the passenger compartment
through the air vents can be very hot or very
cold (depending on the set temperature). This
may cause burns or frostbite to unprotected
skin in the immediate area of the air vents.
Always keep sufficient distance between
unprotected parts of the body and the air
vents. If necessary, use the air distribution
adjustment to direct the air to air vents in the
vehicle interior that are not in the immediate
area of unprotected skin.
192Climate control systemControls in detail
204_AKB; 5; 23, en-USd2ureepe,Version: 2.11.8.12009-07-16T17:54:06+02:00 - Seite 192