2010 MERCEDES-BENZ C300 4MATIC left signal
[x] Cancel search: left signalPage 30 of 364

Instrument clusterFunctionPage:Combination gauge with: Fuel gauge1188 Fuel tank reserve
warning lamp 304
Coolant temperature gauge117? Coolant temperature
warning lamp 305
Indicator/warning lamps:K High-beam headlamp
indicator lamp 93
L Low-beam headlamp
indicator lamp 91
; Engine malfunction
indicator lamp 305
$ Brake warning lamp,
USA only 300
J Brake warning lamp,
Canada only300
;# Left turn signal
indicator lamp 93
FunctionPage=d ESP® warning lamp 62,
302
?Speedometer AMultifunction display120B! Right turn signal
indicator lamp93
CTachometer with: N Front fog lamps
indicator lamp 92
R Rear fog lamp
indicator lamp 92
å ESP OFF warning
lamp, C 63 AMG only
64,
302
h Combination low tire
pressure/TPMS
malfunction telltale, USA
only
234,
306
6 Supplemental
Restraint System (SRS)
indicator lamp
36,
302
28Instrument clusterAt a glance
204_AKB; 5; 23, en-USd2ureepe,Version: 2.11.8.12009-07-16T17:54:06+02:00 - Seite 28
Page 80 of 364
2Ignition (power supply for all electrical
consumers) and driving position
3Starting position
When you switch on the ignition, all lamps in
the instrument cluster come on. The low-
beam headlamp indicator lamp, high-beam
headlamp indicator lamp, turn signal
indicator lamps, and the indicator lamps for
the fog lamps will only come on if activated.
If a lamp in the instrument cluster fails to
come on when the ignition is switched on,
have it checked and replaced if necessary. If
a lamp in the instrument cluster remains on
after starting the engine or comes on while
driving, refer to “Lamps in instrument cluster”
(Y page 297).
If the SmartKey is left in starter switch
position 0 for an extended period of time, it
can no longer be turned in the starter switch.
In this case, the steering is locked. To unlock,
remove SmartKey from the starter switch and
reinsert.
The steering is locked when the SmartKey is
removed from the starter switch.
XAlways remove the SmartKey from the
starter switch when the engine is not in
operation.
This will help to prevent accelerated vehicle
battery discharge or a completely
discharged vehicle battery.
If the SmartKey cannot be turned in the
starter switch, the vehicle battery may not be
sufficiently charged.
XCheck the vehicle battery and charge it if
necessary (Y page 323).
or
XGet a jump start (Y page 323).
iIf the SmartKey does not belong to the
vehicle, the SmartKey can be turned in the
starter switch. However, the ignition does
not switch on and the engine does not start.
KEYLESS-GOGObserve Safety notes, see page 54.
Vehicles equipped with the KEYLESS-GO
feature are supplied with a SmartKey with
integrated KEYLESS-GO function and a
removable KEYLESS-GO start/stop button.
The KEYLESS-GO start/stop button must be
inserted in the starter switch and the
SmartKey present in the vehicle.
Pressing the KEYLESS-GO start/stop button
without depressing the brake pedal
corresponds to the various starter switch
positions (Y page 77).
Pressing the KEYLESS-GO start/stop button
with the brake pedal firmly depressed will
start the engine (Y page 101).
The KEYLESS-GO start/stop button can be
pulled out of the starter switch easily. You can
then insert the SmartKey into the starter
switch.
iThe KEYLESS-GO start/stop button does
not need to be removed from the starter
switch when you leave the vehicle.
However, always take the SmartKey with
you when you leave the vehicle. As long as
the SmartKey is in the vehicle, the vehicle’s
electrical systems can be switched on or
the engine can be started using the
KEYLESS-GO start/stop button.
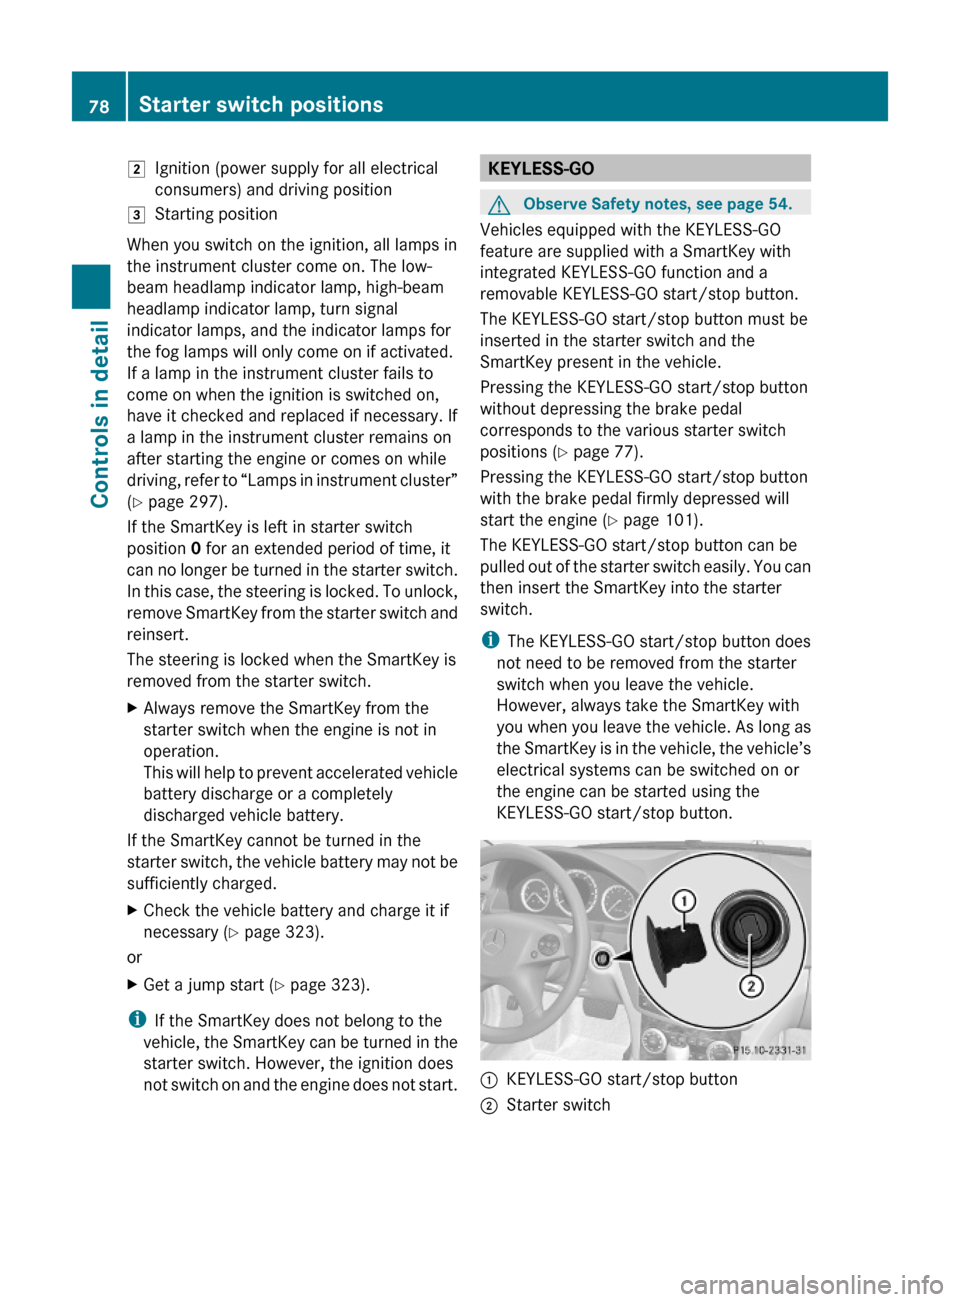
:KEYLESS-GO start/stop button;Starter switch78Starter switch positionsControls in detail
204_AKB; 5; 23, en-USd2ureepe,Version: 2.11.8.12009-07-16T17:54:06+02:00 - Seite 78
Page 92 of 364
Recalling positions from memoryXPress and hold desired memory position
button 1, 2 or 3 until the seat has moved
to the stored position completely. On the
driver’s side, also wait for the steering
wheel and exterior rear view mirrors to
move to the stored position.
iReleasing the memory position button
stops movement to the stored positions
immediately.
Lighting
Notes
iIf you drive in countries with left-hand
driving, you must have the headlamps
modified for symmetrical low beams.
Relevant information can be obtained at
any authorized Mercedes-Benz Center.
iVehicles equipped with active Bi-Xenon
headlamps:
The active Bi-Xenon headlamps increase
usable illumination over conventional
headlamps because they follow the
curvature of the road ahead. The beams of
the active Bi-Xenon headlamps shift to
either side according to the vehicle’s
steering angle and speed.
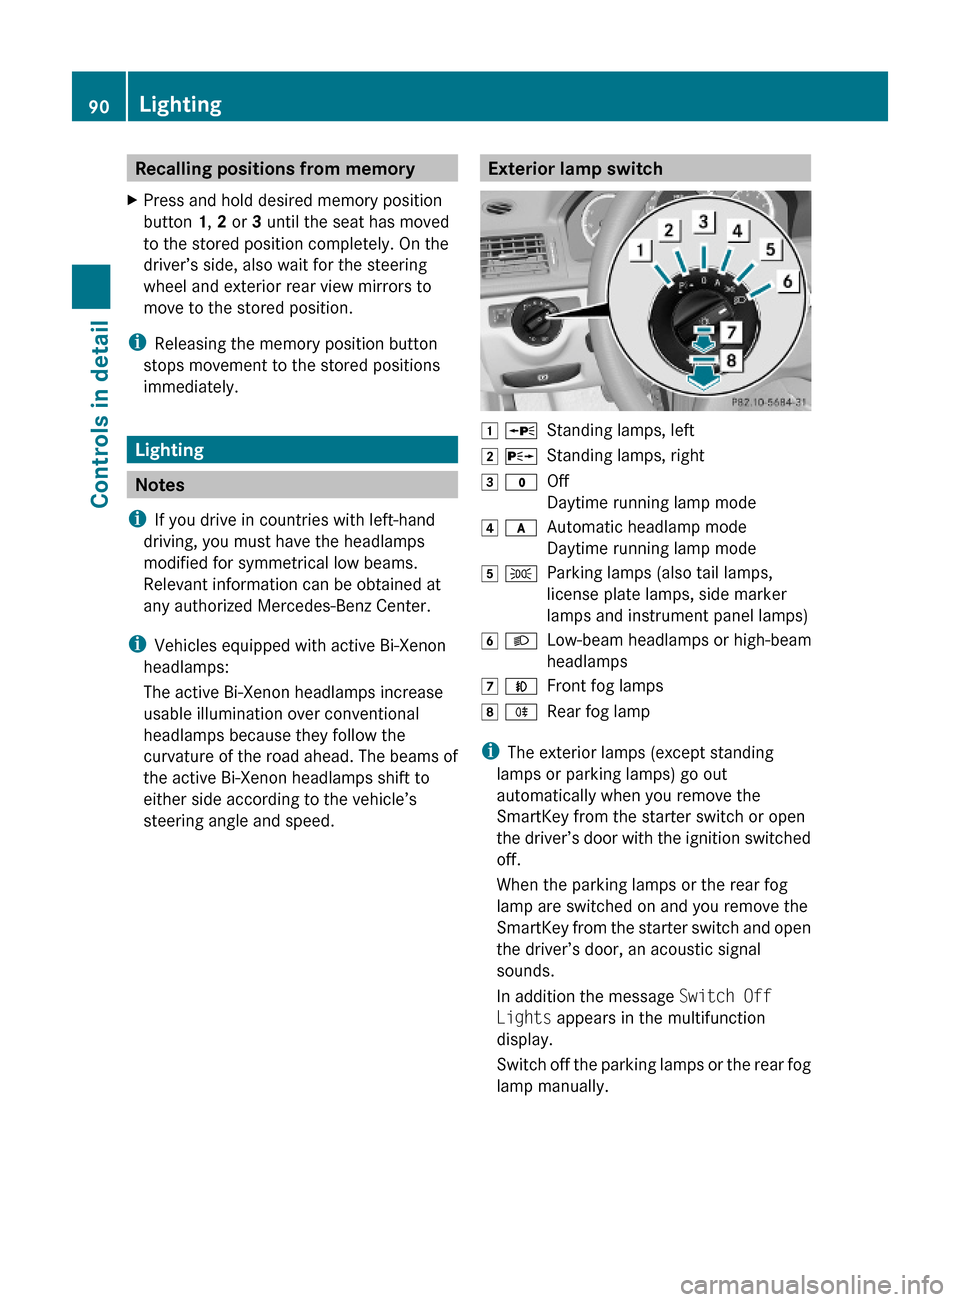
Exterior lamp switch1 WStanding lamps, left2 XStanding lamps, right3 $Off
Daytime running lamp mode
4 cAutomatic headlamp mode
Daytime running lamp mode
5 TParking lamps (also tail lamps,
license plate lamps, side marker
lamps and instrument panel lamps)
6 LLow-beam headlamps or high-beam
headlamps
7 NFront fog lamps8 RRear fog lamp
iThe exterior lamps (except standing
lamps or parking lamps) go out
automatically when you remove the
SmartKey from the starter switch or open
the driver’s door with the ignition switched
off.
When the parking lamps or the rear fog
lamp are switched on and you remove the
SmartKey from the starter switch and open
the driver’s door, an acoustic signal
sounds.
In addition the message Switch Off
Lights appears in the multifunction
display.
Switch off the parking lamps or the rear fog
lamp manually.
90LightingControls in detail
204_AKB; 5; 23, en-USd2ureepe,Version: 2.11.8.12009-07-16T17:54:06+02:00 - Seite 90
Page 95 of 364
Combination switch
Turn signals
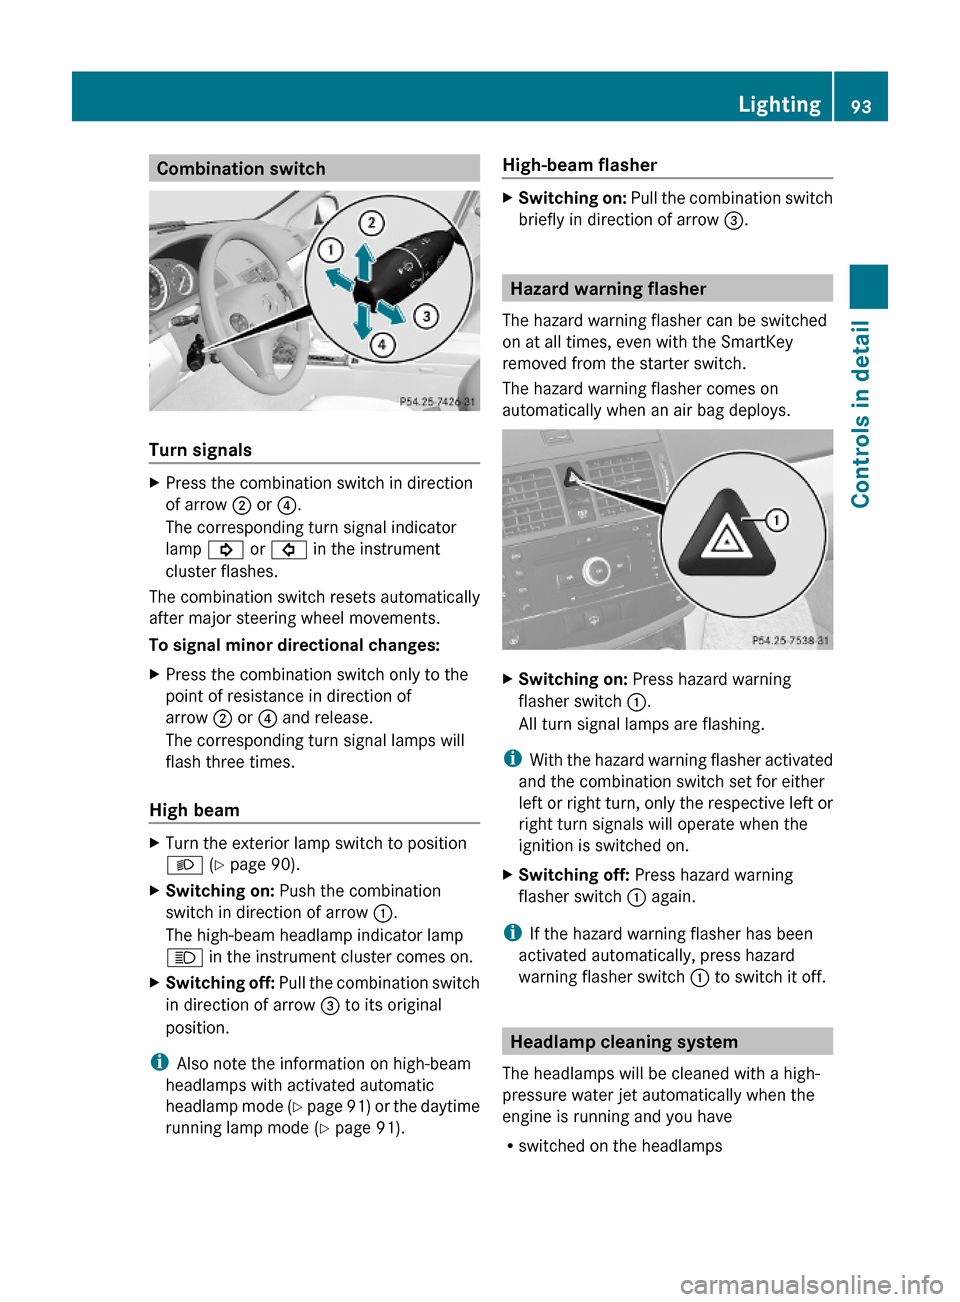
XPress the combination switch in direction
of arrow ; or ?.
The corresponding turn signal indicator
lamp ! or # in the instrument
cluster flashes.
The combination switch resets automatically
after major steering wheel movements.
To signal minor directional changes:
XPress the combination switch only to the
point of resistance in direction of
arrow ; or ? and release.
The corresponding turn signal lamps will
flash three times.
High beam
XTurn the exterior lamp switch to position
L (Y page 90).
XSwitching on: Push the combination
switch in direction of arrow :.
The high-beam headlamp indicator lamp
K in the instrument cluster comes on.
XSwitching off: Pull the combination switch
in direction of arrow = to its original
position.
iAlso note the information on high-beam
headlamps with activated automatic
headlamp mode (Y page 91) or the daytime
running lamp mode (Y page 91).
High-beam flasher XSwitching on: Pull the combination switch
briefly in direction of arrow =.
Hazard warning flasher
The hazard warning flasher can be switched
on at all times, even with the SmartKey
removed from the starter switch.
The hazard warning flasher comes on
automatically when an air bag deploys.
XSwitching on: Press hazard warning
flasher switch :.
All turn signal lamps are flashing.
iWith the hazard warning flasher activated
and the combination switch set for either
left or right turn, only the respective left or
right turn signals will operate when the
ignition is switched on.
XSwitching off: Press hazard warning
flasher switch : again.
iIf the hazard warning flasher has been
activated automatically, press hazard
warning flasher switch : to switch it off.
Headlamp cleaning system
The headlamps will be cleaned with a high-
pressure water jet automatically when the
engine is running and you have
Rswitched on the headlamps
Lighting93Controls in detail204_AKB; 5; 23, en-USd2ureepe,Version: 2.11.8.12009-07-16T17:54:06+02:00 - Seite 93Z
Page 96 of 364
and
R the windshield wipers have wiped the
windshield with washer fluid for the first
time
The headlamps are cleaned every tenth time
the windshield is washed with washer fluid.
The counter resets when you switch off the
ignition.
For information on filling up the washer
reservoir, see “Washer system and headlamp
cleaning system” ( Y page 228).
Corner-illuminating front fog lamps
The corner-illuminating front fog lamps
improve illumination of the area in the
direction into which you are turning.
The corner-illuminating front fog lamps will
only operate
R in low ambient lighting conditions
R at vehicle speeds below 25 mph
(40 km/h)
R with the front fog lamps switched off
R when the engine is running
Switching on
XTurn the exterior lamp switch to position
L or c .
or
XActivate the daytime running lamp mode
( Y page 91).XSwitch on the left or right turn signal,
depending on whether you are turning left
or right.
The respective front fog lamp comes on. If
you have switched on the turn signal for
one side but turn the steering wheel in the
other direction, the corner-illuminatingfront fog lamp on the side of the turn signal
comes on.
or
XTurn the steering wheel in the desired
direction.
Driving forward: The front fog lamp on the
side of your steering direction comes on.
Driving in reverse: The front fog lamp
opposite to your steering direction comes
on.
The corner-illuminating front fog lamps will
come on automatically depending on the
steering angle, even if you did not switch on
either turn signal. If the corner-illuminating
front fog lamps came on automatically, they
will also go out automatically depending on
the steering angle and vehicle speed.
The corner-illuminating front fog lamps
temporarily come on on both sides of the
vehicle if you turn the steering wheel in one
direction and then again in the other direction
shortly thereafter.
The corner-illuminating front fog lamp
remains lit for a short time only. It then goes
out automatically.
Switching off
XSwitch off the left or right turn signal.
or
XSteer straight ahead.
i There may be a brief delay before the
corner-illuminating front fog lamps go out.
94LightingControls in detail
204_AKB; 5; 23, en-USd2ureepe,Version: 2.11.8.12009-07-16T17:54:06+02:00 - Seite 94
Page 153 of 364
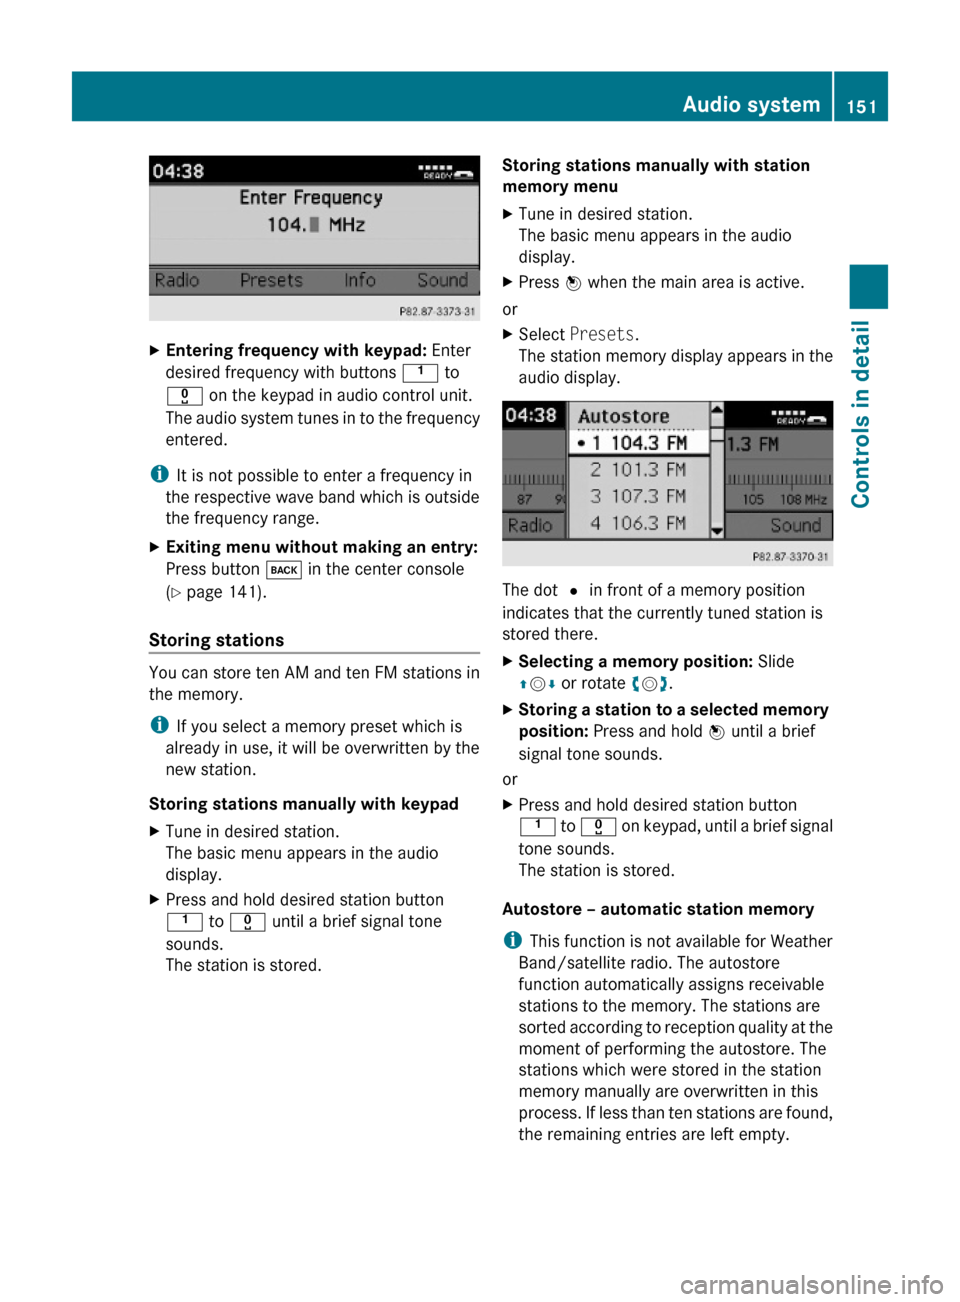
XEntering frequency with keypad: Enter
desired frequency with buttons k to
x on the keypad in audio control unit.
The audio system tunes in to the frequency
entered.
iIt is not possible to enter a frequency in
the respective wave band which is outside
the frequency range.
XExiting menu without making an entry:
Press button k in the center console
(Y page 141).
Storing stations
You can store ten AM and ten FM stations in
the memory.
iIf you select a memory preset which is
already in use, it will be overwritten by the
new station.
Storing stations manually with keypad
XTune in desired station.
The basic menu appears in the audio
display.
XPress and hold desired station button
k to x until a brief signal tone
sounds.
The station is stored.
Storing stations manually with station
memory menu
XTune in desired station.
The basic menu appears in the audio
display.
XPress W when the main area is active.
or
XSelect Presets.
The station memory display appears in the
audio display.
The dot # in front of a memory position
indicates that the currently tuned station is
stored there.
XSelecting a memory position: Slide
ZVÆ or rotate cVd.
XStoring a station to a selected memory
position: Press and hold W until a brief
signal tone sounds.
or
XPress and hold desired station button
k to x on keypad, until a brief signal
tone sounds.
The station is stored.
Autostore – automatic station memory
iThis function is not available for Weather
Band/satellite radio. The autostore
function automatically assigns receivable
stations to the memory. The stations are
sorted according to reception quality at the
moment of performing the autostore. The
stations which were stored in the station
memory manually are overwritten in this
process. If less than ten stations are found,
the remaining entries are left empty.
Audio system151Controls in detail204_AKB; 5; 23, en-USd2ureepe,Version: 2.11.8.12009-07-16T17:54:06+02:00 - Seite 151Z
Page 188 of 364

Front sensors
Centerapprox. 40 in (100 cm)Cornersapprox. 24 in (60 cm)
Rear sensors
Centerapprox. 48 in (120 cm)Cornersapprox. 32 in (80 cm)
Minimum distance
Centerapprox. 8 in (20 cm)Cornersapprox. 6 in (15 cm)
If the Parktronic system detects an obstacle
in this range, all the distance warning
segments illuminate and you hear a warning
signal. If the obstacle is closer than the
minimum distance, the actual distance may
no longer be indicated by the Parktronic
system.
Warning indicators
Visual signals indicate the relative distance
between the sensors and an obstacle.
Front area warning indicators
Rear area warning indicators
Each warning indicator is divided into five
yellow and two red distance segments for left
side : and right side ; of the vehicle. The
Parktronic system is ready to measure when
the yellow readiness indicators = are
illuminated.
The current transmission position determines
which warning indicator will be activated.
Manual transmission:
Current
transmission
position
Warning indicatorForward gear or
neutral position
Front area activatedReverse gearFront and rear area
activated
186Driving systemsControls in detail
204_AKB; 5; 23, en-USd2ureepe,Version: 2.11.8.12009-07-16T17:54:06+02:00 - Seite 186
Page 297 of 364

Display messagesPossible causes/consequences and M SolutionsbCheck
Left Tail
Lamp
or
Check
Right
Tail LampThe left or right tail lamp is malfunctioning.XReplace the bulb as soon as possible ( Y page 313).bCheck
Left Tail
and Brake
Lamps
or
Check
Right
Tail and
Brake
LampsThe left or right tail lamp/brake lamp is malfunctioning.XReplace the bulb as soon as possible ( Y page 313).bCheck
Left
Cornering
Light
or
Check
Right
Cornering
LightThe left or right corner-illuminating front fog lamp is
malfunctioning.XContact an authorized Mercedes-Benz Center as soon as
possible.bCheck
Rear Left
Turn
Signal
or
Check
Rear
Right
Turn
SignalThe left or right rear turn signal lamp is malfunctioning.XReplace the bulb as soon as possible ( Y page 313).Vehicle status messages in the multifunction display295Practical hints204_AKB; 5; 23, en-USd2ureepe,Version: 2.11.8.12009-07-16T17:54:06+02:00 - Seite 295Z