2010 MERCEDES-BENZ C300 4MATIC Setting clock
[x] Cancel search: Setting clockPage 8 of 364

Locking/unlocking from inside ........75
SmartKey ......................................... 70
Central locking/unlocking switch ..... 75
Certification label .............................. 332
Children in the vehicle
Air bags ........................................... 37
BabySmart™ air bag deactivation
system ............................................. 46
Child safety locks (rear doors) .........59
Child seat anchors – LATCH-type
(ISOFIX) ........................................... 58
Indicator lamp, front passenger
front air bag off (Canada only) .........46
Indicator lamp, front passenger
front air bag off (USA only) ..............42
Infant and child restraint systems .... 55
ISOFIX (Child seat anchors –
LATCH-type) ..................................... 58
OCS (Occupant Classification
System) ........................................... 42
Override switch ................................ 59
Safety notes ..................................... 54
Tether anchorage points ..................57
Top tether ........................................ 57
Child safety
see Children in the vehicle
Child seat anchors – LATCH-type
(ISOFIX) see Children in the vehicle
Chrome-plated exhaust tip,
cleaning .............................................. 266
Cigarette lighter ................................ 209
Clear button ....................................... 142
Climate control system
Air conditioning ............................. 191
Air conditioning refrigerant ............354
Air distribution ............................... 194
Air recirculation mode ...................195
Air volume ..................................... 194
Automatic mode ............................ 192
Deactivating system ......................191
Front defroster .............................. 194
Maximum cooling MAX COOL ........195
Temperature .................................. 192
Clock ............................................ 29, 132
Cockpit ................................................. 27
Cold tire inflation pressure .............. 250
Collapsible wheel chock ................... 269COMAND system
see separate COMAND system
operating instructions
Combination gauge ............................. 28
Combination switch ............................ 93
Compass ............................................ 210
Control system .................................. 118
Multifunction display .....................120
Multifunction steering wheel .........118
Resetting to factory settings ..........130
Control system menus ...................... 121
AMG ............................................... 123
Audio ............................................. 126
Navi ............................................... 126
Service ........................................... 129
Settings ......................................... 130
Telephone ...................................... 128
Trip ................................................ 121
Control system submenus
Convenience .................................. 135
Instrument cluster .........................131
Lighting .......................................... 133
Time/Date ..................................... 132
Vehicle ........................................... 135
Convenience submenu
Easy-entry/exit feature .................. 136
Fold-in function for exterior rear
view mirrors ................................... 136
Coolant
Anticorrosion/antifreeze ...............357
Capacities ...................................... 351
Checking level ............................... 227
Messages in the multifunction
display ........................................... 288
Temperature gauge ........................ 117
Warning lamp ................................. 305
Coolant temperature gauge ............... 28
Corner-illuminating front fog
lamps .................................................... 94
Cruise control .................................... 180
Activating ....................................... 181
Canceling ....................................... 181
Changing the set speed .................182
Last stored speed ..........................183
Lever .............................................. 181
Messages in the multifunction
display ........................................... 2756Index204_AKB; 5; 23, en-USd2ureepe,Version: 2.11.8.12009-07-16T17:54:06+02:00 - Seite 6
Page 119 of 364

Rmalfunction/warning messages
Rfailure of any systems
Driving characteristics may be impaired.
If you must continue to drive, do so with added
caution. Contact an authorized Mercedes-
Benz Center as soon as possible.
The language setting for the multifunction
display can be changed with the audio system
(Y page 148) or with the COMAND system.
Vehicles with COMAND system: Refer to
separate operating instructions.
Activating the instrument cluster
The instrument cluster is activated when you
Ropen the driver’s door
Rswitch on the ignition
Adjusting the instrument cluster
illumination
XTo brighten illumination: Turn
dimmer : clockwise.
XTo dim illumination: Turn dimmer :
counterclockwise.
iThe instrument cluster illumination is
dimmed or brightened automatically to suit
ambient light conditions.
The instrument cluster illumination will also
be adjusted automatically when you switch
on the vehicle’s exterior lamps.
Coolant temperature gauge
The coolant temperature gauge is located on
the left side in the instrument cluster
(Y page 28).
GWarning!
Driving when your engine is overheated can
cause some fluids which may have leaked into
the engine compartment to catch fire. You
could be seriously burned.
Steam from an overheated engine can cause
serious burns which can occur just by opening
the engine hood. Stay away from the engine
if you see or hear steam coming from it.
Stop the vehicle in a safe location away from
other traffic. Turn off the engine, get out of the
vehicle and do not stand near the vehicle until
the engine has cooled down.
During severe operating conditions, e.g. stop-
and-go traffic, the coolant temperature may
rise close to 248‡ (120†), i.e close to the
red zone of the temperature gauge.
! Excessive coolant temperature triggers a
warning in the multifunction display.
The engine should not be operated with a
coolant temperature above 248‡ (120†),
i.e. in the red zone of the coolant
temperature gauge. Doing so may cause
serious engine damage which is not
covered by the Mercedes-Benz Limited
Warranty.
Tachometer
The red marking on the tachometer
(Y page 28) denotes excessive engine speed.
! Avoid driving at excessive engine speeds,
as it may result in serious engine damage
that is not covered by the Mercedes-Benz
Limited Warranty.
To help protect the engine, the fuel supply is
interrupted if the engine is operated within
the red marking.
Instrument cluster117Controls in detail204_AKB; 5; 23, en-USd2ureepe,Version: 2.11.8.12009-07-16T17:54:06+02:00 - Seite 117Z
Page 122 of 364

Using the control systemXTo select a menu: Press button =
or ;.
XTo select a submenu: Press button :
or 9.
XTo go to the next higher menu level:
Press button %.
XTo select the standard display: Press
button % repeatedly until the standard
display featuring the odometer and
speedometer appears.
or
XPress and hold button % until the
standard display featuring the trip
odometer and the main odometer appears.
XTo confirm selection: Press button a.XTo confirm display message: Press
button a or %.
The control system saves certain display
messages. Calling up display messages
(Y page 129).
For information about warning and
malfunction messages appearing in the
multifunction display (Y page 270).
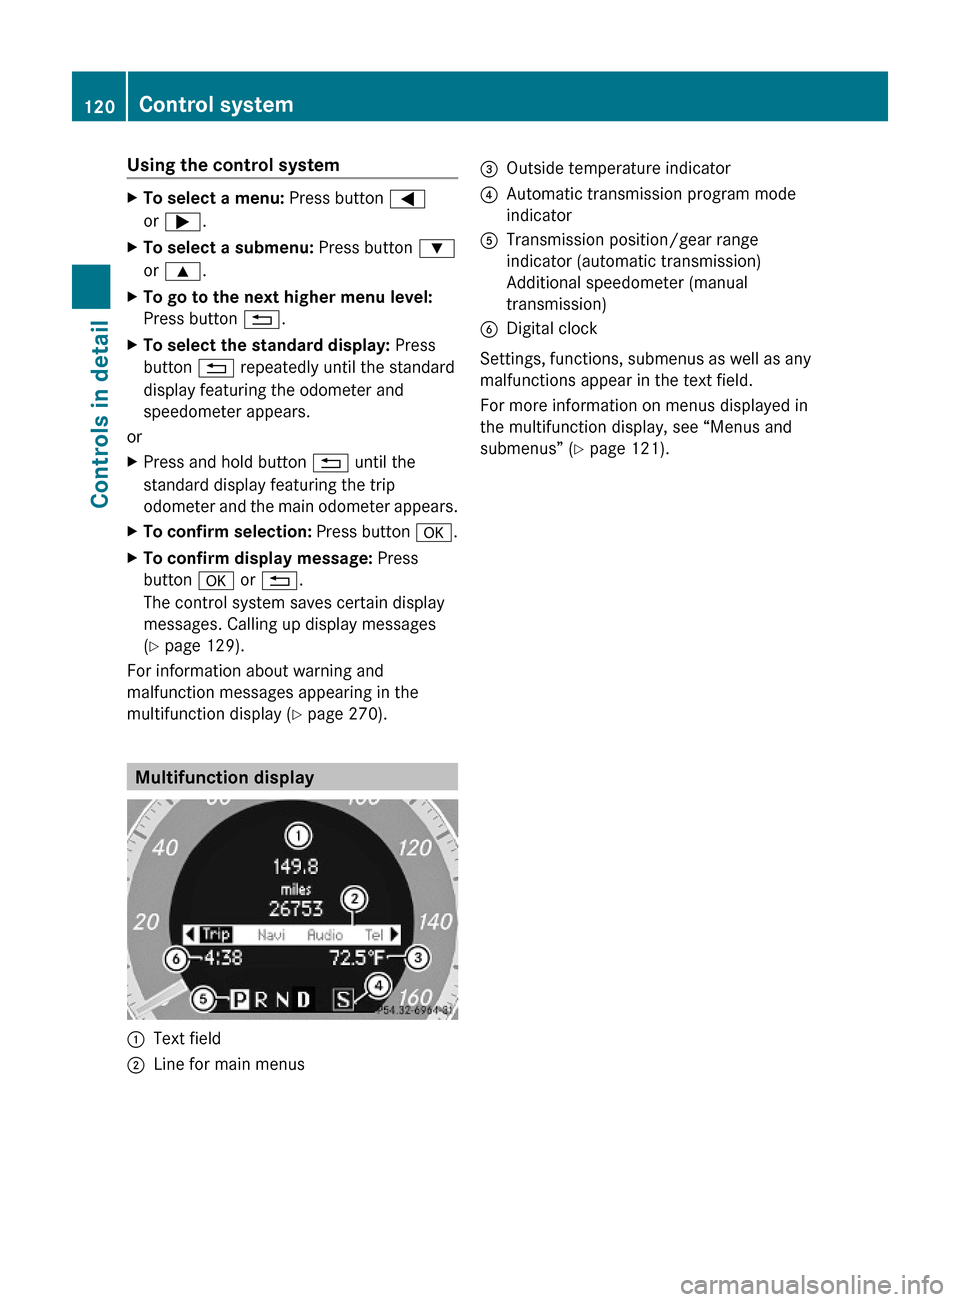
Multifunction display
:Text field;Line for main menus=Outside temperature indicator?Automatic transmission program mode
indicator
ATransmission position/gear range
indicator (automatic transmission)
Additional speedometer (manual
transmission)
BDigital clock
Settings, functions, submenus as well as any
malfunctions appear in the text field.
For more information on menus displayed in
the multifunction display, see “Menus and
submenus” (Y page 121).
120Control systemControls in detail
204_AKB; 5; 23, en-USd2ureepe,Version: 2.11.8.12009-07-16T17:54:06+02:00 - Seite 120
Page 194 of 364

Activating
Moist air can fog up the windows. You can
dehumidify the interior air with the air
conditioning.
XPress button ¿.
The indicator lamp in the button comes on.
i The evaporator will be vented when the
air conditioning has been in use.
Approximately 1 hour after locking the
vehicle, the blower switches on
automatically. The blower will run for
30 minutes at its lowest level. The blower
noise is normal and not an indication of a
malfunction. When you unlock the vehicle
in the meantime, venting will be
interrupted. If the vehicle battery is low,
automatic evaporator venting will not occur
in order to preserve the battery.
Automatic mode
When operating the climate control system in
automatic mode, the interior air temperature,
air volume and air distribution are adjusted
automatically.
In automatic mode, cooling with
dehumidification is switched on. This function
can be switched off if necessary.
GWarning!
If you deactivate the air conditioning, the
vehicle will not be cooled when weather
conditions are warm. The windows can fog up
more quickly. Window fogging may impair
visibility and endanger you and others.
XSet the desired temperature
( Y page 192).XActivating: Press button Ã.
The indicator lamp in the button comes on.
The air volume and air distribution are
adjusted automatically.XDeactivating: Press button I, K or
_ .
The indicator lamp in button à goes out.
The automatic operation of air volume and
air distribution switches off. The symbols of
air distribution or air volume appear in
display G (Y page 189).XAdjust air distribution ( Y page 194).XAdjust air volume ( Y page 194).
Setting temperature
You can adjust the air temperature on each
side of the passenger compartment. You
should raise or lower the temperature setting
in small increments, preferably starting at
72‡ (22†).
You can adjust the air temperature on each
side of the passenger compartment. You
should raise or lower the temperature setting
in small increments, preferably starting at
72‡ (22†).
XIncreasing/decreasing: Turn
temperature controls : and B
( Y page 189) slightly clockwise or
counterclockwise.
Adjusting air vents
GWarning!
When operating the climate control, the air
that enters the passenger compartment
through the air vents can be very hot or very
cold (depending on the set temperature). This
may cause burns or frostbite to unprotected
skin in the immediate area of the air vents.
Always keep sufficient distance between
unprotected parts of the body and the air
vents. If necessary, use the air distribution
adjustment to direct the air to air vents in the
vehicle interior that are not in the immediate
area of unprotected skin.
192Climate control systemControls in detail
204_AKB; 5; 23, en-USd2ureepe,Version: 2.11.8.12009-07-16T17:54:06+02:00 - Seite 192
Page 196 of 364

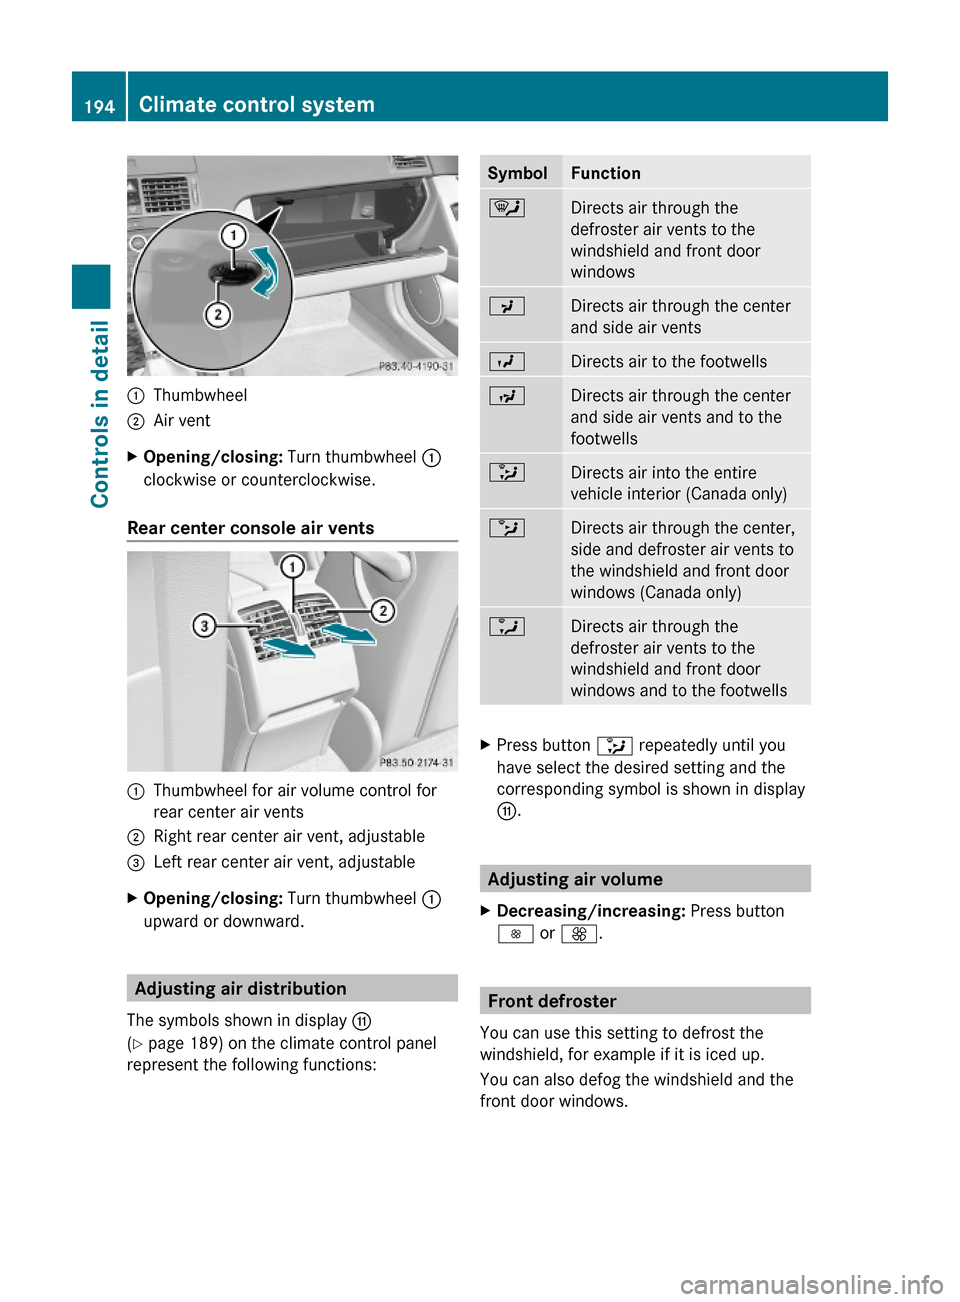
:Thumbwheel;Air ventXOpening/closing: Turn thumbwheel :
clockwise or counterclockwise.
Rear center console air vents
:Thumbwheel for air volume control for
rear center air vents
;Right rear center air vent, adjustable=Left rear center air vent, adjustableXOpening/closing: Turn thumbwheel :
upward or downward.
Adjusting air distribution
The symbols shown in display G
(Y page 189) on the climate control panel
represent the following functions:
SymbolFunction¯Directs air through the
defroster air vents to the
windshield and front door
windows
PDirects air through the center
and side air vents
ODirects air to the footwellsNDirects air through the center
and side air vents and to the
footwells
_Directs air into the entire
vehicle interior (Canada only)
bDirects air through the center,
side and defroster air vents to
the windshield and front door
windows (Canada only)
aDirects air through the
defroster air vents to the
windshield and front door
windows and to the footwells
XPress button _ repeatedly until you
have select the desired setting and the
corresponding symbol is shown in display
G.
Adjusting air volume
XDecreasing/increasing: Press button
I or K.
Front defroster
You can use this setting to defrost the
windshield, for example if it is iced up.
You can also defog the windshield and the
front door windows.
194Climate control systemControls in detail
204_AKB; 5; 23, en-USd2ureepe,Version: 2.11.8.12009-07-16T17:54:06+02:00 - Seite 194
Page 271 of 364

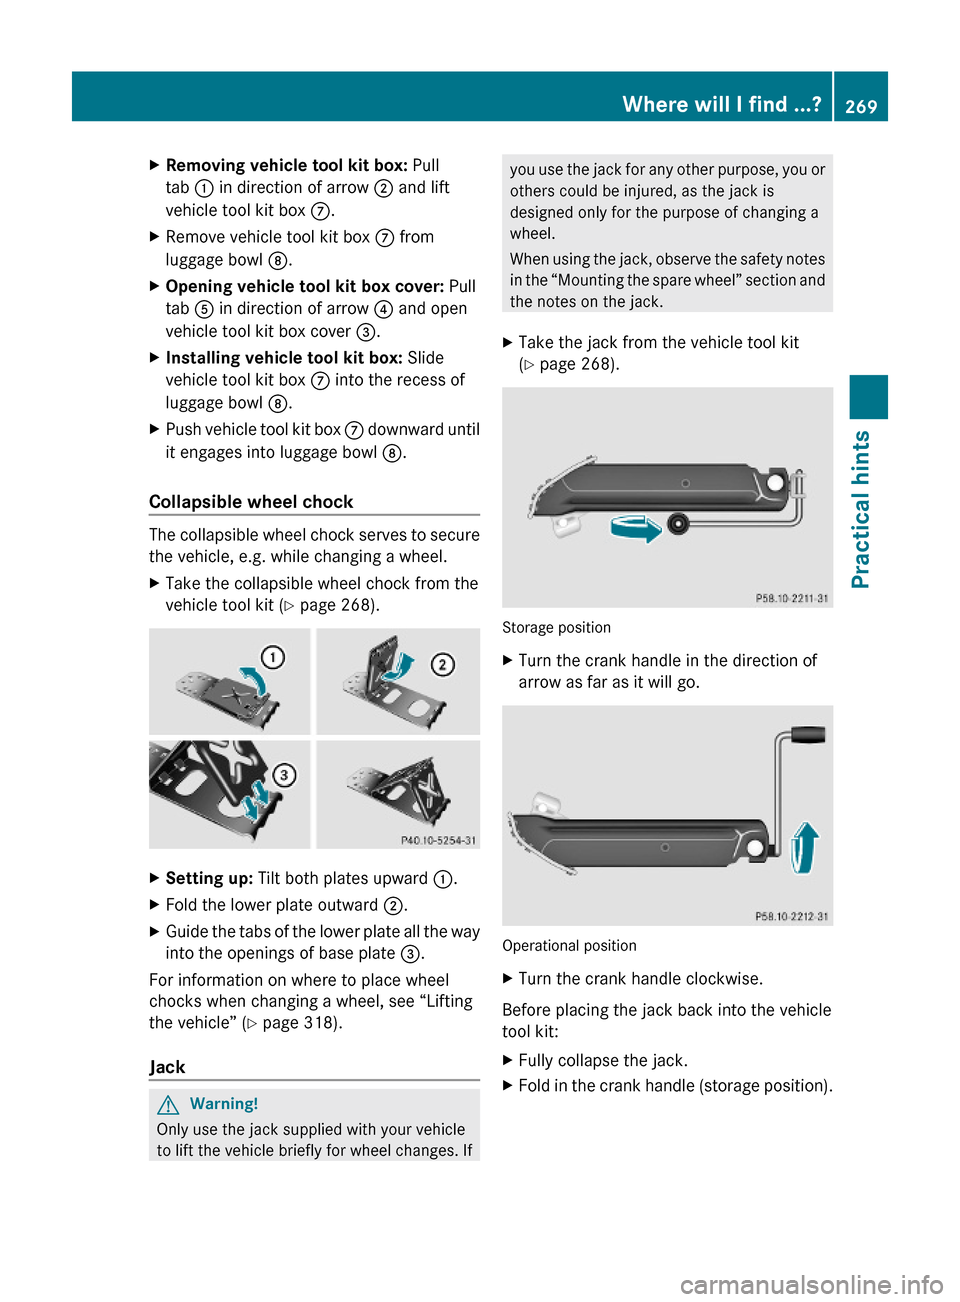
XRemoving vehicle tool kit box: Pull
tab : in direction of arrow ; and lift
vehicle tool kit box C.
XRemove vehicle tool kit box C from
luggage bowl D.
XOpening vehicle tool kit box cover: Pull
tab A in direction of arrow ? and open
vehicle tool kit box cover =.
XInstalling vehicle tool kit box: Slide
vehicle tool kit box C into the recess of
luggage bowl D.
XPush vehicle tool kit box C downward until
it engages into luggage bowl D.
Collapsible wheel chock
The collapsible wheel chock serves to secure
the vehicle, e.g. while changing a wheel.
XTake the collapsible wheel chock from the
vehicle tool kit (Y page 268).
XSetting up: Tilt both plates upward :.XFold the lower plate outward ;.XGuide the tabs of the lower plate all the way
into the openings of base plate =.
For information on where to place wheel
chocks when changing a wheel, see “Lifting
the vehicle” (Y page 318).
Jack
GWarning!
Only use the jack supplied with your vehicle
to lift the vehicle briefly for wheel changes. If
you use the jack for any other purpose, you or
others could be injured, as the jack is
designed only for the purpose of changing a
wheel.
When using the jack, observe the safety notes
in the “Mounting the spare wheel” section and
the notes on the jack.
XTake the jack from the vehicle tool kit
(Y page 268).
Storage position
XTurn the crank handle in the direction of
arrow as far as it will go.
Operational position
XTurn the crank handle clockwise.
Before placing the jack back into the vehicle
tool kit:
XFully collapse the jack.XFold in the crank handle (storage position).Where will I find ...?269Practical hints204_AKB; 5; 23, en-USd2ureepe,Version: 2.11.8.12009-07-16T17:54:06+02:00 - Seite 269Z