2010 MERCEDES-BENZ C300 4MATIC Maximum engine speed
[x] Cancel search: Maximum engine speedPage 14 of 364

M
Maintenance ........................................ 21
Maintenance System
Service indicator display ................259
Service indicator message .............259
Service term exceeded ..................259
Manual headlamp mode (Low-
beam headlamps) ................................ 91
Manual shift program ....................... 113
Manual transmission ........................ 107
Gearshift lever ............................... 107
Hill-start assist system ..................183
Maximum engine speed
see Vehicle specification
Maximum loaded vehicle weight ..... 251
Maximum load rating (tires) ............. 251
Maximum permissible tire
inflation pressure .............................. 251
Mechanical key see Key, Mechanical
Media interface ................................. 205
Memory function ................................. 89
Menus see Control system menus
Minispare wheel
see Spare wheel
Mirrors .................................................. 86
Auto-dimming rear view mirrors ....... 87
Exterior rear view mirror parking
position ............................................ 87
Exterior rear view mirrors ................86
Interior rear view mirror ...................86
Memory function .............................. 89
Power-folding exterior rear view
mirrors ............................................. 88
Vanity mirror .................................. 208
MON (Motor Octane Number) .......... 354
Motor Octane Number see MON
MP3 mode .......................................... 158
Multifunction display ........................ 120
Symbol messages ..........................279
Text messages ............................... 272
Vehicle status messages ...............270
Multifunction display messages
ABS ....................................... 280, 281
Active headlamps .......................... 292Advanced TPMS ............................. 277
Air bags ......................................... 272
Alternator ...................................... 290
Backrests ....................................... 286
Battery ........................................... 290
Brake fluid ..................................... 282
Brake pads ..................................... 279
Child seat ...................................... 275
Coolant .......................................... 288
Corner-illuminating front fog
lamps ............................................. 295
Cruise control ................................ 275
Doors ............................................. 286
EBP ................................................ 281
Engine oil ....................................... 291
ESP ®
............................. 280, 281, 283
Fog lamps .............................. 292, 294
Front passenger front air bag ........272
Gas cap .......................................... 291
High-beam lamps ........................... 293
Hood .............................................. 286
License plate lamps .......................294
Light sensor ................................... 294
Low-beam lamps ............................ 294
Parking brake ................................ 281
Parking lamps ................................ 293
Power steering ............................... 288
Reserve fuel ................................... 291
Reverse lamp ................................. 292
Side marker lamps .........................293
SmartKey ....................................... 286
SmartKey with KEYLESS-GO ..........286
SRS ................................................ 284
Tail lamps ...................................... 295
Tele Aid .......................................... 284
Tire inflation pressure ............276, 296
Tire pressure monitor ....................277
Tires ...................................... 276, 296
Trunk ............................................. 286
Turn signals ................................... 296
Multifunction steering wheel
Adjustment ...................................... 84
Buttons .......................................... 118
Cleaning ......................................... 265
Easy-entry/exit feature ...........85, 136
Gearshift control ............................ 112
Memory function .............................. 89
Overview .......................................... 2912Index204_AKB; 5; 23, en-USd2ureepe,Version: 2.11.8.12009-07-16T17:54:06+02:00 - Seite 12
Page 19 of 364

Tire inflation pressure
Checking ........................................ 232
Important notes on ........................231
Label on the inside of fuel filler
flap ................................................ 231
Placard on driver’s door B-pillar .....238
Tire labeling ....................................... 246
Tire load rating .................................. 251
Tire ply composition and material
used .................................................... 252
Tire pressure loss warning system . 233
Tires ........................................... 229, 344
Advanced Tire Pressure
Monitoring System (Advanced
TPMS) ............................................ 234
Air pressure ................................... 230
Care and maintenance ...................243
Cleaning ......................................... 244
Direction of rotation, spinning .......242
Important notes on tire inflation
pressure ........................................ 231
Inflation pressure ........................... 232
Information placard .......................238
Inspection ...................................... 243
Labeling ......................................... 246
Load index ............................. 246, 251
Load rating .................................... 251
Messages in the multifunction
display ................................... 276, 296
Ply composition and material
used ............................................... 252
Problems under-/overinflation ......232
Retreads ........................................ 229
Rims and tires (technical data) ......344
Rotation ......................................... 245
Service life ..................................... 243
Sizes .............................................. 344
Snow chains .................................. 253
Speed rating .......................... 247, 252
Storing ........................................... 244
Temperature .......................... 231, 245
Terminology ................................... 250
Tire Identification Number .............252
Tire pressure loss warning system . 233
TPMS low tire pressure/
malfunction telltale ........................306
Traction ................................. 244, 252
Tread ............................................. 252Tread depth ........................... 243, 252
Treadwear ...................................... 244
Treadwear indicators .............243, 252
Vehicle maximum load on ..............252
Wear pattern .................................. 245
Winter tires ............................ 252, 344
Tire speed rating ....................... 247, 252
Top tether see Children in the vehicle
Total load limit ................................... 252
Towing
Towing eye bolt .............................. 326
Vehicle ........................................... 325
Towing eye bolt ................................. 326
Traction ...................................... 244, 252
Transfer case ..................................... 116
Transmission see Automatic transmission or
Manual transmission
Transmission fluid level .................... 227
Transmission gear selector lever see Gear selector lever
Transmission positions .................... 109
Traveling abroad ............................... 257
Tread (tires) ....................................... 252
Tread depth (tires) .................... 243, 252
Treadwear .......................................... 244
Treadwear indicators (tires) .... 243, 252
Trip menu ........................................... 121
Trunk
Closing ............................................. 76
Fuse box ........................................ 329
Messages in the multifunction
display ........................................... 286
Opening ........................................... 75
Tie-down rings ............................... 203
Trunk lid emergency release ............76
Unlocking manually .......................309
Valet locking .................................... 77
Turning off the engine ...................... 106
Turn signals ......................................... 93
Cleaning lenses ............................. 263
Indicator lamps ................................ 28
Messages in the multifunction
display ........................................... 296
Replacing bulbs ............................. 314Index17204_AKB; 5; 23, en-USd2ureepe,Version: 2.11.8.12009-07-16T17:54:06+02:00 - Seite 17
Page 39 of 364

GWarning!
The SRS self-check has detected a
malfunction when the SRS indicator lamp
6
R does not come on at all
R fails to go out after approximately
4 seconds after the engine was started
R comes on after the engine was started or
while driving
For your safety, we strongly recommend that
you contact an authorized Mercedes-Benz
Center immediately to have the system
checked. Otherwise the SRS may not be
activated when needed in an accident, which
could result in serious or fatal injury. The SRS
might also deploy unexpectedly and
unnecessarily which could also result in injury
as well.
In addition, improper work on the SRS creates
a risk of rendering the SRS inoperative or
causing unintended air bag deployment. Work
on the SRS must therefore only be performed
by qualified technicians. Contact an
authorized Mercedes-Benz Center.
If it is necessary to modify an air bag system
to accommodate a person with disabilities,
contact an authorized Mercedes-Benz Center.
USA only: Call our Customer Assistance
Center at 1-800-FOR-MERCedes
(1-800-367-6372) for details.
Air bags
GWarning!
Air bags are designed to reduce the potential
of injury and fatality in certain
R frontal impacts (front air bags and driver’s
side knee bag)
R side impacts (side impact air bags, window
curtain air bags and pelvis air bags)
However, no system available today can
completely eliminate injuries and fatalities.
Deployment of the air bags temporarily
releases a small amount of dust from the air
bags. This dust, however, is neither harmful
to your health, nor does it indicate a fire in the
vehicle. The dust might cause some
temporary breathing difficulty for people with
asthma or other breathing trouble. To avoid
this, you may wish to get out of the vehicle as
soon as it is safe to do so. If you have any
breathing difficulty but cannot get out of the
vehicle after the air bag inflates, then get fresh
air by opening a window or door.GWarning!
To reduce the risk of injury when the front air
bags inflate, it is very important for the driver
and front passenger to always be in a properly
seated position and to wear their respective
seat belt.
For maximum protection in the event of a
collision always be in normal seated position
with your back against the seat backrest.
Fasten your seat belt and make sure it is
properly positioned on your body.
Since the air bag inflates with considerable
speed and force, a proper seating position
and correct positioning of the hands on the
steering wheel will help to keep you at a safe
distance from the air bag. Occupants who are
not wearing their seat belt, are not seated
properly or are too close to the air bag can be
seriously injured or killed by an air bag as it
inflates with great force instantaneously:
R Sit with the seat belt properly fastened in a
position that is as upright as possible with
your back against the seat backrest.
R Move the driver’s seat as far back as
possible, still permitting proper operation
of vehicle controls. The distance from the
center of the driver’s chest to the center of
the air bag cover on the steering wheel
must be at least 10 inches (25 cm) or more.
You should be able to accomplish this by
adjusting the seat and steering wheel. If
Occupant safety37Safety and security204_AKB; 5; 23, en-USd2ureepe,Version: 2.11.8.12009-07-16T17:54:06+02:00 - Seite 37Z
Page 53 of 364

XPush latch plate ; into buckle = until it
clicks.
XIf necessary, adjust the seat belt to the
correct height (Y page 51).
XIf necessary, tighten the lap portion to a
snug fit by pulling shoulder portion up.
All lap/shoulder belts except the driver’s seat
belt have special seat belt retractors to
secure child restraints properly. For more
information on special seat belt retractors,
see “Infant and child restraint systems”
(Y page 55).
To release the seat belt with seat belt release
button ?, see (Y page 51).
Seat belt outlet height adjustment
You can adjust the height of the seat belt
outlet for the driver’s and front passenger
seat.
XRaising: Slide the seat belt outlet height
adjuster upward.
The seat belt outlet height adjuster
engages in different positions.
XLowering: Press and hold release
button :.
XSlide the seat belt outlet height adjuster
downward.
XRelease release button : and make sure
the seat belt outlet height adjuster engages
into place.
Releasing the seat beltsXPress seat belt release button ?
(Y page 50).
Allow the retractor to completely rewind
the seat belt by guiding latch plate ;
(Y page 50).
! Make sure the seat belt retracts
completely. Otherwise the seat belt and/or
latch plate could get caught or pinched in
the door or in the seat mechanism. This can
damage the seat belt and impair its
effectiveness, and/or cause damage to the
door and/or door trim panel. Such damage
is not covered by the Mercedes-Benz
Limited Warranty.
Damaged seat belts must be replaced.
Contact an authorized Mercedes-Benz
Center.
Enhanced seat belt reminder system
When the engine is started, the seat belt
telltale 7 will always illuminate for
6 seconds to remind you and your passengers
to fasten your seat belts.
If the driver’s seat belt is not fastened when
the engine is started, an additional warning
chime will sound. The warning chime goes out
after approximately 6 seconds or once the
driver’s seat belt is fastened.
If after these 6 seconds the driver’s or the
front passenger’s seat belt (with the front
passenger seat occupied) is not fastened with
front doors closed,
Rthe seat belt telltale 7 remains
illuminated for as long as either the driver’s
or front passenger’s seat belt is not
fastened.
Rand if the vehicle speed once exceeds
15 mph (25 km/h), the seat belt telltale
7 starts flashing and a warning chime
sounds with increasing intensity for a
maximum of 60 seconds or until the
driver’s and front passenger’s seat belt are
fastened.
Occupant safety51Safety and security204_AKB; 5; 23, en-USd2ureepe,Version: 2.11.8.12009-07-16T17:54:06+02:00 - Seite 51Z
Page 105 of 364

Carry out the following steps:XIf you are starting the engine with the
SmartKey: Turn the SmartKey in the starter
switch to position 0 and repeat the starting
procedure.XIf you are starting the engine with KEYLESS-
GO: Close any doors that may be open to
allow for better detection of the SmartKey.
or
XRemove the KEYLESS-GO start/stop
button from the starter switch.XStart the engine with the SmartKey as radio
signals from another source may be
interfering with the KEYLESS-GO function.XRepeat the starting procedure.
If the engine does not start after several
starting attempts:
XContact an authorized Mercedes-Benz
Center or call Roadside Assistance.
The engine does not start. You cannot
hear the starter.
The battery may not be charged sufficiently.
XGet a jump start ( Y page 323).
If the engine will not start despite a jump
start:
XContact an authorized Mercedes-Benz
Center or call Roadside Assistance.
The starter has been exposed to excessive
temperatures.
XLet the starter cool for about 2 minutes.XRepeat the starting procedure.
If the engine does not start after several
starting attempts:
XContact an authorized Mercedes-Benz
Center or call Roadside Assistance.Driving offGWarning!
On slippery road surfaces, never downshift in
order to obtain braking action. This could
result in drive wheel slip and reduced vehicle
control. Your vehicle’s ABS will not prevent
this type of loss of control.
! Do not run a cold engine at high engine
speeds. Running a cold engine at high
engine speeds may shorten the service life
of the engine. This is not covered by the
Mercedes-Benz Limited Warranty.
C 63 AMG: At engine temperatures below
68‡ (20†), the engine’s maximum speed
is restricted in order to protect it from
damage. Avoid driving your vehicle at full
speed when the engine is cold to prevent
premature engine wear and/or diminished
comfort.
! If an acoustic warning sounds and the
message Release Parking Brake
appears in the multifunction display when
driving off, you have forgotten to release
the parking brake.
Release the parking brake.
! Avoid spinning of a drive wheel. This may
cause serious damage to the drivetrain
which is not covered by the Mercedes-Benz
Limited Warranty.
! Simultaneously depressing the
accelerator pedal and applying the brakes
reduces engine performance and causes
premature brake and drivetrain wear which
is not covered by the Mercedes-Benz
Limited Warranty.
i Once the vehicle is in motion, the
automatic central locking function engages
and the locking knobs in the doors move
down.
Driving and parking103Controls in detail204_AKB; 5; 23, en-USd2ureepe,Version: 2.11.8.12009-07-16T17:54:06+02:00 - Seite 103Z
Page 112 of 364

EffectBPark position
Shift the automatic transmission
into park position P only when the
vehicle is stopped. The park position
is not intended to serve as a brake
when the vehicle is parked. Rather,
the driver should always engage the
parking brake in addition to shifting
the automatic transmission into
park position P to secure the
vehicle.
The SmartKey can only be removed
from the starter switch with the gear
selector lever in park position P.
With the SmartKey removed from
the starter switch, the gear selector
lever is locked in park position P.
If the vehicle’s electrical system is
malfunctioning, the gear selector
lever could remain locked in park
position P. To unlock the gear
selector lever manually, see
“Manually unlocking the gear
selector lever” ( Y page 311).CReverse gear
Shift the automatic transmission
into reverse gear R only when the
vehicle is stopped.EffectANeutral position
No power is transmitted from the
engine to the drive axle. When the
brakes are released, the vehicle can
be moved freely (pushed or towed).
To avoid damage to the
transmission, never shift the
automatic transmission into neutral
position N while driving.
Exception: If the ESP ®
is switched
off or malfunctioning, shift the
automatic transmission into neutral
position N if the vehicle is in danger
of skidding.
! Coasting the vehicle, or driving
for any other reason with the
automatic transmission in neutral
position N can result in
transmission damage that is not
covered by the Mercedes-Benz
Limited Warranty.7Drive position
The automatic transmission shifts
automatically. All forward gears are
available.
Driving tips
Kickdown
Use the kickdown when you want maximum
acceleration.
XU.S. vehicles except AMG vehicles:
Fully depress the accelerator pedal.
Depending on the engine speed the
automatic transmission shifts into a lower
gear.XCanada vehicles and AMG vehicles:
Depress the accelerator pedal past the
point of resistance.
Depending on the engine speed the
automatic transmission shifts into a lower
gear.110Automatic transmissionControls in detail
204_AKB; 5; 23, en-USd2ureepe,Version: 2.11.8.12009-07-16T17:54:06+02:00 - Seite 110
Page 115 of 364

XBriefly press the gear selector lever to the
left in the D- direction.
or
XBriefly pull left gearshift control :.
The automatic transmission will shift into
the next lower gear as permitted by the
shift program. This action simultaneously
limits the gear range of the automatic
transmission.
iTo avoid overrevving the engine when
downshifting, the automatic transmission
will not shift into a lower gear if the engine’s
maximum speed would be exceeded.
Extending gear range
XBriefly press the gear selector lever to the
right in the D+ direction.
or
XBriefly pull right gearshift control ;.
The automatic transmission will shift into
the next higher gear as permitted by the
shift program. This action simultaneously
extends the gear range of the automatic
transmission.
iIf you press on the accelerator pedal
when the engine has reached the
revolution limit of the current gear range,
the automatic transmission will upshift
beyond any gear range limit selected.
Canceling gear range limit
XPress and hold the gear selector lever to
the right in the D+ direction until the gear
range indicator disappears from the
multifunction display.
or
XPull and hold right gearshift control ; until
the gear range indicator disappears from
the multifunction display.
The automatic transmission will shift from
the current gear range directly into drive
position D.
Shifting into optimal gear range XPress and hold the gear selector lever to
the left in the D- direction.
or
XPull and hold left gearshift control :.
The automatic transmission will select the
gear range suited for optimal acceleration
and deceleration automatically. This will
involve shifting down one or more gears.
Manual shift program
The manual shift program is available on
vehicles with dynamic handling package and
on C 63 AMG only.
Manual program mode M differs with regard
to spontaneity, response time, and shifting
smoothness from automatic program mode
S.
In manual program mode M, system-
controlled automatic gearshifting is switched
off. You need to change the gears by manually
upshifting or downshifting using the gear
selector lever or the steering wheel gearshift
control.
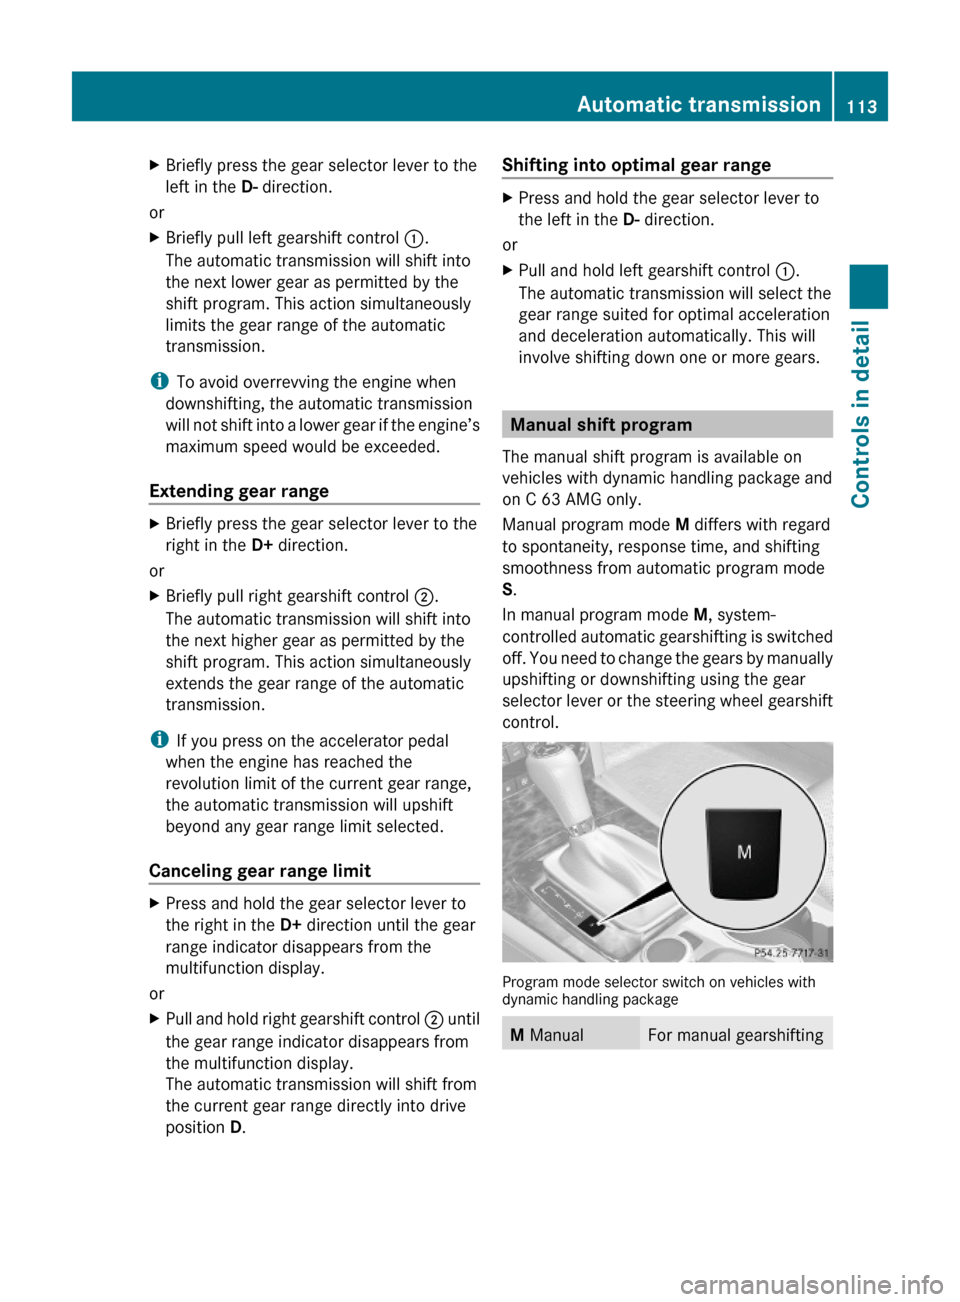
Program mode selector switch on vehicles withdynamic handling package
M ManualFor manual gearshiftingAutomatic transmission113Controls in detail204_AKB; 5; 23, en-USd2ureepe,Version: 2.11.8.12009-07-16T17:54:06+02:00 - Seite 113Z
Page 117 of 364

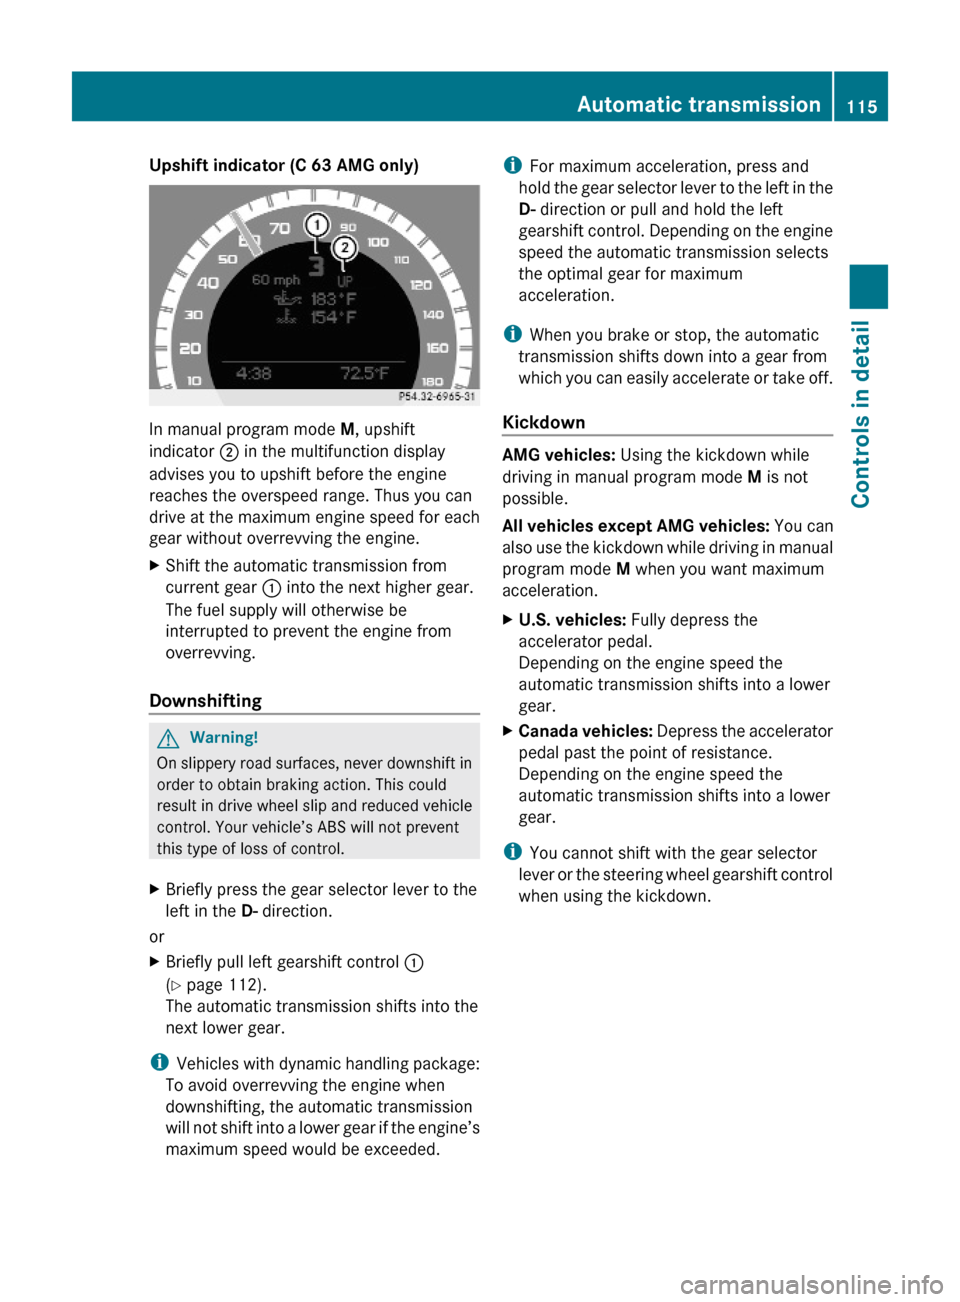
Upshift indicator (C 63 AMG only)
In manual program mode M, upshift
indicator ; in the multifunction display
advises you to upshift before the engine
reaches the overspeed range. Thus you can
drive at the maximum engine speed for each
gear without overrevving the engine.
XShift the automatic transmission from
current gear : into the next higher gear.
The fuel supply will otherwise be
interrupted to prevent the engine from
overrevving.
Downshifting
GWarning!
On slippery road surfaces, never downshift in
order to obtain braking action. This could
result in drive wheel slip and reduced vehicle
control. Your vehicle’s ABS will not prevent
this type of loss of control.
XBriefly press the gear selector lever to the
left in the D- direction.
or
XBriefly pull left gearshift control :
(Y page 112).
The automatic transmission shifts into the
next lower gear.
iVehicles with dynamic handling package:
To avoid overrevving the engine when
downshifting, the automatic transmission
will not shift into a lower gear if the engine’s
maximum speed would be exceeded.
iFor maximum acceleration, press and
hold the gear selector lever to the left in the
D- direction or pull and hold the left
gearshift control. Depending on the engine
speed the automatic transmission selects
the optimal gear for maximum
acceleration.
iWhen you brake or stop, the automatic
transmission shifts down into a gear from
which you can easily accelerate or take off.
Kickdown
AMG vehicles: Using the kickdown while
driving in manual program mode M is not
possible.
All vehicles except AMG vehicles: You can
also use the kickdown while driving in manual
program mode M when you want maximum
acceleration.
XU.S. vehicles: Fully depress the
accelerator pedal.
Depending on the engine speed the
automatic transmission shifts into a lower
gear.
XCanada vehicles: Depress the accelerator
pedal past the point of resistance.
Depending on the engine speed the
automatic transmission shifts into a lower
gear.
iYou cannot shift with the gear selector
lever or the steering wheel gearshift control
when using the kickdown.
Automatic transmission115Controls in detail204_AKB; 5; 23, en-USd2ureepe,Version: 2.11.8.12009-07-16T17:54:06+02:00 - Seite 115Z