Page 129 of 138

129
Before
UseGetting
started
RoutingAddress
Book
Vo i c e Recognition
Navigation
Set Up
Bluetooth Hands-Free
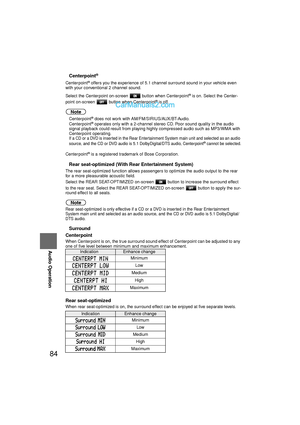
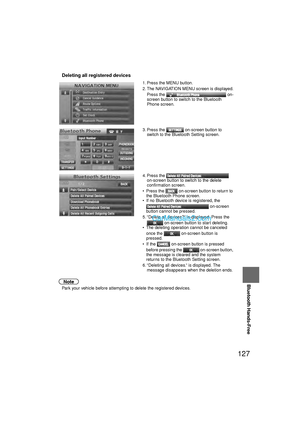
nDeleting all outgoing call records
Note
l
Park your vehicle before attempting to delete the outgoing call records. 1. Press the MENU button.
2. The NAVIGATION MENU screen is displayed.
Press the on-
screen button to switch to the Bluetooth
Phone screen.
3. Press the on-screen button to switch to the Bluetooth Setting screen.
4. Press the on-screen button to switch to the delete
confirmation screen.
• Press the on-screen button to return to the Bluetooth Phone screen.
• If there is no outgoing call record, the
on-screen
button cannot be pressed.
5. “Delete all recent outgoing calls?” is displayed. Press the on-screen
button to start deleting.
• The deleting operation cannot be canceled
once the on-screen button is
pressed.
• If the on-screen button is pressed before pressing the on-screen button,
the message is cleared and the system
returns to the Bluetooth Setting screen.
6. “Deleting all recent outgoing calls.” is displayed. The message disappears when the
deletion ends.
0 # 8 . 8 7 ' $ D Q Q M Mo+ 9Þ9Ü9Ý9Ü9ݬ9âã“Ó
Page 130 of 138

130
Before
UseGetting
started
RoutingAddress
Book
Vo i c e Recognition
Navigation
Set Up
RDM-TMC
Bluetooth Hands-Free
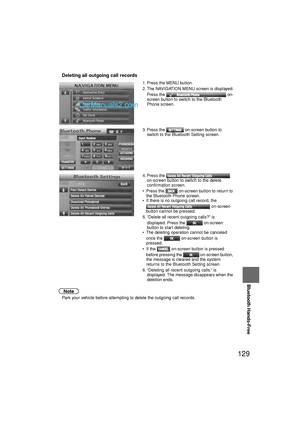
nDeleting all incoming call records
Note
l
Park your vehicle before attempting to delete the incoming call records. 1. Press the MENU button.
2. The NAVIGATION MENU screen is displayed.
Press the on-
screen button to switch to the Bluetooth
Phone screen.
3. Press the on-screen button to switch to the Bluetooth Setting screen.
4. Press the on-screen button to scroll down the menu.
Press the
on-screen button to switch to the delete
confirmation screen.
• Press the on-screen button to return to the Bluetooth Phone screen.
• If there is no incoming call record, the
on-screen
button cannot be pressed.
5. “Delete all recent incoming calls?” is
displayed. Press the on-screen
button to start deleting.
• The deleting operation cannot be canceled once the on-screen button is pressed.
• If the on-screen button is pressed before pressing the on-screen button,
the message is cleared and the system
returns to the Bluetooth Setting screen.
6. “Deleting all recent incoming calls.” is displayed.
The message disappears when the deletion
ends.
0 # 8 . 8 7 ' $ D Q Q M Mo+ 9Þ9Ü9Ý9Ü9ݬ9âã“Ó
Page 131 of 138
131
Before
UseGetting
started
RoutingAddress
Book
Vo i c e Recognition
Navigation
Set Up
Bluetooth Hands-Free
nSetting the Passcode
The system cannot be activated unless the previously set passcode is input.
Note
If the Passcode on-screen button is pressed while Passcode has been enabled,
Passcode is disabled. 1. Press the MENU button.
2. The NAVIGATION MENU screen is displayed.
Press the on-
screen button to switch to the Bluetooth
Phone screen.
3. Press the on-screen button to switch to the Bluetooth Setting screen.
4. Press the on-screen button to scroll down the menu.
Press the Passcode on-screen button
to switch to the Input Bluetooth Passcode
screen.
• Press the on-screen button to return to the Bluetooth Phone screen.
5. After inputting the 4-digit passcode, press the on-screen button.
• Press the on-screen button to return to the Bluetooth Setting screen.
0 # 8 . 8 7 ' $ D Q Q M Mo+ 9Þ9Ü9Ý9Ü9ݬ9âã“Ó
Page 132 of 138
132
Before
UseGetting
started
RoutingAddress
Book
Vo i c e Recognition
Navigation
Set Up
RDM-TMC
Bluetooth Hands-Free
nSetting the PIN code
Note
l
The default PIN code is “0000”. 1. Press the MENU button.
2. The NAVIGATION MENU screen is displayed.
Press the on-
screen button to switch to the Bluetooth
Phone screen.
3. Press the on-screen button to switch to the Bluetooth Setting screen.
4. Press the on-screen button to scroll down the menu.
Press the
on-screen button to switch to the Input
Bluetooth PIN screen.
• Press the on-screen button to return to the Bluetooth Phone screen.
5. After inputting the 4-digit PIN code, press the on-screen button.
• Press the on-screen button to return to the Bluetooth Settings screen.
0 # 8 . 8 7 ' $ D Q Q M Mo+ 9Þ9Ü9Ý9Ü9ݬ9âã“Ó
Page 133 of 138
133
Before
UseGetting
started
RoutingAddress
Book
Vo i c e Recognition
Navigation
Set Up
Bluetooth Hands-Free
nActivating the confirmation prompts function
1. Press the MENU button.
2. The NAVIGATION MENU screen is displayed.
Press the on-
screen button to switch to the Bluetooth
Phone screen.
3. Press the on-screen button to switch to the Bluetooth Setting screen.
4. Press the on-screen button to scroll down the menu.
Press the Confirmation Prompts on-
screen button to activate the function. Press
the on-screen button to cancel the
function.
0 # 8 . 8 7 ' $ D Q Q M Mo+ 9Þ9Ü9Ý9Ü9ݬ9âã“Ó
Page 134 of 138
134
Before
UseGetting
started
RoutingAddress
Book
Vo i c e Recognition
Navigation
Set Up
RDM-TMC
Bluetooth Hands-Free
nActivating the voice training function
1. Press the MENU button.
2. The NAVIGATION MENU screen is displayed.
Press the on-
screen button to switch to the Bluetooth
Phone screen.
3. Press the on-screen button to switch to the Bluetooth Setting screen.
4. Press the on-screen button to scroll down the menu.
Press the Voice Training on-screen
button to activate the voice training function.
Press the on-screen function to cancel
the function.
0 # 8 . 8 7 ' $ D Q Q M Mo+ 9Þ9Ü9Ý9Ü9ݬ9âã“Ó
Page 135 of 138

135
Steering Switch
Steering Switch
nAdjusting the VolumeTo increase the volume, pull up the volume switch.
To decrease the volume, press down the volume switch.
nChanging the SourcePress the mode switch (MODE) to change the audio source (FM1 radio > FM2 radio >
AM radio > SIRIUS1 > SIRIUS2 > SIRIUS3 > CD > AUX1 > AUX2 > iPod > Bluetooth Audio >
OFF > cyclical).
nSeek Switch
When listening to the radio
Pull up or press down the seek switch, the radio switches to the next/previous stored station
in the order that it was stored (1-8).
Pull up or press down the seek switch for about 2 seconds until a beep sound is heard to seek
all usable stations at a higher or lower frequency whether programmed or not.
When listening to the satellite radio
Press the seek switch up or down, the radio switches to the next/previous stored station in the
order that it was stored (1-6).
Press the seek switch up or down for about 2 seconds until a beep sound is heard to seek all
usable stations at a higher or lower frequency, whether programmed or not.
When playing a CD
Pull up the seek switch to skip to the next track.
Press down the seek switch to skip back to the beginning of the current track.
When playing an iPod
Press the seek switch up to skip to the next track.
Press the seek switch down to repeat the current track.
Operating the Steering Switch
0 # 8 . 8 7 ' $ D Q Q M Mo+ 9Þ9Ü9Ý9Ü9ݬ9âã“Ó
Page 136 of 138

136
Before
UseGetting
started
RoutingAddress
Book
Vo i c e Recognition
Navigation
Set Up
RDM-TMC
License
License
nSafety Certification
This CD player is made and tested to meet exacting safety standards. It meets FCC
requirements and complies with safety performance standards of the U.S. Department of
Health and Human Services.
Note
For CD player section:
This device complies with part 15 of the FCC Rules. Operation is subject to the following two
conditions: (1) This device may not cause harmful interference, and (2) this device must
accept any interference received, including interference that may cause undesired operation.
Note
This equipment has been tested and found to comply with the limits for a Class B digital
device, pursuant to part 15 of the FCC Rules. These limits are designed to provide reasona-
ble protection against harmful interference in a residential installation. This equipment gener-
ates, uses, and can radiate radio frequency energy and, if not installed and used in
accordance with the instructions, may cause harmful interference to radio communications.
However, there is no guarantee that interference will not occur in a particular installation. l
This CD player should not be adjusted or repaired by anyone except
qualified service personnel.
If servicing is required, contact an Authorized Mazda Dealer.
l Use of controls or adjustments or performance of procedures other than
those specified herein may result in hazardous laser exposure. Never
operate the CD player with the top case of the unit removed.
l Changes or modifications not expressly approved by the party responsible
for compliance could void the user's authority to operate this equipment.
Cautions
0 # 8 . 8 7 ' $ D Q Q M Mo+ 9Þ9Ü9Ý9Ü9ݬ9âã“Ó