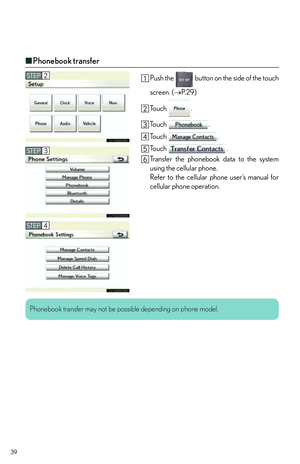
Page 25 of 90
25
Headlights
Off
The instrument panel, side marker, parking, tail
and license plate lights turn on.
The headlights and all lights listed above turn on.
The headlights and parking lights turn on/off
automatically in accordance with ambient light
levels.
To engage the high beams, push the lever forward.
To flash the high beams, pull the lever and hold.
■ AFS (Adaptive Front-lighting System) (if equipped)
AFS improves visibility on curves by automatica lly adjusting the horizontal orientation of the
headlights in accordance with vehicle speed an d the degree of the tire angle that are con-
trolled by steering input.
The system can be turned on and off using the satellite switch. ( P.1 9 )
U.S.A.Canada
1
2
3
4
Page 26 of 90
26
Fog Lights
The fog lights can be used only when the head-
lights (low beam) are on.Front fog lights off
Front fog lights on
Instrument Panel Light Control
To dim: turn the dial counterclockwise.
To brighten: turn the dial clockwise.
1
2
1
2
Page 27 of 90
27
Windshield Wipers and Washer
■Intermittent windshield wipers (if equipped)
Off
Intermittent operation
Low speed
High speed
Single wipe
Intermittent operation: Wiper interval can be
adjusted by turning the band.
To spray washer fluid, pull the lever. The wipers
will operate automatically.1
2
3
4
5
Page 28 of 90
28
■Rain-sensing windshield wipers (if equipped)
Off
Automatic operation
Low speed
High speed
Single wipe
Automatic operation: Sens itivity can be adjusted
by turning the band.
To spray washer fluid, pull the lever. The wipers
will operate automatically.1
2
3
4
5
Page 29 of 90
29
Touch Screen (with navigation system)
By touching the screen with your finger, you can control the audio system and air condition-
ing system, and adjust the screen display etc. For details, refer to the “Navigation System
Owner's Manual”.
The button positions, shapes and screen may slightly vary depending on the type of the
touch screen.
Press the button to display the screen. The “Setup” screen shown in the above illustration is
displayed when the “SET UP” button is pressed.“CLIMATE”: Air conditioning operation screen
“AUDIO”: Audio control screen
“DISP”: Adjust picture quality
“INFO PHONE”: Information screen
“General”: General settings screen
“Clock”: Clock settings screen
“Voice”: Voice settings screen
“Navi.”: Navigation settings screen
“MAP VOICE”: Vehicle's current position
“DEST”: Destination screen
“SET UP”: Setup screen
“Vehicle”: Vehicle settings screen
“Audio”: Audio settings screen
“Phone”: Phone settings screen
1
2
3
4
5
6
7
8
9
10
11
12
13
14
Page 30 of 90
30
■Display
Push the button on the side of the touch
screen to show the “Display” screen.
Displays the screen in “Day Mode” with the
headlight switch on
Turns the screen off
Adjust contrast
Adjust brightness
Adjust color tone
Adjust color
1
2
3
4
5
6
Page 31 of 90
31
■Screen scroll operation
When any point on the map is touched, that point
moves to the center of the screen.
Indicates the street name, city name, etc. for
the selected point
Displays various information for the selected
point (if available)
Indicates the distance from the current posi-
tion to the pointer
Switches the screens
Zooms in on the map
Zooms out on the map
■Setting a route
While route guidance is operating, you can change the route using the following method.
To u c h .
The following settings can be accessed
Detour setting
Route preferences
Route overview
Pause and resume route guidance
1
2
3
4
5
6
1
2
3
4
Some functions are unavailable while the vehicle is in motion. Refer to the “Navigation
System Owner's Manual”.
Page 32 of 90
32
Navigation System (If Equipped)
■Register home
Push the button on the side of the touch
screen. ( P. 2 9 )
To u c h .
To u c h .
To u c h .
To u c h .
To u c h .
Input a city name and touch .
Touch the button of the desired city name from
the displayed list.
Input the street name and touch .
When the desired street name is found, touch
the corresponding button.
Input a house number and touch .
To u c h .
To u c h .
STEP3
STEP6
STEP2
10
11
12
13


 25
Headlights
Off
The instrument panel, side marker, parking, tail
and license plate lights turn on.
The headlights and all lights listed above turn on.
The headlights and parking lights turn on/off
a")
 26
Fog Lights
The fog lights can be used only when the head-
lights (low beam) are on.Front fog lights off
Front fog lights on
Instrument Panel Light Control
To dim: turn the dial counterclockwise.
T")
 27
Windshield Wipers and Washer
■Intermittent windshield wipers (if equipped)
Off
Intermittent operation
Low speed
High speed
Single wipe
Intermittent operation: Wiper interval can be
adjusted by tu")
 28
■Rain-sensing windshield wipers (if equipped)
Off
Automatic operation
Low speed
High speed
Single wipe
Automatic operation: Sens itivity can be adjusted
by turning the band.
To spray washer fluid")
 29
Touch Screen (with navigation system)
By touching the screen with your finger, you can control the audio system and air condition-
ing system, and adjust the screen display etc. For details, refer")
 30
■Display
Push the button on the side of the touch
screen to show the “Display” screen.
Displays the screen in “Day Mode” with the
headlight switch on
Turns the screen off
Adjust contras")
 31
■Screen scroll operation
When any point on the map is touched, that point
moves to the center of the screen.
Indicates the street name, city name, etc. for
the selected point
Displays various inf")
 32
Navigation System (If Equipped)
■Register home
Push the button on the side of the touch
screen. ( P. 2 9 )
To u c h .
To u c h .
To u c h .
To u c h .
To u c h .
Input a city name and t")