Page 180 of 608
180
2-2. Instrument cluster
■Touch tracer display
Only the switch that is being
operated is highlighted, and
thus, the driv
er can perceive
which button is being operated.
The applicable switch displayed
on the head-up display will
change in r
esponse to the
switch operation.
Taking your finger off the steering
switch returns the display to the
vehicle speed indication.
It is possible to turn the touch
tr
acer display ON/OFF as neces -
sary. ( P. 1 8 1 )
Turn-by-turn navigation
When the vehicle approaches an
intersection, the direction the vehi -
cle should go is guided by the
arr
ow.
When the vehicle approaches an
intersection, the r
oute guidance
will start and the distance
* to the
intersection will also be displayed.
The animation guidance changes
according to the vehicle conditions
(running or stopped).
*:The distance decreases in incre -
ments of 50 yards and the dis -
tance indication will disappear
when the v
ehicle passes through
the intersection.
Page 181 of 608
181
2-2. Instrument cluster
2
When driving
Display customization
The touch tracer display and audio display can be hidden (not display) if
desired.
■ T
ouch tracer display
Pressing and holding the HUD
(He
ad-up Display) main switch for
more than 2 seconds changes the
display to touc h tracer display
ON/OFF mode. Press the HUD
(Head-up Display) main switch to
select ON or OFF.
Customization can be performed
when the head-up display is on and
the vehicle is traveling at less than
5 mph (8 km/h).
■ Audio display
With the touch tracer display ON/
OFF selection mode display
ed,
press and hold HUD (Head-up
Display) main switch for more than
2 seconds again to enter audio
display ON/OFF selection mode.
ON or OFF can be selected by
pressing HUD (Head-up Display)
main switch.
Customization can be performed
when the head-up display is on and
the vehicle is traveling at less than
5 mph (8 km/h).
Page 182 of 608

182
2-2. Instrument cluster
■Brightness of the head-up display
The headlight control sensor detects the brightne
ss of the area surrounding the
head-up display and adjusts th e brightness accordingly. (P. 1 8 6 )
■Head-up display
The head-up display may seem dark and hard to see when viewed through sun -
glasses, especially polarized sunglasses.
Adjust the brightness of the head-up display or remove your sunglasses.
CAUTION
■Before using the head-up display
Check that the position and brightness of the head-up display image does not inter-
fere with safe driving. Incorrect adjustme nt of the image's position or brightness
may obstruct the driver's view and lead to an accident, resulting in death or serious
injury.
NOTICE
■To prevent damage to components
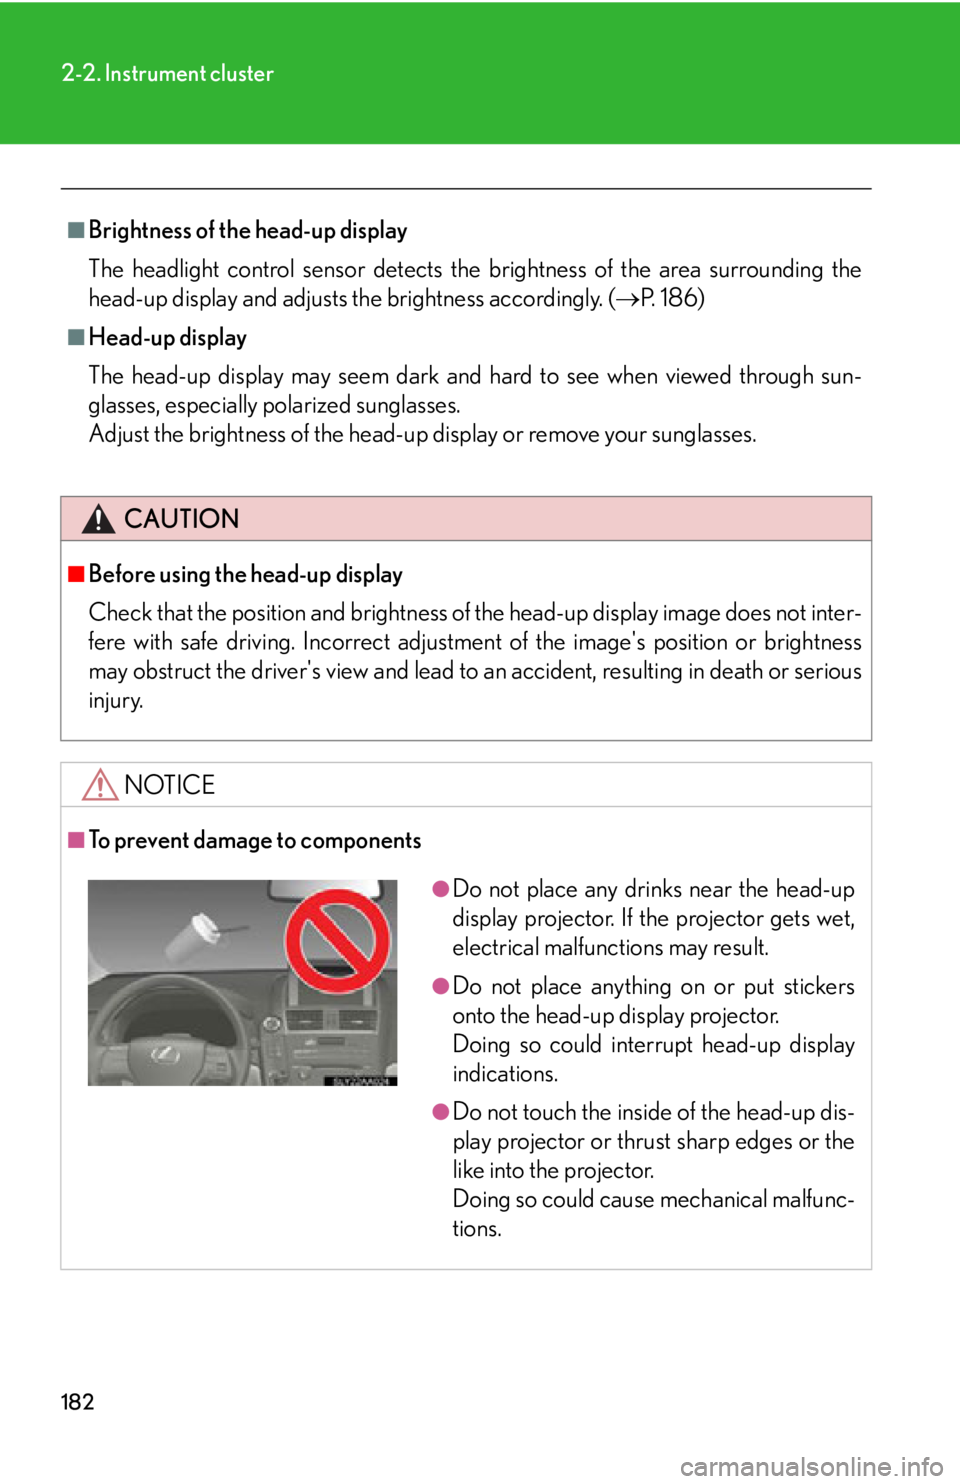
●Do not place any drinks near the head-up
display projector. If the projector gets wet,
electrical malfunctions may result.
●Do not place anything on or put stickers
onto the head-up display projector.
Doing so could interrupt head-up display
indications.
●Do not touch the inside of the head-up dis-
play projector or thrust sharp edges or the
like into the projector.
Doing so could cause mechanical malfunc-
tions.
Page 185 of 608

185
2-3. Operating the lights and windshield wipers
2
When driving
Turning on the high beam headlights
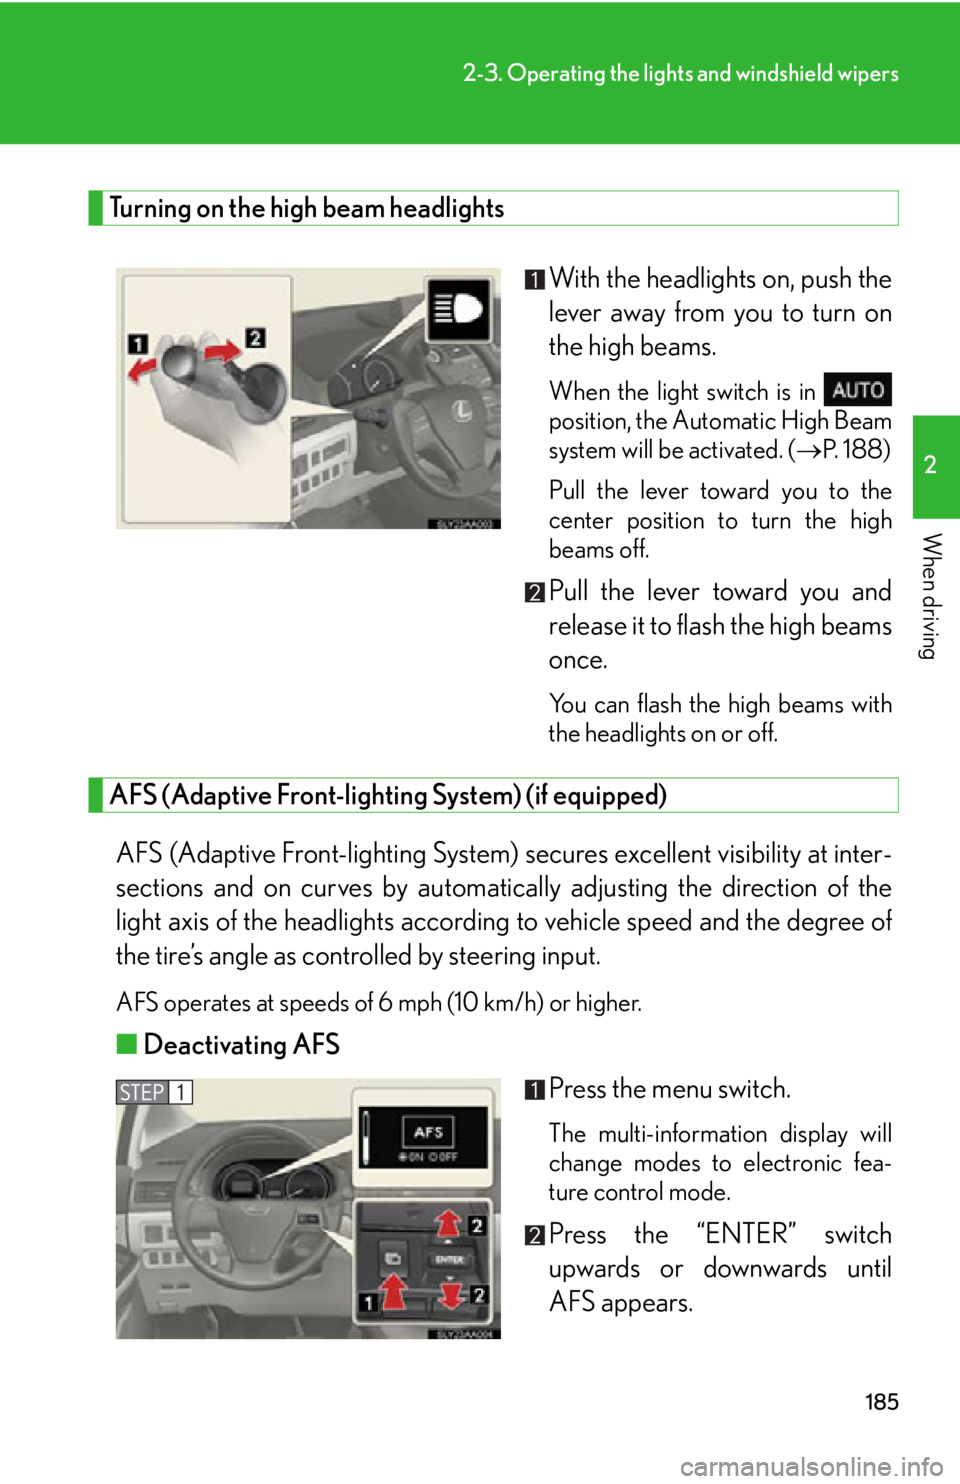
With the headlights on, push the
lever away from you to turn on
the high beam
s.
When the light switch is in
position, the Automatic High Beam
sy
stem will be activated. ( P. 1 8 8 )
Pull the lever toward you to the
ce
nter position to turn the high
beams off.
Pull the lever toward you and
release it to flash the high beams
once.
You can flash the high beams with
the headlights on or off.
AFS (Adaptive Front-lighting System) (if equipped)
AFS (Adaptive Front-lighting System) secures excellent visibility at inter-
sections and on curves by automatically adjusting the dir
ection of the
light axis of the headlights according to vehicle speed and the degree of
the tire’s angle as controlled by steering input.
AFS operates at speeds of 6 mph (10 km/h) or higher.
■ Deactivating AFS
Press the menu switch.
The multi-information display will
change modes to electronic fea-
ture control mode.
Press the “ENTER” switch
upwards or downwards until
AF
S appears.
Page 186 of 608

186
2-3. Operating the lights and windshield wipers
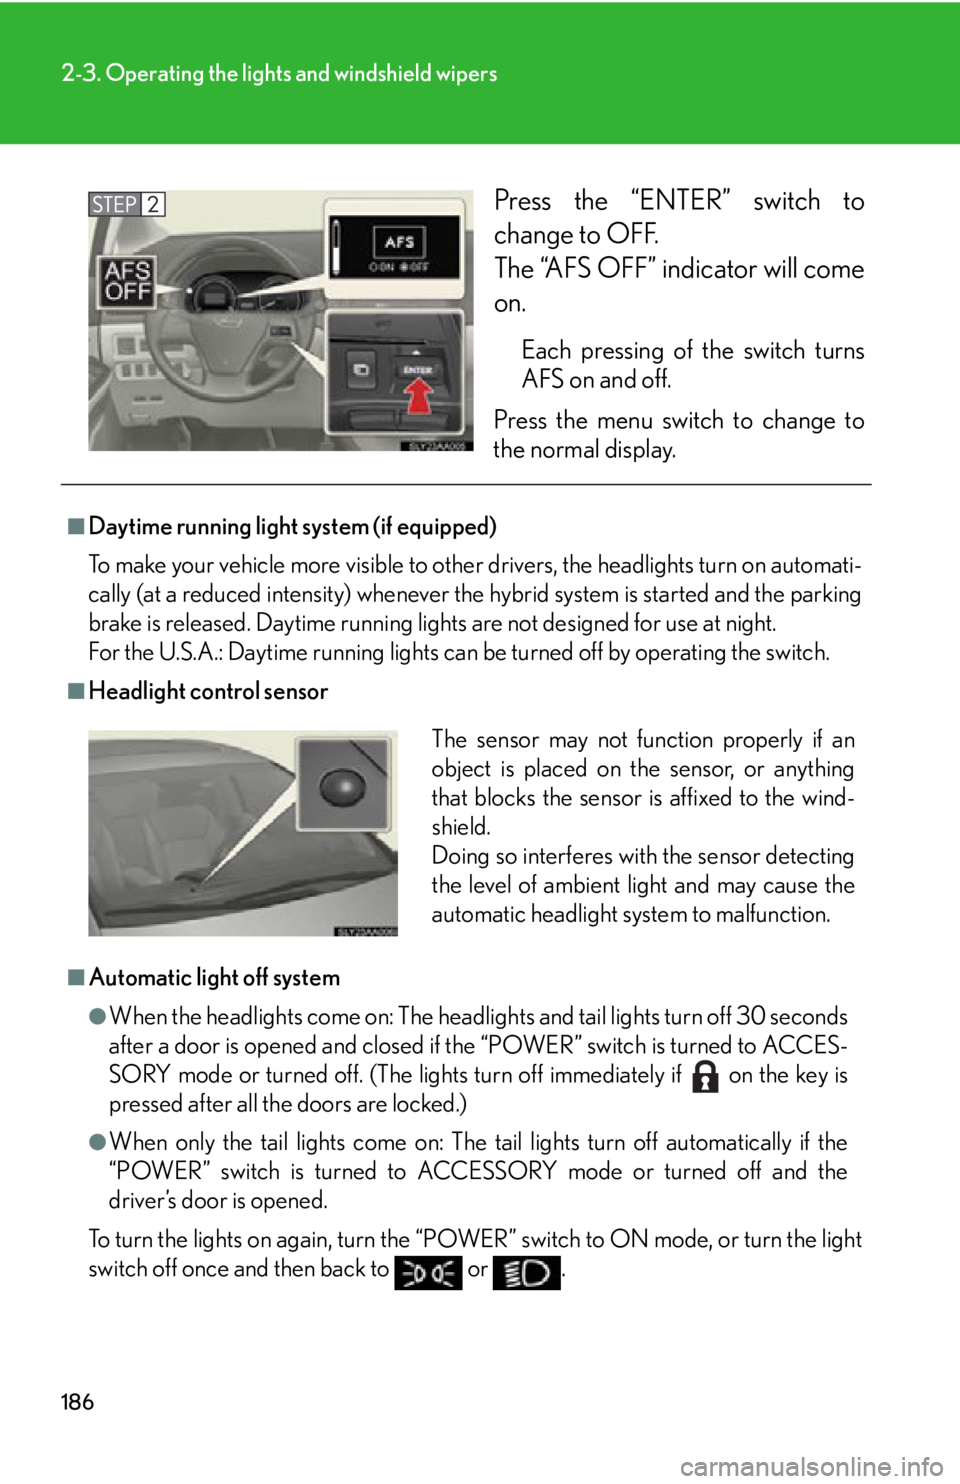
Press the “ENTER” switch to
change to OFF.
The “AFS OFF” indicator will come
on.
Each pressing of the switch turns
AFS on and off.
Press the menu switch to change to
the norma
l display.
■Daytime running light system (if equipped)
To make your vehicle more visible to othe r dr
ivers, the headlights turn on automati-
cally (at a reduced intensity) whenever the hy
brid system is started and the parking
brake is released. Daytime running ligh ts are not designed for use at night.
For the U.S.A.: Daytime running lights can be turned off by operating the switch.
■Headlight control sensor
■Automatic light off system
●When the headlights come on: The headligh ts and tail lights turn off 30 seconds
after a door is opened and closed if the “POWER” switch is turned to ACCES -
SORY mode or turned off. (The lights turn off immediately if on the key is
pressed after all the doors are locked.)
●When only the tail lights come on: The tail lights turn off automatically if the
“POWER” switch is turned to ACCESSORY mode or turned off and the
driver’s door is opened.
To turn the lights on again, turn the “POWER” s
witch to ON mode, or turn the light
switch off once and then back to or .
The sensor may not function properly if an
object is placed on the sensor, or anything
that blocks the sensor is affixed to the wind-
shield.
Doing so interferes with the sensor detecting
the level of ambient light and may cause the
automatic headlight system to malfunction.
Page 205 of 608
205
2-4. Using other driving systems
2
When driving
Dynamic radar cruise control
: If equipped
Dynamic radar cruise control supplements conventional cruise control
with a vehicle-to-vehicle distance control. In vehicle-to-vehicle distance
control mode, the vehicle automatically accelerates or decelerates in
order to maintain a set following distance from vehicles ahead.
Indicators
Display
Set speed
ehicle-to-vehicle distance
button
Cruise control switch
Page 207 of 608

207
2-4. Using other driving systems
2
When driving
■Adjusting the set speed
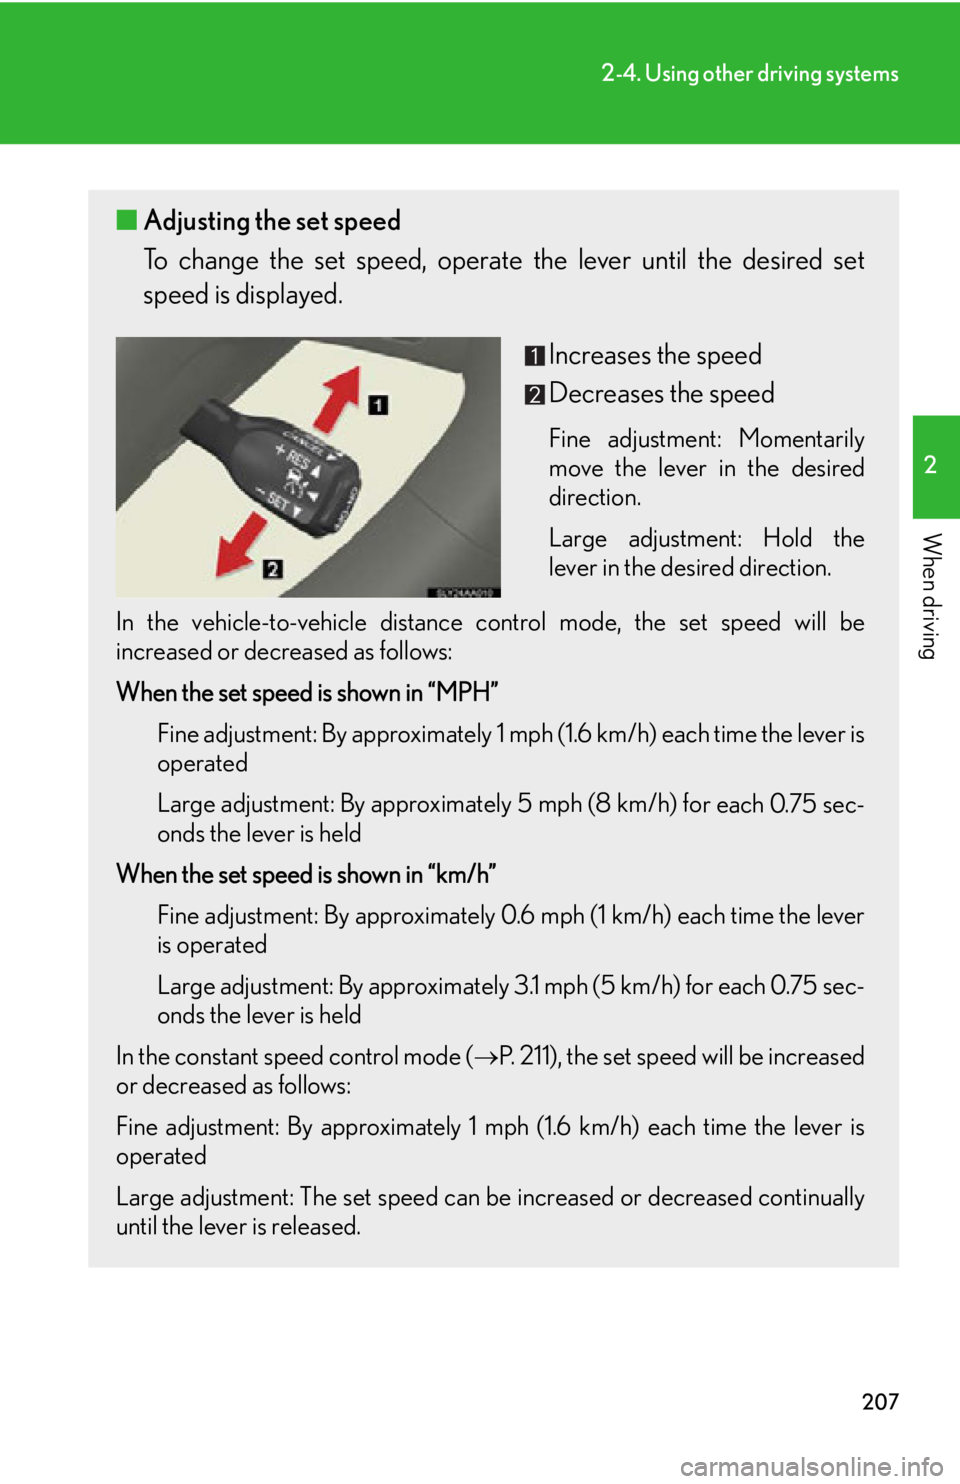
To change the set speed, operate the lever until the desired set
speed is displayed.
Increases the speed
Decreases the speed
Fine adjustment: Momentarily
move the lever in the desired
direction.
Large adjustment: Hold the
le
ver in the desired direction.
In the vehicle-to-vehicle distance contr
ol mode, the set speed will be
increased or decreased as follows:
When the set speed is shown in “MPH”
Fine adjustment: By approximately 1 mp h
(1.6 km/h) each time the lever is
operated
Large adjustment: By approximately 5 mph (8 km/h) fo
r each 0.75 sec-
onds the lever is held
When the set speed is shown in “km/h” Fine adjustment: By approximately 0.6 mph (1 km/h) each time the lever
is oper
ated
Large adjustment: By approximately 3.1 mph (5 km/h) for each 0.75 sec -
onds the lever is held
In the constant speed control mode (
P. 211), the set speed will be increased
or decreased as follows:
Fine adjustment: By approximately 1 mph (1.6 km/h) each time the lever is
oper
ated
Large adjustment: The set speed can be incr
eased or decreased continually
until the lever is released.
Page 208 of 608
208
2-4. Using other driving systems
■Changing the vehicle-to-vehicle distance
Pressing the button changes the
vehicle-to-vehicle distance as
follows:
Long
Medium
Short
The vehicle-to-vehicle distance
is set automatically to long
mode when the “POWER”
switch is turned to ON mode.
If a vehicle is running ahead of
y
ou, the preceding vehicle mark
will also be displayed.
■ Canceling and resuming the constant speed control
Pulling the lever toward you
cancels the cruise control.
The speed setting is also can -
celed when the brakes are
applied.
Pushing the lever up resumes
the cruise control and returns
v
ehicle speed to the set
speed.
Resuming is available when the
vehicle speed is more than
approximately 25 mph (40 km/
h).
Preceding vehicle mark