Page 17 of 94
17
GX460_QG_U (OM60E77U)
Multi-information Display
(Accessory Meters) (If Equipped)
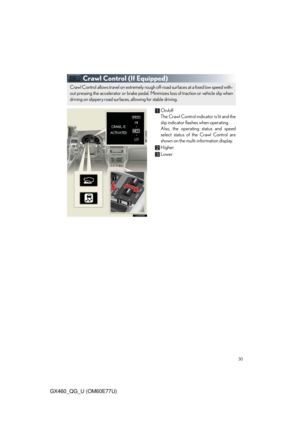
●Clock
Indicates the time.
●Outside temperature
Indicates the outside temperature.
The temperature range that can be displayed is from -40 F (-40 C) to 122 F (50 C).
●Air conditioning system display
●Rear view monitor
Automatically displayed when the shift lever is moved into R.
(Refer to the “Owner’s Manual” or “Navigation System Owner’s Manual”.)
●Multi-terrain Monitor (if equipped)
●Wide view front & side monitor (if equipped)
●Trip information
Displays driving range, fuel consumption and other cruising-related information.
●Intuitive parking assist display (if equipped)
■Switching the display
Items displayed can be switched by press-
ing the “MODE” switch.
“MODE” switch
“RESET” switch
“DISP” switch
Display adjustment switch
The multi-information display presents the driver with a variety of driving-related data
including the current outside air temperature.
Page 18 of 94
18
GX460_QG_U (OM60E77U)
Eco Driving Indicator Light
Eco-friendly driving
If Eco Driving Indicator Light comes on, it
indicates that you are driving at an Eco-
friendly driving. In case of over-use of the
accelerator that cause the vehicle to
exceed the Zone of Eco driving, Eco Driv-
ing Indicator Light will turn off. (When driv-
ing in D shift position.)
Tu r n S i g n a l L e v e r
Right turn
Left turn
Lane change to the right (push and hold
the lever partway)
The right hand signals will flash until you
release the lever.
Lane change to the left (push and hold
the lever partway)
The left hand signals will flash until you
release the lever.
Page 19 of 94
19
GX460_QG_U (OM60E77U)
Cruise Control (If Equipped)
Indicators
Cruise control switch
■Setting the vehicle speed
Press the “ON-OFF” button to activate
the cruise control.
Press the button again to deactivate
the cruise control.
Accelerate or decelerate to the desired
speed, and push the lever down to set
the speed.
“SET” indicator will come on.
Use cruise control to maintain a set speed without depressing the accelerator pedal.
Page 20 of 94
20
GX460_QG_U (OM60E77U)
■Adjusting the set speed
Increases the speed
Decreases the speed
Hold the lever until the desired speed
setting is obtained.
Fine adjustment of the set speed can be
made by lightly pushing the lever up or
down and releasing it.
■Canceling and resuming the constant speed control
Pulling the lever toward you cancels the
constant speed control.
The speed setting is also canceled when
the brakes are applied.
Pushing the lever up resumes the con-
stant speed control.
Dynamic Radar Cruise Control
(If Equipped)
Display
Indicators
Vehicle-to-vehicle distance button
Cruise control switch
Dynamic radar cruise control supplements conventional cruise control with a vehicle-to-
vehicle distance control. In vehicle-to-vehicle distance control mode, the vehicle automati-
cally accelerates or decelerates in order to maintain a set following distance from vehicles
ahead.
Page 21 of 94
21
GX460_QG_U (OM60E77U)
■Selecting cruise mode
Selecting vehicle-to-vehicle distance con-
trol mode:
Press the “ON-OFF” button to activate the
cruise control.
Press the button again to deactivate the
cruise control.
Selecting conventional constant speed con-
trol mode:
Press the “ON-OFF” button to activate
the cruise control.
Press the button again to deactivate the
cruise control.
Vehicle-to-vehicle distance control
mode is always reset when the
“ENGINE START STOP” switch is
turned to IGNITION ON mode.
Switch to constant speed control mode.
(Push the lever forward and hold for
approximately one second.)
Cruise control indicator will come on.
■Driving in the selected cruise control mode
Accelerate or decelerate to the desired
speed, and push the lever down to set the
speed.
“SET” indicator will come on.
Page 22 of 94
 22
GX460_QG_U (OM60E77U)
■Adjusting the set speed
Increases the speed
Decreases the speed
Hold the lever until the desired speed
setting is displayed.
Fine adjustment of the set speed can be
made by")
22
GX460_QG_U (OM60E77U)
■Adjusting the set speed
Increases the speed
Decreases the speed
Hold the lever until the desired speed
setting is displayed.
Fine adjustment of the set speed can be
made by lightly pushing the lever up or
down and releasing it.
■Canceling and resuming the constant speed control
Pulling the lever toward you cancels the
constant speed control.
The speed setting is also canceled when
the brakes are applied.
Pushing the lever up resumes the con-
stant speed control.
■Changing the vehicle-to-vehicle distance
Pressing the button changes the vehicle-to-
vehicle distance as follows:
Long
Medium
Short
The vehicle-to-vehicle distance is set
automatically to long mode when the
“ENGINE START STOP” switch is
turned to IGNITION ON mode.
If a vehicle is running ahead of you, the
preceding vehicle mark will be also dis-
played.Preceding vehicle mark
The vehicle-to-vehicle distance control mode maintains the preset cruising speed as long
as no vehicle is detected ahead.
Page 23 of 94
 23
GX460_QG_U (OM60E77U)
LDA (Lane Departure Alert)(If Equipped)
■Turning the LDA system on
The system will be activated depending on the recognizability of lane markings and on the
vehicle speed")
23
GX460_QG_U (OM60E77U)
LDA (Lane Departure Alert)(If Equipped)
■Turning the LDA system on
The system will be activated depending on the recognizability of lane markings and on the
vehicle speed.
Press the “LDA” switch to activate the sys-
tem.
The “LDA” indicator will come on.
Press the switch again to turn the LDA
system off.
■Indication on the multi-information display
While the LDA system is on, a lane line display is shown on the multi-information display to
inform the driver that the LDA system is on.
●When thin lines are shown:
Lane markings are not recognized by
the system, or the LDA system is tempo-
rarily canceled.
●When solid lane lines are shown:
The LDA system is active.
While driving on a freeway or motor highway that has lane markings, this system recog-
nizes the lanes using a camera as a sensor to alert the driver when the vehicle deviates from
its lane.
If the system judges that the vehicle may deviate from its lane, it alerts the driver using rapid
beeping and indications on the multi-information display.
Lane line display
Page 24 of 94
 24
GX460_QG_U (OM60E77U)
Intuitive Parking Assist (If Equipped)
Press the menu switch.
The multi-information display will
change modes to electronic features
control mode.
Press the “ENTER” switch")
24
GX460_QG_U (OM60E77U)
Intuitive Parking Assist (If Equipped)
Press the menu switch.
The multi-information display will
change modes to electronic features
control mode.
Press the “ENTER” switch upwards or
downwards until the Intuitive parking
assist mark appears in the multi-informa-
tion display.
Press the “ENTER” switch to change to
“ON”.
The Intuitive parking assist indicator will
be displayed.
Each pressing of the switch turns the
Intuitive parking assist on and off.
When on, the buzzer sounds to inform
the driver that the system is operational.
Press the menu switch to change to the nor-
mal display.
Wide View Front & Side Monitor(If Equipped)
On/off
The camera image is displayed when the
wide view front & side monitor switch is
pressed.
The distance from your vehicle to nearby obstacles when parallel parking or maneuver-
ing into a garage is measured by the sensors and communicated via the multi-informa-
tion display and a buzzer. Always check the surrounding area when using this system.
This system can display the wide view front monitor and the side monitor.
The wide view front monitor uses a super-wide angle lens to display on screen the areas to
the left and right of the vehicle and the blind spots to the front of the vehicle. This system
helps the driver check for approaching cars, bicycles and pedestrians when at intersections
with poor visibility.
The side monitor uses a camera installed in the passenger’s side outside rear view mirror to
display on screen the area to the right of the vehicle, helping the driver check this area.


 17
GX460_QG_U (OM60E77U)
Multi-information Display
(Accessory Meters) (If Equipped)
●Clock
Indicates the time.
●Outside temperature
Indicates the outside temperature.
The temperature range that c")
 18
GX460_QG_U (OM60E77U)
Eco Driving Indicator Light
Eco-friendly driving
If Eco Driving Indicator Light comes on, it
indicates that you are driving at an Eco-
friendly driving. In case of over-use of")
 19
GX460_QG_U (OM60E77U)
Cruise Control (If Equipped)
Indicators
Cruise control switch
■Setting the vehicle speed
Press the “ON-OFF” button to activate
the cruise control.
Press the button again")
 20
GX460_QG_U (OM60E77U)
■Adjusting the set speed
Increases the speed
Decreases the speed
Hold the lever until the desired speed
setting is obtained.
Fine adjustment of the set speed can be
made by")
 21
GX460_QG_U (OM60E77U)
■Selecting cruise mode
Selecting vehicle-to-vehicle distance con-
trol mode:
Press the “ON-OFF” button to activate the
cruise control.
Press the button again to deactiva")