Page 49 of 61

416
4-3. Do-it-yourself maintenance
30POWER30 APo w e r w i n d o w
31P/ S E AT30 APo w e r s e a t
■After a fuse is replaced
●If the lights do not turn on even after the fuse has been replaced, a bulb may
need replacement. (→
P. 4 1 9)
●If the replaced fuse blows again, have the vehicle inspected by your Lexus
dealer.
■If there is an overload in the circuits
The fuses are designed to blow before the entire wiring harness is damaged.
CAUTION
■To prevent system breakdowns and vehicle fire
Observe the following precautions.
Failing to do so may cause damage, and possibly a fire or injury.
●Never use a fuse of a higher amperage rating than indicated, or use any other
object in place of a fuse.
●Always use a genuine Lexus fuse or equivalent.
Never replace a fuse with a wire, even as a temporary fix.
This can cause extensive damage or even fire.
●Do not modify fuses or the fuse box.
NOTICE
■Before replacing fuses
Have the cause of electrical overload determined and repaired by your Lexus
dealer.
FuseAmpereCircuit
Page 50 of 61
417
4-3. Do-it-yourself maintenance
4
Maintenance and care
Headlight aim (vehicles with discharge headlights)
■Vertical movement adjusting bolts
Adjustment bolt A
Adjustment bolt B
■Before checking the headlight aim
Make sure the vehicle has a full tank of gas and the area around
the headlight is not deformed.
Park the vehicle on level ground.
Sit in the driver’s seat.
Bounce the vehicle several times.
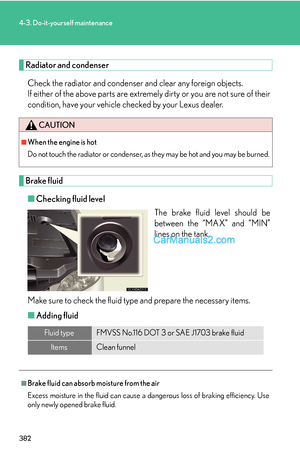
■Adjusting the headlight aim
Remove the engine compartment cover. (→P. 3 76)
Turn bolt A in either direction
using a Phillips-head screw
-
driver.
Remember the turning direction
and the number of turns in mind.
STEP1
STEP2
STEP3
STEP4
STEP1
STEP2
Page 51 of 61
418
4-3. Do-it-yourself maintenance
Turn bolt B the same number of
turns and in the same direction
as step 1 using a Phillips-head
screwdriver.
If the error is over the value
specified above, take the vehicle
to your Lexus dealer to adjust
the headlight aim.
STEP3
Page 52 of 61
419
4-3. Do-it-yourself maintenance
4
Maintenance and care
Light bulbs
You may replace the following bulbs yourself. For more information about
replacing other light bulbs, contact your Lexus dealer.
■Prepare a replacement light bulb.
Check the wattage of the light bulb being replaced. (→P. 4 9 7 )
■Front bulb locations
■Rear bulb locations
Headlight high beam
Headlight
low beam
(halogen
bulb)
Front turn signal light
Front side
marker light
Rear turn signal lightStop/tail light
Rear side marker light
Back-up light
Tail light
Page 53 of 61
420
4-3. Do-it-yourself maintenance
Replacing light bulbs
■Headlight low beams (for vehicles without discharge bulbs) and
headlight high beams
Remove the engine compartment cover. (→P. 3 76)
Turn the bulb base counterclock-
wise.
Unplug the connector while
depressing the lock release.
STEP1
STEP2
STEP3
Page 54 of 61
421
4-3. Do-it-yourself maintenance
4
Maintenance and care
■Front side marker lights and front turn signal lights
Remove the access hole cover.
Front side marker light
Front turn signal light
Turn the bulb base counterclock-
wise.
Front side marker light
Remove the light bulb.
STEP1
STEP2
STEP3
Page 55 of 61
422
4-3. Do-it-yourself maintenance
Front turn signal light
Remove the light bulb.STEP3
Page 56 of 61
423
4-3. Do-it-yourself maintenance
4
Maintenance and care
■Back-up lights and tail lights
Open the trunk lid and remove the
trunk panel cover clips.
Partly remove the trunk panel
cover and turn the bulb bases
counterclockwise.
Tail light
Back-up light
Remove the light bulb.
Tail light
Back-up light
STEP1
STEP2
STEP3


■Vertical movement adjusting bolts
Adjustment bolt A
Adjustment bolt B
■Before checkin")


 and
headlight high beams
Remove the engine compartment cover. (→P. 3 76)
Tur")


