2010 KIA Sportage seat adjustment
[x] Cancel search: seat adjustmentPage 28 of 371
319
Knowing your vehicle
1
2
3
4
5
6
7
8
9
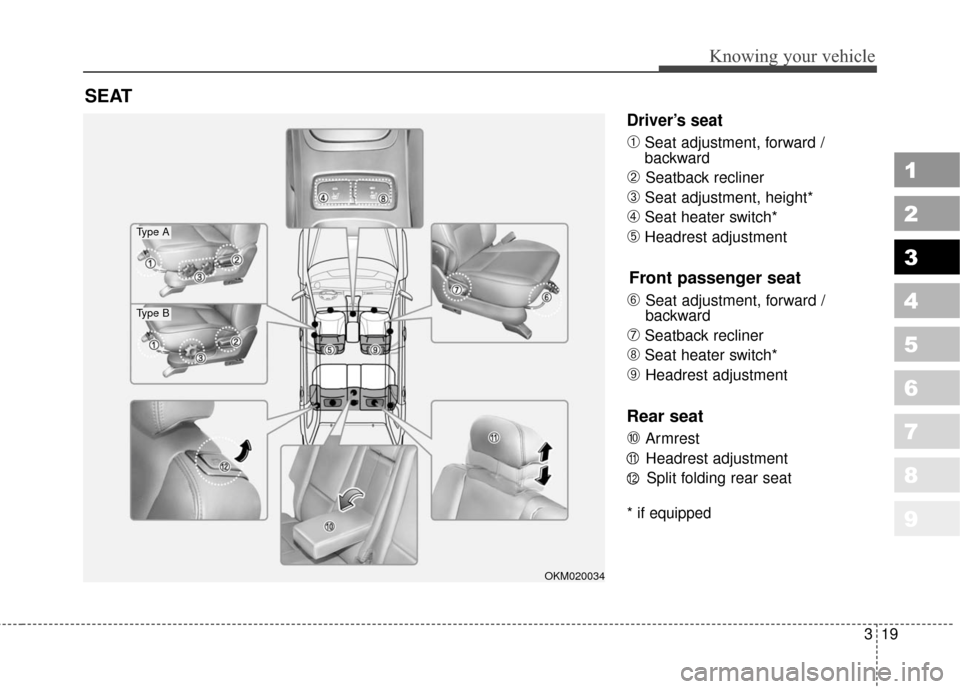
Driver’s seat
➀Seat adjustment, forward /
backward
➁ Seatback recliner
➂Seat adjustment, height*
➃Seat heater switch*
➄Headrest adjustment
Front passenger seat
\b
Seat adjustment, forward /
backward
➆Seatback recliner
➇Seat heater switch*
➈ Headrest adjustment
Rear seat
\f
Armrest Headrest adjustment Split folding rear seat
* if equipped
SEAT
11
12
OKM020034
Type A
Type B
Page 30 of 371
321
Knowing your vehicle
1
2
3
4
5
6
7
8
9
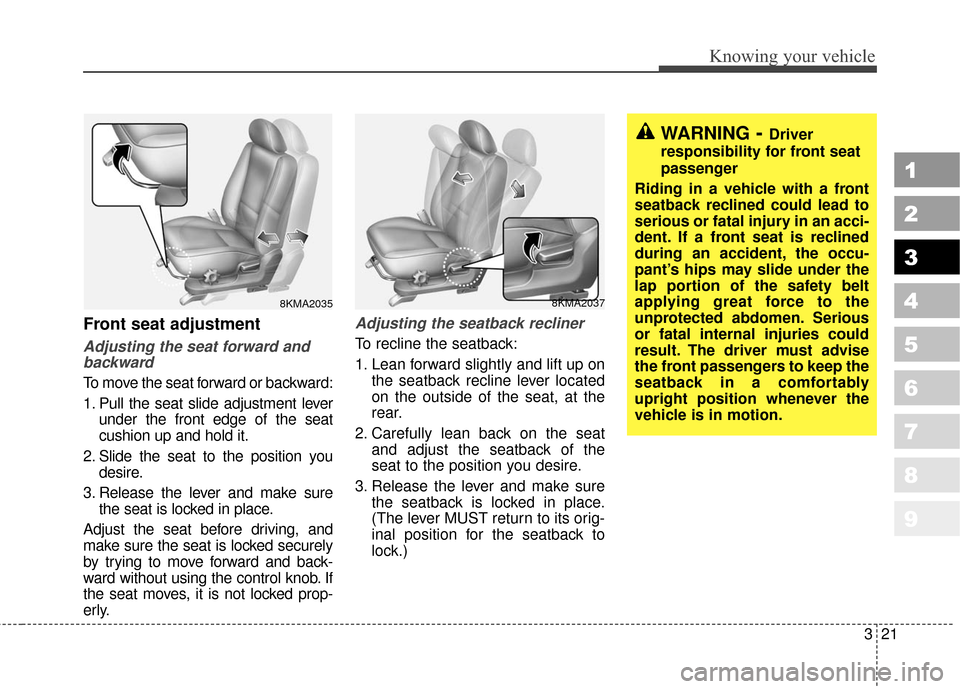
Front seat adjustment
Adjusting the seat forward andbackward
To move the seat forward or backward:
1. Pull the seat slide adjustment lever
under the front edge of the seat
cushion up and hold it.
2. Slide the seat to the position you desire.
3. Release the lever and make sure the seat is locked in place.
Adjust the seat before driving, and
make sure the seat is locked securely
by trying to move forward and back-
ward without using the control knob. If
the seat moves, it is not locked prop-
erly.
Adjusting the seatback recliner
To recline the seatback:
1. Lean forward slightly and lift up on the seatback recline lever located
on the outside of the seat, at the
rear.
2. Carefully lean back on the seat and adjust the seatback of the
seat to the position you desire.
3. Release the lever and make sure the seatback is locked in place.
(The lever MUST return to its orig-
inal position for the seatback to
lock.)
8KMA20358KMA2037
WARNING- Driver
responsibility for front seat
passenger
Riding in a vehicle with a front
seatback reclined could lead to
serious or fatal injury in an acci-
dent. If a front seat is reclined
during an accident, the occu-
pant’s hips may slide under the
lap portion of the safety belt
applying great force to the
unprotected abdomen. Serious
or fatal internal injuries could
result. The driver must advise
the front passengers to keep the
seatback in a comfortably
upright position whenever the
vehicle is in motion.
Page 33 of 371
Knowing your vehicle
24
3
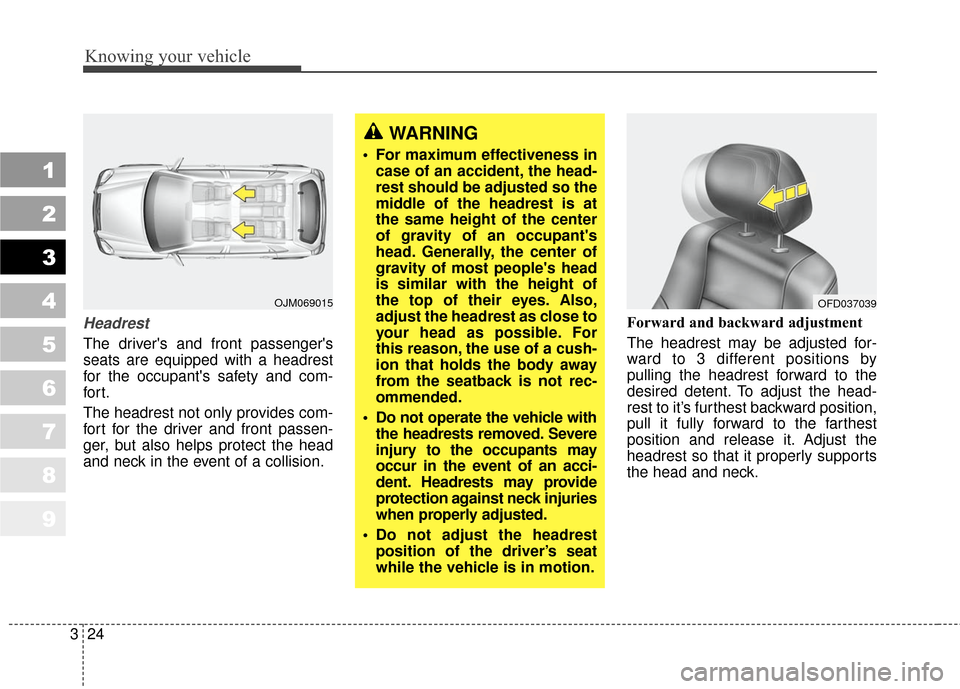
Headrest
The driver's and front passenger's
seats are equipped with a headrest
for the occupant's safety and com-
for t.
The headrest not only provides com-
fort for the driver and front passen-
ger, but also helps protect the head
and neck in the event of a collision. Forward and backward adjustment
The headrest may be adjusted for-
ward to 3 different positions by
pulling the headrest forward to the
desired detent. To adjust the head-
rest to it’s furthest backward position,
pull it fully forward to the farthest
position and release it. Adjust the
headrest so that it properly supports
the head and neck.
1
2
3
4
5
6
7
8
9
OJM069015
WARNING
For maximum effectiveness in
case of an accident, the head-
rest should be adjusted so the
middle of the headrest is at
the same height of the center
of gravity of an occupant's
head. Generally, the center of
gravity of most people's head
is similar with the height of
the top of their eyes. Also,
adjust the headrest as close to
your head as possible. For
this reason, the use of a cush-
ion that holds the body away
from the seatback is not rec-
ommended.
Do not operate the vehicle with the headrests removed. Severe
injury to the occupants may
occur in the event of an acci-
dent. Headrests may provide
protection against neck injuries
when properly adjusted.
Do not adjust the headrest position of the driver’s seat
while the vehicle is in motion.
OFD037039
Page 36 of 371
327
Knowing your vehicle
1
2
3
4
5
6
7
8
9
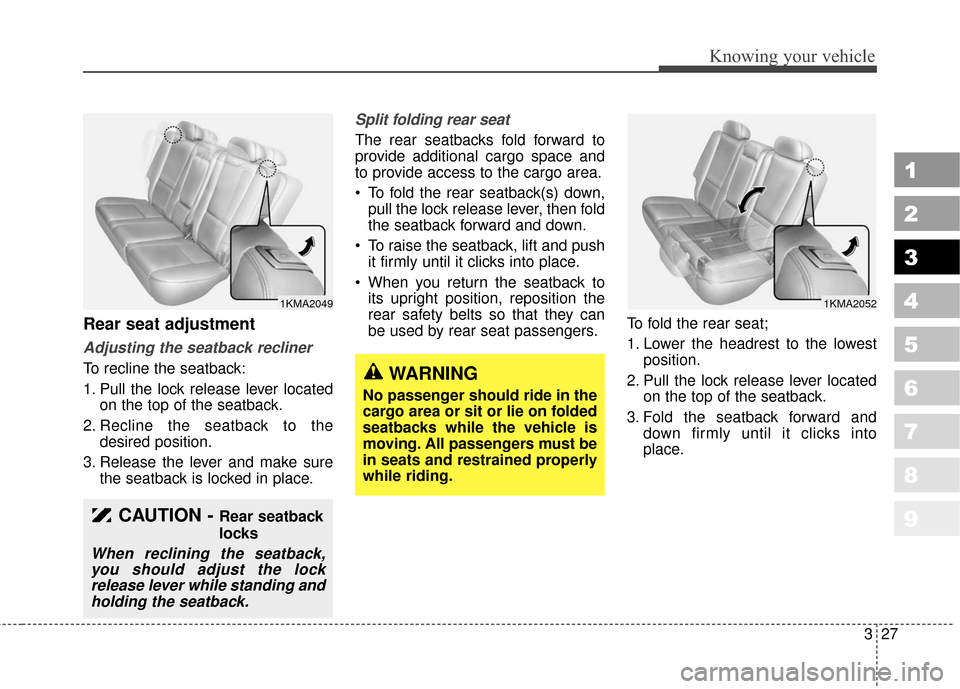
Rear seat adjustment
Adjusting the seatback recliner
To recline the seatback:
1. Pull the lock release lever locatedon the top of the seatback.
2. Recline the seatback to the desired position.
3. Release the lever and make sure the seatback is locked in place.
Split folding rear seat
The rear seatbacks fold forward to
provide additional cargo space and
to provide access to the cargo area.
To fold the rear seatback(s) down,pull the lock release lever, then fold
the seatback forward and down.
To raise the seatback, lift and push it firmly until it clicks into place.
When you return the seatback to its upright position, reposition the
rear safety belts so that they can
be used by rear seat passengers. To fold the rear seat;
1. Lower the headrest to the lowest
position.
2. Pull the lock release lever located on the top of the seatback.
3. Fold the seatback forward and down firmly until it clicks into
place.
1KMA2049
CAUTION - Rear seatback
locks
When reclining the seatback,you should adjust the lockrelease lever while standing andholding the seatback.
WARNING
No passenger should ride in the
cargo area or sit or lie on folded
seatbacks while the vehicle is
moving. All passengers must be
in seats and restrained properly
while riding.
1KMA2052
Page 41 of 371
Knowing your vehicle
32
3
1
2
3
4
5
6
7
8
9
Load limiter
When the pre-tentioner activates, if
the system senses excessive seat
belt tension on the driver or passen-
ger’s seat belt, the load limiter inside
the pre-tensioner will release some
of the pressure on the affected seat
belt.
CAUTION - Airbag/Pre-
tensioner dust
When the airbags and pre-ten- sioners are activated, a loudnoise may be heard and finedust, which may appear to besmoke, may be visible in thepassenger compartment. Thisdust is not toxic. The dust maycause skin irritation and shouldnot be breathed for prolongedperiods. Ventilate the vehicleafter impact and wash yourhands and face thoroughly afteran accident.
WARNING- Airbag/pre-
tensioner warning light
If the SRS airbag warning light
does not illuminate when the
ignition key is turned to “ON”, or
if it remains illuminated after
approximately 6 seconds, or if it
illuminates while the vehicle is
being driven, please have an
authorized Kia dealer inspect
the pre-tensioner and airbag
system as soon as possible.WARNING- Safety belt adjustment
To obtain maximum benefit from
a pre-tensioner seat belt:
The safety belt must be worn correctly.
The safety belt must be adjusted to the correct posi-
tion.
Page 47 of 371
Knowing your vehicle
38
3
1
2
3
4
5
6
7
8
9
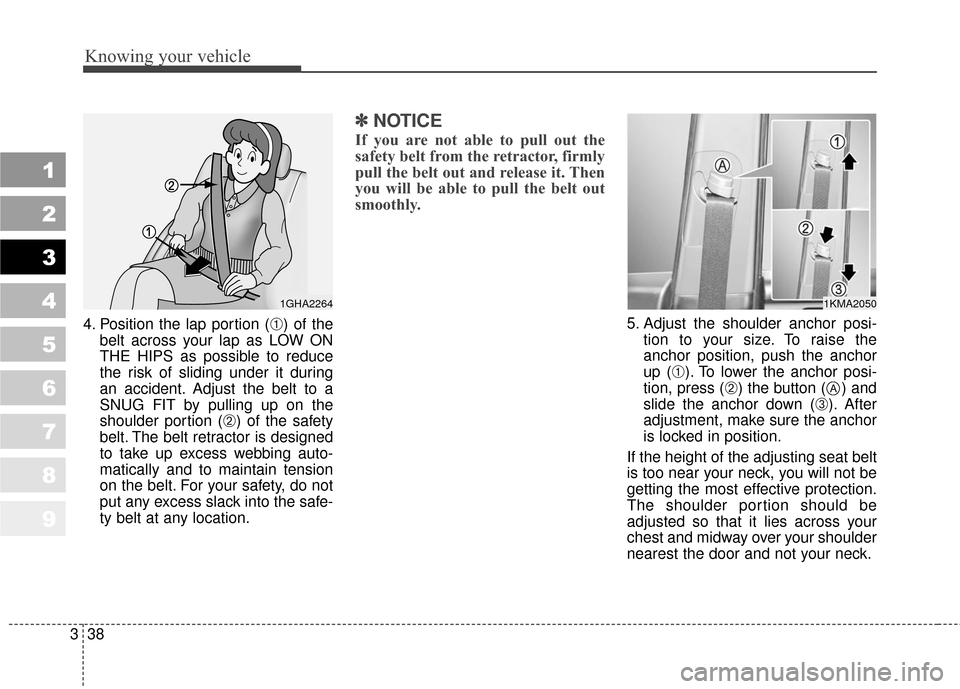
4. Position the lap portion (➀) of the
belt across your lap as LOW ON
THE HIPS as possible to reduce
the risk of sliding under it during
an accident. Adjust the belt to a
SNUG FIT by pulling up on the
shoulder portion (
➁) of the safety
belt. The belt retractor is designed
to take up excess webbing auto-
matically and to maintain tension
on the belt. For your safety, do not
put any excess slack into the safe-
ty belt at any location.
✽ ✽ NOTICE
If you are not able to pull out the
safety belt from the retractor, firmly
pull the belt out and release it. Then
you will be able to pull the belt out
smoothly.
5. Adjust the shoulder anchor posi-
tion to your size. To raise the
anchor position, push the anchor
up (
➀). To lower the anchor posi-
tion, press (
➁) the button ( ) and
slide the anchor down (
➂). After
adjustment, make sure the anchor
is locked in position.
If the height of the adjusting seat belt
is too near your neck, you will not be
getting the most effective protection.
The shoulder portion should be
adjusted so that it lies across your
chest and midway over your shoulder
nearest the door and not your neck.
1GHA22641KMA2050
A
Page 48 of 371
339
Knowing your vehicle
1
2
3
4
5
6
7
8
9
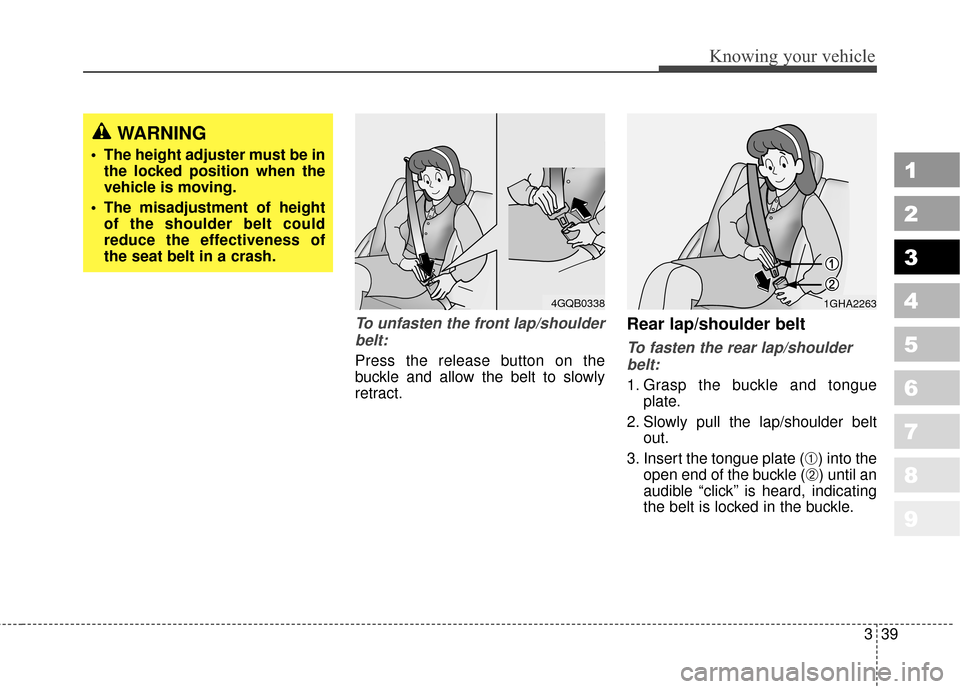
To unfasten the front lap/shoulderbelt:
Press the release button on the
buckle and allow the belt to slowly
retract.
Rear lap/shoulder belt
To fasten the rear lap/shoulderbelt:
1. Grasp the buckle and tongue plate.
2. Slowly pull the lap/shoulder belt out.
3. Insert the tongue plate (
➀) into the
open end of the buckle (
➁) until an
audible “click’’ is heard, indicating
the belt is locked in the buckle.
4GQB03381GHA2263
WARNING
The height adjuster must be in the locked position when the
vehicle is moving.
The misadjustment of height of the shoulder belt could
reduce the effectiveness of
the seat belt in a crash.
Page 95 of 371
Knowing your vehicle
86
3
1
2
3
4
5
6
7
8
9
Outside rearview mirror heater
(if equipped)
The outside rearview mirror heater is
actuated in connection with the rear
window defroster. To heat the outside
rearview mirror glass, push the but-
ton for the rear window defroster.
The rearview mirror heater (and rear
window defroster) will not operate
unless the engine is running.
The outside rearview mirror glass will
be heated for defrosting or defogging
and will give you improved rear
vision in inclement weather condi-
tions. Push the button again to turn
the heater off. The outside rearview
mirror heater automatically turns off
after 20 minutes.
Inside rearview mirror
Adjust the rearview mirror to center
on the view through the rear window.
Make this adjustment before you
start driving.
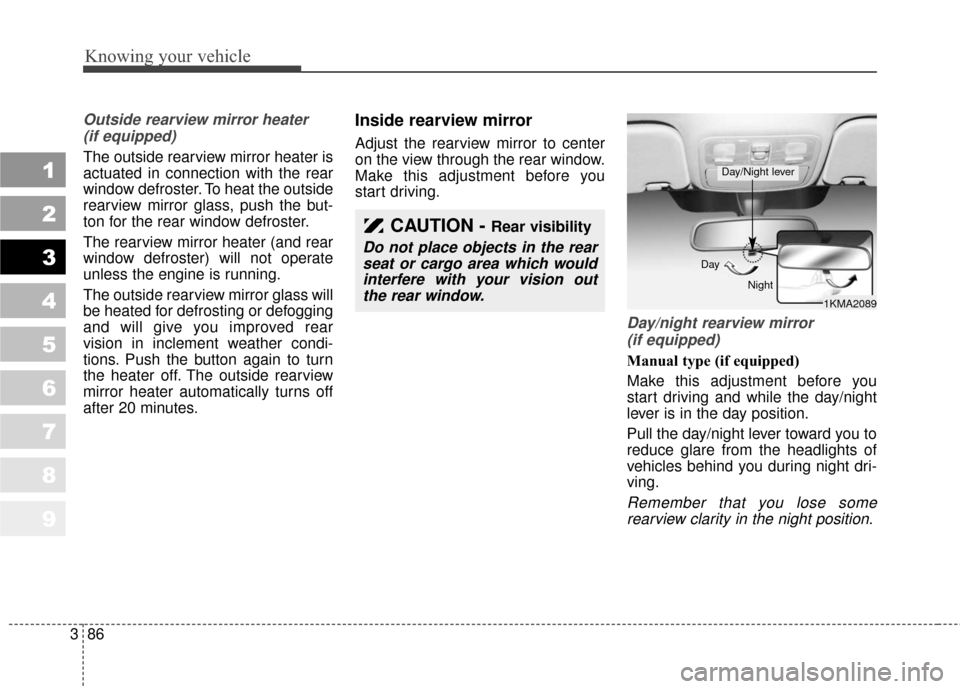
Day/night rearview mirror (if equipped)
Manual type (if equipped)
Make this adjustment before you
start driving and while the day/night
lever is in the day position.
Pull the day/night lever toward you to
reduce glare from the headlights of
vehicles behind you during night dri-
ving.
Remember that you lose somerearview clarity in the night position.
CAUTION - Rear visibility
Do not place objects in the rearseat or cargo area which wouldinterfere with your vision outthe rear window.
1KMA2089
Day
Night
Day/Night lever