Page 95 of 371
Knowing your vehicle
86
3
1
2
3
4
5
6
7
8
9
Outside rearview mirror heater
(if equipped)
The outside rearview mirror heater is
actuated in connection with the rear
window defroster. To heat the outside
rearview mirror glass, push the but-
ton for the rear window defroster.
The rearview mirror heater (and rear
window defroster) will not operate
unless the engine is running.
The outside rearview mirror glass will
be heated for defrosting or defogging
and will give you improved rear
vision in inclement weather condi-
tions. Push the button again to turn
the heater off. The outside rearview
mirror heater automatically turns off
after 20 minutes.
Inside rearview mirror
Adjust the rearview mirror to center
on the view through the rear window.
Make this adjustment before you
start driving.
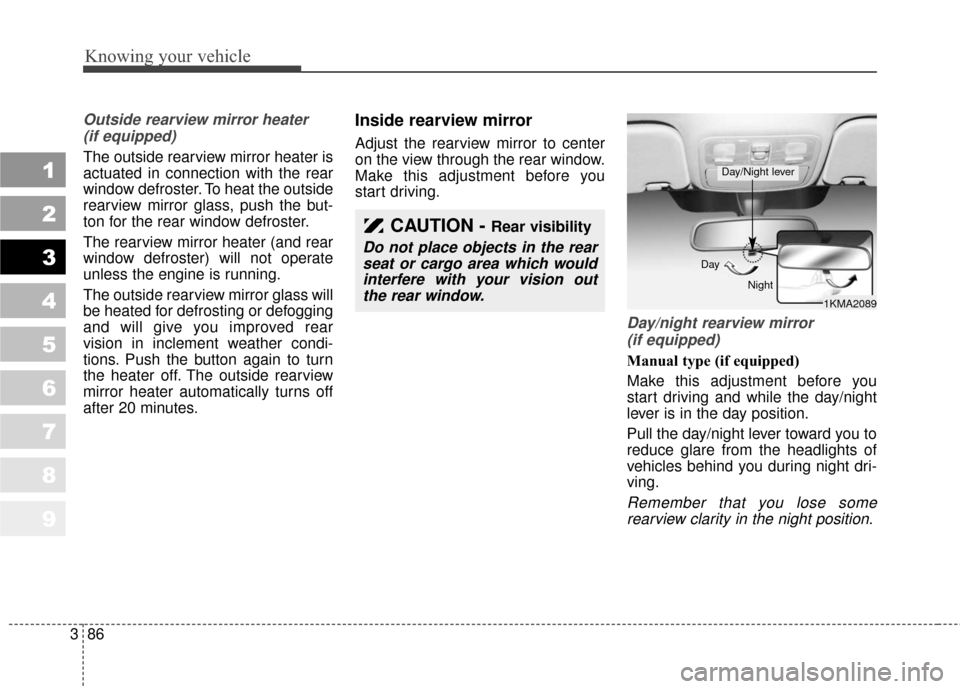
Day/night rearview mirror (if equipped)
Manual type (if equipped)
Make this adjustment before you
start driving and while the day/night
lever is in the day position.
Pull the day/night lever toward you to
reduce glare from the headlights of
vehicles behind you during night dri-
ving.
Remember that you lose somerearview clarity in the night position.
CAUTION - Rear visibility
Do not place objects in the rearseat or cargo area which wouldinterfere with your vision outthe rear window.
1KMA2089
Day
Night
Day/Night lever
Page 96 of 371

387
1
2
3
4
5
6
7
8
9
Knowing your vehicle
Electric type (if equipped)
The electric day/night rearview mir-
ror automatically controls the glare
from the headlights of the car behind
you in nighttime or low light driving
conditions. The sensor mounted in
the mirror senses the light level
around the vehicle, and through a
chemical reaction, automatically
controls the headlight glare from
vehicles behind you.
When the engine is running, the
glare is automatically controlled by
the sensor mounted in the rearview
mirror.
Whenever the shift lever is shifted
into reverse (R), the mirror will auto-
matically go to the brightest setting in
order to improve the drivers view
behind the vehicle.
✽ ✽NOTICE
When cleaning the mirror, use a
paper towel or similar material
dampened with glass cleaner. Do not
spray glass cleaner directly on the
mirror as that may cause the liquid
cleaner to enter the mirror housing.
Type A (with compass)
To operate the electric rearview mir-
ror:
Press and hold the ON/OFF button
(
➀) for 3~6 seconds to turn the auto-
matic- dimming function on. The mir-
ror indicator light will illuminate.
Press and hold the ON/OFF button
(
➀) for 3~6 seconds once again to
turn the automatic- dimming function
off. The mirror indicator light will turn
off. Type B (with homelink wireless
control system)
To operate the electric rearview mir-
ror:
Press the “I” button (
➀) to turn the
automatic- dimming function on. The
mirror indicator light will illuminate.
Press the “O” button (
➁) to turn the
automatic- dimming function off. The
mirror indicator light will turn off.
2GHN3310➀➁1KMA3084A➀
Page 97 of 371
Knowing your vehicle
88
3
1
2
3
4
5
6
7
8
9
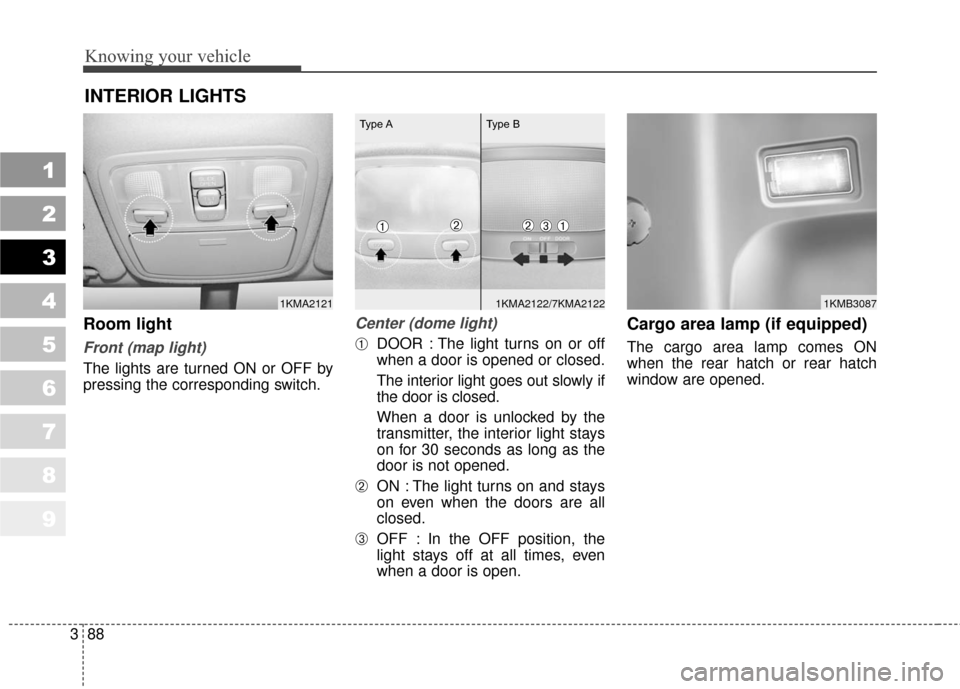
Room light
Front (map light)
The lights are turned ON or OFF by
pressing the corresponding switch.
Center (dome light)
➀DOOR : The light turns on or off
when a door is opened or closed.
The interior light goes out slowly if
the door is closed.
When a door is unlocked by the
transmitter, the interior light stays
on for 30 seconds as long as the
door is not opened.
➁ON : The light turns on and stays
on even when the doors are all
closed.
➂OFF : In the OFF position, the
light stays off at all times, even
when a door is open.
Cargo area lamp (if equipped)
The cargo area lamp comes ON
when the rear hatch or rear hatch
window are opened.
INTERIOR LIGHTS
1KMA21211KMB30871KMA2122/7KMA2122
➀➂➁
Type A Type B
➀➁
Page 98 of 371
389
1
2
3
4
5
6
7
8
9
Knowing your vehicle
These compartments can be used to
store small items required by the
driver or passengers.
✽ ✽NOTICE
• To avoid possible theft, do not
leave valuables in the storage com-
partment.
• Always keep the storage compart- ment covers closed while driving.
Do not attempt to place so many
items in the storage compartment
that the storage compartment
cover can not close securely.
Center console storage
These compartments can be used to
store small items required by the dri-
ver or front passenger.
Type A (if equipped)
To open either of the console storage
compartments, pull up on the locking
tab (
➀) or (➁).
STORAGE COMPARTMENT
WARNING - Flammable
materials
Do not store cigarette lighters,
propane cylinders, or other
flammable/explosive materials
in the vehicle. These items may
catch fire and/or explode if the
vehicle is exposed to hot tem-
peratures for extended periods.
1KMA2165
➀
➁
Page 101 of 371
Knowing your vehicle
92
3
1
2
3
4
5
6
7
8
9
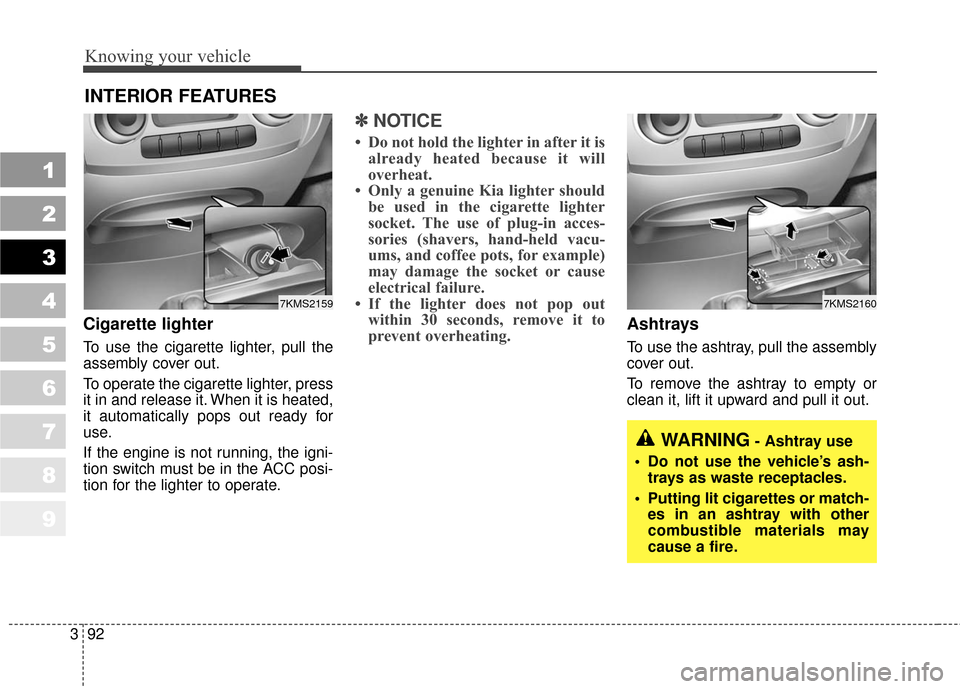
Cigarette lighter
To use the cigarette lighter, pull the
assembly cover out.
To operate the cigarette lighter, press
it in and release it. When it is heated,
it automatically pops out ready for
use.
If the engine is not running, the igni-
tion switch must be in the ACC posi-
tion for the lighter to operate.
✽ ✽
NOTICE
• Do not hold the lighter in after it is
already heated because it will
overheat.
• Only a genuine Kia lighter should be used in the cigarette lighter
socket. The use of plug-in acces-
sories (shavers, hand-held vacu-
ums, and coffee pots, for example)
may damage the socket or cause
electrical failure.
• If the lighter does not pop out within 30 seconds, remove it to
prevent overheating.
Ashtrays
To use the ashtray, pull the assembly
cover out.
To remove the ashtray to empty or
clean it, lift it upward and pull it out.
INTERIOR FEATURES
WARNING- Ashtray use
Do not use the vehicle’s ash- trays as waste receptacles.
Putting lit cigarettes or match- es in an ashtray with other
combustible materials may
cause a fire.
7KMS21597KMS2160
Page 103 of 371
Knowing your vehicle
94
3
1
2
3
4
5
6
7
8
9
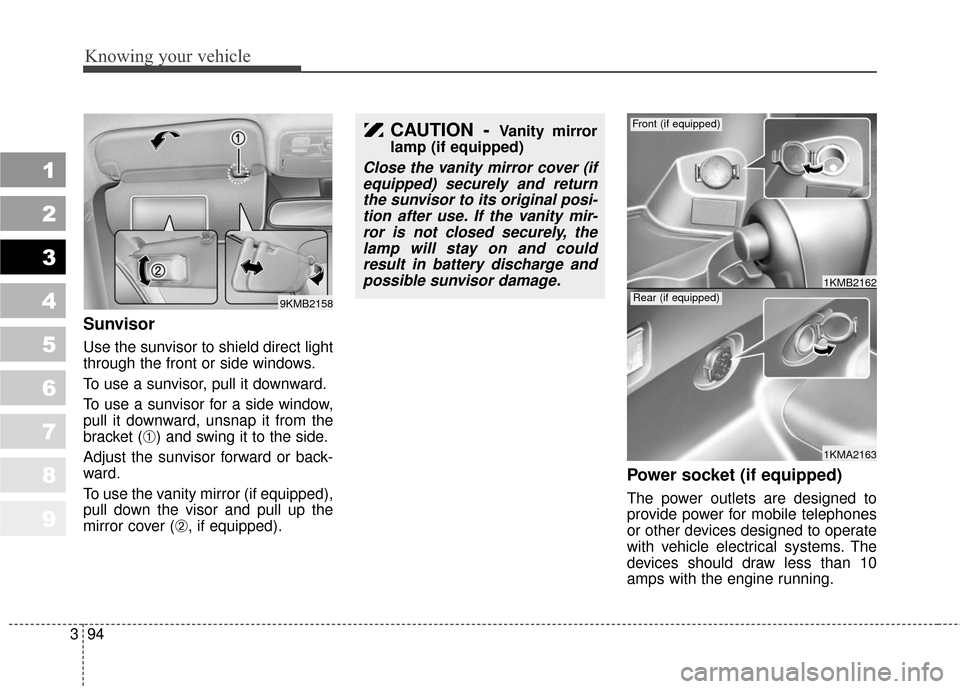
Sunvisor
Use the sunvisor to shield direct light
through the front or side windows.
To use a sunvisor, pull it downward.
To use a sunvisor for a side window,
pull it downward, unsnap it from the
bracket (
➀) and swing it to the side.
Adjust the sunvisor forward or back-
ward.
To use the vanity mirror (if equipped),
pull down the visor and pull up the
mirror cover (
➁, if equipped).
Power socket (if equipped)
The power outlets are designed to
provide power for mobile telephones
or other devices designed to operate
with vehicle electrical systems. The
devices should draw less than 10
amps with the engine running.
9KMB2158
1KMA2163
1KMB2162
Front (if equipped)
Rear (if equipped)
CAUTION - Vanity mirror
lamp (if equipped)
Close the vanity mirror cover (if equipped) securely and returnthe sunvisor to its original posi-tion after use. If the vanity mir-ror is not closed securely, thelamp will stay on and couldresult in battery discharge andpossible sunvisor damage.
Page 122 of 371
3113
Knowing your vehicle
1
2
3
4
5
6
7
8
9
1. CD loading slot
Please face printed side upward and
gently push in. When the ignition
switch is on ACC or ON and power is
off, power is automatically turned on
if the CD is loaded. This CDP sup-
ports both 8 cm and 12 cm CDs. But
if VCD, Data CD, MP3 CD are
loaded, "Er-6" message will appear
and CD will be ejected.
2. CD Indicator
When car ignition switch is ACC or
ON and if the CD is loaded, this indi-
cator is lighted. If the CD is ejected
the light is turned off.
3. CD eject Button
Push button to eject the CD during
CD playback. This button is enabled
when ignition switch is off.
4. AUX Selection Button
If the auxiliary device is connected, it
turns to AUX MODE to play the
sound from the auxiliary player.
If no Disc and auxiliary device is con-
nected, it displays "NO Media" for 5
seconds and returns to the previous
mode.
5. Automatic Track SelectionButton
Push [SEEK ] button for less
than 0.8 second to play from the
beginning of current song.
Push [SEEK ] button for less than 0.8 second and press again
within 1 second to play the previ-
ous song.
Push [SEEK ] button for 0.8 sec- ond or longer to initiate reverse
direction high speed sound search
of current song.
Push [SEEK ] button for less than 0.8 second to play the next
song.
Push [SEEK ] button for 0.8 sec- ond or longer to initiate high speed
sound search of current song.
6. INFO Selection Button
Displays the information of the cur-
rent CD TRACK in the order of
DISC TITLE
➟DISC ARTIST➟TRACK
TITLE
➟TRACK ARTIST➟TOTAL
TRACK
➟Play Screen➟ DISC TITLE
➟... (not displayed if the information
is not available on the DISC.)
7. TUNE/ENTER Button
Turn this button clockwise to display
songs after current song.
Also, turn this button counterclock-
wise to display songs before current
song.
To listen to the displayed song, press
the button to skip to the song and
play.
8. REPEAT Selection Button
Repeats current song when the but-
ton is pressed for less than 0.8 sec-
ond.
Repeats the entire DISC when the
button is pressed for 0.8 second or
longer.
Page 135 of 371
Knowing your vehicle
126
3
1
2
3
4
5
6
7
8
9
1. CD loading slot
Please face printed side upward and
gently push in. When the ignition
switch is on ACC or ON and power is
off, power is automatically turned on
if the CD is loaded. This CDP sup-
ports both 8cm and 12 cm CDs. But
if VCD, Data CD, MP3 CD are
loaded, "Er-6" message will appear
and CD will be ejected.
2. CD Indicator
When car ignition switch is ACC or
ON and if the CD is loaded, this indi-
cator is lighted. If the CD is ejected
the light is turned off.
3. CD eject Button
Push button to eject the CD dur-
ing CD playback. This button is
enabled when ignition switch is off.
4. CD LOAD Button
Push [LOAD] button to load CDs to
available CDC deck (from 1~6). Push
[LOAD] button for more than 2 sec-
onds to load into all available decks.
The last CD will play. 10 seconds idle
status will disable loading process.
5. AUX Selection Button
If the auxiliary device is connected, it
turns to AUX MODE to play the
sound from the auxiliary player.
If no auxiliary device is connected, it
displays "NO MEDIA" for 5 seconds
and returns to the previous mode.
6. Automatic Track Selection
Button
Push [SEEK ] button for less
than 0.8 second to play from the
beginning of current song.
Push [SEEK ] button for less than 0.8 second and press again
within 3 seconds to play the previ-
ous song. Push [SEEK ] button for 0.8 sec-
ond or longer to initiate reverse
direction high speed sound search
of current song.
Push [SEEK ] button for less than 0.8 second to play the next
song.
Push [SEEK ] button for 0.8 sec- ond or longer to initiate high speed
sound search of current song.
7. INFO Selection Button
Displays the information of the cur-
rent CD TRACK in the order of DISC
TITLE
➟ DISC ARTIST➟TRACK TITLE
➟TRACK ARTIST➟TOTAL TRACK➟
Play Screen➟ DISC TITLE➟ ... (not
displayed if the information is not
available on the DISC.)