Page 10 of 399

17
Introduction
INDICATOR SYMBOLS ON THE INSTRUMENT CLUSTER
Seat belt warning light
Door/tailgate open position indicator*
Tailgate open warning light
High beam indicator
Light on indicator*
Turn signal indicator
Front fog light indicator*
ABS warning light
Parking brake & Brake fluid
warning light
Engine oil pressure warning light
4WD system warning light* 4WD LOCK indicator*
Malfunction indicator*
Air bag warning light
Cruise SET indicator*
Low fuel level warning light
Shift pattern indicator*
DBC indicator*
❈ For more detailed explanations, refer to “Instrument cluster” in section 4.
Charging system warning light
Low windshield washer fluid level
warning light*
Door ajar warning light
Overspeed warning light*
120km/h
Key out warning light*KEY
OUT
* if equipped
Glow indicator (Diesel only)
Fuel filter warning light (Diesel only)
Cruise indicator*
Rear fog light indicator*
ESP indicator*
ESP OFF indicator*
Immobilizer indicator*
Low tire pressure telltale*/
TPMS (Tire Pressure MonitoringSystem) malfunction indicator*
Low tire pressure position telltale*
Page 124 of 399

449
Features of your vehicle
Your vehicle is equipped with dual-diago-
nal braking systems. This means you still
have braking on two wheels even if one
of the dual systems should fail. With only
one of the dual systems working, more
than normal pedal travel and greaterpedal pressure are required to stop the
vehicle. Also, the vehicle will not stop in
as short a distance with only a portion of
the brake system working. If the brakes
fail while you are driving, shift to a lower
gear for additional engine braking and
stop the vehicle as soon as it is safe to do
so.
To check bulb operation, check whether
the parking brake and brake fluid warning
light illuminates when the ignition switchis in the ON position.Seat belt warning andchime (if equipped)
Seat belt warning light
As a reminder to the driver and passen-
ger, the seat belt warning light will blink
or illuminate for approximately 6 seconds
each time you turn the ignition switch ON
regardless of belt fastening.
For details, refer to the seat belt on chap- ter 3.
Turn signal indicator
The blinking green arrows on the instru-
ment panel show the direction indicated
by the turn signals. If the arrow comes on
but does not blink, blinks more rapidly
than normal, or does not illuminate at all,
it indicates a malfunction in the turn sig-
nal system. You should consult your deal-
er for repairs.
This indicator also blinks when the haz-
ard warning switch is turned on.
High beam indicator
This indicator illuminates when the head- lights are on and in the high beam posi-
tion or when the turn signal lever is pulled
into the Flash-to-Pass position.
Light on indicator
(if equipped)
The indicator illuminates when the tail lights or headlights are ON.
WARNING
Driving the vehicle with a warning
light on is dangerous. If the brake
warning light remains on, have the
brakes checked and repaired imme-
diately by an authorized KIA dealer.
Page 140 of 399
465
Features of your vehicle
High beam operation
To turn on the high beam headlights,
push the lever away from you. Pull it back
for low beams. The high beam indicator will light when
the headlight high beams are switchedon.
To prevent the battery from being dis-
charged, do not leave the lights on for aprolonged time while the engine is not
running.To flash the headlights, pull the lever
towards you. It will return to the normal
(low beam) position when released. The
headlight switch does not need to be on
to use this flashing feature.
Turn signals and lane change sig- nals
The ignition switch must be on for the
turn signals to function. To turn on the
turn signals, move the lever up or down
(A). The green arrow indicators on the
instrument panel indicate which turn sig-
nal is operating. They will self-cancel
after a turn is completed. If the indicator
continues to flash after a turn, manually
return the lever to the OFF position.
OBK049050NOBK049049NOBK049051N
Page 142 of 399

467
Features of your vehicle
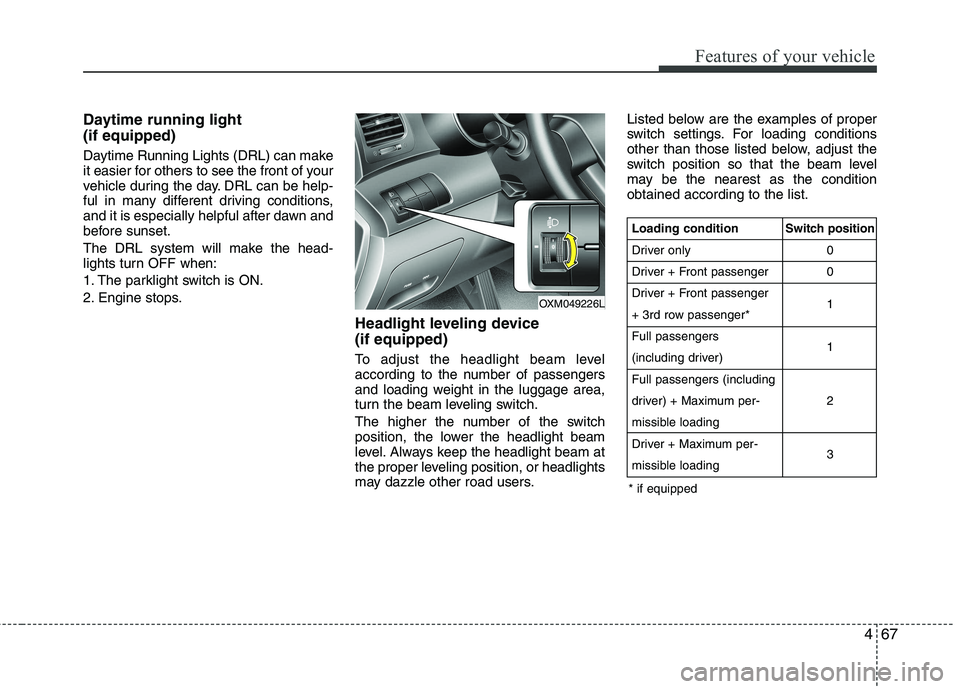
Daytime running light (if equipped)
Daytime Running Lights (DRL) can make
it easier for others to see the front of your
vehicle during the day. DRL can be help-
ful in many different driving conditions,
and it is especially helpful after dawn and
before sunset.
The DRL system will make the head-
lights turn OFF when:
1. The parklight switch is ON.
2. Engine stops.Headlight leveling device (if equipped)
To adjust the headlight beam level
according to the number of passengers
and loading weight in the luggage area,
turn the beam leveling switch.
The higher the number of the switch
position, the lower the headlight beam
level. Always keep the headlight beam at
the proper leveling position, or headlights
may dazzle other road users.Listed below are the examples of proper
switch settings. For loading conditions
other than those listed below, adjust the
switch position so that the beam level
may be the nearest as the conditionobtained according to the list.
OXM049226L
Loading condition
Driver only
Driver + Front passenger
Driver + Front passenger
+ 3rd row passenger*Full passengers
(including driver)Full passengers (including
driver) + Maximum per-
missible loading
Driver + Maximum per-
missible loading
Switch position
00 1 1 2 3
* if equipped
Page 148 of 399

473
Features of your vehicle
Automatic turn off function (if equipped)
The interior lights automatically turn off
approximately 20 minutes after the igni-
tion switch is turned off.
If your vehicle is equipped with the theft
alarm system, the interior lights automat-
ically turns off approximately 3 seconds
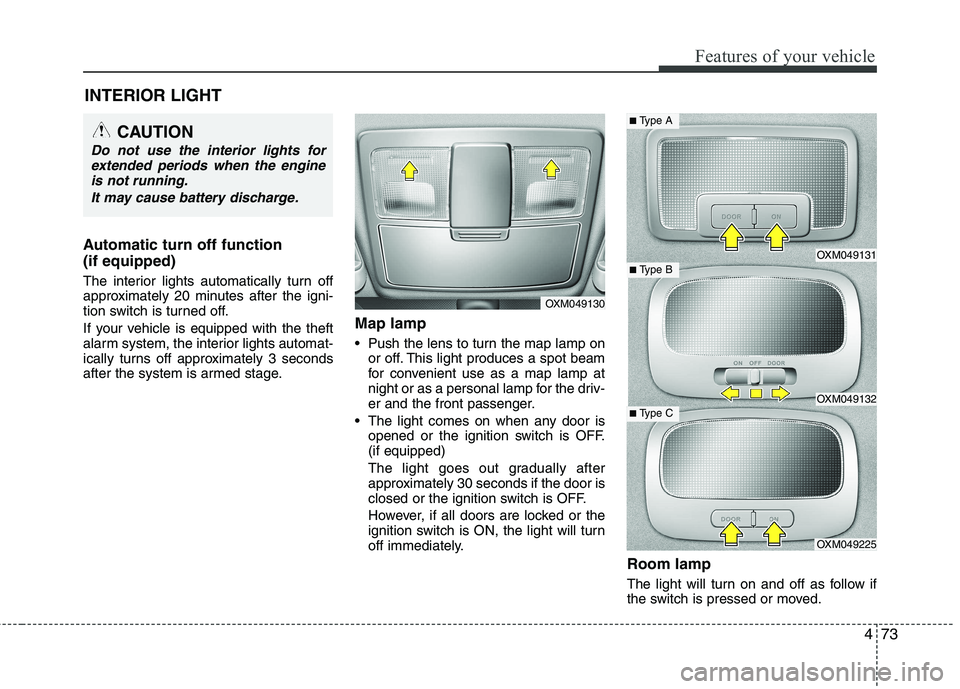
after the system is armed stage.Map lamp
Push the lens to turn the map lamp on
or off. This light produces a spot beam
for convenient use as a map lamp at
night or as a personal lamp for the driv-
er and the front passenger.
The light comes on when any door is opened or the ignition switch is OFF.(if equipped)
The light goes out gradually after
approximately 30 seconds if the door is
closed or the ignition switch is OFF.
However, if all doors are locked or the
ignition switch is ON, the light will turn
off immediately.
Room lamp
The light will turn on and off as follow if
the switch is pressed or moved.
INTERIOR LIGHT
CAUTION
Do not use the interior lights for
extended periods when the engine
is not running.
It may cause battery discharge.
OXM049130
OXM049131
OXM049132
OXM049225
■ Type B
■Type A
■ Type C
Page 372 of 399

Maintenance
66
7
Front fog light bulbs (if equipped)
1. Remove the front bumper under cover.
2. Reach your hand into the back of the
front bumper.
3. Disconnect the power connector from the socket.
4. Remove the bulb-socket from the housing by turning the socket counter
clockwise until the tabs on the socketalign with the slots on the housing.
5. Install the new bulb-socket into the housing by aligning the tabs on the
socket with the slots in the housing.
Push the socket into the housing and
turn the socket clockwise.
6. Connect the power connector to the socket.
7. Reinstall the front bumper under cover.
✽✽ NOTICE
If the headlight aiming adjustment is
necessary after the headlight assembly is
reinstalled, consult an authorized KIA
dealer.
Headlight (HID type), position, turn signal, and front fog light bulb
replacement
If the light bulb does not operate, have
the vehicle checked by an authorized KIA
dealer.
Side repeater light replacement
Type A
If the light bulb does not operate, have
the vehicle checked by an authorized KIA
dealer.
WARNING - HID Headlight
low beam (if equipped)
Do not attempt to replace or
inspect the low beam (XENON bulb)
due to electric shock danger. If the
low beam (XENON bulb) is not
working, have your vehicle checked
by an authorized KIA Dealer
OXM079031OXM079053L