2010 KIA SORENTO clock reset
[x] Cancel search: clock resetPage 177 of 399

Features of your vehicle
102
4
Digital clock
Whenever the battery terminals or relat-
ed fuses are disconnected, you must
reset the time.
When the ignition switch is in the ACC or
ON position, the clock buttons operate as
follows:
Hour (1)
Pressing the H button will advance the
time displayed by one hour.
Minute (2)
Pressing the M button will advance the
time displayed by one minute.
To change the 24 hour format to the 12
hours format (if equipped), while press-
ing the “H” button, press the “M” button
for 3 seconds or more. For example, if the
“H” and “M” buttons are pressed for morethan 3 seconds while the time is 22:15,
the display will change to 10:15.
WARNING
Do not adjust the clock while driv-
ing. You may lose your steering
control and cause an accident that
results in severe personal injury ordeath.
CAUTION
Use the power outlet only when the engine is running and remove
the accessory plug after use.Using the accessory plug for pro-longed periods of time with the engine off could cause the bat-
tery to discharge.
Only use 12V electric accessories which are less than 10A in elec-tric capacity.
Adjust the air-conditioner or heater to the lowest operatinglevel when using the power outlet.
Close the cover when not in use. Some electronic devices can cause electronic interference
when plugged into a vehicle’spower outlet. These devices may cause excessive audio static andmalfunctions in other electronic
systems or devices used in yourvehicle.
WARNING
Do not put a finger or a foreign ele-
ment (pin, etc.) into a power outlet
and do not touch with a wet hand.
You may get an electric shock.
OXM049186
Page 188 of 399
4113
Features of your vehicle
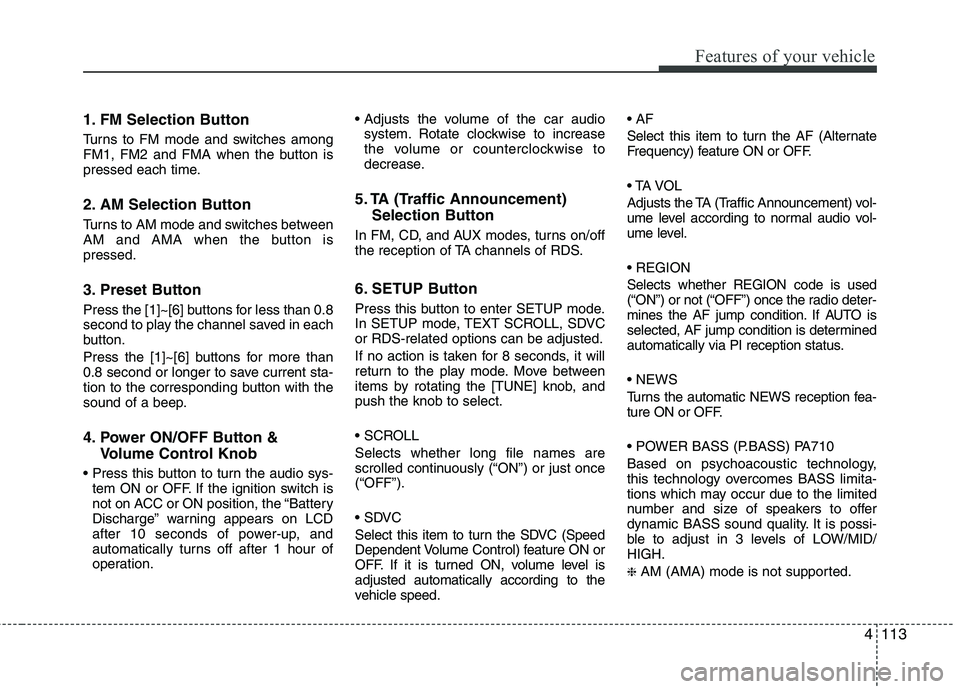
1. FM Selection Button
Turns to FM mode and switches among
FM1, FM2 and FMA when the button is
pressed each time.
2. AM Selection Button
Turns to AM mode and switches between
AM and AMA when the button ispressed.
3. Preset Button
Press the [1]~[6] buttons for less than 0.8
second to play the channel saved in each
button.
Press the [1]~[6] buttons for more than
0.8 second or longer to save current sta-
tion to the corresponding button with the
sound of a beep.
4. Power ON/OFF Button &Volume Control Knob
tem ON or OFF. If the ignition switch is
not on ACC or ON position, the “Battery
Discharge” warning appears on LCD
after 10 seconds of power-up, and
automatically turns off after 1 hour of
operation.
system. Rotate clockwise to increase
the volume or counterclockwise to
decrease.
5. TA (Traffic Announcement) Selection Button
In FM, CD, and AUX modes, turns on/off
the reception of TA channels of RDS.
6. SETUP Button
Press this button to enter SETUP mode.
In SETUP mode, TEXT SCROLL, SDVCor RDS-related options can be adjusted.
If no action is taken for 8 seconds, it will
return to the play mode. Move between
items by rotating the [TUNE] knob, andpush the knob to select.
Selects whether long file names are
scrolled continuously (“ON”) or just once(“OFF”).
Select this item to turn the SDVC (Speed
Dependent Volume Control) feature ON or
OFF. If it is turned ON, volume level isadjusted automatically according to the
vehicle speed.
Select this item to turn the AF (Alternate
Frequency) feature ON or OFF.
Adjusts the TA (Traffic Announcement) vol-
ume level according to normal audio vol-
ume level. Selects whether REGION code is used
(“ON”) or not (“OFF”) once the radio deter-
mines the AF jump condition. If AUTO is
selected, AF jump condition is determined
automatically via PI reception status.
Turns the automatic NEWS reception fea-
ture ON or OFF.
Based on psychoacoustic technology,
this technology overcomes BASS limita-
tions which may occur due to the limited
number and size of speakers to offer
dynamic BASS sound quality. It is possi-
ble to adjust in 3 levels of LOW/MID/HIGH. ❈
AM (AMA) mode is not supported.
Page 189 of 399
Features of your vehicle
114
4
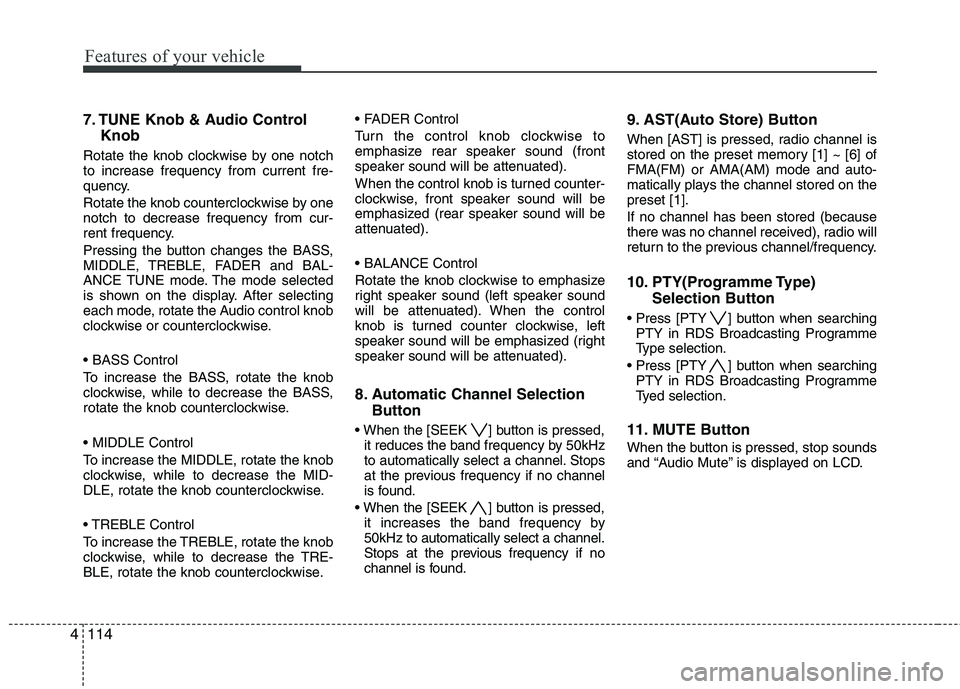
7. TUNE Knob & Audio Control
Knob
Rotate the knob clockwise by one notch to increase frequency from current fre-
quency.
Rotate the knob counterclockwise by one notch to decrease frequency from cur-
rent frequency.
Pressing the button changes the BASS,
MIDDLE, TREBLE, FADER and BAL-
ANCE TUNE mode. The mode selected
is shown on the display. After selecting
each mode, rotate the Audio control knob
clockwise or counterclockwise.
To increase the BASS, rotate the knob
clockwise, while to decrease the BASS,
rotate the knob counterclockwise.
To increase the MIDDLE, rotate the knob
clockwise, while to decrease the MID-
DLE, rotate the knob counterclockwise.
Control
To increase the TREBLE, rotate the knob
clockwise, while to decrease the TRE-
BLE, rotate the knob counterclockwise.
Turn the control knob clockwise to
emphasize rear speaker sound (front
speaker sound will be attenuated).
When the control knob is turned counter-
clockwise, front speaker sound will be
emphasized (rear speaker sound will be
attenuated).
Rotate the knob clockwise to emphasize
right speaker sound (left speaker sound
will be attenuated). When the control
knob is turned counter clockwise, left
speaker sound will be emphasized (right
speaker sound will be attenuated).
8. Automatic Channel Selection
Button
] button is pressed, it reduces the band frequency by 50kHz
to automatically select a channel. Stops
at the previous frequency if no channel
is found.
] button is pressed, it increases the band frequency by50kHz to automatically select a channel.
Stops at the previous frequency if no
channel is found. 9. AST(Auto Store) Button
When [AST] is pressed, radio channel is
stored on the preset memory [1] ~ [6] ofFMA(FM) or AMA(AM) mode and auto-
matically plays the channel stored on thepreset [1]. If no channel has been stored (because
there was no channel received), radio will
return to the previous channel/frequency.
10. PTY(Programme Type)
Selection Button
] button when searching PTY in RDS Broadcasting Programme
Type selection.
] button when searching PTY in RDS Broadcasting Programme
Tyed selection.
11. MUTE Button
When the button is pressed, stop sounds
and “Audio Mute” is displayed on LCD.
Page 201 of 399
![KIA SORENTO 2010 Owners Manual Features of your vehicle
126
4
1. FM Selection Button
Turns to FM mode and toggles FM1 and
FM2 when the button is pressed each
time.
2. AM Selection Button
Pressing the [AM] button selects the A KIA SORENTO 2010 Owners Manual Features of your vehicle
126
4
1. FM Selection Button
Turns to FM mode and toggles FM1 and
FM2 when the button is pressed each
time.
2. AM Selection Button
Pressing the [AM] button selects the A](/manual-img/2/40478/w960_40478-200.png)
Features of your vehicle
126
4
1. FM Selection Button
Turns to FM mode and toggles FM1 and
FM2 when the button is pressed each
time.
2. AM Selection Button
Pressing the [AM] button selects the AM
band. AM Mode is displayed on the LCD.
3. Preset Button
Press the [1]~[6] buttons for less than 0.8
second to play the channel saved in each
button.
Press the [1]~[6] buttons for more than
0.8 second or longer to save current sta-
tion to the respective button with a beep.
4. Power ON/OFF Button &
Volume Control Knob
Press this button to turn the audio sys-
tem ON or OFF if the ignition switch is on
ACC or ON position.
Adjusts the volume of car audio. Rotate
clockwise to increase the volume, or
counterclockwise to decrease. 5. SETUP Button
Press this button to enter the TEXT
SCROLL, SDVC and P.BASS adjustment
mode. If no action is taken for 8 seconds
after pressing the button, it will return to
the play mode. (After entering SETUP
mode, move between items using the
left, right and PUSH functions of the
[TUNE] button.)
The setup items changes from TEXT
SCROLL
↔
SDVC ↔ P.BASS...
Select whether long file names are
scrolled continuously (“ON”) or just once(“OFF”).
Select this item to turn the SDVC(Speed
Dependent Volume Control) feature ON
or OFF. If it is turned ON, volume level isadjusted automatically according to the
vehicle speed.
This function creates virtual sound
effects and allows adjustments to the
BASS level. HIGH
➟
MID ➟LOW ➟OFF
Page 202 of 399
4127
Features of your vehicle
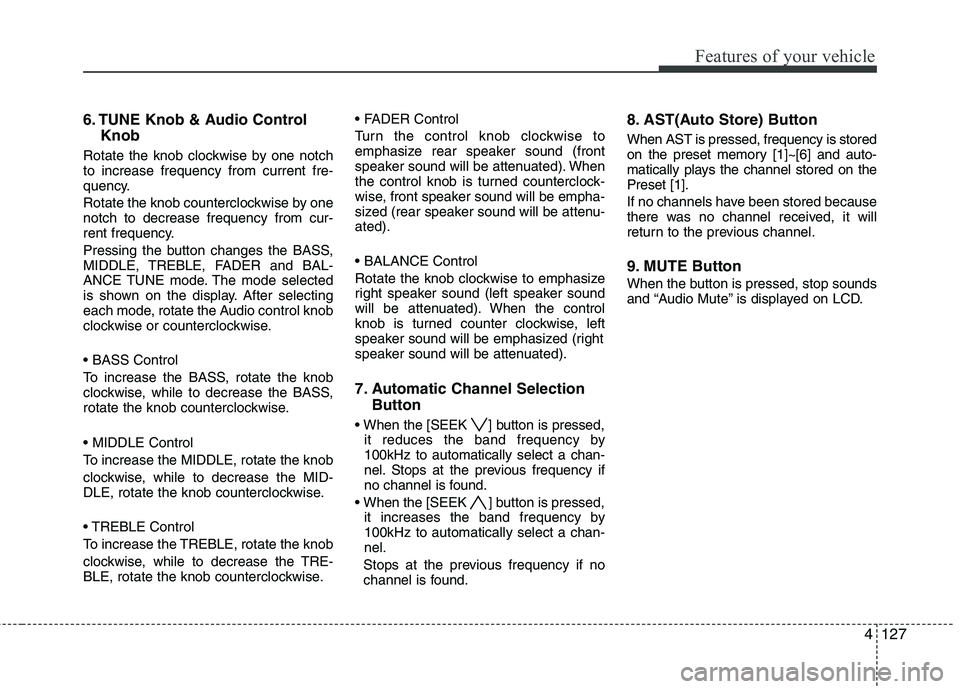
6. TUNE Knob & Audio ControlKnob
Rotate the knob clockwise by one notch to increase frequency from current fre-
quency.
Rotate the knob counterclockwise by one notch to decrease frequency from cur-
rent frequency.
Pressing the button changes the BASS,
MIDDLE, TREBLE, FADER and BAL-
ANCE TUNE mode. The mode selected
is shown on the display. After selecting
each mode, rotate the Audio control knob
clockwise or counterclockwise.
To increase the BASS, rotate the knob
clockwise, while to decrease the BASS,
rotate the knob counterclockwise.
To increase the MIDDLE, rotate the knob
clockwise, while to decrease the MID-
DLE, rotate the knob counterclockwise.
Control
To increase the TREBLE, rotate the knob
clockwise, while to decrease the TRE-
BLE, rotate the knob counterclockwise.
Turn the control knob clockwise to
emphasize rear speaker sound (front
speaker sound will be attenuated). When
the control knob is turned counterclock-
wise, front speaker sound will be empha-
sized (rear speaker sound will be attenu-ated).
Rotate the knob clockwise to emphasize
right speaker sound (left speaker sound
will be attenuated). When the control
knob is turned counter clockwise, left
speaker sound will be emphasized (right
speaker sound will be attenuated).
7. Automatic Channel Selection
Button
] button is pressed, it reduces the band frequency by 100kHz to automatically select a chan-
nel. Stops at the previous frequency if
no channel is found.
] button is pressed, it increases the band frequency by100kHz to automatically select a chan-nel.
Stops at the previous frequency if no
channel is found. 8. AST(Auto Store) Button When AST is pressed, frequency is stored
on the preset memory [1]~[6] and auto-
matically plays the channel stored on thePreset [1].
If no channels have been stored because
there was no channel received, it will
return to the previous channel.
9. MUTE Button
When the button is pressed, stop sounds
and “Audio Mute” is displayed on LCD.
Page 346 of 399
Maintenance
40
7
Battery recharging
Your vehicle has a maintenance-free,
calcium-based battery.
If the battery becomes discharged in a
short time (because, for example, the
headlights or interior lights were left on
while the vehicle was not in use),
recharge it by slow charging (trickle)
for 10 hours.
If the battery gradually discharges because of high electric load while the
vehicle is being used, recharge it at 20-
30A for two hours. Reset items
Items should be reset after the battery
has been discharged or the battery hasbeen disconnected.
Auto up/down window (See section 4)
Sunroof (See section 4)
Trip computer (See section 4)
Climate control system
(See section 4)
Clock (See section 4)
Audio (See section 4)
WARNING - Recharging
battery
When recharging the battery,
observe the following precautions:
The battery must be removed from the vehicle and placed in an area with good ventilation.
Do not allow cigarettes, sparks, or flame near the battery.
Watch the battery during charg- ing, and stop or reduce the charg-
ing rate if the battery cells begin
gassing (boiling) violently or if
the temperature of the electrolyte
of any cell exceeds 49°C (120°F).
Wear eye protection when check- ing the battery during charging.
Disconnect the battery charger in the following order.
1. Turn off the battery charger main switch.
2. Unhook the negative clamp from the negative battery termi- nal.
3. Unhook the positive clamp from the positive battery terminal.WARNING
Before performing maintenance or recharging the battery, turn off all accessories and stop the
engine.
The negative battery cable must be removed first and installed
last when the battery is discon-nected.(Continued)
The electrical ignition systemworks with high voltage. Never
touch these components with theengine running or the ignition
switched on.
Failure to follow the above warn-
ings can result in serious bodily
injury or death.
Page 359 of 399
753
Maintenance
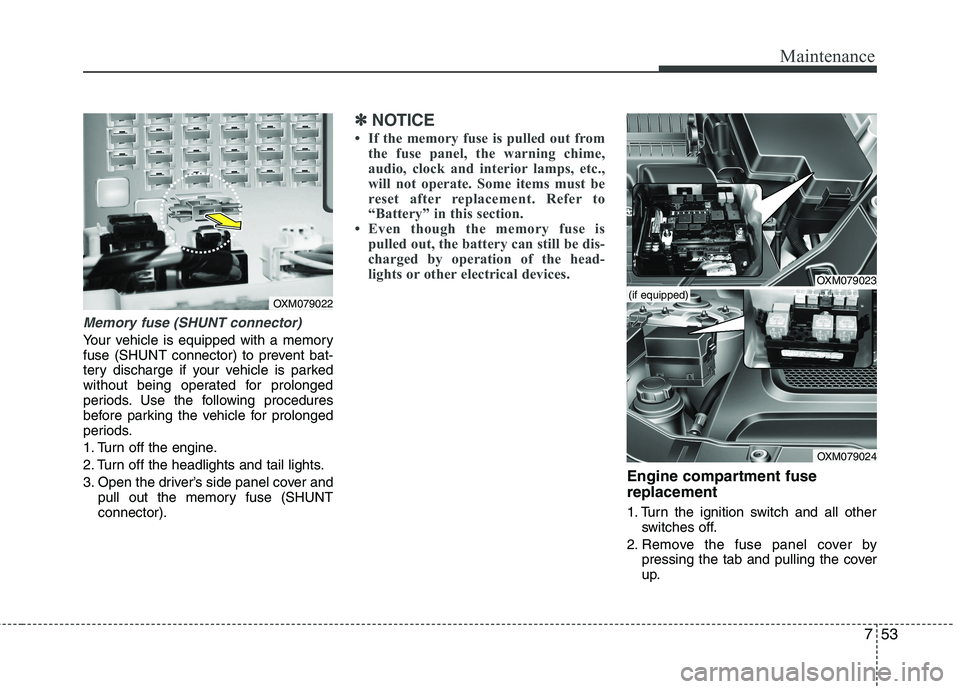
Memory fuse (SHUNT connector)
Your vehicle is equipped with a memory
fuse (SHUNT connector) to prevent bat-
tery discharge if your vehicle is parked
without being operated for prolonged
periods. Use the following procedures
before parking the vehicle for prolonged
periods.
1. Turn off the engine.
2. Turn off the headlights and tail lights.
3. Open the driver’s side panel cover andpull out the memory fuse (SHUNT connector).
✽✽ NOTICE
If the memory fuse is pulled out from the fuse panel, the warning chime,
audio, clock and interior lamps, etc.,
will not operate. Some items must be
reset after replacement. Refer to
“Battery” in this section.
Even though the memory fuse is
pulled out, the battery can still be dis-
charged by operation of the head-
lights or other electrical devices.
Engine compartment fuse replacement
1. Turn the ignition switch and all other switches off.
2. Remove the fuse panel cover by pressing the tab and pulling the cover
up.
OXM079022
OXM079023
OXM079024
(if equipped)