2010 KIA SORENTO battery
[x] Cancel search: batteryPage 165 of 399
Features of your vehicle
90
4
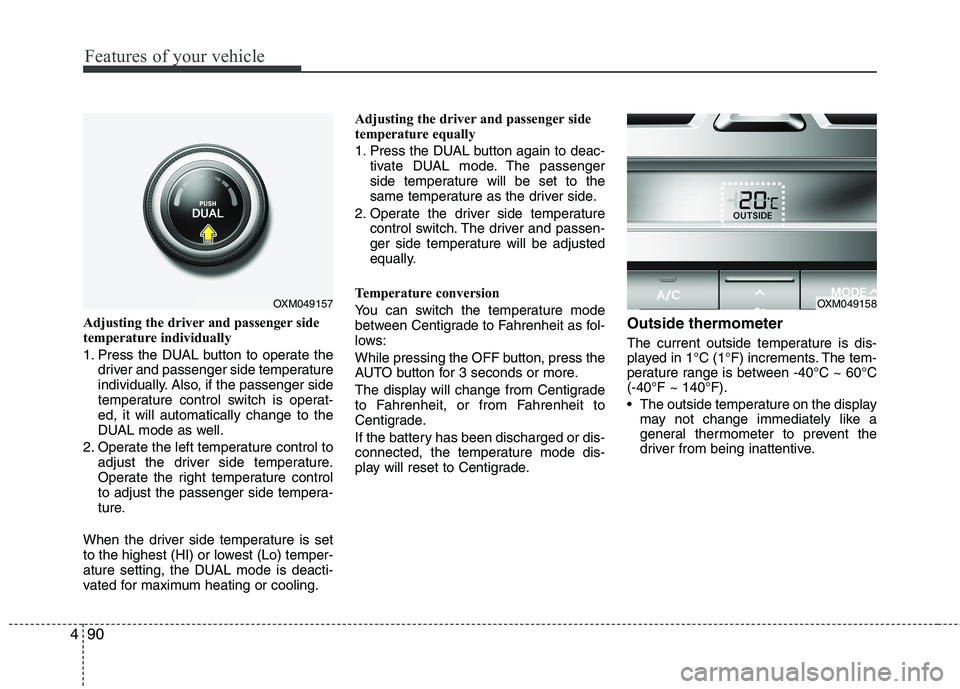
Adjusting the driver and passenger side
temperature individually
1. Press the DUAL button to operate the
driver and passenger side temperature
individually. Also, if the passenger side
temperature control switch is operat-ed, it will automatically change to the
DUAL mode as well.
2. Operate the left temperature control to adjust the driver side temperature.
Operate the right temperature control
to adjust the passenger side tempera-
ture.
When the driver side temperature is set
to the highest (HI) or lowest (Lo) temper-
ature setting, the DUAL mode is deacti-
vated for maximum heating or cooling. Adjusting the driver and passenger side
temperature equally
1. Press the DUAL button again to deac-
tivate DUAL mode. The passenger
side temperature will be set to the
same temperature as the driver side.
2. Operate the driver side temperature control switch. The driver and passen-
ger side temperature will be adjusted
equally.
Temperature conversion
You can switch the temperature mode
between Centigrade to Fahrenheit as fol-
lows:
While pressing the OFF button, press the
AUTO button for 3 seconds or more.
The display will change from Centigrade
to Fahrenheit, or from Fahrenheit to
Centigrade.
If the battery has been discharged or dis-
connected, the temperature mode dis-
play will reset to Centigrade. Outside thermometer
The current outside temperature is dis-
played in 1°C (1°F) increments. The tem-
perature range is between -40°C ~ 60°C(-40°F ~ 140°F).
The outside temperature on the display
may not change immediately like a
general thermometer to prevent the
driver from being inattentive.
OXM049157OXM049158
Page 171 of 399
Features of your vehicle
96
4
Defogging logic
To reduce the possibility of fogging up
the inside of the windshield, the air intakeor air conditioning are controlled auto-
matically according to certain conditions
such as or position. To cancel or
return to the defogging logic, do the fol-
lowing.
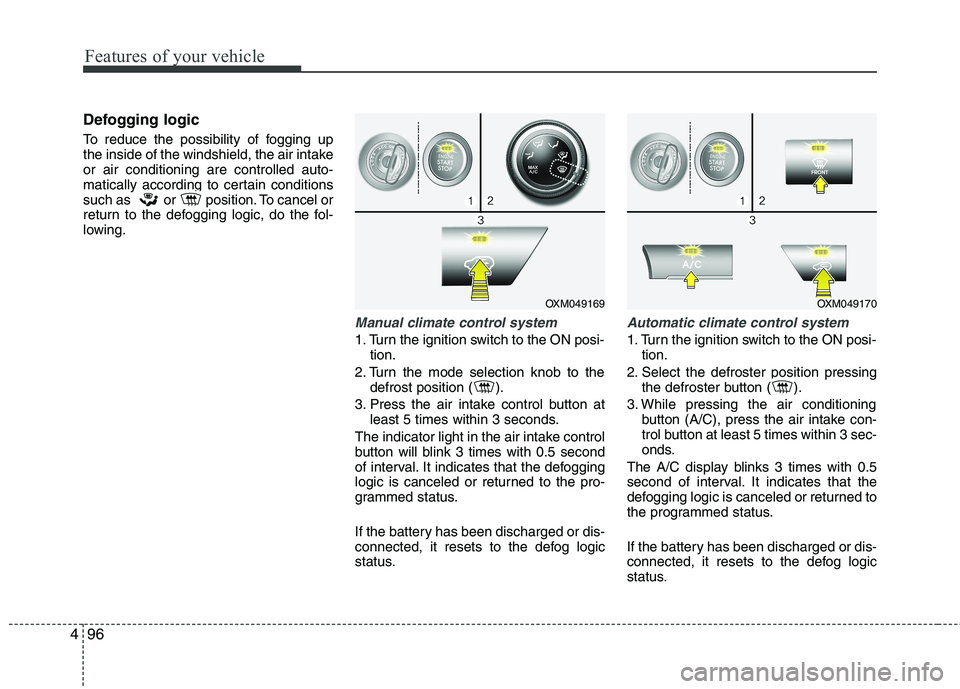
Manual climate control system
1. Turn the ignition switch to the ON posi-
tion.
2. Turn the mode selection knob to the defrost position ( ).
3. Press the air intake control button at least 5 times within 3 seconds.
The indicator light in the air intake control
button will blink 3 times with 0.5 second
of interval. It indicates that the defogging
logic is canceled or returned to the pro-
grammed status.
If the battery has been discharged or dis-
connected, it resets to the defog logic
status.
Automatic climate control system
1. Turn the ignition switch to the ON posi- tion.
2. Select the defroster position pressing the defroster button ( ).
3. While pressing the air conditioning button (A/C), press the air intake con-
trol button at least 5 times within 3 sec-
onds.
The A/C display blinks 3 times with 0.5
second of interval. It indicates that the
defogging logic is canceled or returned to
the programmed status.
If the battery has been discharged or dis-
connected, it resets to the defog logic
status.
OXM049169OXM049170
Page 176 of 399
4101
Features of your vehicle
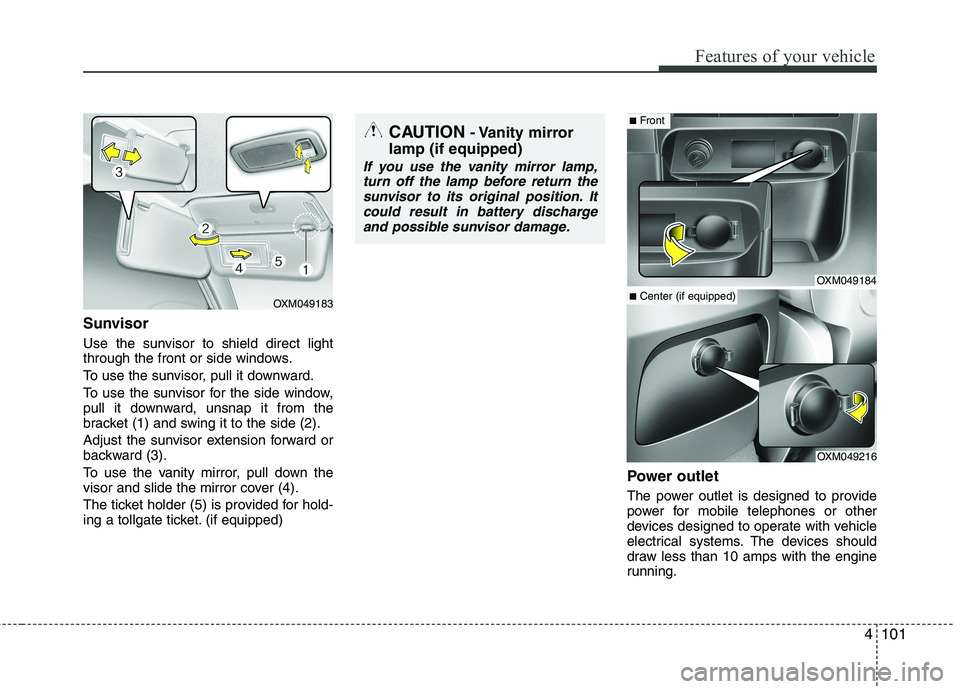
Sunvisor
Use the sunvisor to shield direct light
through the front or side windows.
To use the sunvisor, pull it downward.
To use the sunvisor for the side window,
pull it downward, unsnap it from the
bracket (1) and swing it to the side (2).
Adjust the sunvisor extension forward or
backward (3).
To use the vanity mirror, pull down the
visor and slide the mirror cover (4).
The ticket holder (5) is provided for hold-
ing a tollgate ticket. (if equipped)Power outlet
The power outlet is designed to provide
power for mobile telephones or other
devices designed to operate with vehicle
electrical systems. The devices should
draw less than 10 amps with the engine
running.
OXM049183
CAUTION
- Vanity mirror
lamp (if equipped)
If you use the vanity mirror lamp, turn off the lamp before return the
sunvisor to its original position. Itcould result in battery dischargeand possible sunvisor damage.
OXM049184
OXM049216
■ Front
■Center (if equipped)
Page 177 of 399

Features of your vehicle
102
4
Digital clock
Whenever the battery terminals or relat-
ed fuses are disconnected, you must
reset the time.
When the ignition switch is in the ACC or
ON position, the clock buttons operate as
follows:
Hour (1)
Pressing the H button will advance the
time displayed by one hour.
Minute (2)
Pressing the M button will advance the
time displayed by one minute.
To change the 24 hour format to the 12
hours format (if equipped), while press-
ing the “H” button, press the “M” button
for 3 seconds or more. For example, if the
“H” and “M” buttons are pressed for morethan 3 seconds while the time is 22:15,
the display will change to 10:15.
WARNING
Do not adjust the clock while driv-
ing. You may lose your steering
control and cause an accident that
results in severe personal injury ordeath.
CAUTION
Use the power outlet only when the engine is running and remove
the accessory plug after use.Using the accessory plug for pro-longed periods of time with the engine off could cause the bat-
tery to discharge.
Only use 12V electric accessories which are less than 10A in elec-tric capacity.
Adjust the air-conditioner or heater to the lowest operatinglevel when using the power outlet.
Close the cover when not in use. Some electronic devices can cause electronic interference
when plugged into a vehicle’spower outlet. These devices may cause excessive audio static andmalfunctions in other electronic
systems or devices used in yourvehicle.
WARNING
Do not put a finger or a foreign ele-
ment (pin, etc.) into a power outlet
and do not touch with a wet hand.
You may get an electric shock.
OXM049186
Page 188 of 399
4113
Features of your vehicle
1. FM Selection Button
Turns to FM mode and switches among
FM1, FM2 and FMA when the button is
pressed each time.
2. AM Selection Button
Turns to AM mode and switches between
AM and AMA when the button ispressed.
3. Preset Button
Press the [1]~[6] buttons for less than 0.8
second to play the channel saved in each
button.
Press the [1]~[6] buttons for more than
0.8 second or longer to save current sta-
tion to the corresponding button with the
sound of a beep.
4. Power ON/OFF Button &Volume Control Knob
tem ON or OFF. If the ignition switch is
not on ACC or ON position, the “Battery
Discharge” warning appears on LCD
after 10 seconds of power-up, and
automatically turns off after 1 hour of
operation.
system. Rotate clockwise to increase
the volume or counterclockwise to
decrease.
5. TA (Traffic Announcement) Selection Button
In FM, CD, and AUX modes, turns on/off
the reception of TA channels of RDS.
6. SETUP Button
Press this button to enter SETUP mode.
In SETUP mode, TEXT SCROLL, SDVCor RDS-related options can be adjusted.
If no action is taken for 8 seconds, it will
return to the play mode. Move between
items by rotating the [TUNE] knob, andpush the knob to select.
Selects whether long file names are
scrolled continuously (“ON”) or just once(“OFF”).
Select this item to turn the SDVC (Speed
Dependent Volume Control) feature ON or
OFF. If it is turned ON, volume level isadjusted automatically according to the
vehicle speed.
Select this item to turn the AF (Alternate
Frequency) feature ON or OFF.
Adjusts the TA (Traffic Announcement) vol-
ume level according to normal audio vol-
ume level. Selects whether REGION code is used
(“ON”) or not (“OFF”) once the radio deter-
mines the AF jump condition. If AUTO is
selected, AF jump condition is determined
automatically via PI reception status.
Turns the automatic NEWS reception fea-
ture ON or OFF.
Based on psychoacoustic technology,
this technology overcomes BASS limita-
tions which may occur due to the limited
number and size of speakers to offer
dynamic BASS sound quality. It is possi-
ble to adjust in 3 levels of LOW/MID/HIGH. ❈
AM (AMA) mode is not supported.
Page 198 of 399
4123
Features of your vehicle
✽✽NOTICE FOR USING iPod
DEVICE
Some iPod models might not sup- port the communication protocol
and the files will not be played.
Supported iPod models:
- iPod Mini
- iPod 4th(Photo) ~ 6th(Classic)generation
- iPod Nano 1st~4th generation
- iPod Touch 1st~2nd generation
The order of search or playback of
songs in the iPod can be different
from the order searched in the
audio system.
If the iPod crashes due to its own
malfunction, reset the iPod. (Reset:
Refer to iPod manual)
An iPod may not operate normally on low battery.CAUTION IN USING
iPod DEVICE
You need the power cable exclu- sive for an iPod in order to oper-ate an iPod with the buttons onthe audio system. Connectionthrough standard iPod-USB cable
is not supported, so do not use itwith car audio.
When connecting the device with an iPod cable, push in the jack
fully so as to not cause interfer-ence with communication.
When adjusting the sound effects of an iPod and the audio system,the sound effects of both devices
will overlap and might reduce ordistort the quality of the sound.
Deactivate (turn off) the equalizer function of an iPod when adjust-ing the audio system’s volume,
and turn off the equalizer of the audio system when using theequalizer of an iPod.
(Continued)
(Continued) When the iPod cable is connected, the system can be switched to theAUX mode even without the iPoddevice and can cause noise.
Disconnect the iPod cable whenyou are not using the iPod device.
When not using iPod with car audio, detach the iPod cable from
iPod. If not, the iPod may remain inaccessary mode, and may notwork properly.
Page 211 of 399
Features of your vehicle
136
4
✽✽
NOTICE FOR USING iPod
DEVICE
Some iPod models might not sup- port the communication protocol
and the files will not be played.
Supported iPod models:
- iPod Mini
- iPod 4th(Photo) ~ 6th(Classic)generation
- iPod Nano 1st~4th generation
- iPod Touch 1st~2nd generation
The order of search or playback of
songs in the iPod can be different
from the order searched in the
audio system.
If the iPod crashes due to its own
malfunction, reset the iPod. (Reset:
Refer to iPod manual)
An iPod may not operate normally on low battery.CAUTION IN USING
iPod DEVICE
You need the power cable exclu- sive for an iPod in order to oper-ate an iPod with the buttons onthe audio system. Connectionthrough standard iPod-USB cable
is not supported, so do not use itwith car audio.
When connecting the device with an iPod cable, push in the jack
fully so as to not cause interferewith communication.
When adjusting the sound effects of an iPod and the audio system,the sound effects of both devices
will overlap and might reduce ordistort the quality of the sound.
Deactivate (turn off) the equalizer function of an iPod when adjust-ing the audio system’s volume,
and turn off the equalizer of the audio system when using theequalizer of an iPod.
(Continued)
(Continued) When the iPod cable is connected, the system can be switched to theAUX mode even without the iPoddevice and can cause noise.
Disconnect the iPod cable whenyou are not using the iPod device.
When not using iPod with car audio, detach the iPod cable from
iPod. If not, the iPod may remain inaccessory mode, and may notwork properly.
Page 216 of 399
Driving your vehicle
4
5
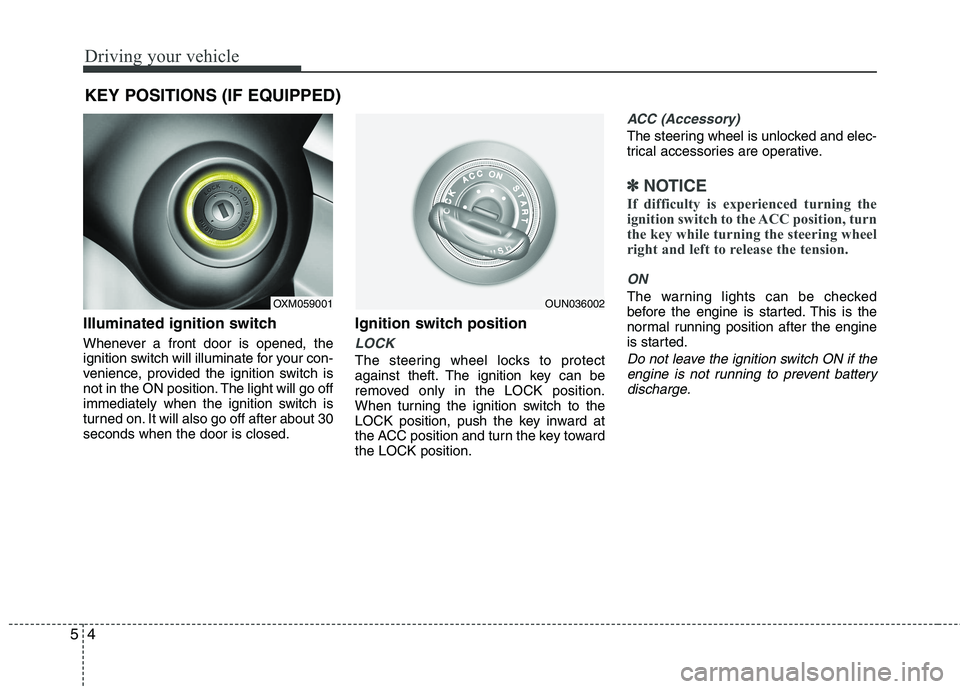
Illuminated ignition switch
Whenever a front door is opened, the
ignition switch will illuminate for your con-
venience, provided the ignition switch is
not in the ON position. The light will go off
immediately when the ignition switch is
turned on. It will also go off after about 30seconds when the door is closed. Ignition switch position
LOCK
The steering wheel locks to protect
against theft. The ignition key can be
removed only in the LOCK position.
When turning the ignition switch to the
LOCK position, push the key inward at
the ACC position and turn the key towardthe LOCK position.
ACC (Accessory)
The steering wheel is unlocked and elec-
trical accessories are operative.
✽✽
NOTICE
If difficulty is experienced turning the
ignition switch to the ACC position, turn
the key while turning the steering wheel
right and left to release the tension.
ON
The warning lights can be checked
before the engine is started. This is the
normal running position after the engine
is started.
Do not leave the ignition switch ON if the engine is not running to prevent batterydischarge.
KEY POSITIONS (IF EQUIPPED)
OXM059001OUN036002