2010 KIA Rio instrument panel
[x] Cancel search: instrument panelPage 75 of 236
Knowing your vehicle
66
3
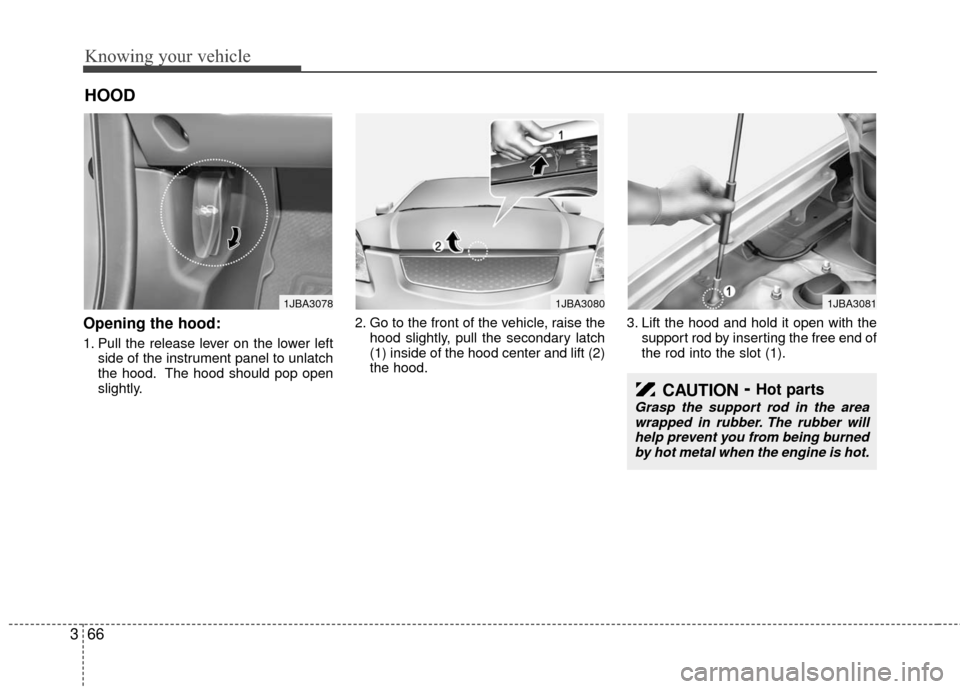
Opening the hood:
1. Pull the release lever on the lower left
side of the instrument panel to unlatch
the hood. The hood should pop open
slightly. 2. Go to the front of the vehicle, raise the
hood slightly, pull the secondary latch
(1) inside of the hood center and lift (2)
the hood. 3. Lift the hood and hold it open with the
support rod by inserting the free end of
the rod into the slot (1).
HOOD
1JBA30781JBA30801JBA3081
CAUTION- Hot parts
Grasp the support rod in the areawrapped in rubber. The rubber willhelp prevent you from being burned by hot metal when the engine is hot.
Page 78 of 236

369
Knowing your vehicle
✽
✽NOTICE
• Make sure to refuel your vehicle
according to the "Fuel requirements"
suggested in section 5.
• Check to make sure the fuel filler cap is securely closed after refueling. A
loose fuel filler cap may cause the
“Check fuel filler cap ( )” light in
the instrument panel to illuminate
unnecessarily.
• If the fuel filler cap requires replace- ment, use only a genuine Kia cap or
the equivalent specified for your vehi-
cle. An incorrect fuel filler cap can
result in a serious malfunction of the
fuel system or emission control sys-
tem.
• Do not spill fuel on the exterior sur- faces of the vehicle. Any type of fuel
spilled on painted surfaces may dam-
age the paint. (Continued)
DO NOT use matches or a lighter
and DO NOT SMOKE or leave a lit
cigarette in your vehicle while at a
gas station especially during
refueling. Automotive fuel is high-
ly flammable and can, when ignit-
ed, result in fire.
If a fire breaks out during refuel- ing, leave the vicinity of the vehi-
cle, and immediately contact the
manager of the gas station and
then contact the local fire depart-
ment or 911.(Continued)
Static electricity discharge from
the container can ignite fuel
vapors causing a fire. Once refu-
eling has begun, contact with the
vehicle should be maintained
until the filling is complete.
Use only portable plastic fuel
containers designed to carry and
store gasoline.
Do not use cellular phones while refueling. Electric current and/or
electronic interference from cellu-
lar phones can potentially ignite
fuel vapors causing a fire.
When refueling, always shut the engine off. Sparks produced by
electrical components related to
the engine can ignite fuel vapors
causing a fire. Once refueling is
complete, check to make sure the
filler cap and filler door are
securely closed, before starting
the engine.
(Continued)
Page 120 of 236
Driving your vehicle
84
2 (Second Gear)
Use 2 (Second Gear) for more power
when climbing hills and for increased
braking when going down hills. This posi-
tion also helps reduce wheel spin on slip-
pery surfaces. When the shift lever is
placed in 2 (Second Gear), the transaxle
will automatically shift from first to sec-
ond gear.
L (Low)
Move the shift lever to this position in
hard pulling situations and for climbing
steep grades.
O/D (Over Drive) system
(if equipped)
Pressing the O/D system button cancels
and engages the overdrive system.
When the O/D system is cancelled, the
O/D OFF indicator illuminates and the
transaxle gear range is limited to 1st
through 3rd. The transaxle will not shift to
4th gear until the O/D system button is
pressed again to release the switch.
When driving down a sloping road with
the transaxle in O/D (4th), you can
decrease the vehicle speed without using
the brakes by pressing the O/D button.
When the ignition is switched OFF, O/D
OFF mode is automatically cancelled.
O/D OFF Indicator ( )
This indicator light illuminates in the
instrument panel when the O/D mode is
cancelled.
Moving up a steep grade from a
standing start
To move up a steep grade from a stand-
ing start, depress the brake pedal, shift
the shift lever to D (Drive). Select the
appropriate gear depending on load
weight and steepness of the grade, and
release the parking brake. Depress the
accelerator gradually while releasing the
service brakes.
O/D
OFF
CAUTION
Do not exceed the recommended
maximum speeds in 2 (Second Gear) or L (Low). Operating thevehicle at speeds above the maxi-mum recommended, for 2 (SecondGear) or L (Low) may cause exces-sive heat to develop which couldresult in damage to or failure of theautomatic transaxle.
OJB030404
Page 137 of 236

425
Driving your vehicle
ECO ON/OFF mode (if equipped)
You can turn the ECO indicator on/off on
the instrument cluster in this mode.
If you push the TRIP button more than 1
second in the ECO ON mode, ECO OFF
is displayed and the ECO indicator turns
off.
If you want to display the ECO indicator
again, press the TRIP button more than 1
second in the ECO OFF mode and then
ECO ON mode is displayed.
For more detailed explanations, refer to
"Warnings and indicators" in section 4.
Instrument panel illumination
(if equipped)
When the vehicle’s parking lights or
headlights are on, rotate the illumination
control knob to adjust the brightness of
the instrument panel illumination.
Warning lights / audible indicators
Checking operation
All warning lights are checked by turning
the ignition switch ON (do not start the
engine). Any light that does not illuminate
should be checked by an authorized Kia
dealer.
After starting the engine, check to make
sure that all warning lights are off. If any
are still on, this indicates a situation that
needs attention. When releasing the
parking brake, the brake system warning
light should go off. The fuel warning light
will stay on if the fuel level is low.
Anti-lock brake system
(ABS) warning light (if
equipped)
This light illuminates if the key is turned
to ON and goes off in approximately 3
seconds if the system is operating nor-
mally.
If the light stays on, you may have a
problem with your ABS. Contact an
authorized Kia dealer as soon as possi-
ble.
OJB0400431JBN4055
WARNINGS AND INDICATORS
ABS
Page 144 of 236
Driving your vehicle
32
4
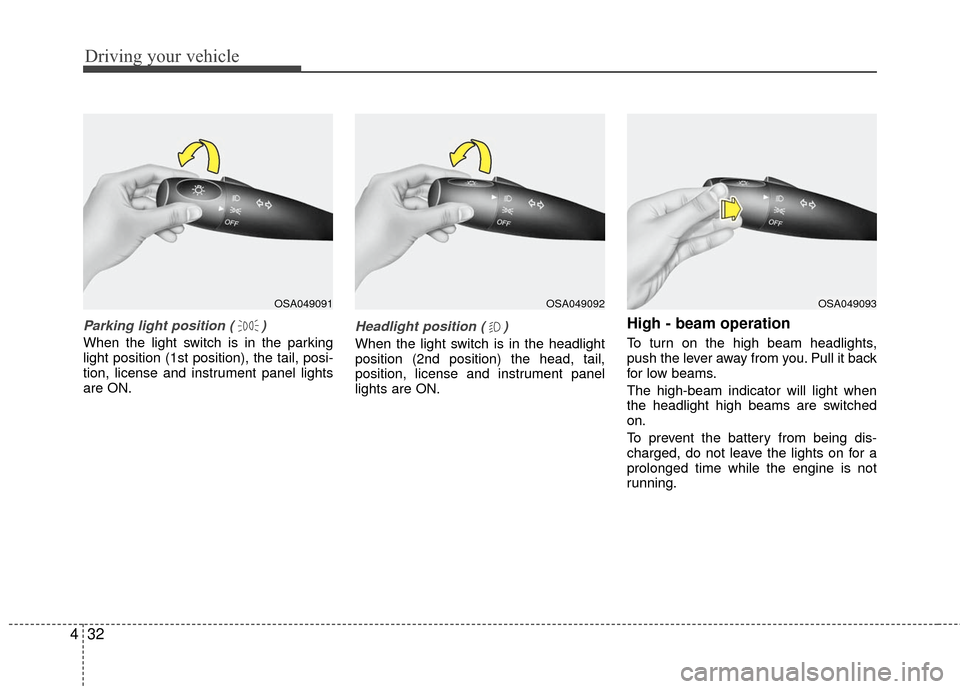
Parking light position ( )
When the light switch is in the parking
light position (1st position), the tail, posi-
tion, license and instrument panel lights
are ON.
Headlight position ( )
When the light switch is in the headlight
position (2nd position) the head, tail,
position, license and instrument panel
lights are ON.
High - beam operation
To turn on the high beam headlights,
push the lever away from you. Pull it back
for low beams.
The high-beam indicator will light when
the headlight high beams are switched
on.
To prevent the battery from being dis-
charged, do not leave the lights on for a
prolonged time while the engine is not
running.
OSA049091OSA049092OSA049093
Page 145 of 236
433
Driving your vehicle
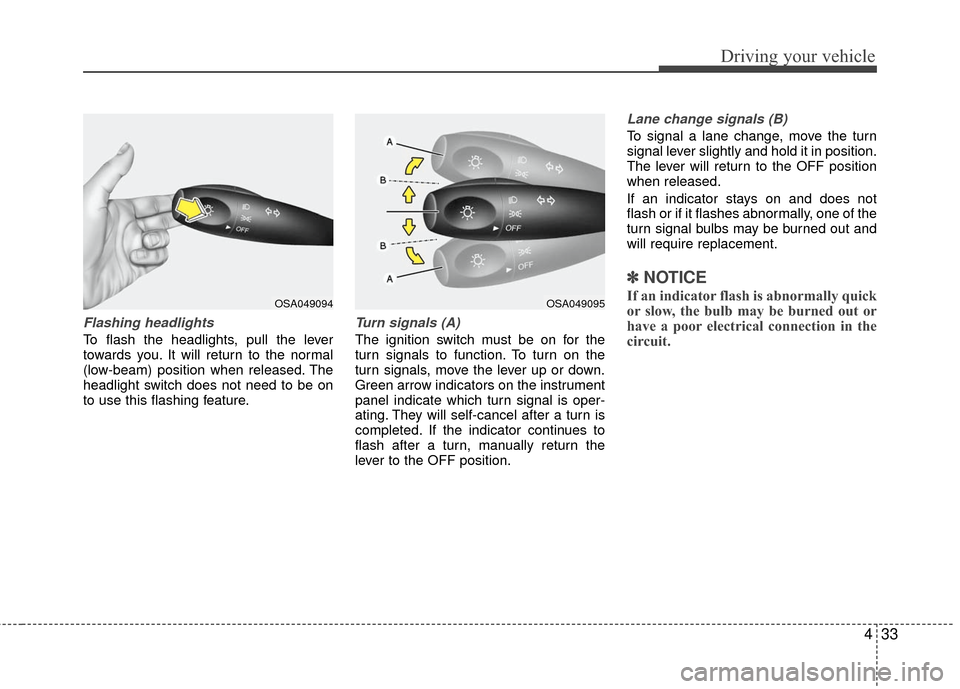
Flashing headlights
To flash the headlights, pull the lever
towards you. It will return to the normal
(low-beam) position when released. The
headlight switch does not need to be on
to use this flashing feature.
Turn signals (A)
The ignition switch must be on for the
turn signals to function. To turn on the
turn signals, move the lever up or down.
Green arrow indicators on the instrument
panel indicate which turn signal is oper-
ating. They will self-cancel after a turn is
completed. If the indicator continues to
flash after a turn, manually return the
lever to the OFF position.
Lane change signals (B)
To signal a lane change, move the turn
signal lever slightly and hold it in position.
The lever will return to the OFF position
when released.
If an indicator stays on and does not
flash or if it flashes abnormally, one of the
turn signal bulbs may be burned out and
will require replacement.
✽ ✽NOTICE
If an indicator flash is abnormally quick
or slow, the bulb may be burned out or
have a poor electrical connection in the
circuit.OSA049094OSA049095
Page 154 of 236
Driving your vehicle
42
4
Face - floor position
Air flow is directed towards
the face and the floor. The air
to the floor is warmer than
the air to the face (except
when the temperature control
is set to the extreme cold
position).
(outlet port: B, C, E, D)
Floor position
Most of the air flow is direct-
ed to the floor, with a small
amount of the air being
directed to the windshield
and side window defroster.
(outlet port: C, E, A, D)
Floor - defrost position
Most of the air flow is direct-
ed to the floor and the wind-
shield with a small amount
directed to the side window
defrosters.
(outlet port: A, C, E, D)
Defrost position
Most of the air flow is direct-
ed to the windshield with a
small amount of air directed
to the side window defrosters.
(outlet port: A, D)
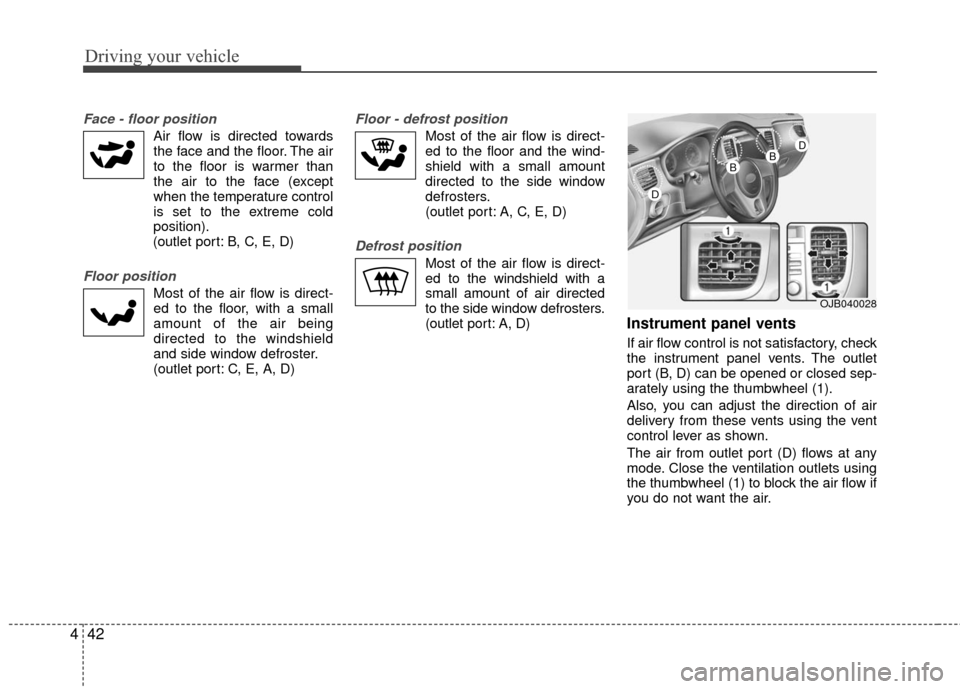
Instrument panel vents
If air flow control is not satisfactory, check
the instrument panel vents. The outlet
port (B, D) can be opened or closed sep-
arately using the thumbwheel (1).
Also, you can adjust the direction of air
delivery from these vents using the vent
control lever as shown.
The air from outlet port (D) flows at any
mode. Close the ventilation outlets using
the thumbwheel (1) to block the air flow if
you do not want the air.
OJB040028
D
BBD
Page 235 of 236

93
Index
In case of an emergency while driving··················\
··········6-2
Instrument cluster ··················\
··················\
··················\
····4-20
Instrument panel overview ··················\
··················\
··········2-3
Interior care··················\
··················\
··················\
··············7-36
Interior features··················\
··················\
··················\
········3-76
Interior lights ··················\
··················\
··················\
···········3-73
Interior overview ··················\
··················\
··················\
·······2-2
Keys ··················\
··················\
··················\
··················\
·········3-2
Label information ··················\
··················\
··················\
····5-10
Lighting··················\
··················\
··················\
··················\
··4-31
Lubricant specifications ··················\
··················\
·············7-33
Lubricants and fluids ··················\
··················\
·················7-17\
Luggage net ··················\
··················\
··················\
·············3-81
Maintenance schedule··················\
··················\
··················\
7-3
Maintenance services ··················\
··················\
··················\
·7-2
Manual transaxle··················\
··················\
··················\
········4-4
Mirrors ··················\
··················\
··················\
··················\
···3-70
Overheating··················\
··················\
··················\
················6-3
Overloading ··················\
··················\
··················\
···············5-9
Owner maintenance ··················\
··················\
··················\
···7-7Power steering ··················\
··················\
··················\
·········7-15
Remote keyless entry ··················\
··················\
··················\
·3-3
Road warning ··················\
··················\
··················\
·············6-2
Safety belts··················\
··················\
··················\
···············3-28
Seat··················\
··················\
··················\
··················\
·········3-17
Special driving conditions ··················\
··················\
···········5-6
Specifications ··················\
··················\
··················\
·············8-2
Starting the engine ··················\
··················\
··················\
·····4-3
Steering wheel···············\
··················\
··················\
·············4-18
Storage compartment ··················\
··················\
·················3-74\
Suggestions for economical operation··················\
···········5-5
Sunroof··················\
··················\
··················\
··················\
···3-79
Theft-alarm system ··················\
··················\
··················\
····3-5
Tires and wheels ··················\
··················\
··················\
······7-24
Towing ··················\
··················\
··················\
··················\
···6-12
Trailer towing ··················\
··················\
··················\
············5-9
Trunk ··················\
··················\
··················\
··················\
······3-64
Vehicle break-in process ··················\
··················\
··············1-2
K
L
M
O
P
R
S
T
V