2010 JEEP PATRIOT warning light
[x] Cancel search: warning lightPage 3 of 72

INTRODUCTION/WELCOME
WELCOME FROM CHRYSLER GROUP LLC.. 2
CONTROLS AT A GLANCE
DRIVER COCKPIT.............. 4
INSTRUMENT CLUSTER .......... 6
GETTING STARTED
KEYFOB .................. 8
THEFT ALARM............... 9
SEAT BELT ................. 9
CHILD RESTRAINTS ............ 9
FRONT SEATS ...............11
REAR SEATS ................14
TILT STEERING COLUMN .........14
PROGRAMMABLE FEATURES .......15
OPERATING YOUR VEHICLE
TURN SIGNAL/LIGHTS LEVER .......17
WIPER/WASHER LEVER ..........18
SPEED CONTROL LEVER .........19
CONTINUOUSLY VARIABLE AUTOMATIC
TRANSMISSION (CVT) ...........20
MANUAL CLIMATE CONTROLS ......20
AUTOMATIC TEMPERATURE CONTROLS
(ATC) ....................21
POWER SUNROOF .............21
WIND BUFFETING .............22
ELECTRONICS
NON-TOUCH-SCREEN RADIOS ......23
TOUCH-SCREEN RADIOS .........26
REMOTE AUDIO CONTROLS ........30
UNIVERSAL CONSUMER INTERFACE . . . 31
ELECTRONIC VEHICLE INFORMATION
CENTER (EVIC) ...............31
UNIVERSAL GARAGE DOOR OPENER . . . 32
POWER INVERTER .............33
POWER OUTLET ..............34
UCONNECT™ PHONE ...........34
VOICE COMMAND .............36
OFF-ROAD CAPABILITIES
FOUR-WHEEL DRIVE OPERATION .....37
UTILITY
TRAILER TOWING WEIGHTS (MAXIMUM
TRAILER WEIGHT RATINGS)........38
RECREATIONAL TOWING (BEHIND
MOTORHOME, ETC.) ............39
BRAKE/TRANSMISSION INTERLOCK
MANUAL OVERRIDE SYSTEM .......39
WHAT TO DO IN EMERGENCIES
24 HOUR TOWING ASSISTANCE -
U.S. ONLY..................40
INSTRUMENT CLUSTER WARNING
LIGHTS ...................40
IF YOUR ENGINE OVERHEATS .......43
AUTOMATIC TRANSAXLE OVERHEATING..44
JACKING AND TIRE CHANGING ......44
JUMP-STARTING ..............47
TOWING A DISABLED VEHICLE ......51
FREEING A STUCK VEHICLE ........52
EVENT DATA RECORDER (EDR) ......53
MAINTAINING YOUR VEHICLE
OPENING THE HOOD............54
ENGINE COMPARTMENT .........55
FLUIDS AND CAPACITIES .........57
MAINTENANCE CHART ..........58
FUSES ...................60
TIRE PRESSURES .............61
WHEEL AND WHEEL TRIM CARE .....62
EXTERIOR BULBS .............62
CONSUMER ASSISTANCE
CHRYSLER GROUP LLC CUSTOMER
CENTER...................63
CHRYSLER CANADA INC. CUSTOMER
CENTER ...................63
ASSISTANCE FOR THE HEARING
IMPAIRED ..................63
PUBLICATIONS ORDERING ........63
REPORTING SAFETY DEFECTS IN THE
50 UNITED STATES
AND WASHINGTON, D.C. .........64
TIRE WARRANTY ..............64
MOPAR ACCESSORIES
MOPAR® ACCESSORIES ..........67
TABLE OF CONTENTS
Page 8 of 72

INSTRUMENT CLUSTER
Warning Lights
- Low Fuel Warning Light
- Charging System Light**
- Oil Pressure Warning Light**
- Anti-Lock Brake (ABS) Light**
- Airbag Warning Light**
- Electronic Throttle Control (ETC) Light
- Tire Pressure Monitoring System (TPMS) Light
- Engine Temperature Warning Light
- Transmission Temperature Warning Light
- Seat Belt Reminder Light
- Brake Warning Light**
- Malfunction Indicator Light (MIL)**
- Electronic Stability Control (ESC) Malfunction Indicator Light**
- 4WD System Fault Indicator Light**
6
CONTROLS AT A GLANCE
Page 23 of 72

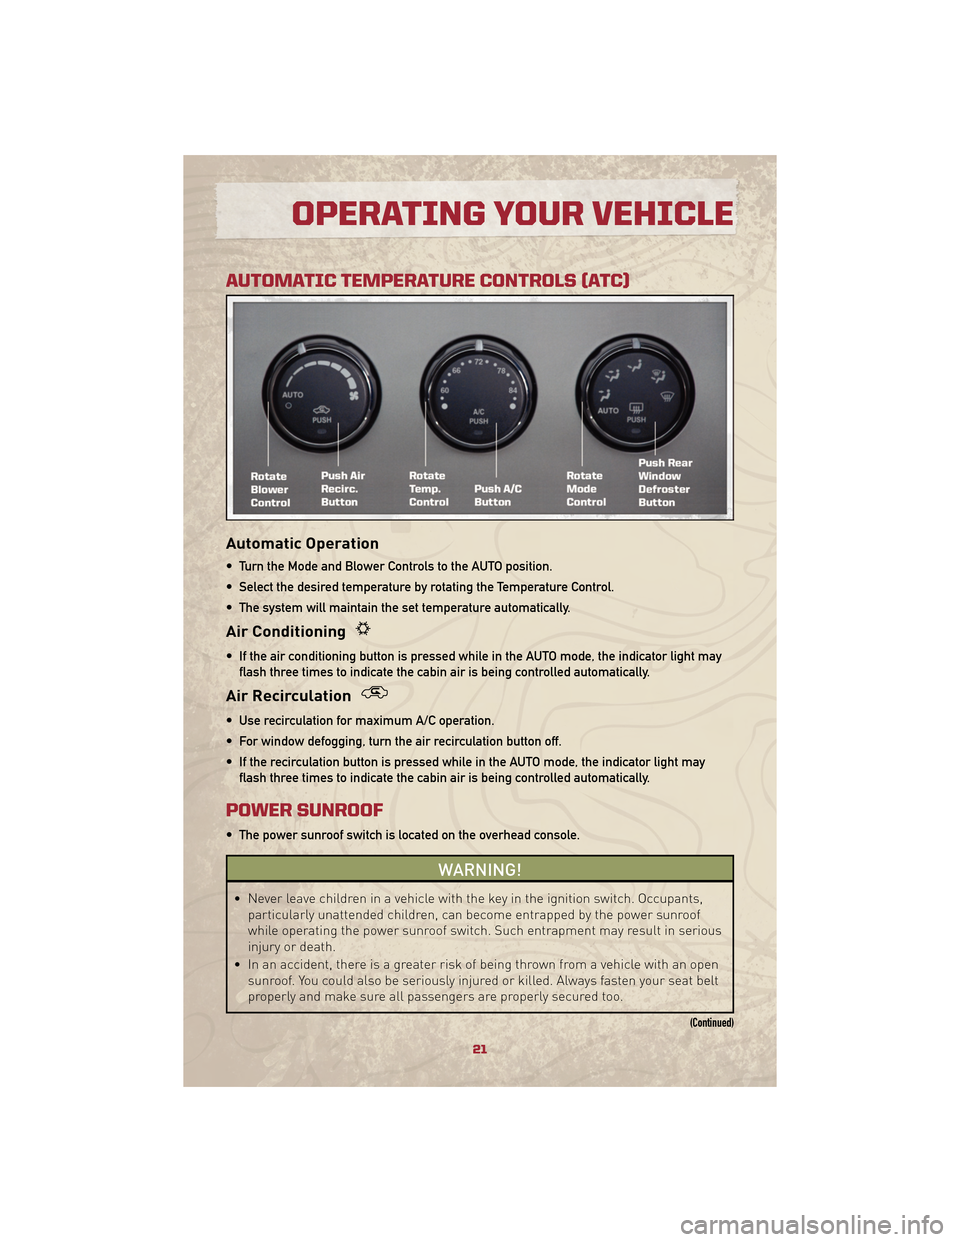
AUTOMATIC TEMPERATURE CONTROLS (ATC)
Automatic Operation
• Turn the Mode and Blower Controls to the AUTO position.
• Select the desired temperature by rotating the Temperature Control.
• The system will maintain the set temperature automatically.
Air Conditioning
• If the air conditioning button is pressed while in the AUTO mode, the indicator light mayflash three times to indicate the cabin air is being controlled automatically.
Air Recirculation
• Use recirculation for maximum A/C operation.
• For window defogging, turn the air recirculation button off.
• If the recirculation button is pressed while in the AUTO mode, the indicator light mayflash three times to indicate the cabin air is being controlled automatically.
POWER SUNROOF
• The power sunroof switch is located on the overhead console.
WARNING!
• Never leave children in a vehicle with the key in the ignition switch. Occupants, particularly unattended children, can become entrapped by the power sunroof
while operating the power sunroof switch. Such entrapment may result in serious
injury or death.
• In an accident, there is a greater risk of being thrown from a vehicle with an open sunroof. You could also be seriously injured or killed. Always fasten your seat belt
properly and make sure all passengers are properly secured too.
(Continued)
21
OPERATING YOUR VEHICLE
Page 34 of 72

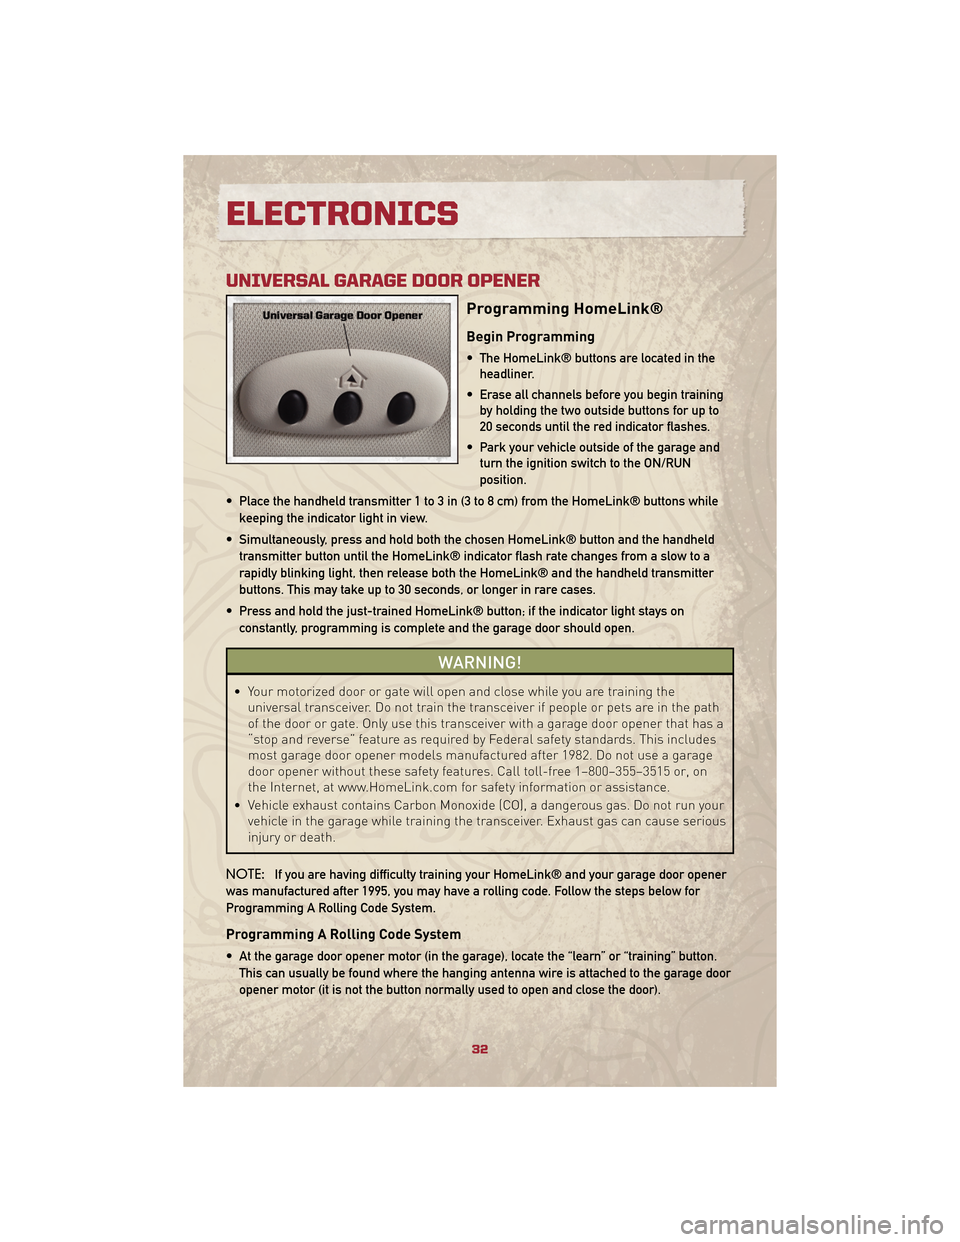
UNIVERSAL GARAGE DOOR OPENER
Programming HomeLink®
Begin Programming
• The HomeLink® buttons are located in theheadliner.
• Erase all channels before you begin training by holding the two outside buttons for up to
20 seconds until the red indicator flashes.
• Park your vehicle outside of the garage and turn the ignition switch to the ON/RUN
position.
• Place the handheld transmitter 1 to 3 in (3 to 8 cm) from the HomeLink® buttons while keeping the indicator light in view.
• Simultaneously, press and hold both the chosen HomeLink® button and the handheld transmitter button until the HomeLink® indicator flash rate changes from a slow to a
rapidly blinking light, then release both the HomeLink® and the handheld transmitter
buttons. This may take up to 30 seconds, or longer in rare cases.
• Press and hold the just-trained HomeLink® button; if the indicator light stays on constantly, programming is complete and the garage door should open.
WARNING!
• Your motorized door or gate will open and close while you are training the universal transceiver. Do not train the transceiver if people or pets are in the path
of the door or gate. Only use this transceiver with a garage door opener that has a
“stop and reverse” feature as required by Federal safety standards. This includes
most garage door opener models manufactured after 1982. Do not use a garage
door opener without these safety features. Call toll-free 1–800–355–3515 or, on
the Internet, at www.HomeLink.com for safety information or assistance.
• Vehicle exhaust contains Carbon Monoxide (CO), a dangerous gas. Do not run your vehicle in the garage while training the transceiver. Exhaust gas can cause serious
injury or death.
NOTE: If you are having difficulty training your HomeLink® and your garage door opener
was manufactured after 1995, you may have a rolling code. Follow the steps below for
Programming A Rolling Code System.
Programming A Rolling Code System
• At the garage door opener motor (in the garage), locate the “learn” or “training” button. This can usually be found where the hanging antenna wire is attached to the garage door
opener motor (it is not the button normally used to open and close the door).
ELECTRONICS
32
Page 36 of 72

POWER OUTLET
• The power outlet is located on the instrument panel below the climate control and ispowered when the ignition switch is in the ON position.
• The outlet can operate a conventional cigar lighter unit or power accessories designed for use with a standard power outlet adapter.
NOTE: Do not exceed the maximum power of 160 Watts (13 Amps) at 12 Volts. If the 160
Watt (13 Amp) power rating is exceeded the fuse protecting the system will need to be
replaced.
Uconnect™ Phone
• The Uconnect™ Phone is a voice-activated, hands-free, in-vehicle communications system.
• The Uconnect™ Phone allows you to dial a phone number with your cellular phone using simple voice commands.
• For vehicles equipped with Video Entertainment System (VES)™, refer to the Uconnect™ Phone section of the Uconnect™ User's Manual on the DVD for further details.
• For vehicles not equipped with VES™, refer to your vehicle Owner's Manual on the DVD for further details.
WARNING!
• Any voice commanded system should be used only in safe driving conditions following local laws and phone use. All attention should be kept on the roadway
ahead. Failure to do so may result in an accident causing serious injury or death.
• Your phone must be turned on and paired to the Uconnect™ Phone to allow use of this vehicle feature in emergency situations, when the cellular phone has network
coverage and stays paired to the Uconnect™ Phone.
NOTE: The Uconnect™ Phone requires a cellular phone equipped with the Bluetooth®
Hands-Free Profile, Version 0.96 or higher. For Uconnect™ customer support, call
1–877–855–8400.
Phone Pairing
NOTE: Pairing is a one-time initial setup before using the phone. You will also need to
follow the Bluetooth® instructions in your cell phone user guide to complete the phone
pairing setup.
• Press the Phone button
to begin.
• Wait for the “ready” prompt and beep.
• (After the BEEP), say “Uconnect setup”.
• (After the BEEP), say “phone pairing”.
• (After the BEEP), say “pair a phone”.
• Follow the audible prompts.
ELECTRONICS
34
Page 42 of 72

24 HOUR TOWING ASSISTANCE - U.S. ONLY
• Dial toll-free 1-800-521-2779.
• Provide your name, vehicle identification number and license plate number.
• Provide your location, including telephone number, from which you are calling.
• Briefly describe the nature of the problem and answer a few simple questions.
• You will be given the name of the service provider and an estimated time of arrival. If youfeel you are in an “unsafe situation”, please let us know. With your consent, we will
contact local police or safety authorities.
INSTRUMENT CLUSTER WARNING LIGHTS
- Electronic Stability Control (ESC) Malfunction Indicator Light
• If the “ESC Malfunction Indicator Light” comes on continuously with the engine running, amalfunction has been detected in the ESC system. If this light remains on after several
ignition cycles, and the vehicle has been driven several miles (kilometers) at speeds
greater than 30 mph (48 km/h), we recommend you drive to the nearest service center as
soon as possible to have the problem diagnosed and corrected.
• The “ESC Malfunction Indicator Light” starts to flash as soon as the tires lose traction and the ESC system becomes active. If the light begins to flash during acceleration, ease up
on the accelerator and apply as little throttle as possible. Be sure to adapt your speed
and driving to the prevailing road conditions. The light also flashes when TCS is active. To
improve the vehicle's traction when starting off in deep snow, sand or gravel, it may be
desirable to switch the ESC system to Partial Off mode by momentarily pressing the ESC
Off
switch.
- Tire Pressure Monitoring System (TPMS) Light
• A Tire Pressure Monitoring Light and a “low tire” message will display in your instrumentcluster along with an audible chime if one or more of your vehicle’s four road tires are
significantly under-inflated.
• Check the inflation pressure of each tire and inflate to the recommended pressure for your vehicle. The tire pressures recommended for your vehicle are found on the “Tire and
Loading Information” label located on the driver’s side door opening. The TPMS light
should not be used as a tire pressure gauge when adjusting your tire pressure.
• It is recommended that you check the tire pressure in the morning when tires are cool; inflate each tire to the recommended pressure for your vehicle. The light will turn off
after your vehicle’s tire pressures are properly inflated and the pressure has been
recognized. The vehicle may need to be driven for up to 20 minutes above 15 mph
(25 km/h) before the light will turn off.
• Temperature changes can affect tire pressure, causing the TPMS light to turn on. Tire pressures will also increase as the vehicle is driven – this is normal and you should not
adjust for this increased pressure.
• Driving on under-inflated tires reduces your vehicle’s fuel efficiency and tire tread life. If a spare tire is in use on the vehicle, the TPMS light may turn on.
WHAT TO DO IN EMERGENCIES
40
Page 43 of 72

- Engine Temperature Warning Light
• This light warns of an overheated engine condition.
• If the light turns on and a warning chime sounds while driving, safely pull over and stopthe vehicle. If the A/C system is on, turn it off. Also, shift the transmission into NEUTRAL
and idle the vehicle. If the temperature reading does not return to normal, turn the
engine off immediately.
• We recommend that you do not operate the vehicle or engine damage will occur. Have the vehicle serviced immediately.
WARNING!
A hot engine cooling system is dangerous. You or others could be badly burned by
steam or boiling coolant. You may want to call an authorized dealership for service if
your vehicle overheats.
- Brake Warning Light
• The Brake Warning light illuminates when there is either a system malfunction or theparking brake is applied. If the light is on and the parking brake is not applied, it
indicates a possible brake hydraulic malfunction, brake booster problem or an Anti-Lock
Brake System problem.
• We recommend you drive to the nearest Service Center and have the vehicle serviced immediately.
WARNING!
Driving a vehicle with the red brake light on is dangerous. Part of the brake system
may have failed. It will take longer to stop the vehicle. You could have an accident.
Have the vehicle checked immediately.
- Malfunction Indicator Light (MIL)
• Certain conditions, such as a loose or missing gas cap, poor fuel quality, etc., mayilluminate the MIL after engine start. The vehicle should be serviced if the light stays on
through several typical driving cycles. In most situations, the vehicle will drive normally
and not require towing.
• If the MIL flashes when the engine is running, serious conditions may exist that could lead to immediate loss of power or severe catalytic converter damage. We recommend
you do not operate the vehicle. Have the vehicle serviced as soon as possible if this
occurs.
- Charging System Light
• This light shows the status of the electrical charging system. If the charging system lightremains on, it means that the vehicle is experiencing a problem with the charging
system.
41
WHAT TO DO IN EMERGENCIES
Page 44 of 72

• We recommend you do not continue driving if the charging system light is on. Have thevehicle serviced immediately.
- Oil Pressure Warning Light
• This light indicates low engine oil pressure. If the light turns on while driving, stop thevehicle and shut off the engine as soon as possible. A chime will sound for four minutes
when this light turns on.
• We recommend you do not operate the vehicle or engine damage will occur. Have the vehicle serviced immediately.
- Anti-Lock Brake (ABS) Light
• This light monitors the Anti-Lock Brake System (ABS).
• If the light is not on during starting, stays on, or turns on while driving, we recommendyou drive to the nearest Service Center and have the system serviced as soon as
possible.
- Electronic Throttle Control (ETC) Light
• This light informs you of a problem with the Electronic Throttle Control (ETC) system.
• If a problem is detected, the light will come on while the engine is running. Cycle theignition when the vehicle has completely stopped and the shift lever is placed in the
PARK position; the light should turn off.
• If the light remains lit with the engine running, your vehicle will usually be drivable; however, see an authorized dealer for service as soon as possible. If the light is flashing
when the engine is running, immediate service is required and you may experience
reduced performance, an elevated/rough idle or engine stall and your vehicle may
require towing.
- Airbag Warning Light
• If the light is not on during starting, stays on, or turns on while driving, we recommendyou drive to the nearest Service Center and have the system serviced as soon as
possible.
- 4WD System Fault Indicator Light
• When lit solid: There is a 4WD system fault. The 4WD performance will be at a reducedlevel. Drive to the nearest Service Center and have the vehicle serviced as soon as
possible.
• When blinking: The 4WD system is temporarily disabled due to overload condition.
- Transmission Temperature Warning Light
• This light indicates that there is excessive transmission fluid temperature that might occur with severe usage such as trailer towing. If this light turns on, you will experience
reduced vehicle performance until the automatic transaxle cools down. If the overheating
continues, stop the vehicle and run the engine at idle, with the transmission in NEUTRAL,
until the light turns off. Once the light turns off, you may continue to drive normally.
WHAT TO DO IN EMERGENCIES
42