Page 231 of 496
Show Time if Radio is Off
When selected, this feature will display the time of day
on the touch screen when the radio is turned off. Proceed
as follows to change the current setting:
1. Turn on the radio.
2. Touch the screen where the time is displayed. The
clock setting menu will appear on the screen.
3. When this feature is on, a check mark will appear in
the box next to the words “Show Time if Radio is Off.”
Touch the screen where the words “Show Time if Radio is
Off” are displayed to change the current setting.
Changing the Time Zone
1. Turn on the radio.
2. Touch the screen where the time is displayed. The
clock setting menu will appear on the screen.3. Touch the screen where the words “Set Time Zone” are
displayed. The time zone selection menu will appear on
the screen.
4. Select a time zone by touching the screen where your
selection appears. If you do not see a time zone that you
want to select, touch the screen where the word “Page” is
displayed to view additional time zones in the menu.
5. Touch the screen where the word “Save” is displayed.
Clock Setting Procedure — RER/REN Radio
Uconnect�
gps — RER Only
The GPS receiver used in this system is synchronized to
the time data being transmitted by the GPS satellite. The
satellite clock is Greenwich Mean Time (GMT). This is the
worldwide standard for time. This makes the system’s
clock very accurate once the appropriate time zone and
daylight savings information is set.
230 UNDERSTANDING YOUR INSTRUMENT PANEL
Page 232 of 496
To Manually Set the Clock — RER/REN
1. Turn on the radio.
2. Touch the screen where the time is displayed.
3. Touch the screen where “User Clock” is displayed, the
clock setting menu will appear on the screen.
4. To move the hour forward, touch the screen where the
word “Hour” with the arrow pointing upward is dis-
played. To move the hour backward, touch the screen
where the word “Hour” with the arrow pointing down-
ward is displayed.
5. To move the minute forward, touch the screen where
the word “Min” with the arrow pointing upward is
displayed. To move the minute backward, touch the
screen where the word “Min” with the arrow pointing
downward is displayed.6. To save the new time setting, touch the screen where
the word “Save” is displayed.
Changing Daylight Savings Time
When selected, this feature will display the time of day in
daylight savings time. Proceed as follows to change the
current setting:
1. Turn on the radio.
2. Touch the screen where “User Clock” is displayed, the
clock setting menu will appear on the screen.
3. When this feature is on, a check mark will appear in
the box next to the words “Daylight Savings.” Touch the
screen where the words “Daylight Savings” are dis-
played to change the current setting.
Show Time if Radio is Off
When selected, this feature will display the time of day
on the touch screen when the radio is turned off. Proceed
as follows to change the current setting:
4
UNDERSTANDING YOUR INSTRUMENT PANEL 231
Page 262 of 496
•Turning it clockwise (forward) and counterclock-
wise (backward) scrolls through the lists, displaying
the track detail on the radio display. Once the track
to be played is highlighted on the radio display,
press theTUNEcontrol knob to select and start
playing the track. Turning the TUNEcontrol knob
fast will scroll through the list faster. During fast
scroll, a slight delay in updating the information on
the radio display may be noticed.
•During all List modes, the iPod� displays all lists in
“wrap-around” mode. So if the track is at the
bottom of the list, just turn the wheel backwards
(counter-clockwise) to get to the track faster.
•In List mode, the radio PRESETbuttons are used as
shortcuts to the following lists on the iPod�.
•Preset 1 – Playlists
•Preset 2 – Artists
•Preset 3 – Albums
•Preset 4 – Genres
•Preset 5 – Audiobooks
•Preset 6 – Podcasts
•Pressing a PRESET button will display the current
list on the top line and the first item in that list on
the second line.
•To Exit List mode without selecting a track, press the
same PRESET button again to go back to Play
mode.
•LIST button: The LISTbutton will display the top
level menu of the iPod�. Turn the TUNEcontrol knob
to list the top-menu item to be selected and press the
TUNE control knob. This will display the next sub-
menu list item on the iPod� then follow the same steps
4
UNDERSTANDING YOUR INSTRUMENT PANEL 261
Page 270 of 496
The button located in the center of the left-hand control
will tune to the next preset station that you have pro-
grammed in the radio preset pushbuttons.
CD Player
Press the top of the switch once to go to the next track on
the CD. Press the bottom of the switch once to go to the
beginning of the current track or to the beginning of the
previous track, if it is within one second after the current
track begins to play.
If you press the switch up or down twice it plays the
second track, three times, it will play the third, etc.
The button in the center of the left-hand switch changes
CD’s on the 6–Disc in-dash CD changer radio. This
button does not function for all other radios.
CD/DVD DISC MAINTENANCE
To keep a CD/DVD in good condition, take the following
precautions:
1. Handle the disc by its edge; avoid touching the
surface.
2. If the disc is stained, clean the surface with a soft cloth,
wiping from center to edge.
3. Do not apply paper or tape to the disc; avoid scratch-
ing the disc.
4. Do not use solvents such as benzene, thinner, cleaners,
or anti-static sprays.
5. Store the disc in its case after playing.
6. Do not expose the disc to direct sunlight.
7. Do not store the disc where temperatures may become
too high.
4
UNDERSTANDING YOUR INSTRUMENT PANEL 269
Page 275 of 496
Air Conditioning Control
Press this button to engage the Air
Conditioning. A light will illuminate
when the Air Conditioning System is
engaged. Rotating the dial left into the
blue area of the scale indicates cooler
temperatures while rotating right into
the red area indicates warmer tem-
peratures.
NOTE: The air conditioning compressor will not engage
until the engine has been running for about 10 seconds.
•MAX A/C
For maximum cooling use the A/C and recirculation
buttons at the same time.
•ECONOMY MODE
If economy mode is desired, press the A/C button to turn
OFF the indicator light and the A/C compressor. Then,
move the temperature control to the desired temperature.
Automatic Temperature Control (ATC) — If
Equipped
The Automatic Temperature Control system automati-
cally maintains the climate in the cabin of the vehicle at
the comfort levels desired by the driver and passenger.
Automatic Temperature Control
274 UNDERSTANDING YOUR INSTRUMENT PANEL
Page 294 of 496
WARNING!
Remember to disconnect the cord before driving.
Damage to the 110-115 Volt electrical cord could cause
electrocution.
MANUAL TRANSMISSION — IF EQUIPPED
Five–Speed Manual Transmission
WARNING!
You or others could be injured if you leave the
vehicle unattended without having the parking
brake fully applied. The parking brake should al-
ways be applied when the driver is not in the vehicle,
especially on an incline.Fully press the clutch pedal before you shift gears. As you
release the clutch pedal, lightly press the accelerator
pedal.
Shift Pattern
5
STARTING AND OPERATING 293
Page 295 of 496
Use each gear in numerical order, do not skip a gear. Be
sure the transmission is in first gear, (not third), when
starting from a standing position. Damage to the clutch
can result from starting in third gear.
For most city driving, you will find it easier to use only
the lower gears. For steady highway driving with light
accelerations, fifth gear is recommended.
Never drive with your foot resting on the clutch pedal,
and never try to hold the vehicle on a hill with the clutch
pedal partially engaged. This will cause abnormal wear
on the clutch.
Never shift into REVERSE until the vehicle has come to a
complete stop.
NOTE:During cold weather, until the transmission
lubricant is warm, you may experience slightly higher
shift efforts. This is normal and not harmful to the
transmission.Recommended Shift Speeds
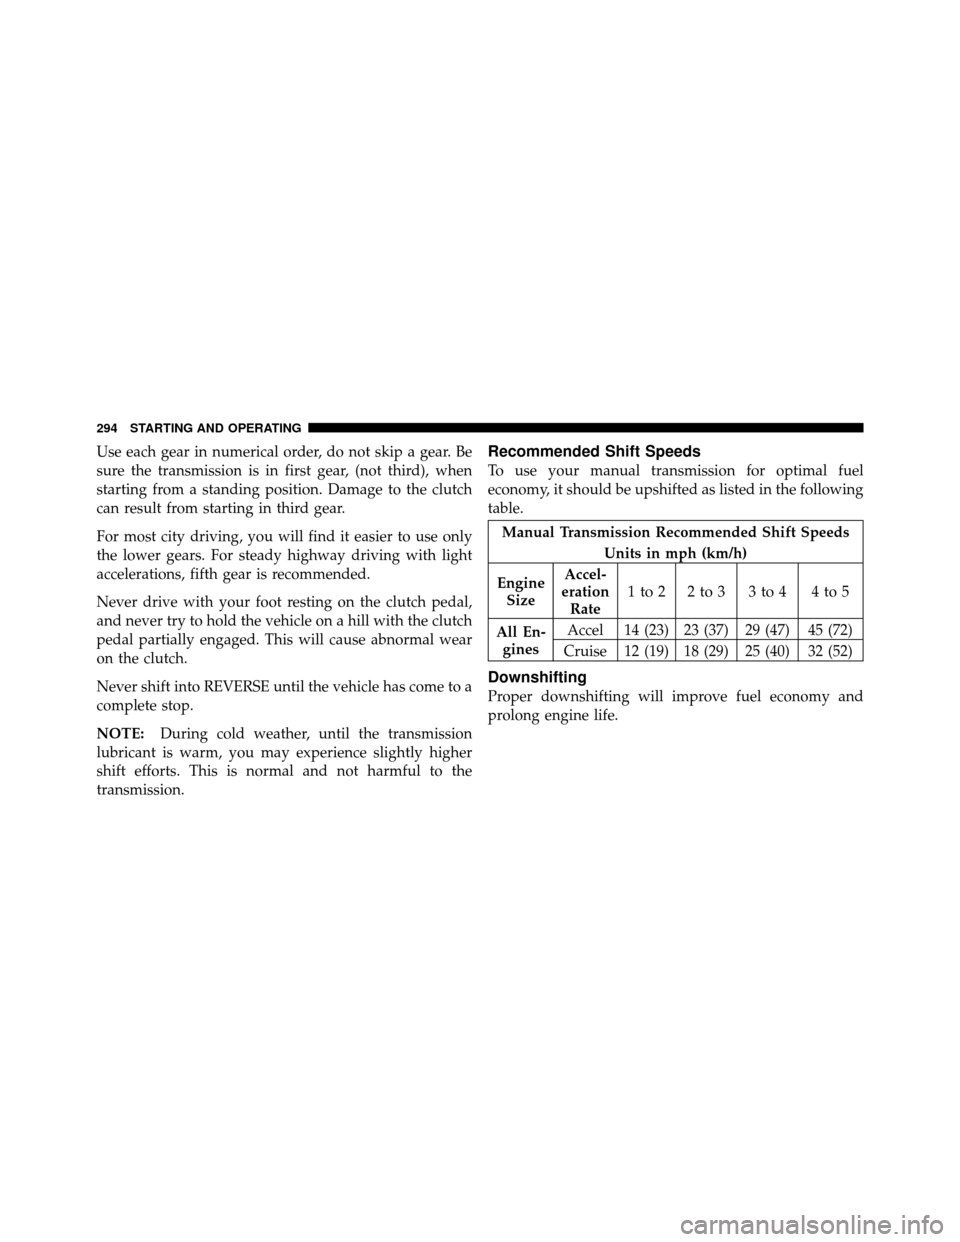
To use your manual transmission for optimal fuel
economy, it should be upshifted as listed in the following
table.
Manual Transmission Recommended Shift Speeds
Units in mph (km/h)
Engine Size Accel-
eration Rate 1to2 2to3 3to4 4to5
All En- gines Accel 14 (23) 23 (37) 29 (47) 45 (72)
Cruise 12 (19) 18 (29) 25 (40) 32 (52)
Downshifting
Proper downshifting will improve fuel economy and
prolong engine life.
294 STARTING AND OPERATING
Page 302 of 496
Where one or more wheels have wheel spin or if addi-
tional traction is needed in sand, deep snow, or loose
traction surfaces, activate the “4WD LOCK” switch by
pulling up once and releasing. This locks the center
coupling allowing more torque to be sent to the rear
wheels. The “4WD Indicator Light” will come on in thecluster. This can be done on the fly, at any vehicle speed.
To deactivate, simply pull on the switch one more time.
The “4WD Indicator Light” will then go out.
NOTE:
Refer to “Electronic Brake Control System/
Electronic Stability Control (ESC)” in “Starting and Op-
erating” for further information.
DRIVING ON SLIPPERY SURFACES
Acceleration
Rapid acceleration on snow covered, wet, or other slip-
pery surfaces may cause the front wheels to pull errati-
cally to the right or left. This phenomenon occurs when
there is a difference in the surface traction under the front
(driving) wheels.
Four-Wheel Drive Switch
5
STARTING AND OPERATING 301