Page 179 of 522
Then proceed with Step 4 under “Programming
HomeLink�” earlier in this section.
Using HomeLink�
To operate, press and release the programmed
HomeLink�button. Activation will now occur for the
trained device (i.e., garage door opener, gate operator,
Security system, entry door lock, home/office lighting,
etc.,). The handheld transmitter of the device may also be
used at any time.
Reprogramming A Single HomeLink �Button
To reprogram a channel that has been previously trained,
follow these steps:
1. Turn the ignition switch to the ON/RUN position.
2. Press and hold the desired HomeLink� button until
the indicator light begins to flash after 20 seconds. Do not
release the button. 3.
Without releasing the button, proceed with Program-
ming HomeLink� Step 2 and follow all remaining steps.
Security
It is advised to erase all channels before you sell or turn
in your vehicle.
To do this, press and hold the two outside buttons for
20 seconds until the red indicator flashes. Note that all
channels will be erased. Individual channels cannot be
erased.
The HomeLink�Universal Transceiver is disabled when
the Vehicle Security Alarm is active.
178 UNDERSTANDING THE FEATURES OF YOUR VEHICLE
Page 181 of 522
POWER SUNROOF — IF EQUIPPED
The power sunroof switch is located between the sun
visors on the overhead console.WARNING!
•Never leave unattended children in a vehicle with
the key in the ignition switch. Occupants, particu-
larly unattended children, can become entrapped
by the power sunroof while operating the power
sunroof switch. Such entrapment may result in
serious injury or death.
•In an accident, there is a greater risk of being
thrown from a vehicle with an open sunroof. You
could also be seriously injured or killed. Always
fasten your seat belt properly and make sure all
passengers are properly secured too.
•Do not allow small children to operate the sun-
roof. Never allow your fingers, other body parts, or
any object to project through the sunroof opening.
Injury may result.
Power Sunroof Switch
180 UNDERSTANDING THE FEATURES OF YOUR VEHICLE
Page 185 of 522
CAUTION!
Failure to follow these cautions can cause damage to
the Sky Slider™ vehicle contents, and the vehicle
interior:
•Never attempt to open or close the Sky Slider™
when it is frozen. Wait until the Sky Slider™ is
thawed before operating.
•Opening the Sky Slider™ when damp, wet, or
dirty can cause stains, mildew, and damage to the
soft-top material and the inside of your vehicle.
Make sure the Sky Slider™ is dry before opening.
•Always close the Sky Slider™ when leaving your
vehicle, damage to the vehicle interior can occur.(Continued)
CAUTION! (Continued)
•Do not leave the Sky Slider™ open for several
weeks at a time. Close it occasionally to prevent
discoloration in the folds of the fabric and to allow
the creases to smooth out. This is especially im-
portant if the Sky Slider™ was opened when not
completely dry.
WARNING!
Failure to follow these warnings can result in injuries
that are serious or fatal to you, your passengers, and
others around you:
•In an accident, there is a greater risk of being
thrown from a vehicle with the Sky Slider™ open.
Always fasten your seat belt properly and make
sure all passengers are properly secured too.(Continued)
184 UNDERSTANDING THE FEATURES OF YOUR VEHICLE
Page 196 of 522
Cargo Tie-Down Hooks and Loops
The tie-downs located on cargo area floor should be used
to secure loads safely when the vehicle is moving.Cargo tie-down loops are located on the trim panels.
Cargo Tie-Down Hooks
Cargo Tie-Down Loops
3
UNDERSTANDING THE FEATURES OF YOUR VEHICLE 195
Page 198 of 522
WARNING! (Continued)
•Do not pile luggage or cargo higher than the top of
the seatback. This could impair visibility or become
a dangerous projectile in a sudden stop or collision.
Retractable Cargo Area Cover — If Equipped
NOTE:The purpose of this cover is for privacy, not to
secure loads. It will not prevent cargo from shifting or
protect passengers from loose cargo.
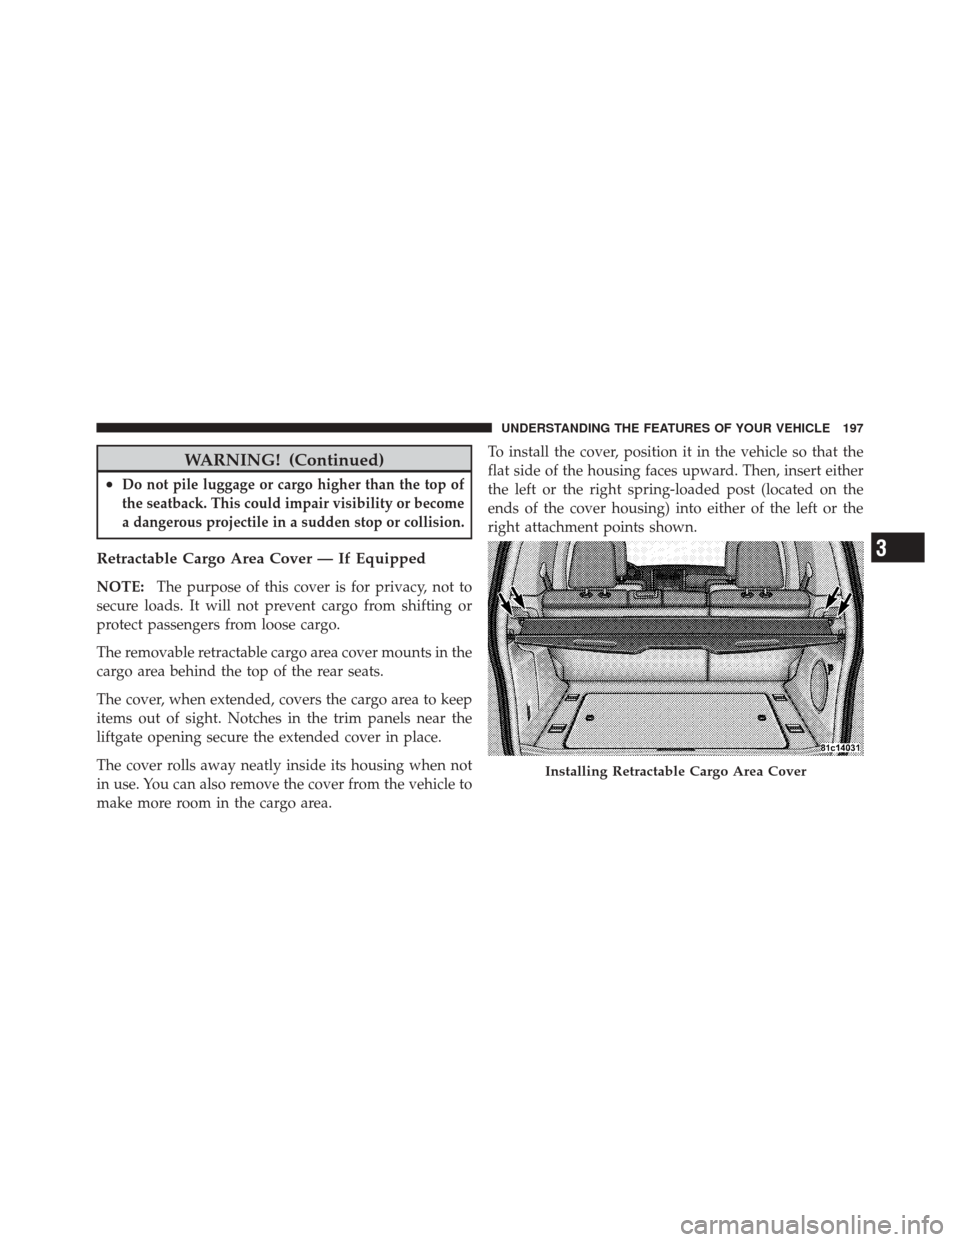
The removable retractable cargo area cover mounts in the
cargo area behind the top of the rear seats.
The cover, when extended, covers the cargo area to keep
items out of sight. Notches in the trim panels near the
liftgate opening secure the extended cover in place.
The cover rolls away neatly inside its housing when not
in use. You can also remove the cover from the vehicle to
make more room in the cargo area. To install the cover, position it in the vehicle so that the
flat side of the housing faces upward. Then, insert either
the left or the right spring-loaded post (located on the
ends of the cover housing) into either of the left or the
right attachment points shown.
Installing Retractable Cargo Area Cover
3
UNDERSTANDING THE FEATURES OF YOUR VEHICLE 197
Page 202 of 522
ROOF LUGGAGE RACK — IF EQUIPPED
NOTE:Roof rack and crossbars cannot be used on
vehicles equipped with Skyslider�.
The load carried on the roof, when equipped with a
luggage rack, must not exceed 150 lbs (68 kg), and it
should be uniformly distributed over the cargo area.
Crossbars should always be used whenever cargo is
placed on the roof rack. Check the straps frequently to be
sure that the load remains securely attached.
NOTE: Crossbars are offered by MOPAR� accessories.
External racks do not increase the total load carrying
capacity of the vehicle. Be sure that the total occupant
and luggage load inside the vehicle, plus the load on the
luggage rack, do not exceed the maximum vehicle load
capacity.
CAUTION!
•To avoid damage to the roof rack and vehicle, do
not exceed the maximum roof rack load capacity.
Always distribute heavy loads as evenly as pos-
sible and secure the load appropriately.
•Long loads, which extend over the windshield,
such as wood panels or surfboards, should be
secured to both the front and rear of the vehicle.
•Place a blanket or other protection between the
surface of the roof and the load.
•Travel at reduced speeds and turn corners care-
fully when carrying large or heavy loads on the
roof rack. Wind forces, due to natural causes or
nearby truck traffic, can add sudden upward loads.
This is especially true on large flat loads and may
result in damage to the cargo or your vehicle.
3
UNDERSTANDING THE FEATURES OF YOUR VEHICLE 201
Page 203 of 522
WARNING!
Cargo must be securely tied down before driving
your vehicle. Improperly secured loads can fly off the
vehicle, particularly at high speeds, resulting in per-
sonal injury or property damage. Follow the roof rack
cautions when carrying cargo on your roof rack.
202 UNDERSTANDING THE FEATURES OF YOUR VEHICLE
Page 223 of 522
If brake failure is indicated, immediate repair is neces-
sary.
WARNING!
Driving a vehicle with the red brake light on is
dangerous. Part of the brake system may have failed.
It will take longer to stop the vehicle. You could have
an accident. Have the vehicle checked immediately.
Vehicles equipped with the Anti-Lock Brake System
(ABS), are also equipped with Electronic Brake Force
Distribution (EBD). In the event of an EBD failure, the
Brake Warning Light will turn on along with the ABS
Light. Immediate repair to the ABS system is required.
Operation of the Brake Warning Light can be checked by
turning the ignition switch from the OFF position to the
ON position. The light should illuminate for approxi-
mately two seconds. The light should then turn off unless the parking brake is applied or a brake fault is detected.
If the light does not illuminate, have the light inspected
by an authorized dealer.
The light also will turn on when the parking brake is
applied with the ignition switch in the ON position.
NOTE:
This light shows only that the parking brake is
applied. It does not show the degree of brake application.
32. Vehicle Security Light — If Equipped This light will flash rapidly for approximately
16 seconds when the vehicle security system is
arming and then flash slowly when the system
is armed. The light will also turn on for about
three seconds when the ignition is first turned ON.
33. Airbag Warning Light This light turns on and remains on for six to
eight seconds as a bulb check when the ignition
switch is first turned ON. If the light does not
222 UNDERSTANDING YOUR INSTRUMENT PANEL