Page 129 of 407

Press the lens to turn these lights on. Press a second time
to turn the lights off.
The lights also turn on when a front door or rear door is
opened. The lights will also turn on when the UNLOCK
button on the Remote Keyless Entry (RKE) transmitter is
pressed.
Sunglasses Storage
At the rear of the console a compartment is provided for
the storage of a pair of sunglasses.
The storage compartment access is a “push/push” de-
sign. Push the finger depression on the overhead console
to open. Push the finger depression to close.
GARAGE DOOR OPENER — IF EQUIPPED
HomeLink�replaces up to three remote controls (hand-
held transmitters) that operate devices such as garage
door openers, motorized gates, lighting or home security systems. The HomeLink�
unit operates off your vehicle’s
battery.
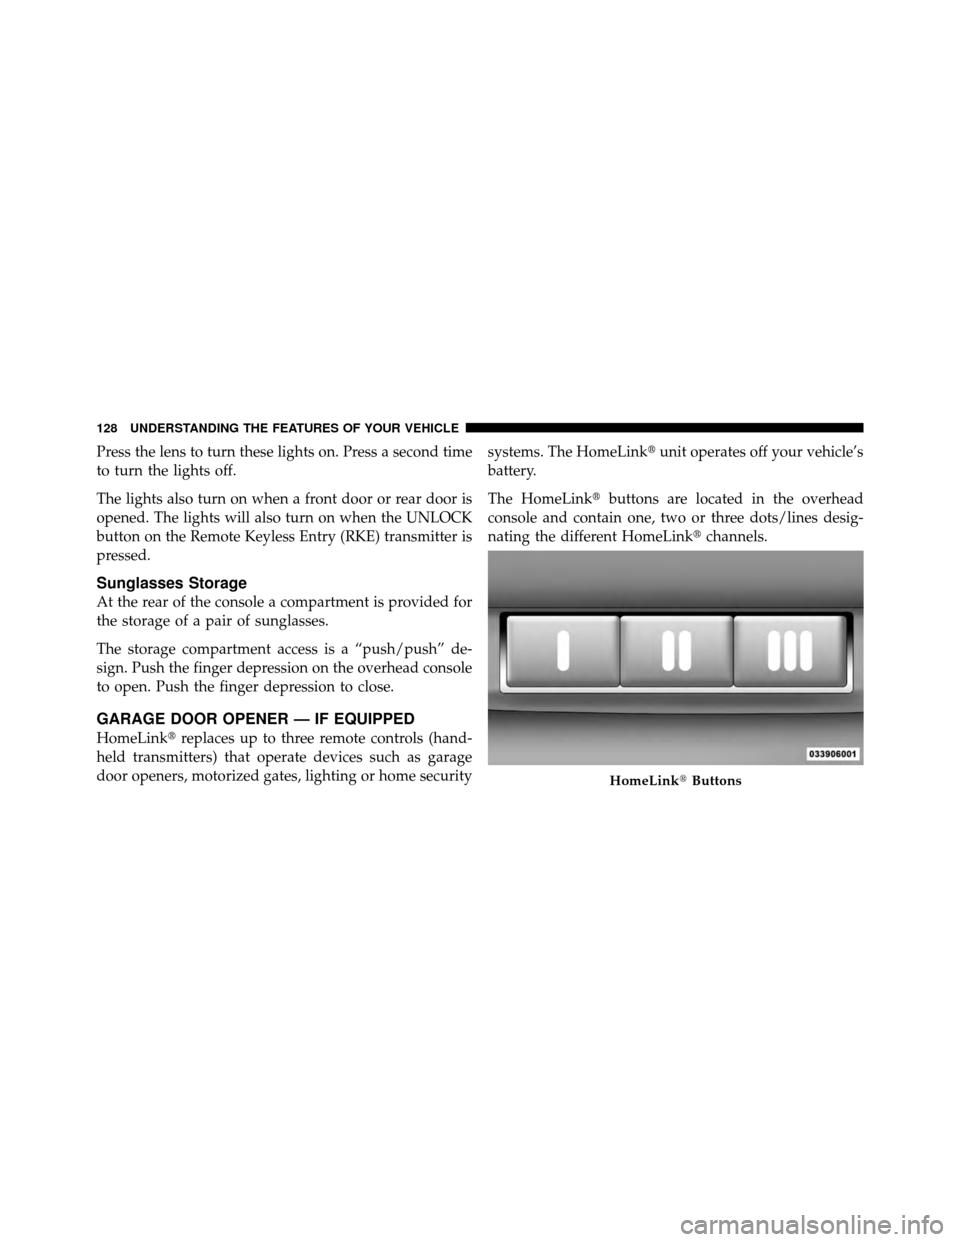
The HomeLink� buttons are located in the overhead
console and contain one, two or three dots/lines desig-
nating the different HomeLink� channels.
HomeLink�Buttons
128 UNDERSTANDING THE FEATURES OF YOUR VEHICLE
Page 130 of 407

NOTE:HomeLink� is disabled when the Vehicle Secu-
rity Alarm is active.
WARNING!
•Your motorized door or gate will open and close
while you are training the Universal Transceiver.
Do not train the transceiver if people, pets or other
objects are in the path of the door or gate. Only use
this transceiver with a garage door opener that has
a “stop and reverse” feature as required by federal
safety standards. This includes most garage door
opener models manufactured after 1982. Do not
use a garage door opener without these safety
features. Call toll-free 1–800–355–3515 or, on the
Internet at www.HomeLink.com for safety infor-
mation or assistance.
(Continued)
WARNING! (Continued)
•Vehicle exhaust contains carbon monoxide, a dan-
gerous gas. Do not run your vehicle in the garage
while training the transceiver. Exhaust gas can
cause serious injury or death.
Programming HomeLink�
Before You Begin
If you have not trained any of the HomeLink� buttons,
erase all channels before you begin training.
To do this, press and hold the two outside buttons for up
to 20 seconds. The EVIC will display “CLEARING
CHANNELS.” Release the buttons when the EVIC mes-
sage states “CHANNELS CLEARED.”
It is recommended that a new battery be placed in the
hand-held transmitter of the device being copied to
3
UNDERSTANDING THE FEATURES OF YOUR VEHICLE 129
Page 134 of 407

Then proceed with Step 4 under “Programming
HomeLink�” earlier in this section.
Using HomeLink�
To operate, press and release the programmed
HomeLink�button. Activation will now occur for the
trained device (i.e., garage door opener, gate operator,
security system, entry door lock, home/office lighting,
etc.,). The handheld transmitter of the device may also be
used at any time.
Reprogramming A Single HomeLink� Button
To reprogram a channel that has been previously trained,
follow these steps:
1. Turn the ignition switch to the ON/RUN position.
2. Press and hold the desired HomeLink� button for
20 seconds until the EVIC display states “CHANNEL #
TRAINING.” Do not release the button. 3.
Without releasing the button, proceed with Program-
ming HomeLink� Step 2 and follow all remaining steps.
Security
It is advised to erase all channels before you sell or turn
in your vehicle.
To do this, press and hold the two outside buttons for
20 seconds until the EVIC message states “CHANNELS
CLEARED.” Note that all channels will be erased. Indi-
vidual channels cannot be erased.
The HomeLink�Universal Transceiver is disabled when
the Vehicle Security Alarm is active.
Troubleshooting Tips
If you are having trouble programming HomeLink �, here
are some of the most common solutions:
•Replace the battery in the original transmitter.
3
UNDERSTANDING THE FEATURES OF YOUR VEHICLE 133
Page 136 of 407
POWER SUNROOF — IF EQUIPPED
The power sunroof switch is located between the sun
visors on the overhead console.WARNING!
•Never leave children in a vehicle with the key in
the ignition switch. Occupants, particularly unat-
tended children, can become entrapped by the
power sunroof while operating the power sunroof
switch. Such entrapment may result in serious
injury or death.
•In an accident, there is a greater risk of being
thrown from a vehicle with an open sunroof. You
could also be seriously injured or killed. Always
fasten your seat belt properly and make sure all
passengers are properly secured too.
•Do not allow small children to operate the sun-
roof. Never allow your fingers, other body parts, or
any object to project through the sunroof opening.
Injury may result.
Power Sunroof Switch
3
UNDERSTANDING THE FEATURES OF YOUR VEHICLE 135
Page 145 of 407
the cargo light lens surface will turn off all interior lights.
Push on the lens surface a second time to restore the
interior lights to normal operation.
Rear Storage Compartment
The rear storage compartment is located on the driver’s
side behind the second row seat.
Retractable Cargo Area Cover — If Equipped
NOTE:The purpose of this cover is for privacy, not to
secure loads. It will not prevent cargo from shifting or
protect passengers from loose cargo.
To cover the cargo area:
1. Grasp the cover at the center handle. Pull it over the
cargo area.
2. Insert the pins on the ends of the cover into the slots in
the pillar trim cover.
3. The liftgate may be opened with the cargo cover in
place.
Rear Storage Compartment
144 UNDERSTANDING THE FEATURES OF YOUR VEHICLE
Page 147 of 407
Cargo Tie-Down Hooks
The cargo tie-downs, located on the cargo area floor,
should be used to safely secure loads when the vehicle is
moving.WARNING!
•To help protect against personal injury, passengers
should not be seated in the rear cargo area. The
rear cargo space is intended for load carrying
purposes only, not for passengers, who should sit
in seats and use seat belts.
•Cargo tie-down hooks are not safe anchors for a
child seat tether strap. In a sudden stop or colli-
sion, a hook could pull loose and allow the child
seat to come loose. A child could be badly injured.
Use only the anchors provided for child seat
tethers.
The weight and position of cargo and passengers
can change the vehicle center of gravity and ve-
hicle handling. To avoid loss of control resulting
in personal injury, follow these guidelines for
loading your vehicle:(Continued)
Cargo Tie-Down Hooks
146 UNDERSTANDING THE FEATURES OF YOUR VEHICLE
Page 160 of 407

6. Airbag Warning LightThis light turns on and remains on for six to
eight seconds as a bulb check when the ignition
switch is first turned ON. If the light is not on
during starting, stays on, or turns on while
driving, have the system inspected by an authorized
dealer as soon as possible. Refer to “Occupant Restraints”
in “Things To Know Before Starting Your Vehicle” for
further information.
7. Anti-Lock Brake (ABS) Warning Light This light monitors the Anti-Lock Brake System.
The light will turn on when the ignition switch is
turned to the ON position and may stay on for as long as
four seconds.
If the ABS Warning Light remains on or turns on while
driving, it indicates that the Anti-Lock portion of the
brake system is not functioning and that service is required. However, the conventional brake system will
continue to operate normally if the Brake Warning Light
is not on.
If the ABS Warning Light is on, the brake system should
be serviced as soon as possible to restore the benefits of
anti-lock brakes. If the ABS Warning Light does not turn
on when the ignition switch is turned to the ON position,
have the light inspected by an authorized dealer.
8. Tachometer
Indicates the engine speed in revolutions per minute
(RPM).
9. Vehicle Security Light
This light will flash rapidly for approximately
15 seconds when the vehicle theft alarm is
arming. The light will flash at a slower speed
continuously after the alarm is set. The security
light will also come on for about three seconds when the
ignition is first turned on.
4
UNDERSTANDING YOUR INSTRUMENT PANEL 159
Page 169 of 407
COMPASS/TEMPERATURE ButtonPress and release the COMPASS/
TEMPERATURE button to display one of eight
compass readings and the outside temperature.
Electronic Vehicle Information Center (EVIC)
Displays
When the appropriate conditions exist, the EVIC displays
the following messages:
•TURN SIGNAL ON
•PERFORM SERVICE
•DAMAGED KEY — KEY DOES NOT COMMUNI-
CATE
•KEY NOT PROGRAMMED — KEY NOT PRO-
GRAMMED
•WRONG KEY — KEY DOES NOT BELONG TO
VEHICLE
•KEY NOT PROGRAMMED — EXCEEDED KEY PRO-
GRAM LIMIT
•PROGRAMMING ACTIVE — NEW KEY PRO-
GRAMMED
•SERVICE SECURITY KEY
•DRIVER/PASSENGER DOOR OPEN (with graphic)
•LEFT/RIGHT REAR DOOR OPEN (with graphic)
•X DOORS OPEN (with graphic)
•LIFTGATE OPEN (with graphic)
•LIFTGATE/DOOR OPEN (with graphic)
•LIFTGATE/DOORS OPEN (with graphic)
•LIFTGLASS OPEN (with graphic)
•HOOD OPEN (with graphic)
•HOOD/DOOR OPEN (with graphic)
168 UNDERSTANDING YOUR INSTRUMENT PANEL