Page 304 of 474
.")
For vehicles not equipped with the EVIC, perform the
following steps:
NOTE:You must complete Steps 1 through 8 within
90 seconds.
1. Center the steering wheel (front wheels pointing
straight forward).
2. Shift the transaxle into NEUTRAL.
3. Apply the parking brake.
4. Start the engine.
5. Release the clutch pedal.
6. Rotate the steering wheel one-half turn to the left.
7. Press the “ESC Off” switch (located in the lower
switch bank below the climate controls) four times within
20 seconds. The “ESC Off Indicator Light” should turn on
and turn off two times. 8. Rotate the steering wheel back to center and then an
additional half-turn to the right.
9. Turn the ignition switch to the OFF position and then
back to the ON position. If the sequence was completed
properly, the “ESC Off Indicator Light” will blink several
times to confirm HSA is disabled.
10. Repeat these steps if you want to return this feature
to it’s previous setting.
Electronic Stability Control (ESC)
This system enhances directional control and stability of
the vehicle under various driving conditions. ESC cor-
rects for over-steering or under-steering of the vehicle by
applying the brake of the appropriate wheel to assist in
counteracting the over-steering or under-steering condi-
tion. Engine power may also be reduced to help the
vehicle maintain the desired path. ESC uses sensors in
the vehicle to determine the vehicle path intended by the
5
STARTING AND OPERATING 303
Page 371 of 474
jumper
cable from the positive (+)post of the booster battery.
9. Disconnect the positive (+)end of the jumper cable
from the positive (+)post of the d")
8. Disconnect the opposite end of the positive(+)jumper
cable from the positive (+)post of the booster battery.
9. Disconnect the positive (+)end of the jumper cable
from the positive (+)post of the discharged vehicle.
10. Reinstall the air intake duct.
If frequent jump-starting is required to start your vehicle
you should have the battery and charging system in-
spected at your authorized dealer.
CAUTION!
Accessories that can be plugged into the vehicle
power outlets draw power from the vehicle’s battery,
even when not in use (i.e., cellular phones, etc.).
Eventually, if plugged in long enough, the vehicle’s
battery will discharge sufficiently to degrade battery
life and/or prevent the engine from starting.
FREEING A STUCK VEHICLE
If your vehicle becomes stuck in mud, sand or snow, it
can often be moved by a rocking motion. Turn your
steering wheel right and left to clear the area around the
front wheels. Then shift back and forth between RE-
VERSE and 1st gear. Using minimal accelerator pedal
pressure to maintain the rocking motion, without spin-
ning the wheels, is most effective.
NOTE: If your vehicle is equipped with Traction Con-
trol or Electronic Stability Control (ESC), turn the system
OFF before attempting to “rock” the vehicle.
CAUTION!
•When “rocking” a stuck vehicle by moving be-
tween 1st and REVERSE, do not spin the wheels
faster than 15 mph (24 km/h), or drivetrain damage
may result.
(Continued)
370 WHAT TO DO IN EMERGENCIES
Page 378 of 474
ENGINE COMPARTMENT — 2.0L
1 — Washer Fluid Reservoir6 — Integrated Power Module
2 — Power Steering Fluid Reservoir 7 — Battery (Under Cover)
3 — Engine Oil Fill 8 — Coolant Pressure Cap
4 — Air Cleaner Filter 9 — Engine Oil Dipstick
5 — Brake Fluid Reservoir 10 — Engine Coolant Reservoir
7
MAINTAINING YOUR VEHICLE 377
Page 379 of 474
ENGINE COMPARTMENT — 2.4L
1 — Washer Fluid Reservoir6 — Battery (Under Cover)
2 — Power Steering Fluid Reservoir 7 — Air Cleaner Filter
3 — Engine Oil Fill 8 — Coolant Pressure Cap
4 — Brake Fluid Reservoir 9 — Engine Oil Dipstick
5 — Integrated Power Module 10 — Engine Coolant Reservoir
378 MAINTAINING YOUR VEHICLE
Page 384 of 474

•Your vehicle has been built with improved fluids
that protect the performance and durability of
your vehicle and also allow extended maintenance
intervals. Do not use chemical")
CAUTION! (Continued)
•Your vehicle has been built with improved fluids
that protect the performance and durability of
your vehicle and also allow extended maintenance
intervals. Do not use chemical flushes in these
components as the chemicals can damage your
engine, transaxle, power steering or air condition-
ing. Such damage is not covered by the New
Vehicle Limited Warranty. If a flush is needed
because of component malfunction, use only the
specified fluid for the flushing procedure.
Engine Oil
Checking Oil Level
To assure proper engine lubrication, the engine oil must
be maintained at the correct level. Check the oil level at
regular intervals, such as every fuel stop. The best time to
check the engine oil level is about five minutes after a
fully warmed engine is shut off. Do not check oil level
before starting the engine after it has sat overnight.
Checking engine oil level when the engine is cold will
give you an incorrect reading.
Checking the oil while the vehicle is on level ground and
only when the engine is hot, will improve the accuracy of
the oil level readings. Maintain the oil level between the
range markings on the dipstick. The range markings will
consist of a crosshatch zone that says SAFE or a cross-
hatch zone that says MIN at the low end of the range and
MAX at the high end of the range. Adding 1 qt (1L) of oil
7
MAINTAINING YOUR VEHICLE 383
Page 410 of 474
inside of the cover. Refer to “Engine Compartment” in
“Maintaining Your Vehicle” for further information.
Cavity CartridgeFuseMini-
Fuse Description
1 Empty Empty
2 15 Amp
Lt BlueAWD/4WD ECU
Feed
3 10 Amp
RedCHMSL Brake Switch
Feed
4 10 Amp
RedIgnition Switch Feed/
OCM
5 20 Amp
YellowTrailer Tow
6 10 Amp
RedIOD Sw/Pwr Mir/
Steering Cntrl Sdar/
Hands-Free Phone
7 30 Amp
GreenIOD Sense1
Cavity Cartridge
FuseMini-
Fuse Description
8 30 Amp
GreenIOD Sense2
9 40 Amp Green Power Seats
10 20 Amp
YellowCCN Power Locks/
Interior Lighting
11 15 Amp
Lt BluePower Outlet
12 20 Amp
YellowIgn Run/Acc Inverter
13 20 Amp
YellowPwr Run/Acc Outlet
RR/Dome Lamp/
Cigar Lighter
14 10 Amp
RedIOD CCN
15 40 Amp Green RAD Fan Relay Bat-
tery Feed
7
MAINTAINING YOUR VEHICLE 409
Page 424 of 474
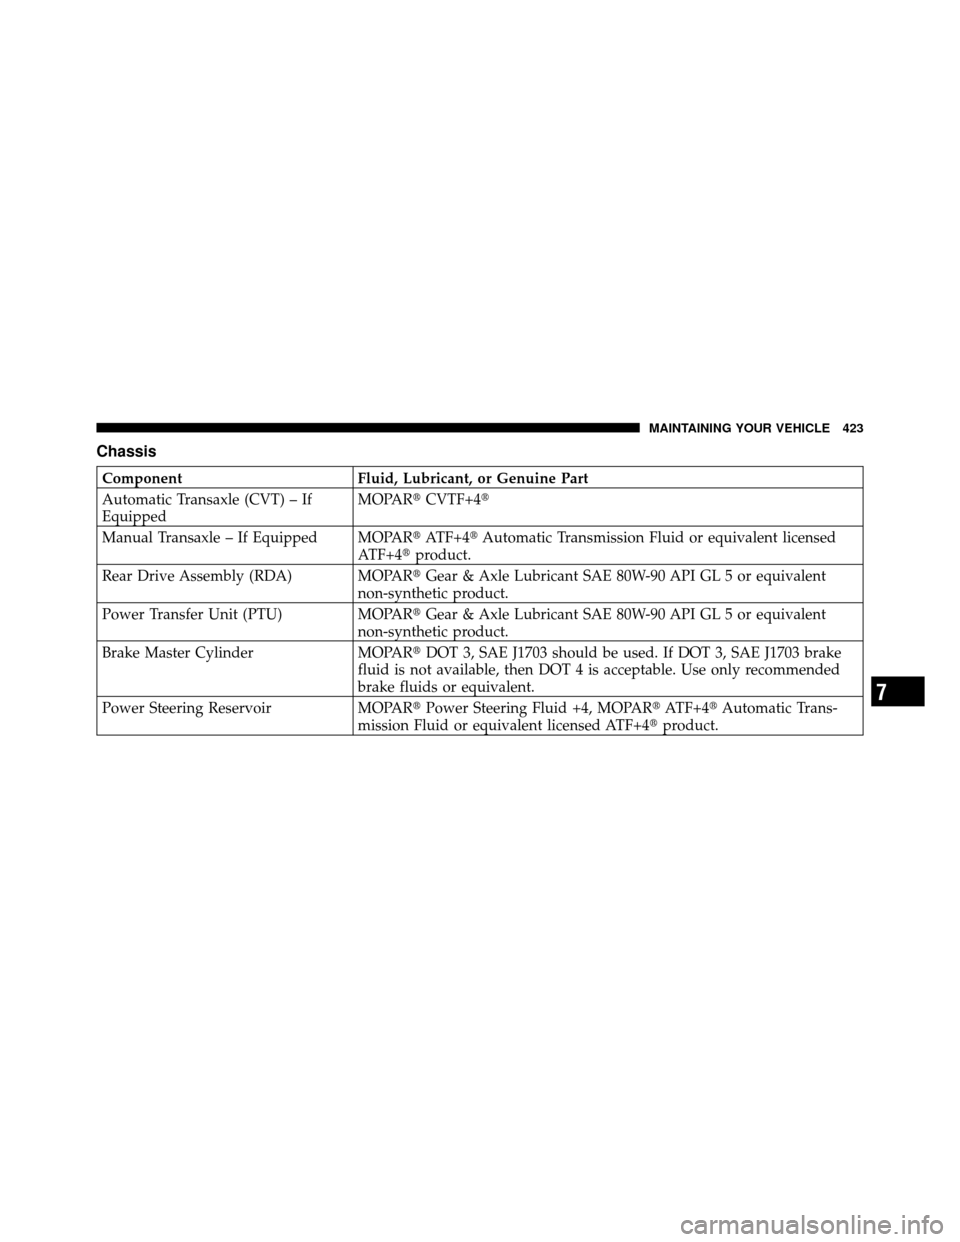
Chassis
ComponentFluid, Lubricant, or Genuine Part
Automatic Transaxle (CVT) – If
Equipped MOPAR�
CVTF+4�
Manual Transaxle – If Equipped MOPAR� ATF+4�Automatic Transmission Fluid or equivalent licensed
ATF+4� product.
Rear Drive Assembly (RDA) MOPAR� Gear & Axle Lubricant SAE 80W-90 API GL 5 or equivalent
non-synthetic product.
Power Transfer Unit (PTU) MOPAR�Gear & Axle Lubricant SAE 80W-90 API GL 5 or equivalent
non-synthetic product.
Brake Master Cylinder MOPAR�DOT 3, SAE J1703 should be used. If DOT 3, SAE J1703 brake
fluid is not available, then DOT 4 is acceptable. Use only recommended
brake fluids or equivalent.
Power Steering Reservoir MOPAR�Power Steering Fluid +4, MOPAR� ATF+4�Automatic Trans-
mission Fluid or equivalent licensed ATF+4� product.
7
MAINTAINING YOUR VEHICLE 423
Page 429 of 474
Once a Month
•Check the tire pressure and look for unusual wear or
damage.
•Inspect the battery and clean and tighten the terminals
as required.
•Check the fluid levels of the coolant reservoir, brake
master cylinder, and power steering — add as needed.
•Check all lights and other electrical items for correct
operation.At Each Oil Change
•Change the engine oil filter.
•Inspect the brake hoses and lines.
•Check the manual transaxle fluid level.
CAUTION!
Failure to perform the required maintenance items
may result in damage to the vehicle.
Required Maintenance Intervals
Refer to the Maintenance Schedules on the following
pages for the required maintenance intervals.
8
M
A I
N T
E
N A
N CE
S
C
H E
D
U L
E
S428 MAINTENANCE SCHEDULES

3 — Engine Oil Fill 8 — Coolant Pressure Cap")

2 — Power Steering Fluid Reservoir 7 — Air Cleaner Filter
3 — Engine Oil Fill 8 — Coolant Pressure Cap
4 —")