Page 1139 of 3039
14. Visually check the engine and cooling system for signs of coolant
leakage.
15. WARNING: When releasing the cooling system pressure, cover the
coolant expansion tank cap with a thick cloth.
CAUTIONS:
Since injury such as scalding could be caused by escaping steam or
coolant, make sure the vehicle cooling system is cool prior to carrying
out this procedure.
Make sure the coolant level remains above the "COLD FILL RANGE"
lower level mark.
NOTE: When the cooling system is warm, the coolant will be
approximately 10mm above the upper level mark on the expansion tank
with the cap removed.
Check and top-up the coolant system as required when cool.
16. Refer to: Air Deflector (501-02 Front End Body Panels, Removal and Installation).
17. Refer to: Radiator Splash Shield (501-02 Front End Body Panels, Removal and Installation).
18. Refer to: Secondary Bulkhead Center Panel (501-02 Front End Body Panels, Removal and Installation).
Page 1140 of 3039
Published: 19-Nov-2013
Engine Cooling - V8 5.0L Petrol/V8 S/C 5.0L Petrol - Auxiliary Radiator
Removal and Installation
Removal
NOTE: Removal steps in this procedure may contain installation details.
1. Refer to: Battery Disconnect and Connect (414-01 Battery, Mounting and Cables, General Procedures).
2. Refer to: Air Cleaner RH (303-12C Intake Air Distribution and Filtering - V8 5.0L Petrol, Removal and Installation).
3. CAUTION: Be prepared to collect escaping coolant.
4. WARNING: Make sure to support the vehicle with axle stands.
Raise and support the vehicle.
5. Refer to: Cooling System Partial Draining, Filling and Bleeding - V8 5.0L Petrol (303-03C Engine Cooling - V8 5.0L Petrol/V8 S/C 5.0L Petrol, General Procedures).
6. Refer to: Fender Splash Shield (501-02 Front End Body Panels, Removal and Installation). www.JagDocs.com
Page 1145 of 3039
Published: 11-May-2011
Engine Cooling - V8 5.0L Petrol/V8 S/C 5.0L Petrol - Cooling Fan Motor and
Shroud Vehicles With: Supercharger
Removal and Installation
Removal
NOTE: Removal steps in this procedure may contain installation details.
1. Refer to: Battery Disconnect and Connect (414-01 Battery, Mounting and Cables, General Procedures).
2. WARNING: Make sure to support the vehicle with axle stands.
Raise and support the vehicle.
3. Refer to: Radiator Splash Shield (501-02 Front End Body Panels, Removal and Installation).
4. NOTE: Some variation in the illustrations may occur, but
the essential information is always correct. www.JagDocs.com
Page 1157 of 3039
Published: 19-Nov-2013
Engine Cooling - V8 5.0L Petrol/V8 S/C 5.0L Petrol - Radiator Vehicles With:
Supercharger
Removal and Installation
Removal
NOTE: Removal steps in this procedure may contain installation details.
1. Refer to: Battery Disconnect and Connect (414-01 Battery, Mounting and Cables, General Procedures).
2. WARNING: Make sure to support the vehicle with axle stands.
Raise and support the vehicle.
3. NOTE: Some variation in the illustrations may occur, but
the essential information is always correct.
Page 1167 of 3039
1 Intake manifold assemblies 2 Supply hoses to charge air coolers 3 Charge air radiator 4 Charge air coolant pump 5 Engine cooling system connecting hose 6 Return hoses from charge air coolers
Page 1170 of 3039
1 RH (right hand) charge air cooler 2 Engine 3 LH (left hand) charge air cooler 4 Expansion hose connection (with engine cooling system) 5 Charge air radiator 6 Charge air coolant pump
System Operation
Electrical power for the charge air coolant pump is supplied from the intercooler water pump relay in the power distribution box.
When the intercooler water pump relay is energized, it connects power from the battery, via the BJB (battery junction box)
and CJB (central junction box), to the charge air coolant pump. Operation of the intercooler water pump relay is controlled by
the ECM (engine control module). The intercooler water pump relay is energized continuously while the ignition is in power
mode 6.
When the charge air coolant pump is running, coolant flows from the pump outlet through the charge air coolers, the charge air
radiator and back to the pump inlet. Supercharger Cooling Flow Diagram
Page 1171 of 3039
1 Coolant outlet connection 2 Coolant inlet connection 3 Electrical connector The charge air coolant pump is an electric pump attached to the RH (right-hand) side of the charge air radiator. Hoses connect
the inlet of the charge air coolant pump to the charge air radiator, and the outlet to the charge air coolers. An electrical
connector provides the interface between the motor of the charge air coolant pump and the vehicle wiring. www.JagDocs.com
Page 1172 of 3039

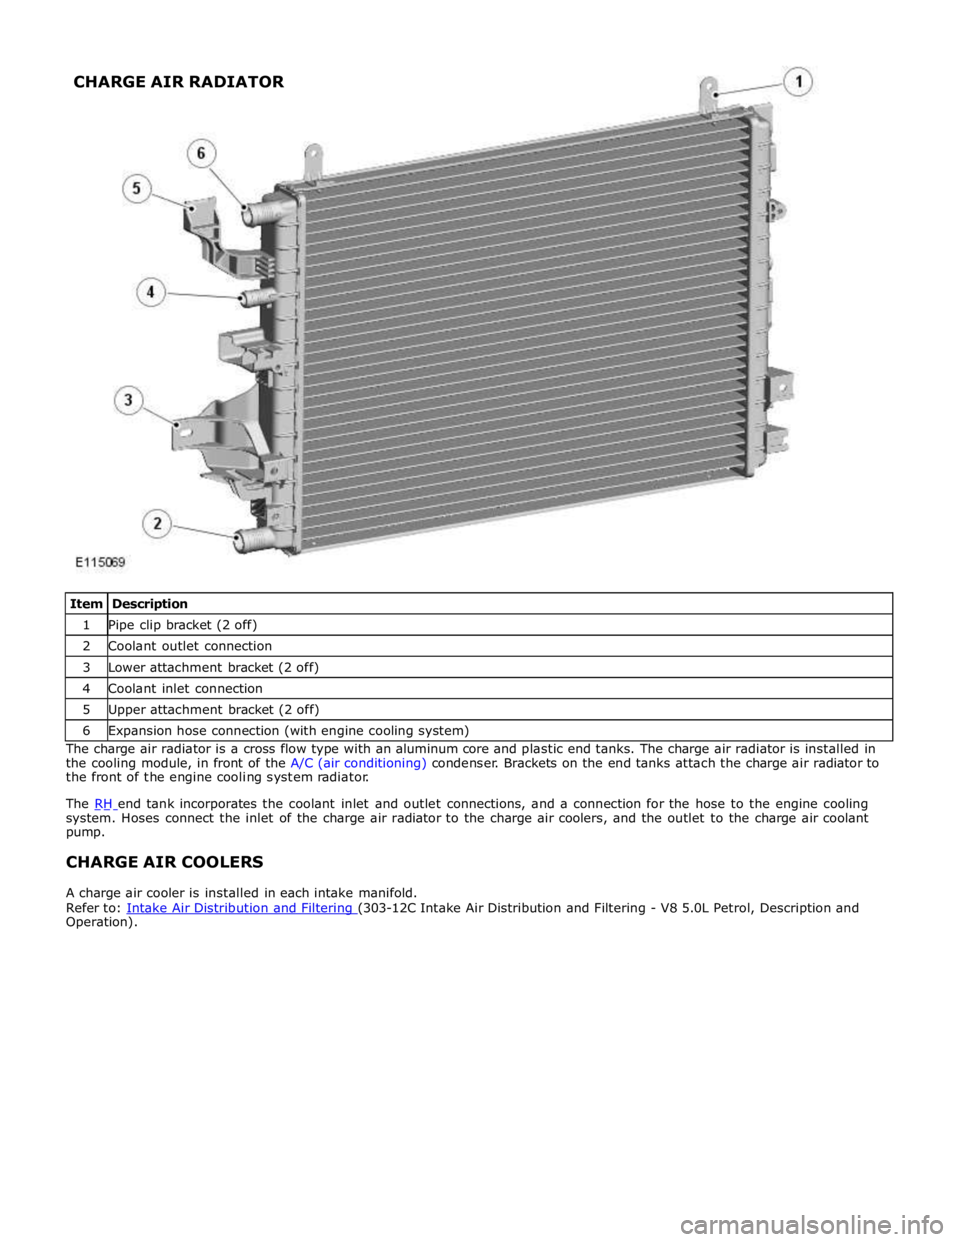
1 Pipe clip bracket (2 off) 2 Coolant outlet connection 3 Lower attachment bracket (2 off) 4 Coolant inlet connection 5 Upper attachment bracket (2 off) 6 Expansion hose connection (with engine cooling system) The charge air radiator is a cross flow type with an aluminum core and plastic end tanks. The charge air radiator is installed in
the cooling module, in front of the A/C (air conditioning) condenser. Brackets on the end tanks attach the charge air radiator to
the front of the engine cooling system radiator.
The RH end tank incorporates the coolant inlet and outlet connections, and a connection for the hose to the engine cooling system. Hoses connect the inlet of the charge air radiator to the charge air coolers, and the outlet to the charge air coolant
pump.
CHARGE AIR COOLERS
A charge air cooler is installed in each intake manifold.
Refer to: Intake Air Distribution and Filtering (303-12C Intake Air Distribution and Filtering - V8 5.0L Petrol, Description and Operation). CHARGE AIR RADIATOR