Page 16 of 466
SEDAN 1. Coat hooks (P. 2-48)
2. Rear personal light (P. 2-54)
3. Power windows (P. 2-49) 4. Outside mirror remote control switch
(P. 3-26)
5. Automatic drive positioner switch
(if so equipped) (P. 3-28)
6. Sun visors (P. 3-24) 7. Moonroof switch (if so equipped)
(P. 2-52)
8. Map light (P. 2-54)
9. Sunglasses holder (P. 2-45)
10. Inside rearview mirror
— Operation (P. 3-25)
— HomeLink � (if so equipped) (P. 2-57)
— Compass (if so equipped) (P. 2-8)
11. Trunk pass-through/Rear armrest
(P. 1-12)
12. Rear cup holders (P. 2-43)
13. Console box
— Power outlet (P. 2-41)
— Auxiliary input jacks (P. 4-81)
— USB input operation (if so equipped)
(P. 4-62)
— iPod � player operation
(if so equipped) (P. 4-71)
14. Front cup holders (P. 2-43) SSI0668PASSENGER COMPARTMENT
Illustrated table of contents
0-7
� —
—
10/12/09—tbrooks
�
Page 17 of 466
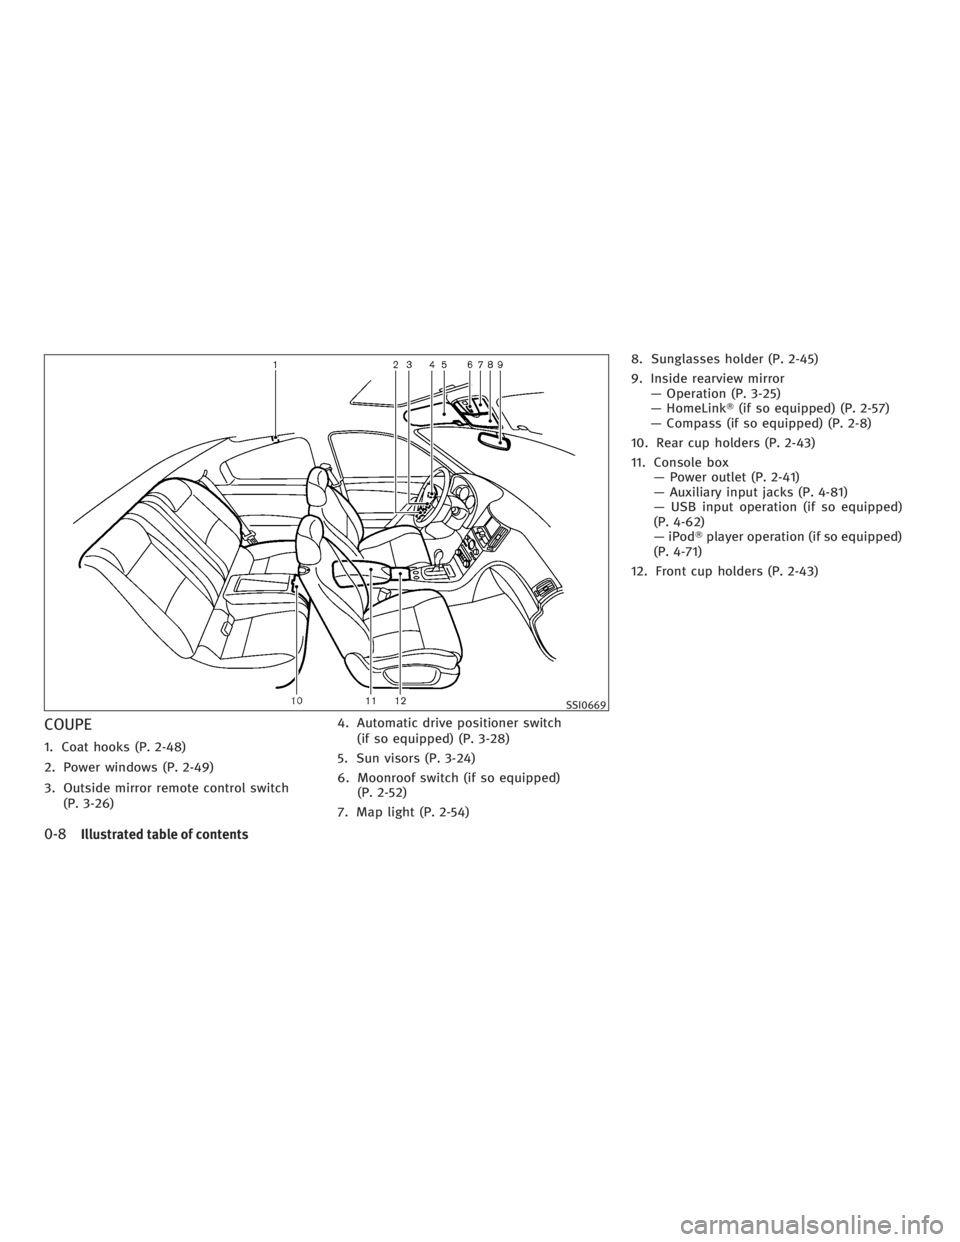
COUPE 1. Coat hooks (P. 2-48)
2. Power windows (P. 2-49)
3. Outside mirror remote control switch
(P. 3-26) 4. Automatic drive positioner switch
(if so equipped) (P. 3-28)
5. Sun visors (P. 3-24)
6. Moonroof switch (if so equipped)
(P. 2-52)
7. Map light (P. 2-54) 8. Sunglasses holder (P. 2-45)
9. Inside rearview mirror
— Operation (P. 3-25)
— HomeLink � (if so equipped) (P. 2-57)
— Compass (if so equipped) (P. 2-8)
10. Rear cup holders (P. 2-43)
11. Console box
— Power outlet (P. 2-41)
— Auxiliary input jacks (P. 4-81)
— USB input operation (if so equipped)
(P. 4-62)
— iPod � player operation (if so equipped)
(P. 4-71)
12. Front cup holders (P. 2-43)
SSI0669
0-8 Illustrated table of contents
� —
—
10/12/09—tbrooks
�
Page 173 of 466

4 Monitor, climate, audio, phone and voice
recognition systems Safety note ....................................... 4-2
Center multi-function control panel ................. 4-2
How to use INFINITI controller ................... 4-4
How to use touch screen
(models with navigation system) ................. 4-4
Menu options (models with navigation
system) ....................................... 4-6
How to select menus on the screen .............. 4-7
Vehicle information and settings .................... 4-7
How to use STATUS button ...................... 4-7
How to use brightness control and display
ON/OFF button ................................. 4-7
How to use INFO button ........................ 4-8
How to use SETTING button .................... 4-12
Rearview monitor (if so equipped) ................. 4-22
How to read displayed lines .................... 4-22
How to park with predicted course lines ......... 4-23
Difference between predicted and actual
distances ..................................... 4-24
How to adjust screen .......................... 4-26
Operating tips ................................ 4-26
Ventilators ....................................... 4-27
Automatic climate control ......................... 4-28
Automatic climate control (Type A) .............. 4-30 Automatic climate control (Type B) .............. 4-32
Automatic climate control (Type C) .............. 4-34
Operating tips ................................ 4-37
In-cabin microfilter ............................ 4-38
Servicing climate control ....................... 4-38
Audio system .................................... 4-39
Audio operation precautions ................... 4-39
FM-AM-SAT radio with Compact Disc (CD)
player ........................................ 4-54
DVD (DIGITAL VERSATILE DISC) player
operation (models with navigation system) ...... 4-59
Usb input operation (if so equipped) ............ 4-62
Bluetooth � streaming audio
(models with navigation system) ................ 4-66
iPod � player operation (if so equipped) ......... 4-71
Music box hard-disk drive (if so equipped) ...... 4-73
Auxiliary input jacks (if so equipped) ............ 4-81
Cd/dvd/usb memory care and cleaning ......... 4-82
Steering-wheel-mounted controls for audio ...... 4-83
Antenna ...................................... 4-84
Car phone or CB radio ............................ 4-85
Bluetooth � Hands-Free Phone System
(models with navigation system) ................... 4-85
Regulatory information ......................... 4-87
� —
—
04/21/10—debbie
�
Page 175 of 466

WARNING● Do not disassemble or modify this system. If
you do, it may result in accidents, fire, or
electric shock.
● Do not use this system if you notice any
abnormality, such as a frozen screen or lack
of sound. Continued use of the system may
result in accident, fire or electric shock.
● In case you notice any foreign object in the
system hardware, spill liquid on it, or notice
smoke or smell coming from it, stop using
the system immediately and contact your
nearest INFINITI retailer. Ignoring such con-
ditions may lead to accidents, fire, or electric
shock.
● Park the vehicle in a safe location and apply
the parking brake to view the images on the
front center display screen using devices
connected to the auxiliary input jacks.
Do not attempt to operate the system in extreme
temperature conditions [below � 4°F ( � 20°C)
and above 158°F (70°C)]. Operating this system
under these conditions may result in system
malfunctions. 1. “ STATUS ” status display button (P. 4-7)
2, 6, 7, 10, 11. For navigation system control
buttons (Refer to the sepa-
rate Navigation System Own-
er’s Manual.)
3. INFINITI controller (P. 4-4)
4. “ PHONE ” Bluetooth � Hands-Free Phone
System button (P. 4-85)
5. “ OFF ” brightness control and dis-
play ON/OFF button (P. 4-7) 8. “ AM·FM·SAT ” band selector button
(P. 4-39)
9. “ DISC·AUX ” selector button (P. 4-39)
12. “ INFO ” vehicle and navigation informa-
tion button (P. 4-8)
13. “ SETTING ” button (P. 4-12)Models with navigation system SAA1523
SAFETY NOTE CENTER MULTI-FUNCTION CONTROL PANEL
4-2 Monitor, climate, audio, phone and voice recognition systems
� —
—
04/21/10—debbie
�
Page 254 of 466

AUXILIARY INPUT JACKS (if so
equipped) The auxiliary input jacks are located in the
center console. NTSC compatible devices such
as video games, camcorders and portable video
players can be connected to the auxiliary jacks.
Compatible audio devices, such as some MP3
players, can also be connected to the system
through the auxiliary jacks.
The auxiliary jacks are color coded for identifi-
cation purposes.
● Yellow - video input
● White - left channel audio input
● Red - right channel audio input Before connecting a device to a jack, turn off the
power of the portable device.
With a compatible device connected to the
jacks, push the AUX button to switch to the AUX
mode. The output from the device will be played
through the monitor and audio system.
AUX Menu When the “Setting” key on the display is se-
lected while in the AUX mode, the menu screen
will be displayed.
Display Mode :
Choose the display mode from the following
items.
● Normal
● Wide
● CinemaSAA2990 SAA1567
Monitor, climate, audio, phone and voice recognition systems
4-81
� —
—
04/21/10—debbie
�