2010 HYUNDAI VERACRUZ ECU
[x] Cancel search: ECUPage 269 of 425

511
Driving your vehicle
Sports mode
Whether the vehicle is stationary or in
motion, sports mode is selected by push-
ing the shift lever from the D (Drive) posi-
tion into the manual gate. To return to D
(Drive) range operation, push the shift
lever back into the main gate.
In sports mode, moving the shift lever
backwards and forwards will allow you to
make gearshifts rapidly. In contrast to a
manual transaxle, the sports mode
allows gearshifts with the accelerator
pedal depressed.Up (+) : Push the lever forward once to
shift up one gear.
Down (-) : Pull the lever backwards once
to shift down one gear.
✽ ✽
NOTICE
• In sports mode, the driver must exe-
cute upshifts in accordance with road
conditions, taking care to keep the
engine speed below the red zone.
• In sports mode, only the 6 forward
gears can be selected. To reverse or
park the vehicle, move the shift lever
to the R (Reverse) or P (Park) position
as required.
• In sports mode, downshifts are made
automatically when the vehicle slows
down. When the vehicle stops, 1st gear
is automatically selected.
(Continued)(Continued)
• In sports mode, when the engine rpm
approaches the red zone shift points
are varied to upshift automatically.
• To maintain the required levels of
vehicle performance and safety, the
system may not execute certain
gearshifts when the shift lever is oper-
ated.
• When starting from a stopped posi-
tion in slippery conditions, push the
shift lever forward into the +(up) posi-
tion. This causes the transaxle to shift
into the 2nd (or 3rd) gear which will
make it easier to control wheel spin.
Push the shift lever back to the D
(Drive) once the vehicle is moving.
OEN056003 + (UP)
- (DOWN)
Sports mode
procarmanuals.com
Page 281 of 425
523
Driving your vehicle
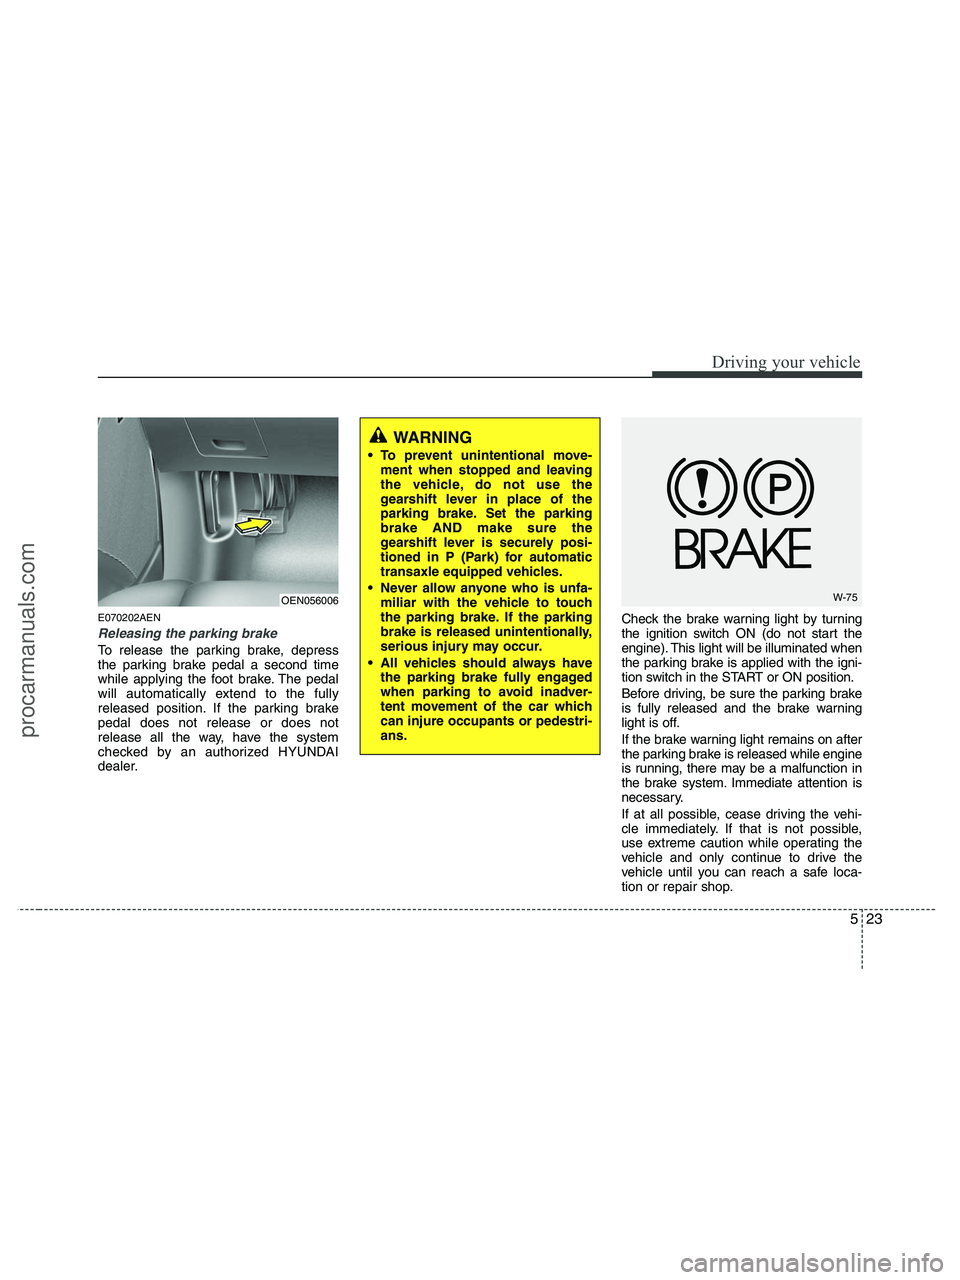
E070202AEN
Releasing the parking brake
To release the parking brake, depress
the parking brake pedal a second time
while applying the foot brake. The pedal
will automatically extend to the fully
released position. If the parking brake
pedal does not release or does not
release all the way, have the system
checked by an authorized HYUNDAI
dealer.Check the brake warning light by turning
the ignition switch ON (do not start the
engine). This light will be illuminated when
the parking brake is applied with the igni-
tion switch in the START or ON position.
Before driving, be sure the parking brake
is fully released and the brake warning
light is off.
If the brake warning light remains on after
the parking brake is released while engine
is running, there may be a malfunction in
the brake system. Immediate attention is
necessary.
If at all possible, cease driving the vehi-
cle immediately. If that is not possible,
use extreme caution while operating the
vehicle and only continue to drive the
vehicle until you can reach a safe loca-
tion or repair shop.
WARNING
To prevent unintentional move-
ment when stopped and leaving
the vehicle, do not use the
gearshift lever in place of the
parking brake. Set the parking
brake AND make sure the
gearshift lever is securely posi-
tioned in P (Park) for automatic
transaxle equipped vehicles.
Never allow anyone who is unfa-
miliar with the vehicle to touch
the parking brake. If the parking
brake is released unintentionally,
serious injury may occur.
All vehicles should always have
the parking brake fully engaged
when parking to avoid inadver-
tent movement of the car which
can injure occupants or pedestri-
ans.
OEN056006W-75
procarmanuals.com
Page 306 of 425
Driving your vehicle
48 5
E140400AUN
Driving with a trailer
Towing a trailer requires a certain
amount of experience. Before setting out
for the open road, you must get to know
your trailer. Acquaint yourself with the
feel of handling and braking with the
added weight of the trailer. And always
keep in mind that the vehicle you are
driving is now a good deal longer and not
nearly so responsive as your vehicle is
by itself.
Before you start, check the trailer hitch
and platform, safety chains, electrical
connector(s), lights, tires and mirror
adjustment. If the trailer has electric
brakes, start your vehicle and trailer mov-
ing and then apply the trailer brake con-
troller by hand to be sure the brakes are
working. This lets you check your electri-
cal connection at the same time.
During your trip, check occasionally to be
sure that the load is secure, and that the
lights and any trailer brakes are still work-
ing.
E140401AUN
Following distance
Stay at least twice as far behind the vehi-
cle ahead as you would when driving
your vehicle without a trailer. This can
help you avoid situations that require
heavy braking and sudden turns.
E140402AUN
Passing
You’ll need more passing distance up
ahead when you’re towing a trailer. And,
because of the increased vehicle length,
you’ll need to go much farther beyond the
passed vehicle before you can return to
your lane.
E140403AUN
Backing up
Hold the bottom of the steering wheel
with one hand. Then, to move the trailer
to the left, just move your hand to the left.
To move the trailer to the right, move your
hand to the right. Always back up slowly
and, if possible, have someone guide
you.
E140404AUN
Making turns
When you’re turning with a trailer, make
wider turns than normal. Do this so your
trailer won’t strike soft shoulders, curbs,
road signs, trees, or other objects. Avoid
jerky or sudden maneuvers. Signal well
in advance.
E140405AEN
Turn signals when towing a trailer
When you tow a trailer, your vehicle has
to have a different turn signal flasher and
extra wiring. The green arrows on your
instrument panel will flash whenever you
signal a turn or lane change. Properly
connected, the trailer lights will also flash
to alert other drivers you’re about to turn,
change lanes, or stop.
When towing a trailer, the green arrows
on your instrument panel will flash for
turns even if the bulbs on the trailer are
burned out. Thus, you may think drivers
behind you are seeing your signals
when, in fact, they are not. It’s important
to check occasionally to be sure the trail-
er bulbs are still working. You must also
check the lights every time you discon-
nect and then reconnect the wires.
Do not connect a trailer lighting system
directly to your vehicle’s lighting system.
Use only an approved trailer wiring har-
ness.
procarmanuals.com
Page 315 of 425

557
Driving your vehicle
This label also tells you the maxi-
mum weight that can be supported
by the front and rear axles, called
Gross Axle Weight Rating (GAWR).
To find out the actual loads on your
front and rear axles, you need to go
to a weigh station and weigh your
vehicle. Your dealer can help you with
this. Be sure to spread out your load
equally on both sides of the center-
line.
(Continued)
Do not load your vehicle any
heavier than the GVWR, either
the maximum front or rear
GAWR and vehicle capacity
weight. If you do, parts,
including tires on your vehicle
can break, and it can change
the way your vehicle handles
and braking ability. This could
cause you to lose control and
crash. Also, overloading can
shorten the life of your vehi-
cle.WARNING
Overloading your vehicle can
cause heat buildup in your
vehicle's tires and possible
tire failure that could lead to a
crash.
Overloading your vehicle can
cause increased stopping dis-
tances that could lead to a
crash.
A crash resulting from poor
handling vehicle damage, tire
failure, or increased stopping
distances could result in seri-
ous injury or death.
WARNING - Loose cargo
Items you carry inside your
vehicle can strike and injure
occupants in a sudden stop or
turn, or in a crash.
Put items in the cargo area of
your vehicle. Try to spread the
weight evenly.
Never stack items, like suit-
cases, inside the vehicle
above the tops of the seats.
Do not leave an unsecured
child restraint in your vehicle.
When you carry something
inside the vehicle, secure it.
Do not drive with a seat folded
down unless necessary.
CAUTION
Overloading your vehicle may
cause damage. Repairs would
not be covered by your warran-
ty. Do not overload your vehicle.
Using heavier suspension com-
ponents to get added durability
might not change your weight
ratings. Ask your dealer to help
you load your vehicle the right
way.
procarmanuals.com
Page 319 of 425

63
What to do in an emergency
2. When the car is stopped, turn on your
emergency hazard flashers, set the
parking brake and put the transaxle in
P (automatic transaxle).
3. Have all passengers get out of the car.
Be sure they all get out on the side of
the car that is away from traffic.
4. When changing a flat tire, follow the
instruction provided later in this sec-
tion.
F020300AEN
If engine stalls while driving
1. Reduce your speed gradually, keeping
a straight line. Move cautiously off the
road to a safe place.
2. Turn on your emergency flashers.
3. Try to start the engine again. If your
vehicle will not start, contact an
authorized HYUNDAI dealer or seek
other qualified assistance.
F030100AUN
If engine doesn't turn over or
turns over slowly
1. If your car has an automatic transaxle,
be sure the gear selector lever is in N
(Neutral) or P (Park) and the emer-
gency brake is set.
2. Check the battery connections to be
sure they are clean and tight.
3. Turn on the interior light. If the light
dims or goes out when you operate the
starter, the battery is discharged.
4. Check the starter connections to be
sure they are securely tightened.
5. Do not push or pull the vehicle to start
it. See instructions for "Jump starting".
F030200AEN
If engine turns over normally but
does not start
1. Check fuel level.
2. With the ignition switch in the LOCK
position, check all connectors at igni-
tion coils and spark plugs. Reconnect
any that may be disconnected or
loose.
3. Check the fuel line in the engine com-
partment.
4. If the engine still does not start, call an
authorized HYUNDAI dealer or seek
other qualified assistance.
IF THE ENGINE WILL NOT START
WARNING
If the engine will not start, do not
push or pull the car to start it. This
could result in a collision or cause
other damage. In addition, push or
pull starting may cause the catalyt-
ic converter to be overloaded and
create a fire hazard.
procarmanuals.com
Page 329 of 425
613
What to do in an emergency
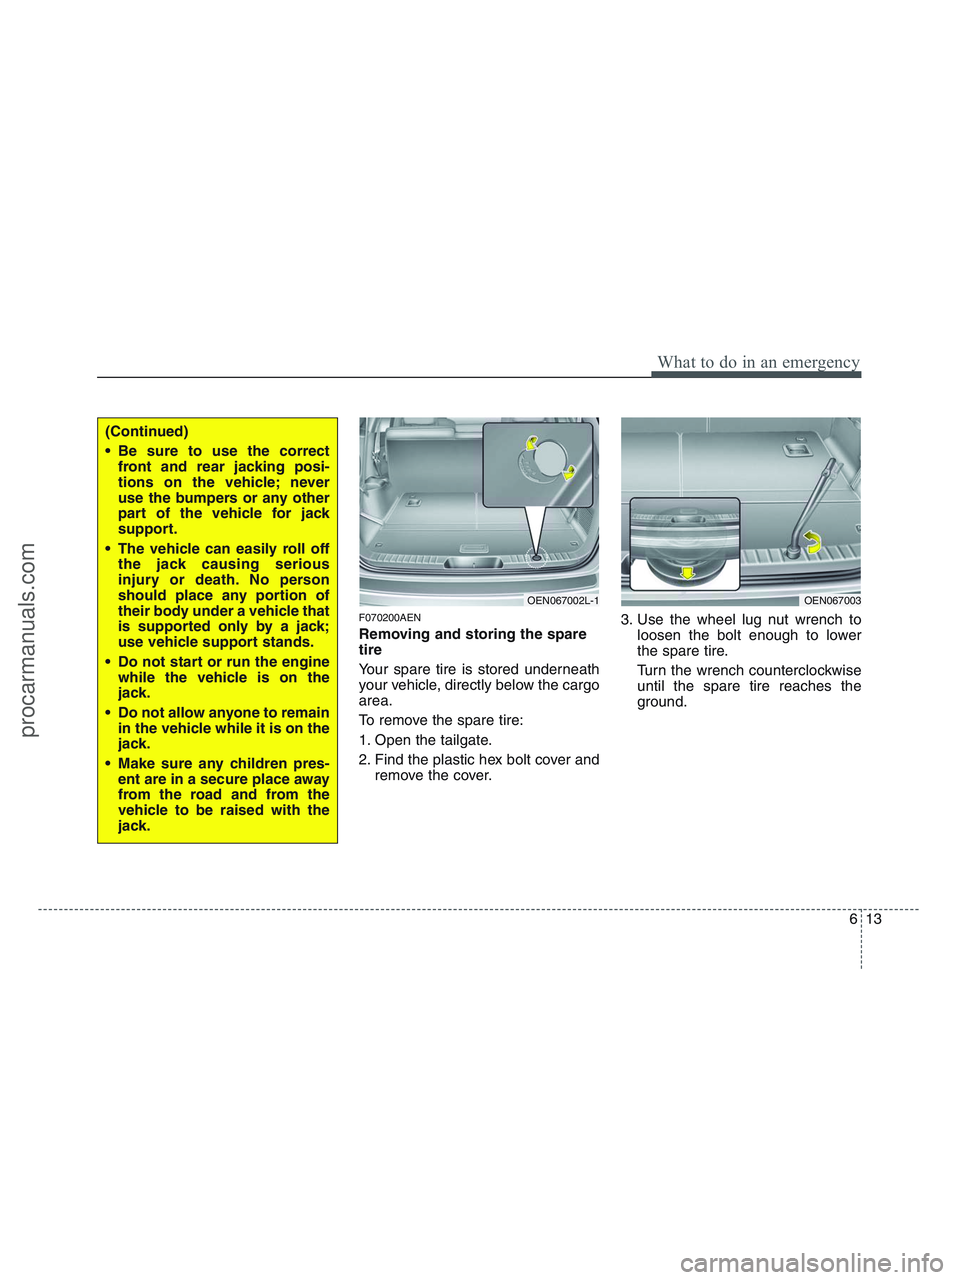
F070200AEN
Removing and storing the spare
tire
Your spare tire is stored underneath
your vehicle, directly below the cargo
area.
To remove the spare tire:
1. Open the tailgate.
2. Find the plastic hex bolt cover and
remove the cover.3. Use the wheel lug nut wrench to
loosen the bolt enough to lower
the spare tire.
Turn the wrench counterclockwise
until the spare tire reaches the
ground.
OEN067002L-1OEN067003
(Continued)
Be sure to use the correct
front and rear jacking posi-
tions on the vehicle; never
use the bumpers or any other
part of the vehicle for jack
support.
The vehicle can easily roll off
the jack causing serious
injury or death. No person
should place any portion of
their body under a vehicle that
is supported only by a jack;
use vehicle support stands.
Do not start or run the engine
while the vehicle is on the
jack.
Do not allow anyone to remain
in the vehicle while it is on the
jack.
Make sure any children pres-
ent are in a secure place away
from the road and from the
vehicle to be raised with the
jack.
procarmanuals.com
Page 334 of 425
What to do in an emergency
18 6
If you have a tire gauge, remove the
valve cap and check the air pressure.
If the pressure is lower than recom-
mended, drive slowly to the nearest
service station and inflate to the cor-
rect pressure. If it is too high, adjust
it until it is correct. Always reinstall
the valve cap after checking or
adjusting tire pressure. If the cap is
not replaced, air may leak from the
tire. If you lose a valve cap, buy
another and install it as soon as pos-
sible.
After you have changed wheels,
always secure the flat tire in its place
and return the jack and tools to their
proper storage locations.To prevent the jack, jack handle,
wheel lug nut wrench and spare tire
from rattling while the vehicle is in
motion, store them properly.CAUTION
Your vehicle has metric threads
on the wheel studs and nuts.
Make certain during wheel
removal that the same nuts that
were removed are reinstalled -
or, if replaced, that nuts with
metric threads and the same
chamfer configuration are used.
Installation of a non-metric
thread nut on a metric stud or
vice-versa will not secure the
wheel to the hub properly and
will damage the stud so that it
must be replaced.
Note that most lug nuts do not
have metric threads. Be sure to
use extreme care in checking
for thread style before installing
aftermarket lug nuts or wheels.
If in doubt, consult an author-
ized HYUNDAI dealer.
WARNING- Wheel studs
If the studs are damaged, they
may lose their ability to retain
the wheel. This could lead to the
loss of the wheel and a collision
resulting in serious injuries.
WARNING - Inadequate
spare tire pressure
Check the inflation pressures as
soon as possible after installing
the spare tire. Adjust it to the
specified pressure, if necessary.
Refer to “Tires and wheels” sec-
tion 8.
procarmanuals.com
Page 338 of 425
What to do in an emergency
22 6
When towing your vehicle in an emer-
gency without wheel dollies :
1. Set the ignition switch in the ACC posi-
tion.
2. Place the transaxle shift lever in N
(Neutral).
3. Release the parking brake.
F080200AUN
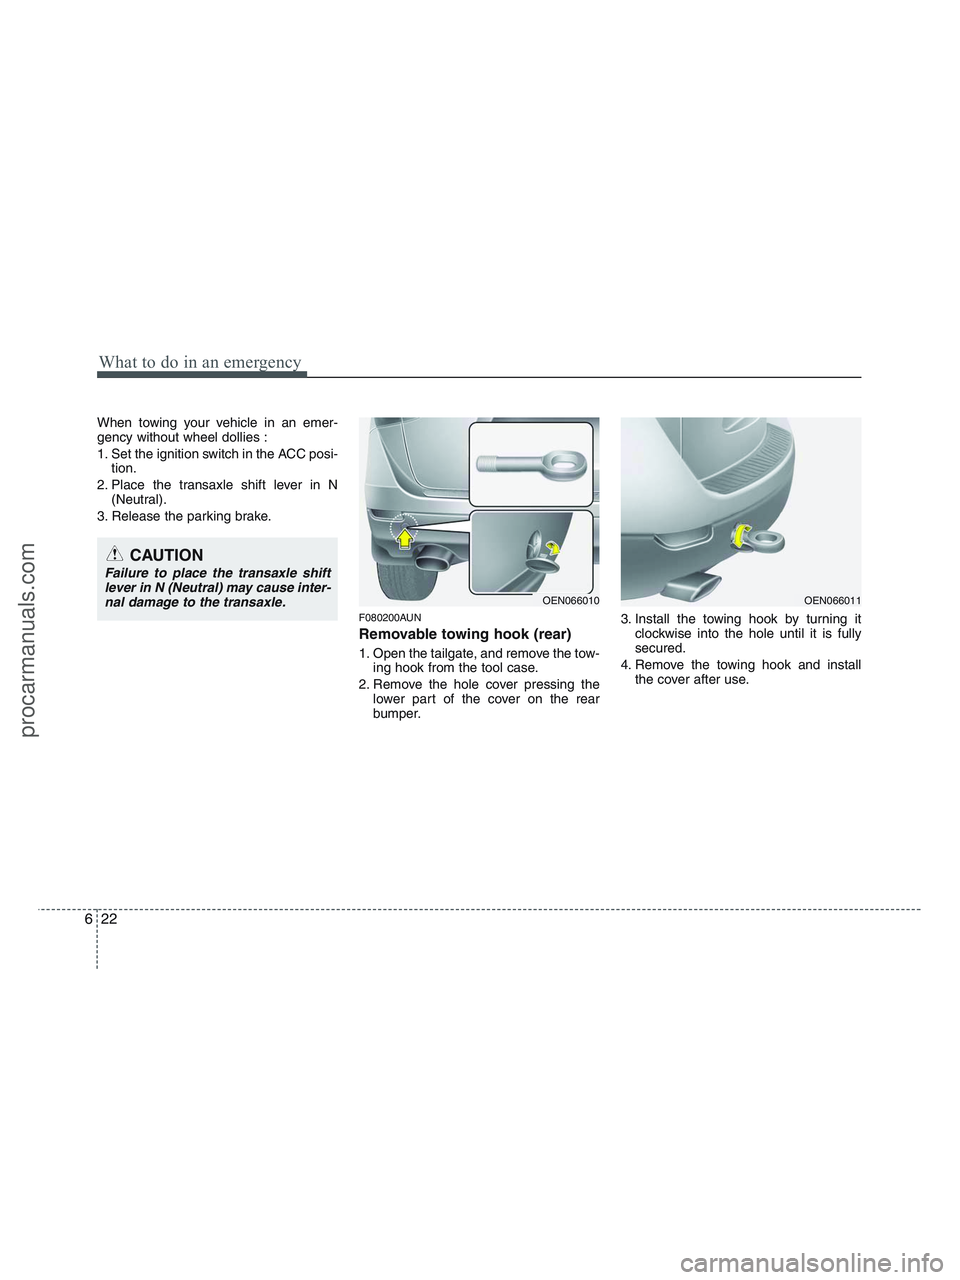
Removable towing hook (rear)
1. Open the tailgate, and remove the tow-
ing hook from the tool case.
2. Remove the hole cover pressing the
lower part of the cover on the rear
bumper.3. Install the towing hook by turning it
clockwise into the hole until it is fully
secured.
4. Remove the towing hook and install
the cover after use.
CAUTION
Failure to place the transaxle shift
lever in N (Neutral) may cause inter-
nal damage to the transaxle.
OEN066010OEN066011
procarmanuals.com