Page 390 of 425

749
Maintenance
Description Fuse rating Protected component
DR LOCK 20A Power window main switch, Power tailgate relay, Tailgate lock actuator relay
STOP LP 15A Stop lamp switch
ADJ-PEDAL 15A Adjustable pedal relay
H/LP WASHER 20A -
FUEL LID 15A Fuel filler lid switch
RR FOG 15A -
FR WIPER 30A Front wiper motor
TILT & TELE 15A Tilt & Telescopic module
DRL 15A DRL relay
P/WDW LH 25A Driver safety window ECM, Rear power window switch LH
P/WDW RH 25A Front/Rear power window switch RH
MIRR HTD 10A Power outside mirror motor & defogger LH/RH, Front A/C control module (Defogger switch)
P/SEAT 30A IMS control module, Driver/Passenger seat manual switch, Front lumbar support switch
KEY SOL 10A AWD ECM, Back warning buzzer, PIC mechanical steering column lock, Key solenoid,
Weight classification module, Rear initiator LH/RH
DEICER 15A Windshield defogger relay
S/ROOF 15A Sunroof control module
RSE, SMART KEY 10A PIC immobilizer module, RSE module
15A Audio, USA set top box
15A Instrument cluster, Power window main switch, Door lamp, Room lamp, Data link connector, BCM,
Door warning switch, IMS control module, Front/Rear A/C control module, Foot lamp, Map lamp,
Electro chromic mirror
AUDIO 1
(MEMORY FUSE)
ROOM LP
(MEMORY FUSE)
procarmanuals.com
Page 391 of 425

Maintenance
50 7
Engine compartment main fuse panel
Description Fuse rating Protected component
IGN 1 40A Ignition switch(ACC, IG1)
IGN 2 40A Start relay, Ignition switch(IG2, START)
I/P B+1 50A Fuse(DR LOCK 20A, STOP LP 15A, TAIL LH/RH 10A, ADJ-PEDAL 15A)
I/P B+2 50A Fuse(P/SEAT 30A, KEY SOL 10A, S/ROOF 15A, RSE/SMART KEY 10A, DEICER 15A),
Memory fuse (AUDIO1 15A, ROOM LP 15A)
P/WDW 40A Fuse(P/WDW LH/RH 25A)
BLOWER 40A Blower relay
RR HTD 40A Rear defogger relay, Fuse(MIRR HTD 10A)
ECU 30A Engine control relay, Fuse(IGN COIL 20A, ECU2 10A, SNSR1 15A, SNSR2 15A, SNSR3 10A)
ABS 1 40A ABS/ESC control module, Multipurpose check connector
ABS 2 40A ABS/ESC control module, Multipurpose check connector
TCU 1 15A TCM
TPMS 10A Tire pressure monitoring module, Semi active engine mounting solenoid, Front initiator LH/RH
B/ALARM 10A -
F/PUMP 20A Fuel pump relay
T/SIG 15A BCM (Hazard lamp), Head lamp (High/Low) relay
A/CON 10A A/C relay
ECU 1 10A ECM
ECU DSL, IGN COIL 20A Ignition coil #1~#6, Condenser
SNSR 1 15A ECM, Mass air flow sensor, Oil control valve, Immobilizer module, PCSV, VIV, CCV
SNSR 2 15A Fuel pump relay, Oxygen sensor #1~#4
SNSR 3 10A Injector #1~#6, Condenser fan relay, Radiator fan relay, A/C relay
ECU 2 10A ECM
procarmanuals.com
Page 393 of 425

Maintenance
52 7
LIGHT BULBS
G220000AEN
Use only the bulbs of the specified
wattage.
✽ ✽
NOTICE
After heavy, driving rain or washing,
headlight and taillight lenses could
appear frosty. This condition is caused by
the temperature difference between the
lamp inside and outside. This is similar
to the condensation on your windows
inside your vehicle during the rain and
doesn’t indicate a problem with your
vehicle. If the water leaks into the lamp
bulb circuitry, have the vehicle checked
by an authorized HYUNDAI dealer.
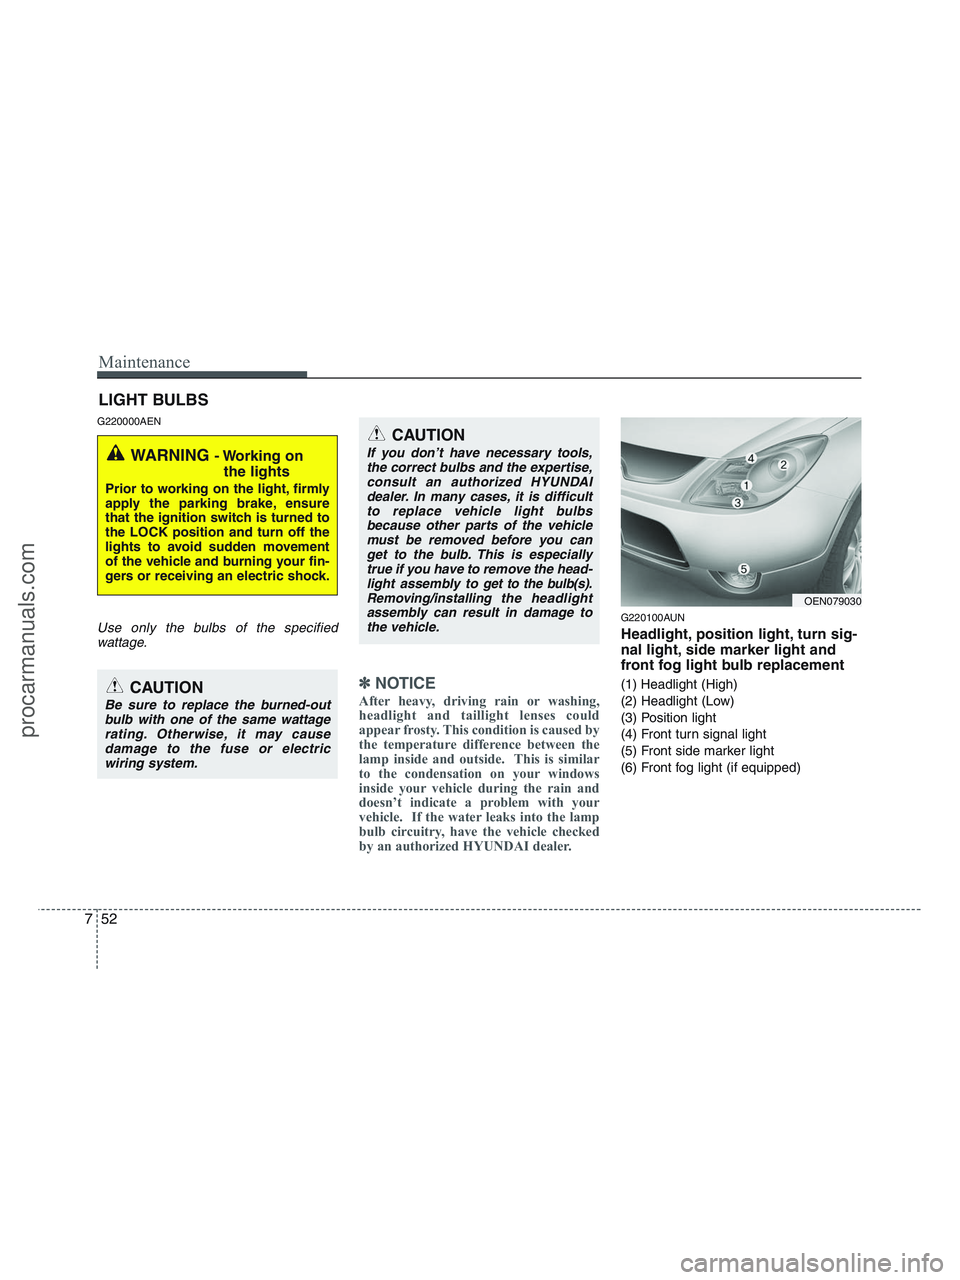
G220100AUN
Headlight, position light, turn sig-
nal light, side marker light and
front fog light bulb replacement
(1) Headlight (High)
(2) Headlight (Low)
(3) Position light
(4) Front turn signal light
(5) Front side marker light
(6) Front fog light (if equipped)
WARNING - Working on
the lights
Prior to working on the light, firmly
apply the parking brake, ensure
that the ignition switch is turned to
the LOCK position and turn off the
lights to avoid sudden movement
of the vehicle and burning your fin-
gers or receiving an electric shock.
CAUTION
Be sure to replace the burned-out
bulb with one of the same wattage
rating. Otherwise, it may cause
damage to the fuse or electric
wiring system.
CAUTION
If you don’t have necessary tools,
the correct bulbs and the expertise,
consult an authorized HYUNDAI
dealer. In many cases, it is difficult
to replace vehicle light bulbs
because other parts of the vehicle
must be removed before you can
get to the bulb. This is especially
true if you have to remove the head-
light assembly to
get to the bulb(s).
Removing/installingthe headlight
assembly can result in damage to
the vehicle.OEN079030
procarmanuals.com
Page 394 of 425
753
Maintenance
G220101AUN-EU
Headlight bulb
1. Open the hood.
2. Remove the headlight bulb cover by
turning it counterclockwise.
3. Disconnect the headlight bulb socket-
connector.
4. Unsnap the headlight bulb retaining
wire by depressing the end and push-
ing it upward. (High beam)
(Continued)
If a bulb becomes damaged or
cracked, replace it immediately
and carefully dispose of it.
Wear eye protection when chang-
ing a bulb. Allow the bulb to cool
down before handling it.
OHD076046
WARNING- Halogen bulbs
Halogen bulbs contain pressur-
ized gas that will produce flying
pieces of glass if broken.
Always handle them carefully,
and avoid scratches and abra-
sions. If the bulbs are lit, avoid
contact with liquids. Never touch
the glass with bare hands.
Residual oil may cause the bulb
to overheat and burst when lit. A
bulb should be operated only
when installed in a headlight.
(Continued)
OEN076060N
OEN076051N
■High beam
■Low beam
procarmanuals.com
Page 395 of 425
Maintenance
54 7
5. Remove the bulb from the headlight
assembly.
6. Install a new headlight bulb and snap
the headlight bulb retaining wire (high
beam) into position by aligning the
wire with the groove on the bulb.
7. Connect the headlight bulb socket-
connector.
8. Install the headlight bulb cover by turn-
ing it clockwise.
G220102AEN-EU
Front turn signal, position, side mark-
er and fog light bulbs (if equipped)
If the light bulb is not operating, have the
vehicle checked by an authorized
HYUNDAI dealer.
G220200AEN
Side repeater light bulb replace-
ment
If the light bulb is not operating, have the
vehicle checked by an authorized
HYUNDAI dealer.
G220300AEN-EU
Rear combination light bulb
replacement
(1) Tail light
(2) Back-up light
(3) Rear turn signal light
(4) Stop and tail light
(5) Rear side marker light
OEN076031
OEN076032
OEN076033
Type A
Type B
procarmanuals.com
Page 396 of 425
755
Maintenance
Outside light
1. Open the tailgate.
2. Loosen the light assembly retaining
screws with a philips head screwdriver.
3. Remove the rear combination light
assembly from the body of the vehicle.4. Remove the socket from the assembly
by turning the socket counterclockwise
until the tabs on the socket align with
the slots on the assembly.
5. Remove the bulb from the socket by
pressing it in and rotating it counter-
clockwise until the tabs on the bulb
align with the slots in the socket. Pull
the bulb out of the socket.6. Insert a new bulb by inserting it into
the socket and rotating it until it locks
into place.
7. Install the socket in the assembly by
aligning the tabs on the socket with the
slots in the assembly. Push the socket
into the assembly and turn the socket
clockwise.
8. Reinstall the light assembly to the
body of the vehicle.
OEN076034
OEN076035
OEN076036
OEN076037
procarmanuals.com
Page 397 of 425

Maintenance
56 7
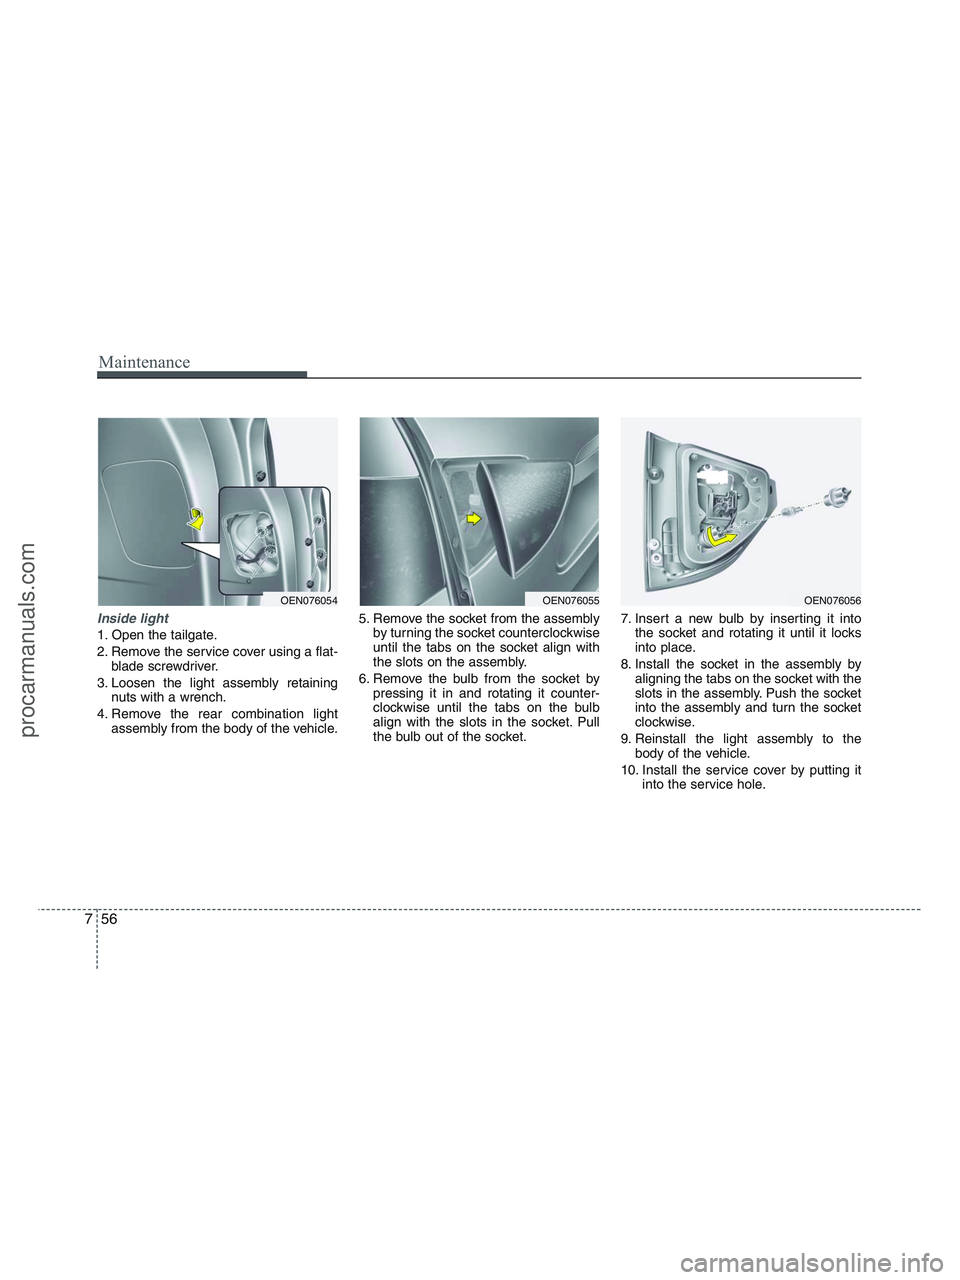
Inside light
1. Open the tailgate.
2. Remove the service cover using a flat-
blade screwdriver.
3. Loosen the light assembly retaining
nuts with a wrench.
4. Remove the rear combination light
assembly from the body of the vehicle.5. Remove the socket from the assembly
by turning the socket counterclockwise
until the tabs on the socket align with
the slots on the assembly.
6. Remove the bulb from the socket by
pressing it in and rotating it counter-
clockwise until the tabs on the bulb
align with the slots in the socket. Pull
the bulb out of the socket.7. Insert a new bulb by inserting it into
the socket and rotating it until it locks
into place.
8. Install the socket in the assembly by
aligning the tabs on the socket with the
slots in the assembly. Push the socket
into the assembly and turn the socket
clockwise.
9. Reinstall the light assembly to the
body of the vehicle.
10. Install the service cover by putting it
into the service hole.
OEN076054OEN076055OEN076056
procarmanuals.com
Page 416 of 425
87
Specifications, Consumer information, Reporting safety defects
H030000AUN
The tires supplied on your new vehicle
are chosen to provide the best perform-
ance for normal driving.
The tire label located on the driver's side
center pillar gives the tire pressures rec-
ommended for your car.
H04000AUN
The engine number is stamped on the
engine block as shown in the drawing.
OEN086003OEN088005
ENGINE NUMBER
TIRE SPECIFICATION AND
PRESSURE LABEL
procarmanuals.com