2010 HYUNDAI TUCSON clock
[x] Cancel search: clockPage 19 of 382
23
Your vehicle at a glance
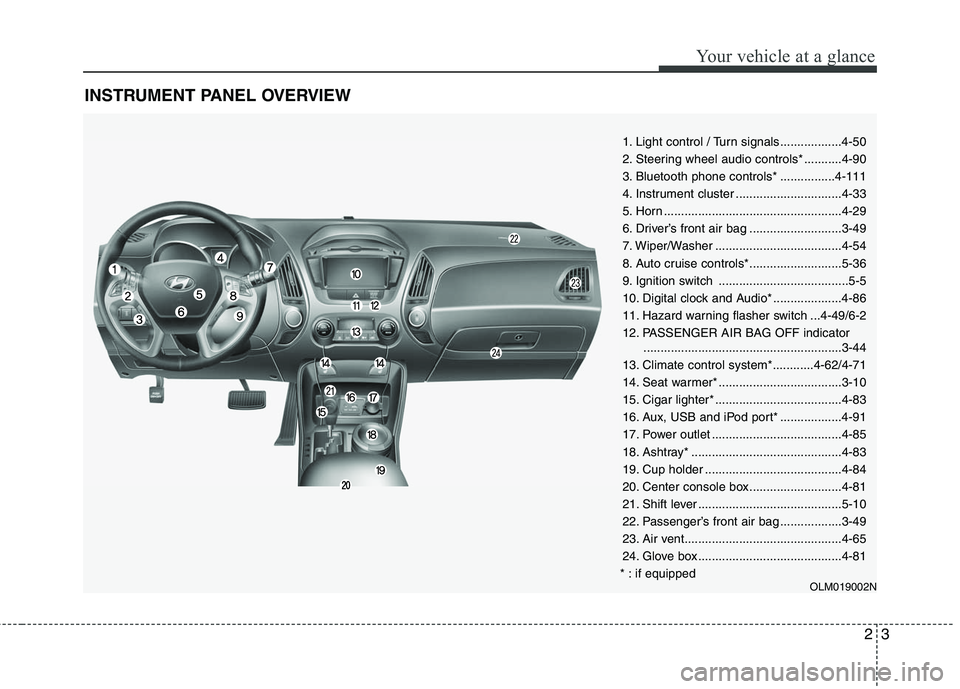
INSTRUMENT PANEL OVERVIEW
1. Light control / Turn signals..................4-50
2. Steering wheel audio controls* ...........4-90
3. Bluetooth phone controls* ................4-111
4. Instrument cluster ...............................4-33
5. Horn ....................................................4-29
6. Driver’s front air bag ...........................3-49
7. Wiper/Washer .....................................4-54
8. Auto cruise controls*...........................5-36
9. Ignition switch ......................................5-5
10. Digital clock and Audio* ....................4-86
11. Hazard warning flasher switch ...4-49/6-2
12. PASSENGER AIR BAG OFF indicator..........................................................3-44
13. Climate control system*............4-62/4-71
14. Seat warmer* ....................................3-10
15. Cigar lighter* .....................................4-83
16. Aux, USB and iPod port* ..................4-91
17. Power outlet ......................................4-85
18. Ashtray* ............................................4-83
19. Cup holder ........................................4-84
20. Center console box...........................4-81
21. Shift lever ..........................................5-10
22. Passenger’s front air bag ..................3-49
23. Air vent..............................................4-65
24. Glove box ..........................................4-81
* : if equipped
OLM019002N
Page 104 of 382
421
Features of your vehicle
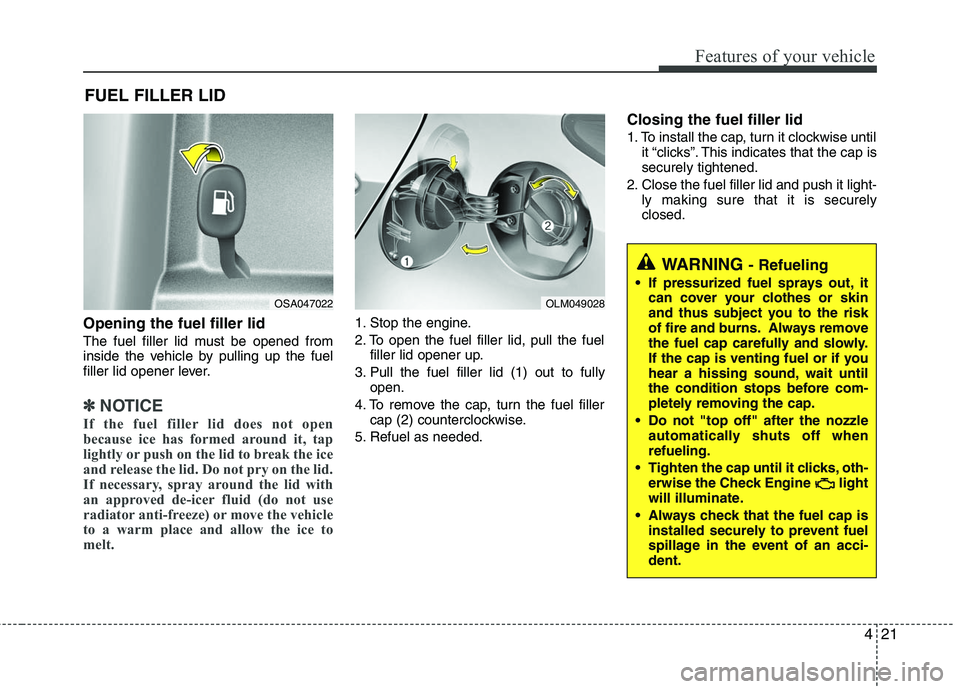
Opening the fuel filler lid
The fuel filler lid must be opened from
inside the vehicle by pulling up the fuel
filler lid opener lever.
✽ ✽NOTICE
If the fuel filler lid does not open
because ice has formed around it, tap
lightly or push on the lid to break the ice
and release the lid. Do not pry on the lid.
If necessary, spray around the lid with
an approved de-icer fluid (do not use
radiator anti-freeze) or move the vehicle
to a warm place and allow the ice to
melt.
1. Stop the engine.
2. To open the fuel filler lid, pull the fuel
filler lid opener up.
3. Pull the fuel filler lid (1) out to fully open.
4. To remove the cap, turn the fuel filler cap (2) counterclockwise.
5. Refuel as needed.
Closing the fuel filler lid
1. To install the cap, turn it clockwise until it “clicks”. This indicates that the cap is
securely tightened.
2. Close the fuel filler lid and push it light- ly making sure that it is securely
closed.
FUEL FILLER LID
OSA047022
OLM049028
WARNING - Refueling
If pressurized fuel sprays out, itcan cover your clothes or skin
and thus subject you to the risk
of fire and burns. Always remove
the fuel cap carefully and slowly.
If the cap is venting fuel or if you
hear a hissing sound, wait until
the condition stops before com-
pletely removing the cap.
Do not "top off" after the nozzle automatically shuts off when
refueling.
Tighten the cap until it clicks, oth- erwise the Check Engine light
will illuminate.
Always check that the fuel cap is installed securely to prevent fuel
spillage in the event of an acci-
dent.
Page 169 of 382
Features of your vehicle
86
4
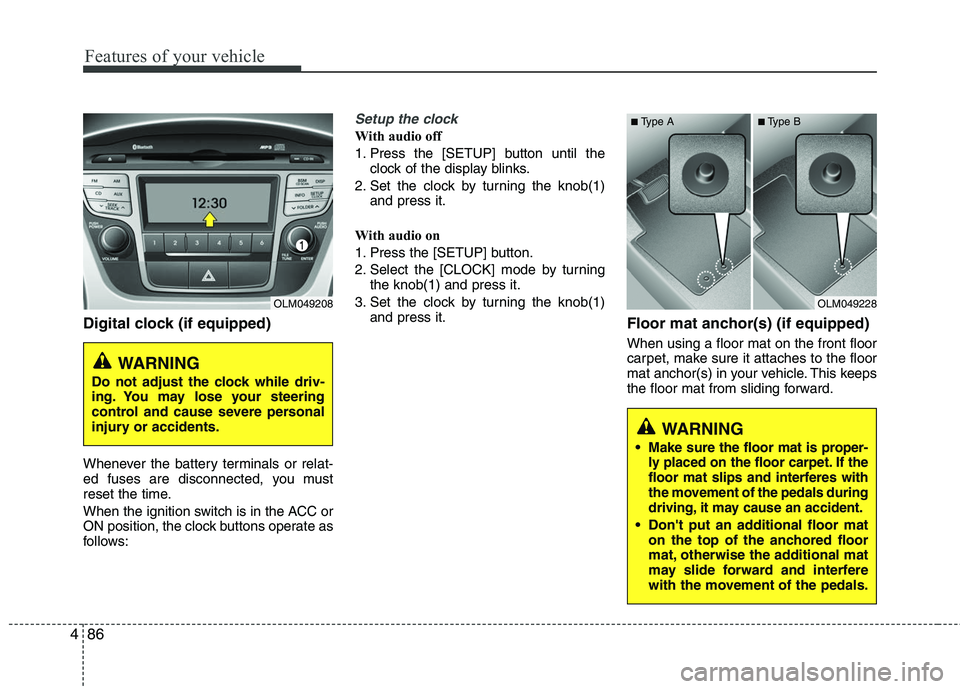
Digital clock (if equipped)
Whenever the battery terminals or relat-
ed fuses are disconnected, you must
reset the time.
When the ignition switch is in the ACC or
ON position, the clock buttons operate as
follows:
Setup the clock
With audio off
1. Press the [SETUP] button until the
clock of the display blinks.
2. Set the clock by turning the knob(1) and press it.
With audio on
1. Press the [SETUP] button.
2. Select the [CLOCK] mode by turning the knob(1) and press it.
3. Set the clock by turning the knob(1) and press it.
Floor mat anchor(s) (if equipped)
When using a floor mat on the front floor
carpet, make sure it attaches to the floor
mat anchor(s) in your vehicle. This keeps
the floor mat from sliding forward.
OLM049208
WARNING
Do not adjust the clock while driv-
ing. You may lose your steering
control and cause severe personal
injury or accidents.
OLM049228
WARNING
Make sure the floor mat is proper-
ly placed on the floor carpet. If the
floor mat slips and interferes with
the movement of the pedals during
driving, it may cause an accident.
Don't put an additional floor maton the top of the anchored floor
mat, otherwise the additional mat
may slide forward and interfere
with the movement of the pedals.
■Type A■Type B
Page 173 of 382
Features of your vehicle
90
4
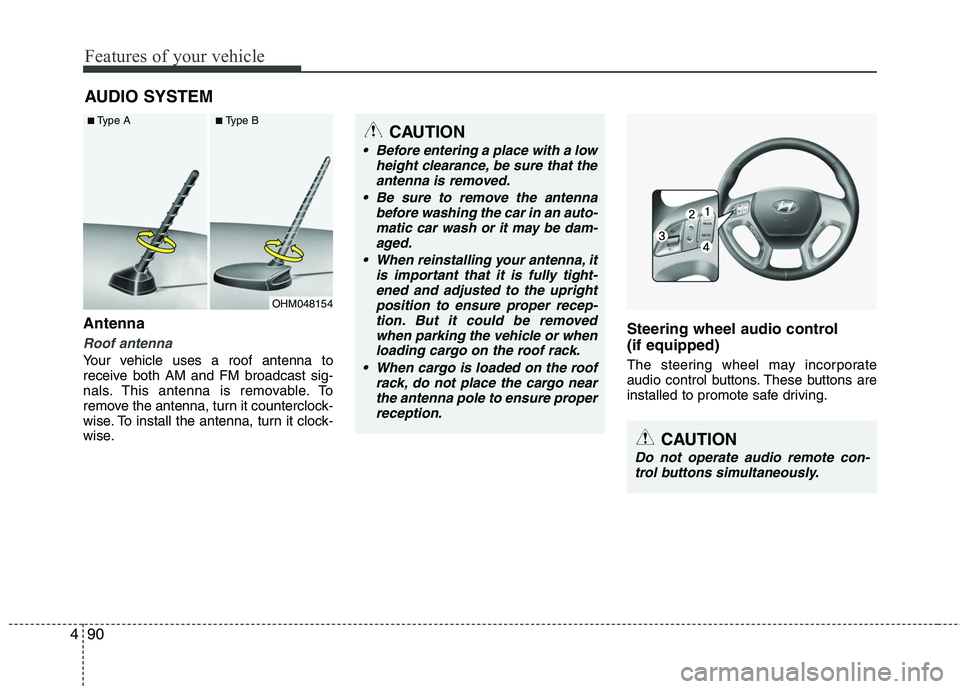
Antenna
Roof antenna
Your vehicle uses a roof antenna to
receive both AM and FM broadcast sig-
nals. This antenna is removable. To
remove the antenna, turn it counterclock-
wise. To install the antenna, turn it clock-
wise.
Steering wheel audio control
(if equipped)
The steering wheel may incorporate
audio control buttons. These buttons are
installed to promote safe driving.
AUDIO SYSTEM
OHM048154
■Type A■Type BCAUTION
• Before entering a place with a low
height clearance, be sure that theantenna is removed.
Be sure to remove the antenna before washing the car in an auto-matic car wash or it may be dam-aged.
When reinstalling your antenna, it is important that it is fully tight-ened and adjusted to the upright position to ensure proper recep-tion. But it could be removedwhen parking the vehicle or whenloading cargo on the roof rack.
When cargo is loaded on the roof rack, do not place the cargo nearthe antenna pole to ensure properreception.
CAUTION
Do not operate audio remote con-trol buttons simultaneously.
Page 180 of 382
![HYUNDAI TUCSON 2010 Owners Manual
497
Features of your vehicle
Using RADIO, SETUP, VOLUME
and AUDIO CONTROL
1. AM Selection Button
Pressing the [AM] button selects the AM
band. AM Mode is displayed on the LCD.
2. FM Selection Button HYUNDAI TUCSON 2010 Owners Manual
497
Features of your vehicle
Using RADIO, SETUP, VOLUME
and AUDIO CONTROL
1. AM Selection Button
Pressing the [AM] button selects the AM
band. AM Mode is displayed on the LCD.
2. FM Selection Button](/manual-img/35/56207/w960_56207-179.png)
497
Features of your vehicle
Using RADIO, SETUP, VOLUME
and AUDIO CONTROL
1. AM Selection Button
Pressing the [AM] button selects the AM
band. AM Mode is displayed on the LCD.
2. FM Selection Button Turns to FM mode and toggles FM1 and
FM2 when the button is pressed each
time.
3. Automatic Station Seek Button
When the [SEEK ] is pressed, it willautomatically tune to the next lower
station.
When the [SEEK ] is pressed, it will automatically tune to the next higher
station.
4. Power ON/OFF Button & Volume Control Knob
Turns the audio system on/off when
the ignition switch is on ACC or ON.
If the knob is turned clockwise/counter- clockwise, the volume will increase
/decrease.
5. Preset Selection Button
Press [1]~[6] buttons less than 0.8 sec-ond to play the station saved in each
button.
Press [1]~[6] b utton more than 0.8 sec-
ond or longer to save the current station
to the respective button with a beep.
6. SCAN Button
When the button is pressed, it auto- matically scans the radio stations
upwards.
The SCAN feature steps through each station, starting from the initial station,
for ten seconds.
Press the [SCAN] button again to stop the scan feature and to listen to the
currently selected channel.
7. DISP Button
Turn the LCD Display & Backlight on/off
when [DISP] button press.
8. SETUP Button
Press this Button to enter SETUP mode,
If no action is taken for 8 seconds, it will
return to previous mode.
In “SETUP” mode, rotate the TUNE knob
to move the cursor between items, and
push the TUNE knob to select.
Select whether long file names are
scrolled continuously (“ON”) or just once
(“OFF”).
Select this item to turn the SDVC(Speed
Dependent Volume Control) feature ON
or OFF. If it is turned ON, volume level is
adjusted automatically according to the
vehicle speed.
This function creates virtual sound
effects and allows adjustments to the
BASS level.
HIGH
➟MID ➟LOW ➟OFF
Select default display of XM mode.
“Category/Channel name” or “Artist/Song
Title” can be selected.
Page 181 of 382
![HYUNDAI TUCSON 2010 Owners Manual
Features of your vehicle
98
4
Select this item to enter BLUETOOTH
setup mode. Refer to “BLUETOOTH
PHONE OPERATION” section for
detailed information.
Press the [SETUP] button. Use the vol-
ume c HYUNDAI TUCSON 2010 Owners Manual
Features of your vehicle
98
4
Select this item to enter BLUETOOTH
setup mode. Refer to “BLUETOOTH
PHONE OPERATION” section for
detailed information.
Press the [SETUP] button. Use the vol-
ume c](/manual-img/35/56207/w960_56207-180.png)
Features of your vehicle
98
4
Select this item to enter BLUETOOTH
setup mode. Refer to “BLUETOOTH
PHONE OPERATION” section for
detailed information.
Press the [SETUP] button. Use the vol-
ume controller to adjust the clock in the
following order: CLOCK
ENTERhour or
minute.
Adjust the hour and press the [ENTER]
button to set. Use the same method to
adjust the minute and press the [ENTER]
button to complete and exit from clock
adjustment mode.
Pressing the [SETUP] button while in
POWER OFF screen will allow the user
to make immediately adjustments to the
clock.
9. TUNE Knob & Audio Control Knob
clock wise to increase or decrease from
current frequency.
(AM 10kHz, FM 200kHz)
Pressing the button changes the BASS,
MIDDLE, TREBLE, FADER and BAL-
ANCE TUNE mode. The mode selected
is shown on the display. After selecting
each mode, rotate the Audio control knob
clockwise or counterclockwise.
To increase the BASS, rotate the knob
clockwise, while to decrease the BASS,
rotate the knob counterclockwise.
To increase the MIDDLE, rotate the knob
clockwise, while to decrease the MID-
DLE, rotate the knob counterclockwise.
Control
To increase the TREBLE, rotate the knob
clockwise, while to decrease the TRE-
BLE, rotate the knob counterclockwise.
Turn the control knob clockwise to
emphasize rear speaker sound (front
speaker sound will be attenuated). When
the control knob is turned counterclock-
wise, front speaker sound will be empha-
sized (rear speaker sound will be attenu-
ated).
Rotate the knob clockwise to emphasize
right speaker sound (left speaker sound
will be attenuated). When the control
knob is turned counter clockwise, left
speaker sound will be emphasized (right
speaker sound will be attenuated).
Page 184 of 382
4101
Features of your vehicle
- MP3 CD : File Name, Title, Artist,Album, Folder, Total Files (Not dis-
played if the information is unavailable
on the CD or file.)
10. FOLDER Moving Button
Press [FOLDER ] button to move to child folder of the current folder and
display the first song in the folder.
Press TUNE/ ENTER knob to move to
the folder displayed. It will play the first
song in the folder.
Press [FOLDER ] button to move to parent folder of the current folder and
display the first song in the folder.
Press TUNE/ENTER knob to move to
the folder displayed.
11. SEARCH Knob & ENTER Button
Turn this knob clockwise to browse
songs after current song, or counter-
clockwise to browse songs before cur-
rent song. To play the displayed song,
press the knob.
Pressing this knob without turning enters to AUDIO CONTROL mode.
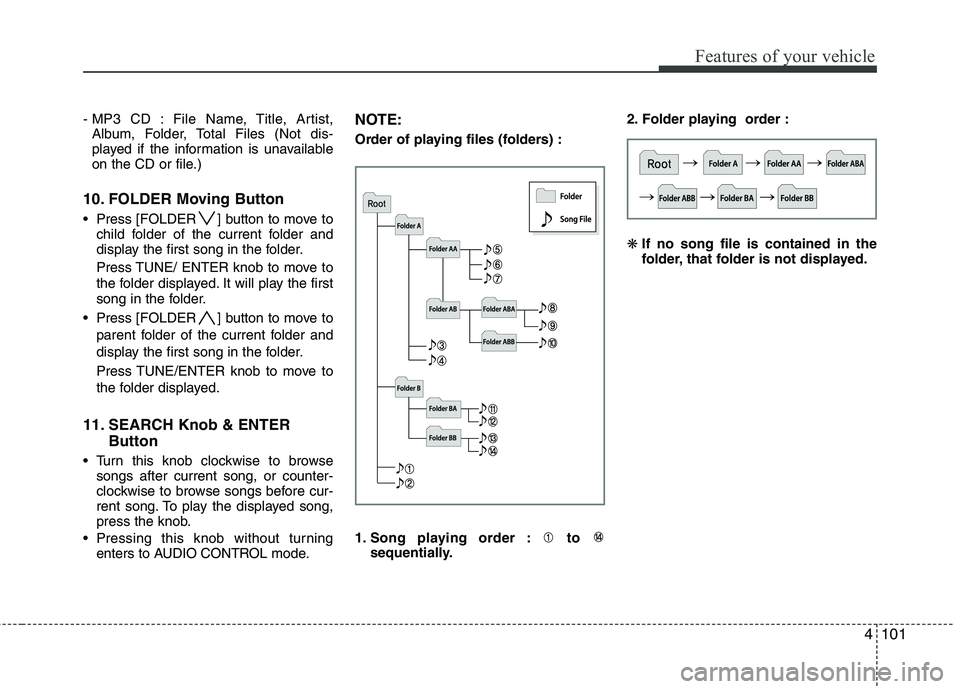
NOTE:
Order of playing files (folders) :
1. Song playing order : to sequentially. 2. Folder playing order :
❋
If no song file is contained in the
folder, that folder is not displayed.
Page 189 of 382
Features of your vehicle
106
4
8. SEARCH Knob & ENTER
Button
songs after current song, or counter
clockwise to browse songs before cur-
rent song. To play the displayed song,
press the knob.
enters to AUDIO CONTROL mode.
✽ ✽ NOTICE FOR USING iPod
DEVICE
• Some iPod models might not support the communication protocol and the
files will not be played. (iPod models
supported: Mini, 4G, Photo, Nano,
5G)
• The order of search or playback of songs in the iPod can be different
from the order searched in the audio
system.
• If the iPod crashes due to its own trou- ble, reset iPod. (Reset: Refer to iPod
manual)
• iPod may not operate normally on low battery.
(Continued)
When the iPod cable is connected, the system can be switched to theAUX mode even without the iPoddevice and can cause noise.Disconnect iPod cable when youare not using the iPod device.
When the iPod is not used at audio system, iPod cable has tobe separate from iPod device.Origin display of iPod may not bedisplayed.CAUTION IN USING
iPod DEVICE
You need the power cable exclu-
sive for iPod in order to operateiPod with the buttons on the audiosystem. The PC cable provided byApple may cause malfunction anddo not use it for vehicle use.
When connecting the device with iPod cable, push in the jack fullynot to interfere with communica-tion.
When adjusting the sound effects of iPod and the audio system, thesound effects of both devices willoverlap each and might causereduce or distort the quality of thesound.
Deactivate (turn off) the equalizer function of iPod when adjustingthe audio system’s volume, andturn off the equalizer of the audiosystem when using the equalizerof iPod.
(Continued)