2010 HYUNDAI TUCSON clock
[x] Cancel search: clockPage 324 of 382
Maintenance
36
7
Reset items
Items should be reset after the battery
has been discharged or the battery has
been disconnected.
Auto up/down window (See section 4)
Sunroof (See section 4)
Trip computer (See section 4)
Climate control system
(See section 4)
Clock (See section 4)
Audio (See section 4)(Continued)
Wear eye protection when check- ing the battery during charging.
Disconnect the battery charger in the following order.
1. Turn off the battery charger main switch.
2. Unhook the negative clamp from the negative battery terminal.
3. Unhook the positive clamp from the positive battery terminal.
WARNING
Before performing maintenanceor recharging the battery, turn off
all accessories and stop the
engine.
The negative battery cable must be removed first and installed
last when the battery is discon-
nected.
Page 340 of 382
Maintenance
52
7
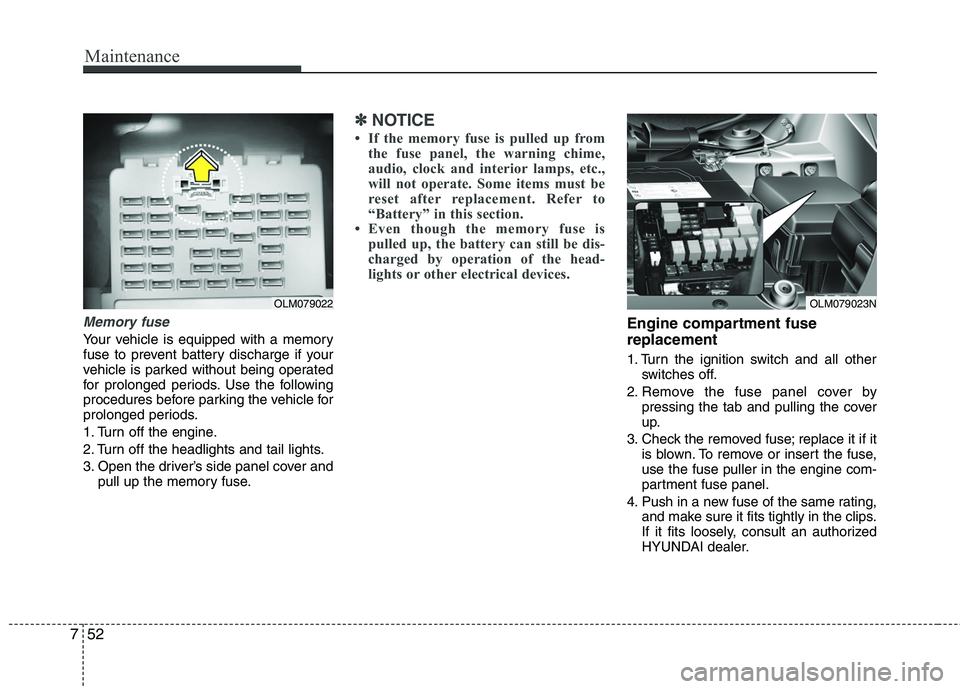
Memory fuse
Your vehicle is equipped with a memory
fuse to prevent battery discharge if your
vehicle is parked without being operated
for prolonged periods. Use the following
procedures before parking the vehicle for
prolonged periods.
1. Turn off the engine.
2. Turn off the headlights and tail lights.
3. Open the driver’s side panel cover and
pull up the memory fuse.
✽ ✽NOTICE
• If the memory fuse is pulled up from
the fuse panel, the warning chime,
audio, clock and interior lamps, etc.,
will not operate. Some items must be
reset after replacement. Refer to
“Battery” in this section.
• Even though the memory fuse is pulled up, the battery can still be dis-
charged by operation of the head-
lights or other electrical devices.
Engine compartment fuse
replacement
1. Turn the ignition switch and all other
switches off.
2. Remove the fuse panel cover by pressing the tab and pulling the cover
up.
3. Check the removed fuse; replace it if it is blown. To remove or insert the fuse,
use the fuse puller in the engine com-
partment fuse panel.
4. Push in a new fuse of the same rating, and make sure it fits tightly in the clips.
If it fits loosely, consult an authorized
HYUNDAI dealer.
OLM079023N
OLM079022
Page 348 of 382
Maintenance
60
7
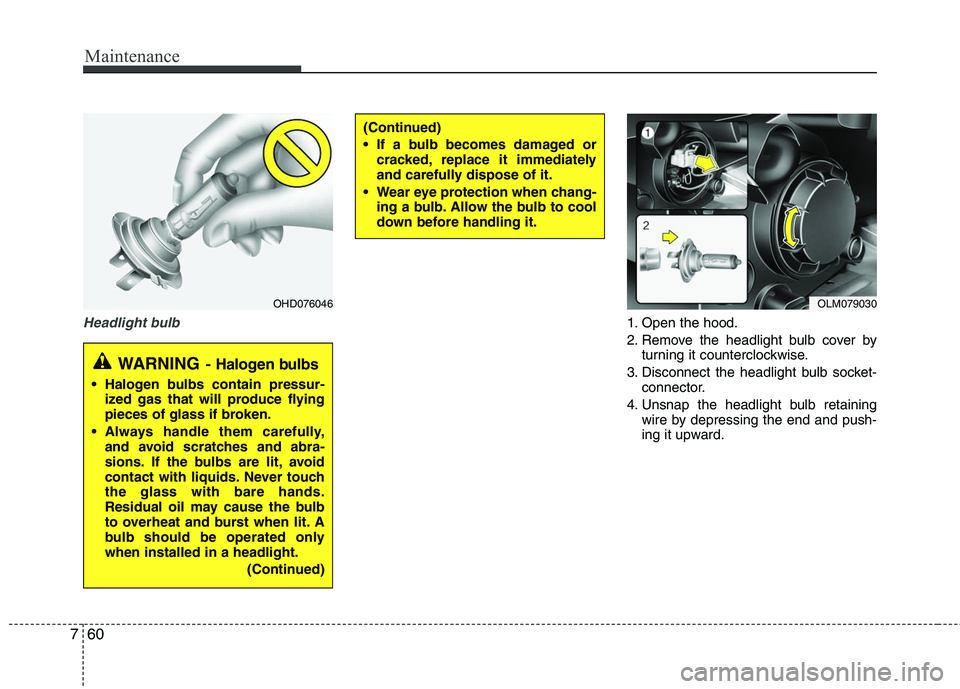
Headlight bulb1. Open the hood.
2. Remove the headlight bulb cover by
turning it counterclockwise.
3. Disconnect the headlight bulb socket- connector.
4. Unsnap the headlight bulb retaining wire by depressing the end and push-
ing it upward.
(Continued)
If a bulb becomes damaged orcracked, replace it immediately
and carefully dispose of it.
Wear eye protection when chang- ing a bulb. Allow the bulb to cool
down before handling it.
OHD076046
WARNING- Halogen bulbs
Halogen bulbs contain pressur-ized gas that will produce flying
pieces of glass if broken.
Always handle them carefully, and avoid scratches and abra-
sions. If the bulbs are lit, avoid
contact with liquids. Never touch
the glass with bare hands.
Residual oil may cause the bulb
to overheat and burst when lit. A
bulb should be operated only
when installed in a headlight.
(Continued)
OLM079030
Page 349 of 382
761
Maintenance
5. Remove the bulb from the headlightassembly.
6. Install a new headlight bulb and snap the headlight bulb retaining wire into
position by aligning the wire with the
groove on the bulb.
7. Connect the headlight bulb socket- connector.
8. Install the headlight bulb cover by turn- ing it clockwise.
Front fog light bulbs (if equipped)
If the light bulb is not operating, have the
vehicle checked by an authorized
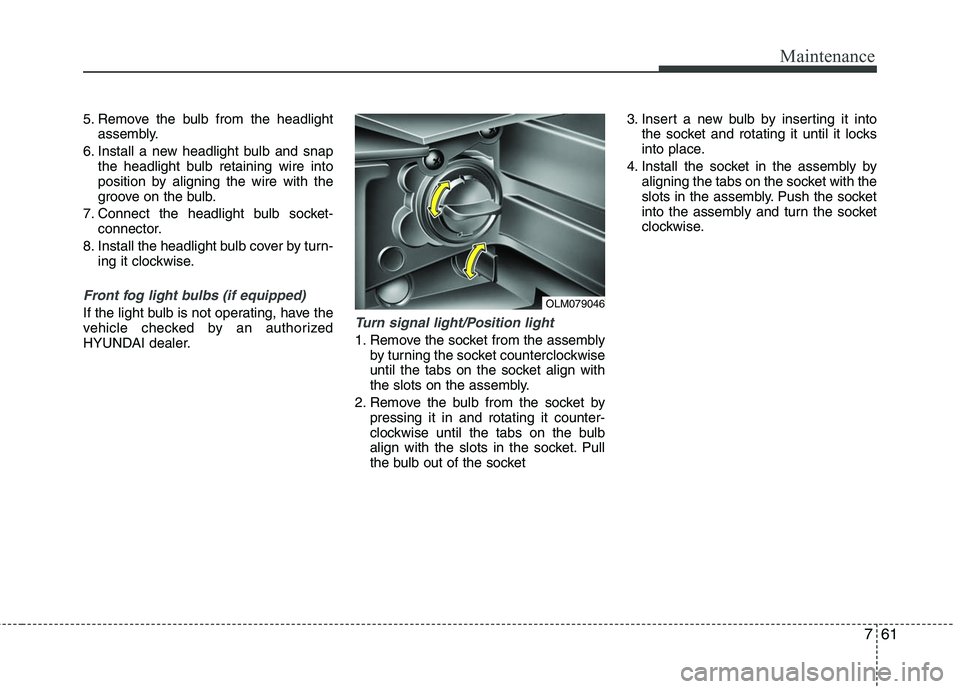
HYUNDAI dealer.Turn signal light/Position light
1. Remove the socket from the assemblyby turning the socket counterclockwise
until the tabs on the socket align with
the slots on the assembly.
2. Remove the bulb from the socket by pressing it in and rotating it counter-
clockwise until the tabs on the bulb
align with the slots in the socket. Pull
the bulb out of the socket 3. Insert a new bulb by inserting it into
the socket and rotating it until it locks
into place.
4. Install the socket in the assembly by aligning the tabs on the socket with the
slots in the assembly. Push the socket
into the assembly and turn the socket
clockwise.
OLM079046
Page 351 of 382
763
Maintenance
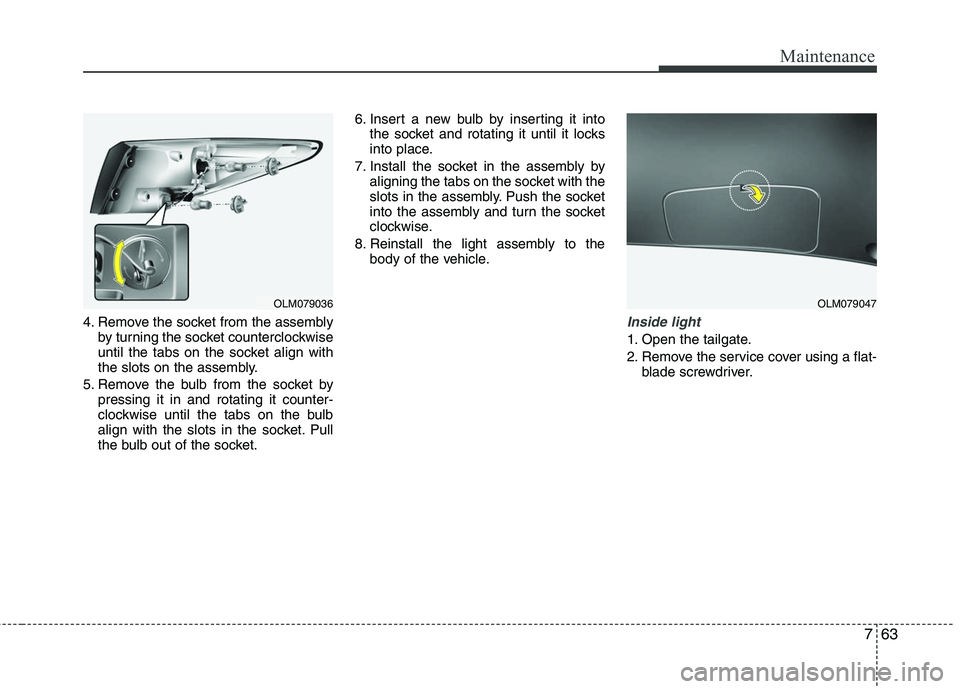
4. Remove the socket from the assemblyby turning the socket counterclockwise
until the tabs on the socket align with
the slots on the assembly.
5. Remove the bulb from the socket by pressing it in and rotating it counter-
clockwise until the tabs on the bulb
align with the slots in the socket. Pull
the bulb out of the socket. 6. Insert a new bulb by inserting it into
the socket and rotating it until it locks
into place.
7. Install the socket in the assembly by aligning the tabs on the socket with the
slots in the assembly. Push the socket
into the assembly and turn the socket
clockwise.
8. Reinstall the light assembly to the body of the vehicle.Inside light
1. Open the tailgate.
2. Remove the service cover using a flat-blade screwdriver.
OLM079036
OLM079047
Page 352 of 382
Maintenance
64
7
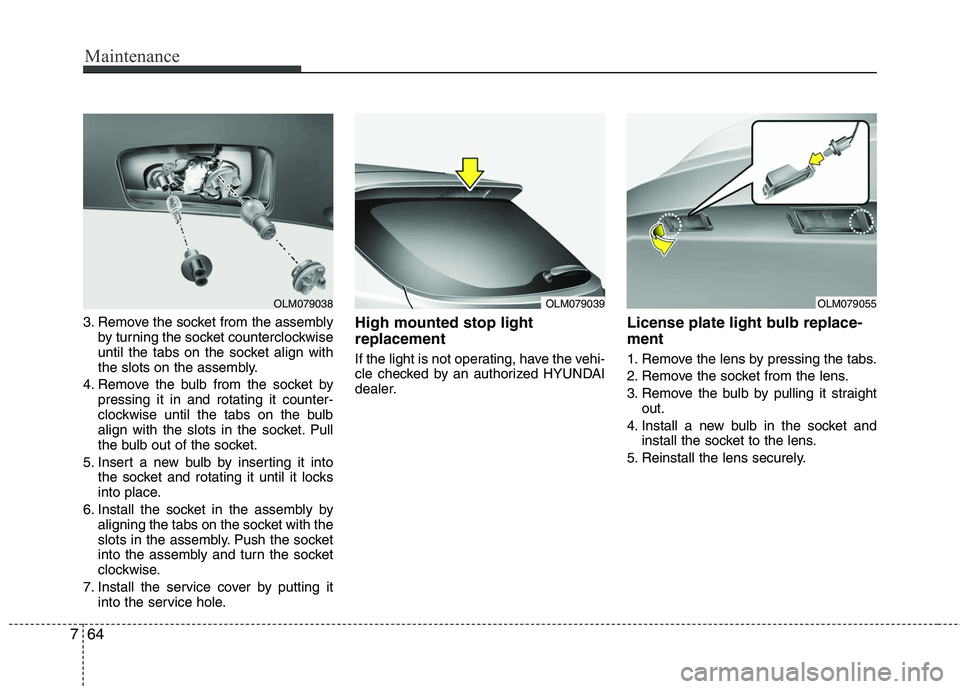
3. Remove the socket from the assembly
by turning the socket counterclockwise
until the tabs on the socket align with
the slots on the assembly.
4. Remove the bulb from the socket by pressing it in and rotating it counter-
clockwise until the tabs on the bulb
align with the slots in the socket. Pull
the bulb out of the socket.
5. Insert a new bulb by inserting it into the socket and rotating it until it locks
into place.
6. Install the socket in the assembly by aligning the tabs on the socket with the
slots in the assembly. Push the socket
into the assembly and turn the socket
clockwise.
7. Install the service cover by putting it into the service hole.High mounted stop light
replacement
If the light is not operating, have the vehi-
cle checked by an authorized HYUNDAI
dealer.
License plate light bulb replace-
ment
1. Remove the lens by pressing the tabs.
2. Remove the socket from the lens.
3. Remove the bulb by pulling it straightout.
4. Install a new bulb in the socket and install the socket to the lens.
5. Reinstall the lens securely.
OLM079038
OLM079039
OLM079055
Page 375 of 382
I3
Index
California Perchlorate Notice ··················\
··················\
····7-75
Capacities (Lubricants) ··················\
··················\
················8-4
Care Exterior care ··················\
··················\
··················\
··········7-66
Interior care ··················\
··················\
··················\
···········7-71
Tire care ··················\
··················\
··················\
·················7-37\
Cargo capacity ··················\
··················\
··················\
·········5-57
Cargo security screen··················\
··················\
·················4-87\
Cargo weight ··················\
··················\
··················\
············5-61
Center console storage ··················\
··················\
···············4-81
Central door lock switch··················\
··················\
············4-10
Certification label ··················\
··················\
··················\
····5-59
Changing a tire with TPMS ··················\
··················\
·······6-10
Changing tires ··················\
··················\
··················\
··········6-13
Chains Safety chains··················\
··················\
··················\
··········5-51
Tire chains ··················\
··················\
··················\
·············7-49
Tire chains ··················\
··················\
··················\
·············5-47
Checking tire inflation pressure··················\
··················\
·7-38
Child restraint system ··················\
··················\
················3-30 Auto lock mode (Passenger seat belt) ··················\
·······3-33
Tether anchor system ··················\
··················\
···············3-35
Lower anchor system··················\
··················\
···············3-36
Child-protector rear door lock ··················\
··················\
···4-12
Climate control system (Automatic) ··················\
···········4-71 Air conditioning ··················\
··················\
··················\
····4-77 Automatic heating and air conditioning ··················\
····4-72
Manual heating and air conditioning··················\
·········4-73
Climate control system (Manual) ··················\
···············4-62 Air conditioning ··················\
··················\
··················\
····4-67
Heating and air conditioning ··················\
··················\
···4-63
Cigarette lighter ··················\
··················\
··················\
·······4-83
Climate control air filter ··················\
··················\
············4-69
Climate control air filter ··················\
··················\
············7-29
Clock (Digital) ··················\
··················\
··················\
·········4-86
Combined instrument, see instrument cluster ···············4-33
Compact spare tire ··················\
··················\
··················\
···6-18
Compact spare tire replacement ··················\
··················\
7-42
Consumer information ··················\
··················\
·················8-8
Coolant ··················\
··················\
··················\
··················\
···7-22
Cooling fluid, see engine coolant ··················\
················7-22
Crankcase emission control system ··················\
·············7-72
Cruise control system ··················\
··················\
················5-36
Cup holder ··················\
··················\
··················\
···············4-84
Curtain air bag ··················\
··················\
··················\
·········3-55
Dashboard, see instrument cluster ··················\
···············4-33
Dashboard illumination, see instrument panel illumination ··················\
·············4-34
Defogging (Windshield) ··················\
··················\
············4-78
Defogging logic (Windshield) ··················\
··················\
···4-80
Defroster (Rear window) ··················\
··················\
···········4-60
Defrosting (Windshield) ··················\
··················\
············4-78
C
D
Page 376 of 382
Index
4I
Digital clock··················\
··················\
··················\
·············4-86
Dimensions ··················\
··················\
··················\
················8-2
Displays, see instrument cluster ··················\
··················\
4-33
Display illumination, see instrument panel illumination···4-34
Door locks··················\
··················\
··················\
··················\
4-9
Central door lock switch ··················\
··················\
·········4-10
Child-protector rear door lock ··················\
··················\
·4-12
Drinks holders, see cup holders··················\
··················\
·4-84
Driver's air bag··················\
··················\
··················\
·········3-49
Driving at night ··················\
··················\
··················\
········5-43
Driving in flooded areas ··················\
··················\
············5-44
Driving in the rain··················\
··················\
··················\
····5-44
Economical operation ··················\
··················\
················5-40
Electric chromic mirror (ECM) ··················\
··················\
·4-30
Electronic power steering ··················\
··················\
·········4-28
Emergency starting ··················\
··················\
··················\
····6-4 Jump starting ··················\
··················\
··················\
···········6-4
Push starting ··················\
··················\
··················\
············6-5
Emergency tailgate safety release··················\
················4-14
Emergency towing ··················\
··················\
··················\
···6-21
Emergency while driving ··················\
··················\
·············6-2
Emission control system ··················\
··················\
············7-72 Crankcase emission control system··················\
···········7-72
Evaporative emission control (including ORVR) System ··················\
··················\
··················\
·················7-72\
Exhaust emission control system ··················\
··············7-73 Engine compartment ··················\
··················\
············2-4, 7-2
Engine coolant ··················\
··················\
··················\
·········7-22
Engine number ··················\
··················\
··················\
···········8-7
Engine oil ··················\
··················\
··················\
·················7-21\
Engine overheats ··················\
··················\
··················\
········6-6
Engine temperature gauge ··················\
··················\
·········4-35
Engine will not start··················\
··················\
··················\
···6-3
Evaporative emission control (including ORVR) System ··
7-72
Exhaust emission control system··················\
·················7-73\
Explanation of scheduled maintenance items ···············7-18
Exterior care··················\
··················\
··················\
·············7-66
Exterior features··················\
··················\
··················\
·······4-89 Roof rack ··················\
··················\
··················\
···············4-89
Flat tire ··················\
··················\
··················\
··················\
···6-12 Changing tires··················\
··················\
··················\
········6-13
Compact spare tire ··················\
··················\
··················\
·6-18
Jack and tools ··················\
··················\
··················\
········6-12
Removing and storing the spare tire···········\
·················6-13\
Floor mat anchor(s) ··················\
··················\
··················\
·4-86
Fluid Washer fluid··················\
··················\
··················\
···········7-26
Brakes/clutch fluid··················\
··················\
··················\
·7-25
Folding the rear seat ··················\
··················\
··················\
3-13
Four wheel drive (4WD), See all wheel drive (AWD) ··5-17
Front fog light bulb replacement ··················\
·················7-61\
Front seat adjustment - manual ··················\
··················\
···3-5
E
F