2010 Hyundai Sonata ESP
[x] Cancel search: ESPPage 17 of 285

1FEATURES OF YOUR HYUNDAI4
DOOR LOCKS!
B040A01A-AAT B030C01JM-AAT
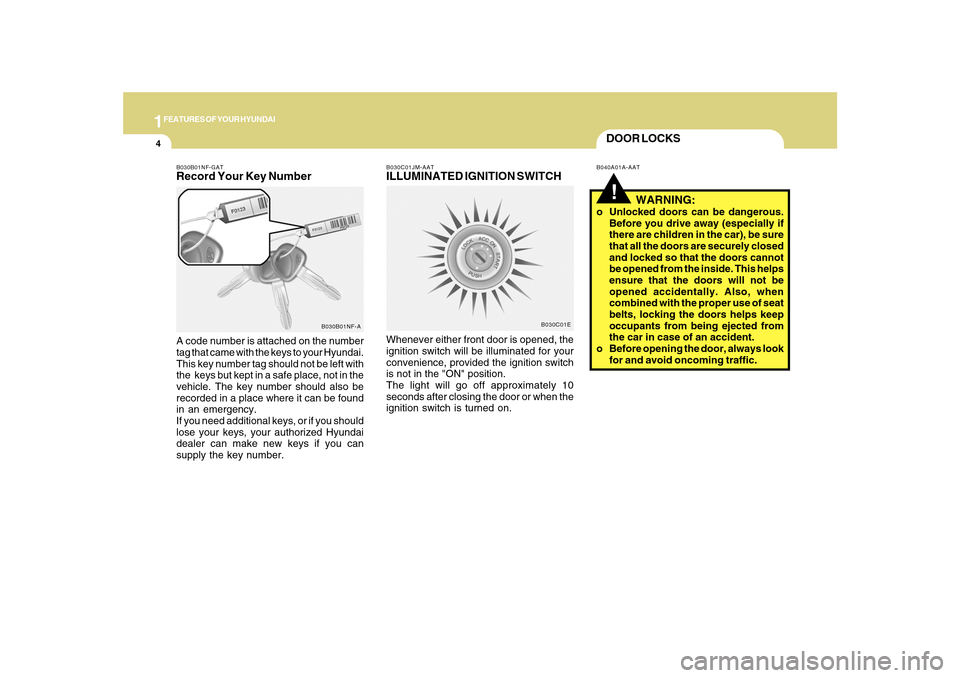
ILLUMINATED IGNITION SWITCHWhenever either front door is opened, the
ignition switch will be illuminated for your
convenience, provided the ignition switch
is not in the "ON" position.
The light will go off approximately 10
seconds after closing the door or when the
ignition switch is turned on.
WARNING:
o Unlocked doors can be dangerous.
Before you drive away (especially if
there are children in the car), be sure
that all the doors are securely closed
and locked so that the doors cannot
be opened from the inside. This helps
ensure that the doors will not be
opened accidentally. Also, when
combined with the proper use of seat
belts, locking the doors helps keep
occupants from being ejected from
the car in case of an accident.
o Before opening the door, always look
for and avoid oncoming traffic.
B030B01NF-GATRecord Your Key NumberA code number is attached on the number
tag that came with the keys to your Hyundai.
This key number tag should not be left with
the keys but kept in a safe place, not in the
vehicle. The key number should also be
recorded in a place where it can be found
in an emergency.
If you need additional keys, or if you should
lose your keys, your authorized Hyundai
dealer can make new keys if you can
supply the key number.
B030B01NF-A
B030C01E
Page 20 of 285

1
FEATURES OF YOUR HYUNDAI
7
!
WARNING:
Be careful not to pull the inside door
handle while driving. If you pull the inside
door handle, the door can be opened and
you may be ejected from the vehicle and
can be injured or killed. o The driver's and front passenger's
doors can be opened by pulling the
inside door handle even if the front
portion of the driver's or front
passenger's central door locking
switch has been depressed to lock
the doors.
o If the door is locked/unlocked mul-
tiple times in rapid succession with
either the vehicle key or door lock
switch, the system may stop operat-
ing temporarily in order to protect the
circuit and prevent damage to sys-
tem components.
D050400ANFAuto door lock/unlock feature
(If Installed)o All doors will be automatically locked
when shifting the transaxle shift lever
out of P(Park).
o All doors will be automatically unlocked
when shifting the transaxle shift lever
into P(Park).NOTE:An authorized Hyundai dealer can acti-
vate or deactivate the auto door lock/
unlock features.
If you want to activate or deactivate the
auto door lock/unlock features, consult
an authorized Hyundai dealer.
B070F02NF-AATKEYLESS ENTRY SYSTEM
CAUTION:Changes or modifications not expressly
approved by the party responsible for
compliance could void the user's
authority to operate the equipment.
!
ONF048011L
NOTE:This device complies with Part 15 of the
FCC rules. Operation is subject to the
following two conditions:
(1) This device may not cause harmful
interference, and (2) this device must
accept any interference received,
including interference that may cause
undesired operation.
Page 90 of 285

1
FEATURES OF YOUR HYUNDAI
77
!
WARNING:
To avoid the possibility of injury in case
of an accident or a sudden stop, the
center console box lid should be kept
closed when the car is in motion.
OUTSIDE REARVIEW MIRRORB510B01Y-AATElectric TypeThe outside rearview mirrors can be
adjusted to your preferred rear vision, both
directly behind the vehicle, and to the rear
of the left and right sides.
The remote control outside rearview mirror
switch controls the adjustments for both
right and left outside mirrors.To adjust the position of either
mirror:1. Move the selecting switch (1) to the right
or left to activate the adjustable
mechanism for the corresponding door
mirror.
2. Adjust mirror angle by depressing the
appropriate perimeter switch as
illustrated.
ONF048035L
!
CAUTION:
o Do not operate the switch continu-
ously for an unnecessary length of
time.
o Scraping ice from the mirror face
could cause permanent damage. To
remove any ice, use a sponge, soft
cloth or approved de-icer.
!
WARNING:
Be careful when judging the size or dis-
tance of any object seen in the passen-
ger side rearview mirror. It is a convex
mirror with a curved surface, and any
objects seen in this mirror are closer
than they appear. The center console box is used for storing
cassette tapes or small articles.
To use the center console box, pull up the
handle and lift the lid as shown.
CENTER CONSOLE
COMPARTMENTB505A01NF-GATCenter Console Box
ONF048098
Page 97 of 285

1FEATURES OF YOUR HYUNDAI84
!
handheld transmitter every two seconds
until the frequency signal has been learned.
The indicator light will flash slowly and
then rapidly after several seconds upon
successful training.
Operating HomeLink
®
To operate, simply press and release the
programmed HomeLink
® button. Activation
will now occur for the trained device (i.e.
garage door opener, gate operator, security
system, entry door lock, home/office
lighting, etc.). For convenience, the hand-
held transmitter of the device may also be
used at any time.
Reprogramming a Single HomeLink
® But-
ton
To program a new device to a previously
trained HomeLink
® button, follow these
steps:
1. Press and hold the desired HomeLink
®
button. Do NOT release until step 4 has
been completed.
2. When the indicator light begins to flash
slowly (after 20 seconds), position the
handheld transmitter 1 to 3 inches away
from the HomeLink
® surface.
3. Press and hold the handheld transmitter
button. The HomeLink
® indicator light
will flash, first slowly and then rapidly.4. When the indicator light begins to flash
rapidly, release both buttons.
5. Press and hold the just-trained
HomeLink
® button and observe the red
Status Indicator LED. If the indicator
light stays on constantly, programming
is complete and your new device should
activate.
Erasing HomeLink
® Buttons
Individual buttons cannot be erased.
However, to erase all three programmed
buttons:
1. Press and hold the two outer HomeLink
®
buttons until the indicator light begins to
flash-after 20 seconds.
2. Release both buttons. Do not hold for
longer than 30 seconds.
The Integrated HomeLink
® Wireless
Control System is now in the training (learn)
mode and can be programmed at any time
following the appropriate steps in the
Programming sections above.
FCC ID: NZLZTVHL3
IC: 4112A-ZTVHL3This device complies with Part 15 of the
FCC Rules. Operation is subject to the
following two conditions: (1) this device
may not cause harmful interference, and
(2) this device must accept any interfer-
ence received, including interference that
may cause undesired operation.
WARNING:
The transceiver has been tested and
complies with FCC and Industry Canada
rules. Changes or modifications not
expressly approved by the party
responsible for compliance could void
the user's authority to operate the
device.
NVS
® is a registered trademark and Z-
Nav™ is a trademark of the Gentex
Corporation, Zeeland, Michigan.
HomeLink
® is a registered trademark
owned by Johnson Controls, Incorporated,
Milwaukee, Wisconsin.
Page 129 of 285

1FEATURES OF YOUR HYUNDAI
116
PA710SB01NF-AAT1. FM Selection ButtonTurns to FM mode and toggles FM1 and
FM2 when the button is pressed each time.2. AM Selection ButtonTurns to AM mode, selects the AM.3. XM Selection ButtonTurns to XM mode, and toggles in the order
of XM1➟XM2➟XM3➟···➟XM1··· when the
button is pressed each time.4. CD/AUX Selection ButtonIf there is a CD in the CDP DECK it turns to
CD mode, and if a device is connected to
AUX then it toggles.
CD➟AUX➟CD··· when the button is
pressed each time.(It will not turn to AUX if
the auxiliary device is not connected)
5. Automatic Channel Selection
Buttono When the [SEEK
]button is pressed,
it reduces the band frequency by 200khz
to automatically select channel. Stops
at the previous frequency if no channel
is found.
o When the [SEEK ]button is pressed,
it increases the band frequency by
200khz to automatically select chan-
nel. Stops at the previous frequency if
no channel is found.
6. Power ON/OFF & Volume Control
ButtonTurns the set on/off when the IGNITION
SWITCH is on ACC or ON. If the button is
turned to the right, it increases the volume
and left, decreases the volume.7. SCAN ButtonIf this button is pressed, the frequencies
will increase and receive the correspond-
ing broadcasts.
This function will play the frequencies for
5 seconds (XM mode : 10 seconds) each
and find other broadcasts as the frequency
increases.
Press the button again when desiring to
continue listening to the currently playing
broadcast.
8. MUTE ButtonPress to temporarily cut off the Sound.9. Information Display ButtonInformation Display function operation (In-
formation is displayed each time (the) Key
is pressed) : Pressing the Category/
Channel➟ Artist Name/Song
Title➟Category/Channel... for 3 seconds
will display the corresponding text then
become restored.
Text Scroll operation
After pressing (the) Key, if the text to be
displayed is longer than the LCD text line,
then rotating the Tune Knob will operate
the Page up function displaying 16(Max.
characters) characters for 3 seconds each
dispalys.10. SET UP ButtonPress this button to turn to the XM option,
TEXT SCROLL, AVC and adjustment
mode.
If no action is taken for 5 seconds after
pressing the button, it will return to the play
mode.(After entering SET UP mode, move
between items using the left, right and
PUSH functions of the TUNE button.)
The set up item changes from TEXT
SCROLL ➟AVC➟XM...
Page 130 of 285

1
FEATURES OF YOUR HYUNDAI
117
11. TUNE/ENTER ButtonTurn this button clockwise by one notch to
increase frequency by 200Khz from cur-
rent frequency.
Turn this button counterclockwise by one
notch to decrease frequency by 200Khz
from current frequency.
Press this button while holding SET UP
button to activate / inactivate the item.
Select SET UP item using left and right
function of the Tune button.
Pressing the button changes the BASS,
MIDDLE, TREBLE, FADER and BALANCE
TUNE mode.
The mode selected is shown on the dis-
play.
After selecting each mode, rotate the Au-
dio control knob clockwise or counter-
clockwise.
o BASS Control
To increase the BASS, rotate the knob
clockwise, while to decrease the BASS,
rotate the knob counterclockwise.
o MIDDLE Control
To increase the MIDDLE, rotate the knob
clockwise, while to decrease the MIDDLE,
rotate the knob counterclockwise.o TREBLE Control
To increase the TREBLE, rotate the knob
clockwise, while to decrease the TREBLE,
rotate the knob counterclockwise.
o FADER Control
Turn the control knob clockwise to empha-
size rear speaker sound (front speaker
sound will be attenuated). When the con-
trol knob is turned counterclockwise, front
speaker sound will be emphasized (rear
speaker sound will be attenuated).
o BALANCE Control
Rotate the knob clockwise to emphasize
right speaker sound (left speaker sound
will be attenuated). When the control knob
is turned counter clockwise, left speaker
sound will be emphasized (right speaker
sound will be attenuated).
12. CAT(FLDR) ButtonMoves [CAT
] button when Category Up
search operation.
o Category is moved Up from the cat-
egory currently being received and
Category Name becomes displayed.
o If the Enter Key is not pressed within 5
seconds, then the previous mode will
be restored.o If the Key is pressed while in the last
Category, then the first category will
become displayed and operation will
be repeated.
o Corresponding category can be se-
lected by pressing ENTER.
Moves [CAT
] button when Category
Down search operation.
o Category is moved Down from the cat-
egory currently being received and
Category Name becomes displayed.
o If the Enter Key is not pressed within 5
seconds, then the previous mode will
be restored.
o If the [CAT ] Key is pressed while in
the first Category, then the last category
will become displayed and operation
will be repeated.
o Corresponding category can be se-
lected by pressing ENTER.
13. Pre-set ButtonPush [1]~[6] buttons less than 0.8 seconds
to play the channel saved in each button.
Push pre-set button for 0.8 seconds or
longer to save current channel to the re-
spective button with a beep.
Page 142 of 285

1
FEATURES OF YOUR HYUNDAI
129
PA760SB01NF-AAT1. FM Selection ButtonTurns to FM mode and toggles FM1 and
FM2 when the button is pressed each time.2. AM Selection ButtonTurns to AM mode, selects the AM.3. XM Selection ButtonTurns to XM mode, and toggles in the order
of XM1➟XM2➟XM3➟···➟XM1··· when the
button is pressed each time.4. CD/AUX Selection ButtonIf there is a CD in the CDP DECK it turns to
CD mode, and if a device is connected to
AUX then it toggles.
CD➟AUX➟CD··· when the button is
pressed each time.(It will not turn to AUX if
the auxiliary device is not connected)5. Automatic Channel Selection
Buttono When the [SEEK
]button is pressed,
it reduces the band frequency by 200khz
to automatically select channel. Stops
at the previous frequency if no channel
is found.o When the [SEEK
]button is pressed,
it increases the band frequency by
200khz to automatically select chan-
nel.
Stops at the previous frequency if no chan-
nel is found.
6. Power ON/OFF & Volume Control
ButtonTurns the set on/off when the IGNITION
SWITCH is on ACC or ON. If the button is
turned to the right, it increases the volume
and left, decreases the volume.7. SCAN ButtonIf this button is pressed, the frequencies
will increase and receive the correspond-
ing broadcasts.
This function will play the frequencies for
5 seconds (XM mode : 10 seconds) each
and find other broadcasts as the frequency
increases.
Press the button again when desiring to
continue listening to the currently playing
broadcast.8. MUTE ButtonPress to temporarily cut off the Sound.
9. Information Display ButtonInformation Display function operation (In-
formation is displayed each time (the) Key
is pressed) : Pressing the Category/
Channel➟ Artist Name/Song
Title➟Category/Channel... for 3 seconds
will display the corresponding text then
become restored.
Text Scroll operation
After pressing (the) Key, if the text to be
displayed is longer than the LCD text line,
then rotating the Tune Knob will operate
the Page up function displaying 16(Max.
characters) characters for 3 seconds each
dispalys.10. SET UP ButtonPress this button to turn to the XM option,
TEXT SCROLL, AVC and adjustment
mode.
If no action is taken for 5 seconds after
pressing the button, it will return to the play
mode.(After entering SET UP mode, move
between items using the left, right and
PUSH functions of the TUNE button.)
The set up item changes from TEXT
SCROLL ➟AVC➟XM...
.
Page 143 of 285

1FEATURES OF YOUR HYUNDAI
130
11. TUNE/ENTER ButtonTurn this button clockwise by one notch to
increase frequency by 200Khz from cur-
rent frequency.
Turn this button counterclockwise by one
notch to decrease frequency by 200Khz
from current frequency.
Press this button while holding SET UP
button to activate / inactivate the item to
select.
Select SET UP item using left and right
function of the Tune button.
Pressing the button changes the BASS,
MIDDLE, TREBLE, FADER and BALANCE
TUNE mode.
The mode selected is shown on the dis-
play.
After selecting each mode, rotate the Au-
dio control knob clockwise or counter-
clockwise.
o BASS Control
To increase the BASS, rotate the knob
clockwise, while to decrease the BASS,
rotate the knob counterclockwise.
o MIDDLE Control
To increase the MIDDLE, rotate the knob
clockwise, while to decrease the MIDDLE,
rotate the knob counterclockwise.o TREBLE Control
To increase the TREBLE, rotate the knob
clockwise, while to decrease the TREBLE,
rotate the knob counterclockwise.
o FADER Control
Turn the control knob clockwise to empha-
size rear speaker sound (front speaker
sound will be attenuated). When the con-
trol knob is turned counterclockwise, front
speaker sound will be emphasized (rear
speaker sound will be attenuated).
o BALANCE Control
Rotate the knob clockwise to emphasize
right speaker sound (left speaker sound
will be attenuated). When the control knob
is turned counter clockwise, left speaker
sound will be emphasized (right speaker
sound will be attenuated).
12. CAT(FLDR) ButtonMoves [CAT
] button when Category Up
search operation.
o Category is moved Up from the cat-
egory currently being received and
Category Name becomes displayed.
o If the Enter Key is not pressed within 5
seconds, then the previous mode will
be restored.o If the Key is pressed while in the last
Category, then the first category will
become displayed and operation will
be repeated.
o Corresponding category can be se-
lected by pressing ENTER.
Moves [CAT
] button when Category
Down search operation.
o Category is moved Down from the cat-
egory currently being received and
Category Name becomes displayed.
o If the Enter Key is not pressed within 5
seconds, then the previous mode will
be restored.
o If the [CAT ] Key is pressed while in
the first Category, then the last category
will become displayed and operation
will be repeated.
o Corresponding category can be se-
lected by pressing ENTER.
13. Pre-set ButtonPush [1]~[6] buttons less than 0.8 seconds
to play the channel saved in each button.
Push pre-set button for 0.8 seconds or
longer to save current channel to the re-
spective button with a beep.