2010 Hyundai Sonata lights
[x] Cancel search: lightsPage 176 of 285

2
DRIVING YOUR HYUNDAI
23
8. When parking your car and trailer, es-
pecially on a hill, be sure to follow all
the normal precautions. Turn your front
wheel into the curb, set the parking
brake firmly, and put the transaxle in 1st
or Reverse (manual) or Park (automatic).
In addition, place wheel chocks at each
of the trailer's tires.
9. If the trailer has electric brakes, start
your vehicle and trailer moving, and
then apply the trailer brake controller by
hand to be sure the brakes are working.
This lets you check your electrical
connection at the same time.
10. During your trip, check occasionally to
be sure that the load is secure, and that
the lights and any trailer brakes are still
working.
11. Avoid jerky starts, sudden acceleration
or sudden stops.
12. Avoid sharp turns and rapid lane
changes.
13. Avoid holding the brake pedal down
too long or too frequently. This could
cause the brakes to overheat, resulting
in reduced braking efficiency.
14. When going down a hill, shift into a
lower gear and use the engine braking
effect.
When ascending a long grade, down-
shift the transaxle to a lower gear and
reduce speed to reduce chances of
engine overloading and/or overheat-
ing.
CAUTION:
If overheating should occur when tow-
ing, (the temperature gauge reads near
red zone), taking the following action
may reduce or eliminate the problem.
1. Turn off the air conditioner.
2. Reduce highway speed.
3. Select a lower gear when going uphill.
4. While in stop and go traffic, place the
gear selector in park or neutral and
idle the engine at a higher speed.
!
15. If you have to stop while going uphill,
do not hold the vehicle in place by
pressing on the accelerator. This can
cause the automatic transaxle to over-
heat. Use the parking brake or
footbrake.NOTE:When towing check transaxle fluid more
frequently.
Page 184 of 285
3
WHAT TO DO IN AN EMERGENCY
3
JUMP STARTING!
o If you should accidentally get acid on
your skin or in your eyes, immediately
remove any contaminated clothing and
flush the area with clean water for at
least 15 minutes. Then promptly obtain
medical attention. If you must be trans-
ported to an emergency facility, continue
to apply water to the affected area with
a sponge or cloth.
o The gas produced by the battery during
the jump-start operation is highly
explosive. Do not smoke or allow a
spark or an open flame in the vicinity.
o The battery being used to provide the
jump start must be 12-volt. If you cannot
determine that it is a 12-volt battery, do
not attempt to use it for the jump start.
o To jump start a car with a discharged
battery, follow this procedure exactly:
1. If the booster battery is installed in
another vehicle, be sure the two vehicles
are not touching.
2. Turn off all unnecessary lights and
acces-sories in both vehicles.
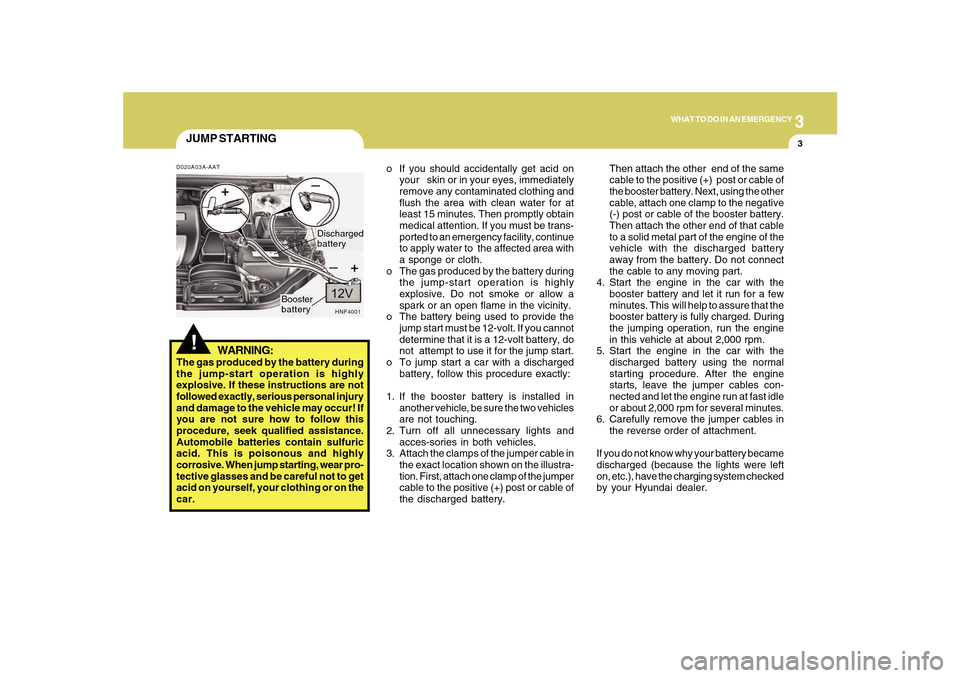
3. Attach the clamps of the jumper cable in
the exact location shown on the illustra-
tion. First, attach one clamp of the jumper
cable to the positive (+) post or cable of
the discharged battery.Then attach the other end of the same
cable to the positive (+) post or cable of
the booster battery. Next, using the other
cable, attach one clamp to the negative
(-) post or cable of the booster battery.
Then attach the other end of that cable
to a solid metal part of the engine of the
vehicle with the discharged battery
away from the battery. Do not connect
the cable to any moving part.
4. Start the engine in the car with the
booster battery and let it run for a few
minutes. This will help to assure that the
booster battery is fully charged. During
the jumping operation, run the engine
in this vehicle at about 2,000 rpm.
5. Start the engine in the car with the
discharged battery using the normal
starting procedure. After the engine
starts, leave the jumper cables con-
nected and let the engine run at fast idle
or about 2,000 rpm for several minutes.
6. Carefully remove the jumper cables in
the reverse order of attachment.
If you do not know why your battery became
discharged (because the lights were left
on, etc.), have the charging system checked
by your Hyundai dealer.
D020A03A-AAT
WARNING:
The gas produced by the battery during
the jump-start operation is highly
explosive. If these instructions are not
followed exactly, serious personal injury
and damage to the vehicle may occur! If
you are not sure how to follow this
procedure, seek qualified assistance.
Automobile batteries contain sulfuric
acid. This is poisonous and highly
corrosive. When jump starting, wear pro-
tective glasses and be careful not to get
acid on yourself, your clothing or on the
car.
HNF4001
Booster
batteryDischarged
battery
Page 218 of 285
6
DO-IT-YOURSELF MAINTENANCE
4
G020C01A-AATVehicle InteriorThe following should be checked each
time when the vehicle is driven:
o Lights operation
o Windshield wiper operation
o Horn operation
o Defroster, heating system operation
(and air conditioning, if installed)
o Steering operation and condition
o Mirror condition and operation
o Turn signal operation
o Accelerator pedal operation
o Brake operation, including parking
brake
o Manual transaxle operation, including
clutch operation
o Automatic transaxle operation,
including "Park" mechanism operation
o Seat control condition and operation
o Seat belt condition and operation
o Sun visor operation
If you notice anything that does not operate
correctly or appears to be functioning
correctly, inspect it carefully and seek
assistance from your Hyundai dealer if
service is needed.
G020B01A-AATVehicle ExteriorThe following should be checked monthly:
o Overall appearance and condition
o Wheel condition and wheel nut torque
o Exhaust system condition
o Light condition and operation
o Windshield glass condition
o Wiper blade condition
o Paint condition and body corrosion
o Fluid leaks
o Door and hood lock condition
o Tire pressure and condition
(including spare tire)GENERAL CHECKSG020A01NF-AATEngine CompartmentThe following should be checked regu-
larly:
o Engine oil level and condition
o Transaxle fluid level and condition
o Brake fluid level
o Engine coolant level
o Windshield washer fluid level
o Accessory drive belt condition
o Engine coolant hose condition
o Fluid leaks (on or below components)
o Power steering fluid level
o Battery condition
o Air filter condition
o Engine vibration
CHECKING THE ENGINE OILG030B01O-AATRecommended OilThe engine oil quality should meet the
following classification.
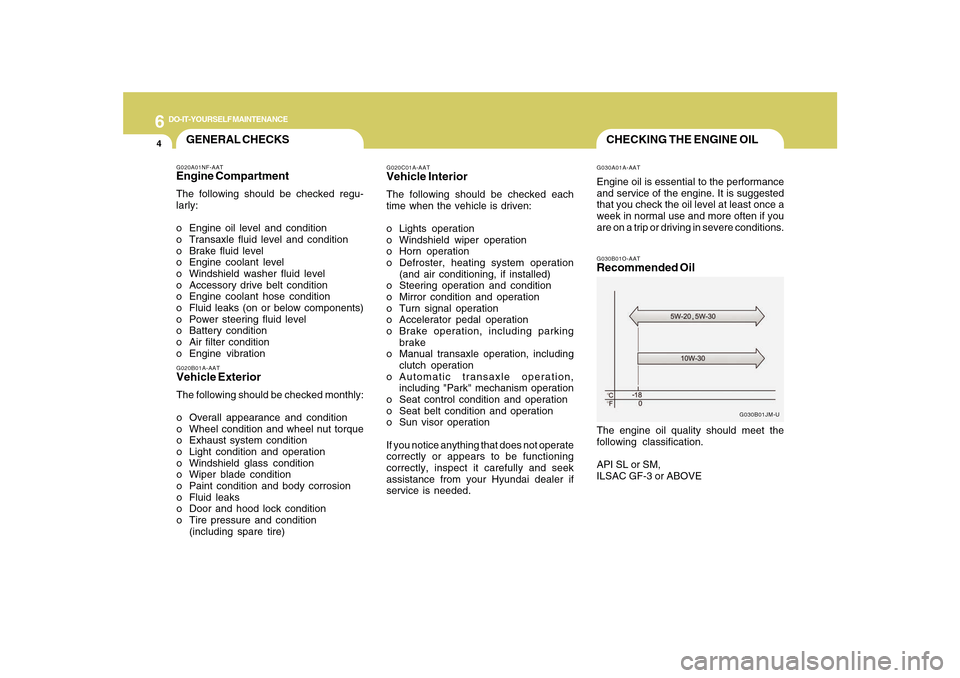
API SL or SM,
ILSAC GF-3 or ABOVE
G030B01JM-U G030A01A-AAT
Engine oil is essential to the performance
and service of the engine. It is suggested
that you check the oil level at least once a
week in normal use and more often if you
are on a trip or driving in severe conditions.
Page 237 of 285

6
DO-IT-YOURSELF MAINTENANCE
23
!
CAUTION:
When replacing a fusible link, never use
anything but a new fusible link with the
same or lower amperage rating. Never
use a piece of wire or a higher-rated
fusible link. This could result in serious
damage and create a fire hazard.
G200B02NF
4. Replace the blown fuse by pressing a
new fuse of the same rating into place.
The fuse should be a snug fit. If it is not,
have the fuse clip repaired or replaced
by a Hyundai dealer. If you do not have
a spare fuse, you may be able to borrow
a fuse of the same or lower rating from
an accessory you can temporarily get
along without (the radio or cigarette
lighter, for example). Always remember
to replace the borrowed fuse.
G200B01NF-AATReplacing Accessory FuseThe fuse box for the lights and other elec-
trical accessories will be found on the left
side of the instrument panel. Inside the box
you will find a list showing the circuits
protected by each fuse.
If any of your car's lights or other electrical
accessories stop working, a blown fuse
could be the reason. If the fuse has burned
out, you will see that the metal strip inside
the fuse has burned through. If you suspect
a blown fuse, follow this procedure:
1. Turn off the ignition and all other
switches.
2. Open the fuse box and examine each
fuse. Remove each fuse by pulling it
toward you (a small "fuse puller" tool is
contained in the relay and fuse box of
the engine room to simplify this
operation).
ONF078018
3. Be sure to check all other fuses, even if
you find one that appears to have burned
out.
Page 241 of 285
6
DO-IT-YOURSELF MAINTENANCE
27
FOR MORE INFORMATION
ABOUT YOUR HYUNDAIG250A01A-AATIf you desire additional information about
maintaining and servicing your Hyundai,
you may purchase a factory Shop Manual
at your Hyundai dealer's parts department.
This is the same manual used by
dealership technicians and while it is highly
technical it can be useful in obtaining a
better understanding of your car and how
it works.
HEADLIGHT AIMING ADJUST-
MENTG290A03O-AATBefore performing aiming adjustment,
make sure of the following.
1. Keep all tires inflated to the correct
pressure.
2. Place the vehicle on level ground and
press the front bumper & rear bumper
down several times.
Place vehicle at a distance of 118 in.
(3m) from the test wall.
3. See that the vehicle is unloaded (except
for full levels of coolant, engine oil and
fuel, and spare tire, jack, and tools).
Have the driver or equivalent weight
placed in driver's seat.
4. Clean the headlight lenses and turn on
the headlights (Low beam).
5. Open the hood.
G290A01NF-A
Vertical
aiming
!
6. Draw a vertical line (through the center
of each headlight beam pattern) and a
horizontal line (through the center of
each headlight beam pattern) on the
aiming screen measured from ground
to center mark on headlight lens.
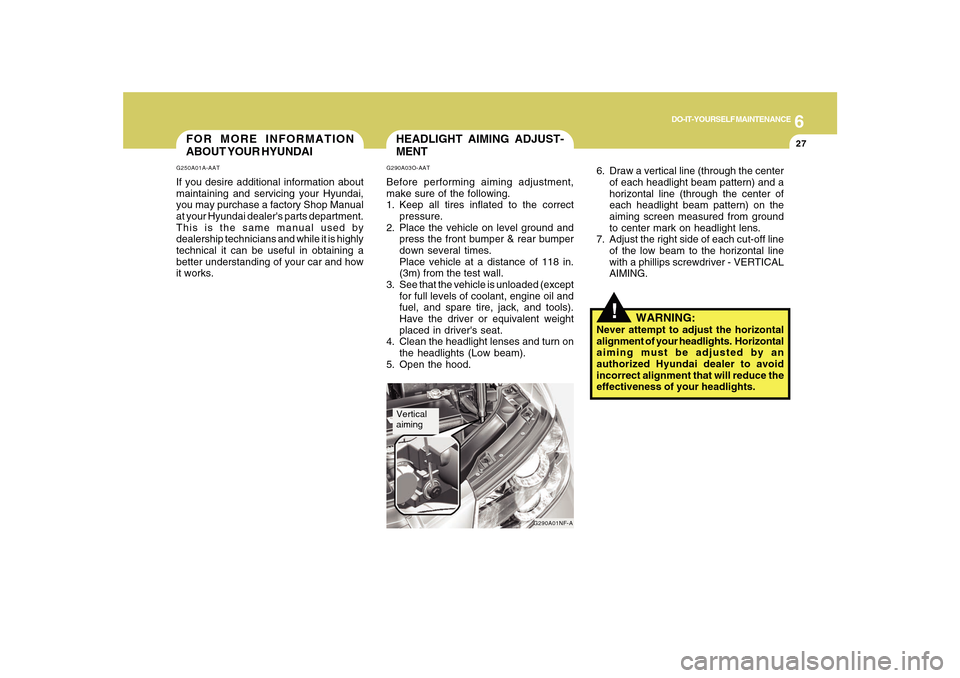
7. Adjust the right side of each cut-off line
of the low beam to the horizontal line
with a phillips screwdriver - VERTICAL
AIMING.
WARNING:
Never attempt to adjust the horizontal
alignment of your headlights. Horizontal
aiming must be adjusted by an
authorized Hyundai dealer to avoid
incorrect alignment that will reduce the
effectiveness of your headlights.
Page 242 of 285
6
DO-IT-YOURSELF MAINTENANCE
28
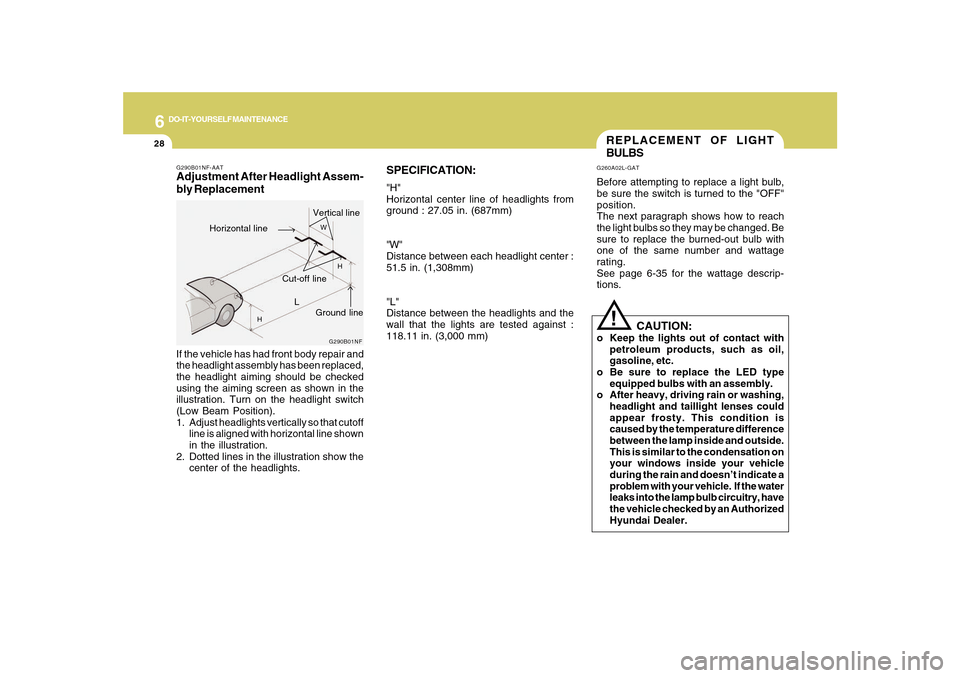
SPECIFICATION:"H"
Horizontal center line of headlights from
ground : 27.05 in. (687mm)
"W"
Distance between each headlight center :
51.5 in. (1,308mm)
"L"
Distance between the headlights and the
wall that the lights are tested against :
118.11 in. (3,000 mm)
REPLACEMENT OF LIGHT
BULBSG260A02L-GATBefore attempting to replace a light bulb,
be sure the switch is turned to the "OFF"
position.
The next paragraph shows how to reach
the light bulbs so they may be changed. Be
sure to replace the burned-out bulb with
one of the same number and wattage
rating.
See page 6-35 for the wattage descrip-
tions.
!
CAUTION:
o Keep the lights out of contact with
petroleum products, such as oil,
gasoline, etc.
o Be sure to replace the LED type
equipped bulbs with an assembly.
o After heavy, driving rain or washing,
headlight and taillight lenses could
appear frosty. This condition is
caused by the temperature difference
between the lamp inside and outside.
This is similar to the condensation on
your windows inside your vehicle
during the rain and doesn’t indicate a
problem with your vehicle. If the water
leaks into the lamp bulb circuitry, have
the vehicle checked by an Authorized
Hyundai Dealer.
G290B01NF-AATAdjustment After Headlight Assem-
bly Replacement
G290B01NF
L
W
H
H
Cut-off line
Ground line
Horizontal lineVertical line
If the vehicle has had front body repair and
the headlight assembly has been replaced,
the headlight aiming should be checked
using the aiming screen as shown in the
illustration. Turn on the headlight switch
(Low Beam Position).
1. Adjust headlights vertically so that cutoff
line is aligned with horizontal line shown
in the illustration.
2. Dotted lines in the illustration show the
center of the headlights.
Page 253 of 285

6
DO-IT-YOURSELF MAINTENANCE
39
PROTECTED COMPONENTS
FUSE RATING FUSE
SPARE 15A(Spare)
SPARE 15A(Spare)
ETACS 10ABCM(Body Control Module), Sunroof control module, Electronic chrome mirror, Rheostat
ESC 10A ESC module, Blower relay
C/LIGHTER 20ACigarette lighter
SPARE 15A(Spare)
TAIL RH 10AIllumination lights, Right : License light (LH, RH), Rear combination light, Headlight, Glove box light
TAIL LH 10A Front fog light relay, Left : Rear combination light, Headlight
IONIZER 10A (Spare)
H/LP 10ADRL control module, Headlight relay, AQS and ambient sensor
WIPER 25A Wiper and washer
A/CON 10AA/C control module
A/BAG 15A SRS control module, Passenger's Airbag switch
P/OUTLET 20AFront accessory socket, Rear power outlet
D/CLOCK 10ADigital clock, Audio, A/T shift lock control module, Power outside mirror and mirror folding, BCM
SAFETY PWR 25A Safety window module
ECS 15A (Spare)
ATM KEY LOCK 10A A/T shift lock control module
P/WDW RR LH 25A Power window main switch, Left rear power window switch
P/WDW RH 30A Power window main switch, Right power window switch
Inner Panel
Page 254 of 285
6
DO-IT-YOURSELF MAINTENANCE
40
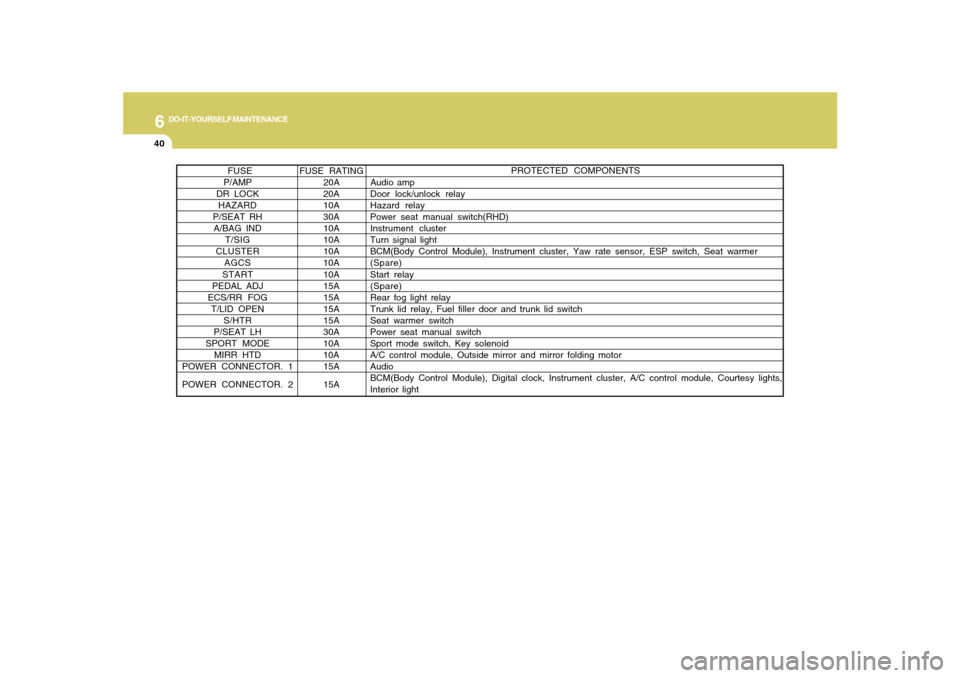
PROTECTED COMPONENTS
FUSE RATING FUSE
P/AMP 20A Audio amp
DR LOCK 20A Door lock/unlock relay
HAZARD 10AHazard relay
P/SEAT RH 30A Power seat manual switch(RHD)
A/BAG IND 10A Instrument cluster
T/SIG 10A Turn signal light
CLUSTER 10ABCM(Body Control Module), Instrument cluster, Yaw rate sensor, ESP switch, Seat warmer
AGCS 10A (Spare)
START 10A Start relay
PEDAL ADJ 15A(Spare)
ECS/RR FOG 15A Rear fog light relay
T/LID OPEN 15A Trunk lid relay, Fuel filler door and trunk lid switch
S/HTR 15A Seat warmer switch
P/SEAT LH 30A Power seat manual switch
SPORT MODE 10A Sport mode switch, Key solenoid
MIRR HTD 10A A/C control module, Outside mirror and mirror folding motor
POWER CONNECTOR. 115A Audio
POWER CONNECTOR. 2 15ABCM(Body Control Module), Digital clock, Instrument cluster, A/C control module, Courtesy lights,
Interior light