2010 Hyundai Sonata service
[x] Cancel search: servicePage 218 of 285

6
DO-IT-YOURSELF MAINTENANCE
4
G020C01A-AATVehicle InteriorThe following should be checked each
time when the vehicle is driven:
o Lights operation
o Windshield wiper operation
o Horn operation
o Defroster, heating system operation
(and air conditioning, if installed)
o Steering operation and condition
o Mirror condition and operation
o Turn signal operation
o Accelerator pedal operation
o Brake operation, including parking
brake
o Manual transaxle operation, including
clutch operation
o Automatic transaxle operation,
including "Park" mechanism operation
o Seat control condition and operation
o Seat belt condition and operation
o Sun visor operation
If you notice anything that does not operate
correctly or appears to be functioning
correctly, inspect it carefully and seek
assistance from your Hyundai dealer if
service is needed.
G020B01A-AATVehicle ExteriorThe following should be checked monthly:
o Overall appearance and condition
o Wheel condition and wheel nut torque
o Exhaust system condition
o Light condition and operation
o Windshield glass condition
o Wiper blade condition
o Paint condition and body corrosion
o Fluid leaks
o Door and hood lock condition
o Tire pressure and condition
(including spare tire)GENERAL CHECKSG020A01NF-AATEngine CompartmentThe following should be checked regu-
larly:
o Engine oil level and condition
o Transaxle fluid level and condition
o Brake fluid level
o Engine coolant level
o Windshield washer fluid level
o Accessory drive belt condition
o Engine coolant hose condition
o Fluid leaks (on or below components)
o Power steering fluid level
o Battery condition
o Air filter condition
o Engine vibration
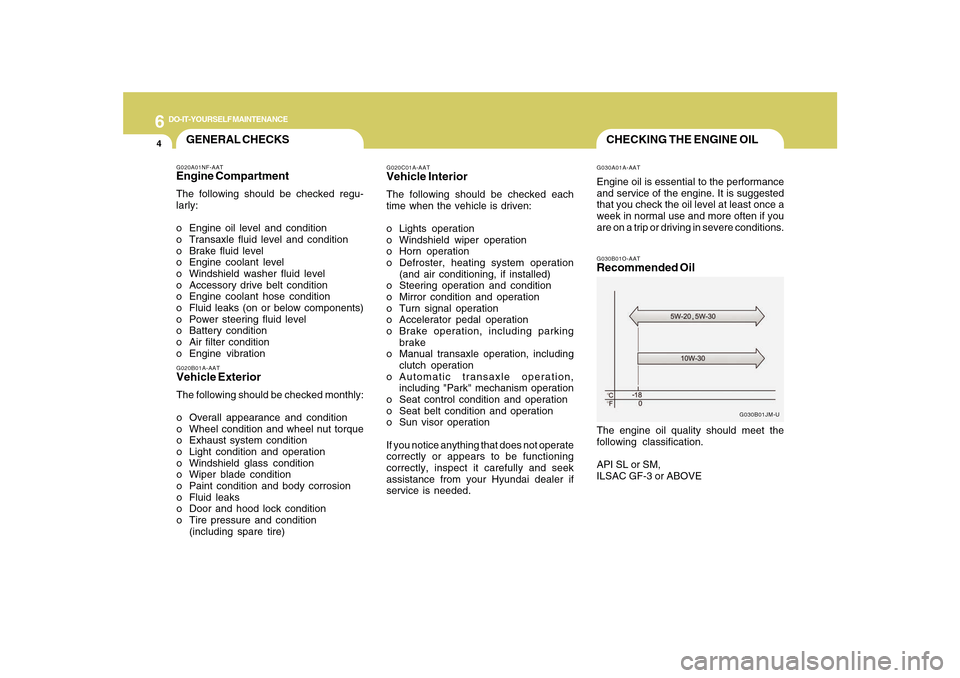
CHECKING THE ENGINE OILG030B01O-AATRecommended OilThe engine oil quality should meet the
following classification.
API SL or SM,
ILSAC GF-3 or ABOVE
G030B01JM-U G030A01A-AAT
Engine oil is essential to the performance
and service of the engine. It is suggested
that you check the oil level at least once a
week in normal use and more often if you
are on a trip or driving in severe conditions.
Page 222 of 285

6
DO-IT-YOURSELF MAINTENANCE
8
CHECKING AND CHANGING THE
ENGINE COOLANT!
G050A01A-AAT
WARNING:
Do not remove the radiator cap when the
engine is hot. When the engine is hot, the
engine coolant is under pressure and
may erupt through the opening if the cap
is removed. You could be seriously
burned if you do not observe this
precaution. Do not remove the radiator
cap until the radiator is cool to the touch.
!
5. Remove the oil filter by turning it counter-
clockwise with a oil filter wrench of the
proper size. A certain amount of oil will
come out when you remove the filter. So be
sure to have your drain pan in place
underneath it.
6. Install a new oil filter in accordance with the
instructions on the carton or on the filter
itself. Do not over-tighten.
Tightening torque:
8.7 ~ 11.6 lb.ft (1.2 ~ 1.6 kgf.m)
Be sure that the mounting surface on the
engine is clean and that the old gasket is
removed completely. Lubricate the new
gasket on the filter with clean engine oil
before installation.
7. Remove the engine oil level dipstick.
8. Refill the crankcase with the recommended
engine oil. Refer to the specification in
chapter 9 for engine oil capacity.
CAUTION:
Slowly pour the recommended oil into a
funnel. Do not overfill to avoid damage to
the engine.
NOTE:Always dispose of used engine oil in an
environmentally acceptable manner. It
is suggested that it be placed in a sealed
container and taken to a service station
for reclamation. Do not pour the oil on the
ground or put it into the household trash.
PROPOSITION 65 WARNING:
Engine oil contains chemicals known to
the State of California to cause cancer,
birth defects and reproductive harm.
Used engine oil may cause irritation or
cancer of the skin if left in contact with
the skin for prolonged periods of time.
Always protect your skin by washing
your hands thoroughly with soap and
warm water as soon as possible after
handling used oil.
!
9. Start the engine and check to be sure no
oil is leaking from the drain plug or oil
filter.
10. Shut off the engine and recheck the oil
level.
Page 229 of 285

6
DO-IT-YOURSELF MAINTENANCE
15
CHECKING THE TRANSAXLE
FLUID (AUTOMATIC)G110A01E-AATTransaxle fluid in the automatic transaxle
should be checked at those intervals
specified in the vehicle maintenance
schedule in Section 5.NOTE:Automatic transaxle fluid is basically
red in color. As driving distance in-
creases, the fluid color turns darkish red
gradually. It is a normal condition and
you should not judge the need to replace
based upon the changing color.
You must replace the automatic
transaxle fluid in accordance with
intervals specified in the vehicle
maintenance schedule in section 5.
!
G110B05A-AATRecommended Fluid
Your Hyundai automatic transaxle is
specially designed to operate with
HYUNDAI GENUINE ATF SP III, DIAMOND
ATF SP III, SK ATF SP III or other brands
meeting the SP III specification approved
by Hyundai Motor Co.. Damage caused
by a nonspecified fluid is not covered by
your new vehicle limited warranty.
CAUTION:
Use of aftermarket ATF additives may
cause damage to the automatic
transaxle.
Only use HYUNDAI GENUINE ATF SP III,
DIAMOND ATF SP III, SK ATF SP III or
other brands meeting the SP III specifi-
cation approved by Hyundai Motor Co..
If you are having your vehicle serviced
at a facility other than a Hyundai dealer,
verify that the correct ATF is used for
your vehicle.
!
G110C01NF-AATTransaxle Fluid CapacityThe fluid capacity of the automatic
transaxle is:
WARNING:
The transaxle fluid level should be
checked when the engine is at normal
operating temperature. This means that
the engine, radiator, radiator hose,
exhaust system etc., are very hot.
Exercise great care not to burn yourself
during this procedure.2.4L
3.3L
8.24 U.S. quarts (7.8 liters)
11.52 U.S. quarts (10.9 liters)
Page 272 of 285

8CONSUMER INFORMATION, REPORTING SAFETY DEFECTS & BINDING ARBITRATION OF WARRANTY CLAIMS14
Traction AA, A, B, C - The traction
grades, from highest to lowest, are AA,
A, B, and C. Those grades represent
the tire's ability to stop on wet pave-
ment as measured under controlled
conditions on specified government test
surfaces of asphalt and concrete. A tire
marked C may have poor traction per-
formance.
!
WARNING:
The traction grade assigned to this
tire is based on straight-ahead brak-
ing traction tests, and does not in-
clude acceleration, cornering, hy-
droplaning, or peak traction charac-
teristics.
CONSUMER INFORMATION
(U.S.A only)I130A01A-AATThis consumer information has been
prepared in accordance with regulations
issued by the National Highway Traffic
Safety Administration of the U.S.
Department of Transportation. It provides
the purchasers and/or prospective
purchasers of Hyundai automobiles with
information on uniform tire quality grading.
Your Hyundai dealer will help answer any
questions you may have as you read this
information.
I130B04A-AATTire Quality GradingQuality grades can be found where appli-
cable on the tire sidewall between tread
shoulder and maximum section width.
For example:
TREAD wear 200
TRACTION AA
TEMPERATUE ATreadwear - The treadwear grade is a
comparative rating based on the wear
rate of the tire when tested under con-
trolled conditions on a specified gov-
ernment test course. For example, a
tire graded 150 would wear one and a
half (1 - 1/2) times as well on the
government course as a tire graded
100. The relative performance of tires
depends upon the actual conditions of
their use, however, and may depart
significantly from the norm due to varia-
tions in driving habits, service prac-
tices and differences in road character-
istics and climate.
Page 283 of 285

10
INDEX
4
Fuel
Capacity............................................................................ 9-2
Gauge..............................................................................1-58
Recommendations............................................................ 1-2
Fuel Filler Lid
Remote release ..............................................................1-87
Fuse Panel Description .....................................................6-37
Fuses..................................................................................6-22
G
General Checks ................................................................... 6-4
Glove Box ...........................................................................1-76
H
Hazard Warning System ....................................................1-68
Headlight
Aiming adjustment ..........................................................6-27
Replacement...................................................................6-28
Switch..............................................................................1-64
Heating and Ventilation
Air flow control ................................................... 1-97, 1-108
Air intake control switch ..................................... 1-99, 1-107
Bi-level heating .............................................................1-100
Defrosting/Defogging....................................................1-103
Fan speed control (Blower Control) .................. 1-97, 1-107
Temperature control .......................................................1-96
High-Mounted Rear Stop Light .........................................1-87
Hood Release ....................................................................1-89
Horn....................................................................................1-91I
Ignition Switch ...................................................................... 2-3
Instrument Cluster and Indicator Lights ............................1-50
Instrument Panel Light Control (Rheostat) .......................1-69
Interior Light .......................................................................1-74
Intermittent Wiper ...............................................................1-67
J
Jump Starting ....................................................................... 3-3
K
Key ........................................................................................ 1-3
If you lose your keys ......................................................3-17
Positions............................................................................ 2-3
L
Light Bulb Watages ............................................................6-36
Light Bulbs Replacement ..................................................6-28
Lubrication Chart .................................................................. 9-4
M
Maintenance Intervals
Explanation of scheduled maintenance items ................ 5-7
Maintenance under severe usage conditions ................. 5-6
Scheduled maintenance.................................................. 5-4
Service requirements ........................................................ 5-2
Manual Heating and Cooling Control System ..................1-96