Page 242 of 285

6
DO-IT-YOURSELF MAINTENANCE
28
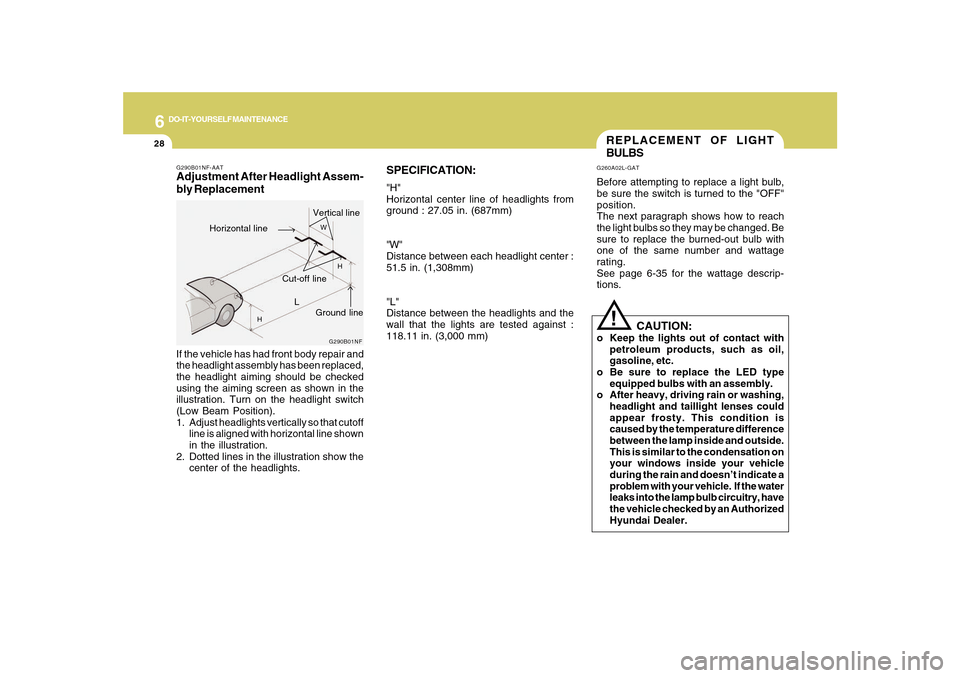
SPECIFICATION:"H"
Horizontal center line of headlights from
ground : 27.05 in. (687mm)
"W"
Distance between each headlight center :
51.5 in. (1,308mm)
"L"
Distance between the headlights and the
wall that the lights are tested against :
118.11 in. (3,000 mm)
REPLACEMENT OF LIGHT
BULBSG260A02L-GATBefore attempting to replace a light bulb,
be sure the switch is turned to the "OFF"
position.
The next paragraph shows how to reach
the light bulbs so they may be changed. Be
sure to replace the burned-out bulb with
one of the same number and wattage
rating.
See page 6-35 for the wattage descrip-
tions.
!
CAUTION:
o Keep the lights out of contact with
petroleum products, such as oil,
gasoline, etc.
o Be sure to replace the LED type
equipped bulbs with an assembly.
o After heavy, driving rain or washing,
headlight and taillight lenses could
appear frosty. This condition is
caused by the temperature difference
between the lamp inside and outside.
This is similar to the condensation on
your windows inside your vehicle
during the rain and doesn’t indicate a
problem with your vehicle. If the water
leaks into the lamp bulb circuitry, have
the vehicle checked by an Authorized
Hyundai Dealer.
G290B01NF-AATAdjustment After Headlight Assem-
bly Replacement
G290B01NF
L
W
H
H
Cut-off line
Ground line
Horizontal lineVertical line
If the vehicle has had front body repair and
the headlight assembly has been replaced,
the headlight aiming should be checked
using the aiming screen as shown in the
illustration. Turn on the headlight switch
(Low Beam Position).
1. Adjust headlights vertically so that cutoff
line is aligned with horizontal line shown
in the illustration.
2. Dotted lines in the illustration show the
center of the headlights.
Page 243 of 285
6
DO-IT-YOURSELF MAINTENANCE
29
Replacement instructions:
1. Allow the bulb to cool. Wear eye
protection.
2. Open the engine hood.
3. Always grasp the bulb by its base, avoid
touching the glass.G270A01NF-AATHEADLIGHT, FRONT TURN SIGNAL
LIGHT AND FRONT FOG LIGHT
Headlight and Front Turn Signal
Light
ONF078024
Headlight (Low beam)
Turn signal light
Front position light
Front Fog LightHeadlight
(High beam)
ONF078023N
4. Using a socket wrench of the correct
size, remove the headlight assembly
mounting bolts and bumper mounting
bolt.
HNF5024
5. Disconnect the power cord from the
back of the headlight.
Page 244 of 285
6
DO-IT-YOURSELF MAINTENANCE
30
HNF5027
9. Remove the protective cap from the
replacement bulb and install the new
bulb by matching the plastic base with
the headlight hole.Low Beam
OMG075038N
HNF5025
6. Turn the plastic cover counterclock-
wise and remove it.
ONF078026N
7. Disconnect the connector from the bulb
base in the back of the headlight.
8. Rotate the bulb counterclockwise to
remove the headlight bulb.
Page 250 of 285
6
DO-IT-YOURSELF MAINTENANCE
36
Socket Type
BAY 15d
w2.1 x 9.5d
BAY 15d
sv6-7, 6
BAY 15d
BAY 15s
w2.1 x 9.5d
w2.1 x 9.5d No.
1
2
3
4
5
6
7Socket Type
P x 26d
P14,5s
BAY15d
w2.1 x 9.5d
sv6-7,6
PGJ13
w2.1 x 9.2d
w2.1 x 4.6d
BULB WATTAGESG280A01NF-AAT
G280A01NF-D
Part Name
Stop / Tail Light
High Mounted Rear Stop Light
Tail Light
Luggage Compartment Light
Rear Side Marker Light
Rear Turn Signal Light
Back-up Light
License Plate Light Part Name
Headlight
Front Turn Signal Light
Map Light
Interior Light
Front Fog Light
Front Position Side Marker Light
Front Door Edge Warning LightNo.
8
9
10
11
12
13
14
15 Wattage
55
55
28
10
10
27
5
8
Low beam
High beamWattage
28/8
16
28/8
5
5
27
16
5