Page 183 of 408
Features of your vehicle
104
4
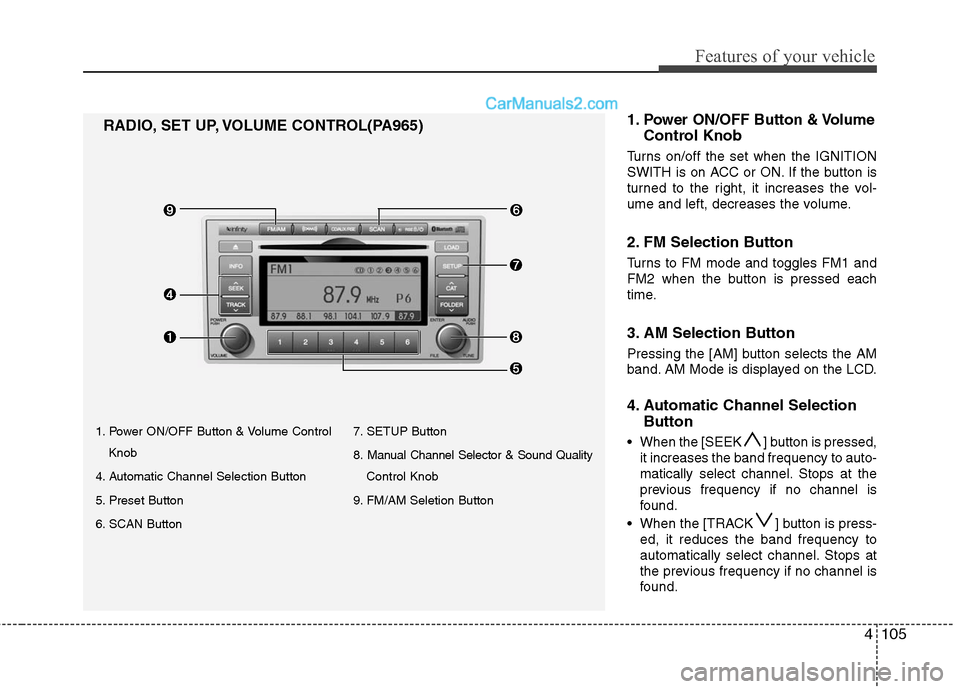
1. Power ON/OFF Button & Volume Control
Knob
2. FM Selection Button
3. AM Selection Button
4. Automatic Channel Selection Button
5. Preset Button
6. SCAN Button
7. SETUP Button
8. Manual Channel Selector & Sound Quality Control Knob
RADIO, SET UP, VOLUME, AUDIO CONTROL(PA910)
RADIO, SET UP, VOLUME, AUDIO CONTROL(PA960)
Page 184 of 408
4105
Features of your vehicle
1. Power ON/OFF Button & Volume ControlKnob
4. Automatic Channel Selection Button
5. Preset Button
6. SCAN Button 7. SETUP Button
8. Manual Channel Selector & Sound Quality
Control Knob
9. FM/AM Seletion Button
RADIO, SET UP, VOLUME CONTROL(PA965) 1.Power ON/OFF Button & Volume
Control Knob
Turns on/off the set when the IGNITION
SWITH is on ACC or ON. If the button is
turned to the right, it increases the vol-
ume and left, decreases the volume.
2. FM Selection Button
Turns to FM mode and toggles FM1 and
FM2 when the button is pressed each
time.
3. AM Selection Button
Pressing the [AM] button selects the AM
band. AM Mode is displayed on the LCD.
4. Automatic Channel Selection
Button
When the [SEEK ] button is pressed,
it increases the band frequency to auto-
matically select channel. Stops at the
previous frequency if no channel is
found.
When the [TRACK ] button is press- ed, it reduces the band frequency to
automatically select channel. Stops at
the previous frequency if no channel is
found.
Page 185 of 408
![Hyundai Santa Fe 2010 Owners Manual
Features of your vehicle
106
4
5. Preset Button
Push [1]~[6] buttons less than 0.8 sec-
ond to play the channel saved in each
button. Push Preset button for 0.8 sec-
ond or longer to save current cha Hyundai Santa Fe 2010 Owners Manual
Features of your vehicle
106
4
5. Preset Button
Push [1]~[6] buttons less than 0.8 sec-
ond to play the channel saved in each
button. Push Preset button for 0.8 sec-
ond or longer to save current cha](/manual-img/35/16393/w960_16393-184.png)
Features of your vehicle
106
4
5. Preset Button
Push [1]~[6] buttons less than 0.8 sec-
ond to play the channel saved in each
button. Push Preset button for 0.8 sec-
ond or longer to save current channel to
the respective button with a beep.
6. SCAN Button
If this button is pressed, the frequencies
will become increased and receive the
corresponding broadcasts. This function
will play the frequencies for 5 seconds
(XM MODE:10 seconds) each and find
other broadcasts as the frequency
increases.
Press the button again when desiring to
continue listening to the currently playing
broadcast.
7. SETUP Button
Press this button to turn to the XM option
and the other adjustment mode.
If no action is taken for 5 seconds after
pressing the button, it will return to the
play mode.(After entering SEPUP mode,
move between items using the left, right
and PUSH funtions of the [TUNE] knob.)
■ ■
PA910
The setup change in the order of
SCROLL
➟SDVC➟PHONE➟RETURN
➟P.BASS➟XM...
■ ■
PA960/PA965
The setup changes in the order of
SCROLL
➟SURROUND➟XM➟PHONE...
This function is used to display charac-
ters longer than the LCD text display and
can be turned ON/OFF through the vol-
ume controller.
This function displays the previous
MODE screen.
This function automatically adjusts the
volume level according to the speed of
the vehicle and can be turned ON/OFF
through the volume controller.
Based on psychoacoustic technology, this
technology overcomes BASS limitations
which may occur due to the limited number
and size of speakers to offer dynamic
BASS sound quality. It is possible to
adjust in 3 levels of LOW/MID/HIGH.
OFF ➟LOW ➟MID ➟HIGH
Modes: CD/FM/AUX/IPOD/USB (exclud-
ing MW, LW Mode)
8. Manual Channel Selector
& Sound Quality Control Knob
Turn this control while listening to a radio
channel to manually adjust frequency.
Turn clockwise to increase frequency and
counterclockwise to reduce frequency.
Pressing the button changes the BASS,
MIDDLE, TREBLE, FADER and BAL-
ANCE TUNE mode. The mode selected
is shown on the display. After selecting
each mode, rotate the Audio control knob
clockwise or counterclockwise.
BASS Control
To increase the BASS, rotate the knob
clockwise, while to decrease the BASS,
rotate the knob counterclockwise.
Page 200 of 408
4121
Features of your vehicle
XM SATELLITE RADIO(PA960)
1. XM Selection Button
2. INFO Button
3. Automatic Channel Selection Button
4. SCAN Button
5. CATEGORY Search Button
6. Manual Channel Selection Button
7. Preset Button
XM SATELLITE RADIO(PA910)
Page 201 of 408
Features of your vehicle
122
4
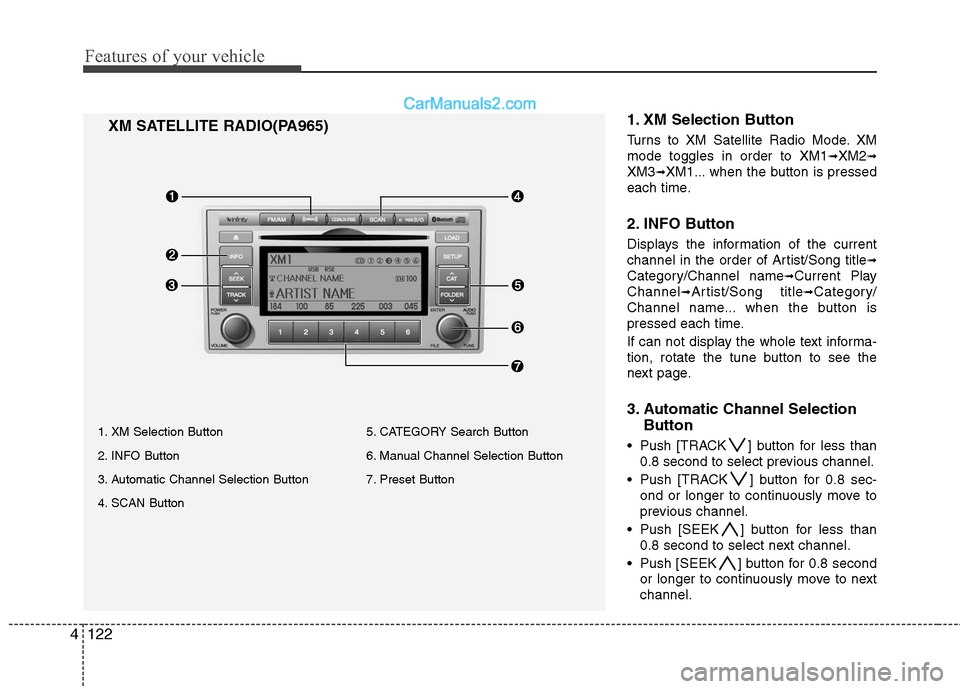
1. XM Selection Button
Turns to XM Satellite Radio Mode. XM
mode toggles in order to XM1
➟XM2➟
XM3➟XM1... when the button is pressed
each time.
2. INFO Button
Displays the information of the current
channel in the order of Artist/Song title
➟
Category/Channel name➟Current Play
Channel
➟Artist/Song title➟Category/
Channel name... when the button is
pressed each time.
If can not display the whole text informa-
tion, rotate the tune button to see the
next page.
3. Automatic Channel Selection Button
Push [TRACK ] button for less than
0.8 second to select previous channel.
Push [TRACK ] button for 0.8 sec- ond or longer to continuously move to
previous channel.
Push [SEEK ] button for less than 0.8 second to select next channel.
Push [SEEK ] button for 0.8 second or longer to continuously move to next
channel.
XM SATELLITE RADIO(PA965)
1. XM Selection Button
2. INFO Button
3. Automatic Channel Selection Button
4. SCAN Button 5. CATEGORY Search Button
6. Manual Channel Selection Button
7. Preset Button
Page 202 of 408
4123
Features of your vehicle
Radio ID : Seek or Tune to XM channel0 to display the Radio ID.
4. SCAN Button
Press to hear a brief sampling of all
channel. To cancel the scan mode, press
the button once again.
5. CATEGORY Search Button
Push [FOLDER ] button to searchprevious category.
Push [CAT ] button to search next category. To listen to the displayed cat-
egory, press the TUNE/SETUP button.
To scan channel in displayed category,
press the scan button. To search chan-
nel in displayed category, press seek
buttons or turn the tune button clock-
wise/counterclockwise.(CATEGORY
icon is will be turned on in Category
mode)
6. Manual Channel Selection Button
While listening to XM broadcast, rotate
this control to the right or left to search
other channels while listening to current
channel. (Turn to the right to searchhigh-
er channels and left, lower channels)
7. Preset Button
Push [1]~[6] buttons less than 0.8 sec-
ond to play the channel saved in each
button. Push Preset button for 0.8 sec-
ond or longer to save current channel to
the respective button with a beep.
Page 211 of 408
Features of your vehicle
132
4
D320000AEN
Important Safety Information
It is always important to operate your
vehicle in a safe manner and to avoid dis-
traction while driving. This manual pro-
vides information that will help you safely
operate your Rear Seat Entertainment
System (RSE). Please read it completely
before using the system.
This device complies with part 15 of
the FCC rules.
Operation is subject to the following two
conditions:
1. This device may not cause harmful
interference, and
2. This device must accept any interfer- ence received, including interference
that may cause undesired operation.
Welcome
The Rear Seat Entertainment System is
a compact, built-in, easy-to-use enter-
tainment system designed to provide
family fun while you are on the road.
Enjoy great quality sound from the vehi-
cle speakers, or have a private, quiet lis-
tening with the wireless headphones.
The overhead display unit is mounted to
the ceiling in the rear passenger area of
the vehicle, allowing rear-seat passen-
gers to play DVD movies, video CDs or
music CDs. Users may also plug in a
game platform or VHS player into an aux-
iliary input to show the programs through
the RSE display. The RSE can also
access to the vehicle's front radio pro-
grams.
System Overview
Connections / Setup
Your Rear Seat Entertainment system
will play DVD movies, video CDs, music
CDs or music MP3 discs, and is
designed to make your time on the road
more enjoyable. Please follow these
instructions carefully to get the most out
of your RSE.
REAR SEAT ENTERTAINMENT SYSTEM (RSE) (IF EQUIPPED)
CAUTION
• Avoid having food or drinks near, in or on the RSE, the wirelessheadphones or the remote con-troller.
Direct sunlight may interfere with the headphone's operation andperformance.
Normal RSE operation cannot be guaranteed with unofficiallyduplicated discs.
(Continued)
WARNING
Changes or modifications not
expressly approved by the party
responsible for compliance could
void the user's authority to operate
the equipment.
Page 219 of 408
Features of your vehicle
140
4
1. ON/OFF and Speaker Volume
Press the POWER/VOLUME knob to
turn the RSE on or off.
Rotate the knob to adjust the speaker
volume. Note that changing the volume
by using the POWER/VOLUME knob
affects only the vehicle speakers. The
wireless headset volume is not affected.
See the "Headphones" section of this
manual for more information.
2. RSE Display
This RSE control panel display indicates
the current selected source, mode of
operation in the current disc, and other
information. It will display FRONT to indi-
cate that the selected source is the front
vehicle radio and REAR to indicate that
the RSE player is the current source.
The display will indicate DISC IN when a
disc is in loaded the RSE player.
3. MENU Button
DVD can be controlled, and any special
programming or features accessed, by
using the DVD menu. To access the
menu while playing a DVD, press the
MENU button. Press the button a second
time to exit the menu and return to the
DVD program at the point it was being
viewed.
While viewing the menu, press the
NEXT button to move the cursor up and
the PREVbutton to move the cursor
down the menu. Press the FF >button
to move the cursor to the right, and the
< REW button to move the cursor to the
left.
❇ For more details, see the "DVD -
Menu" section of this manual.
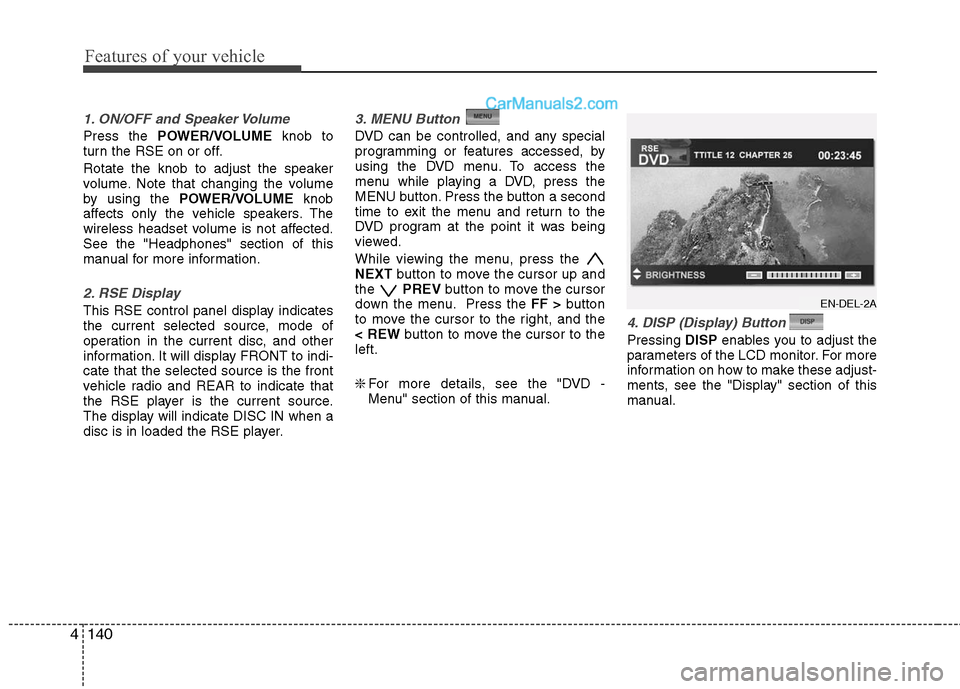
4. DISP (Display) Button
Pressing DISPenables you to adjust the
parameters of the LCD monitor. For more
information on how to make these adjust-
ments, see the "Display" section of this
manual.
EN-DEL-2A