Page 178 of 408
499
Features of your vehicle
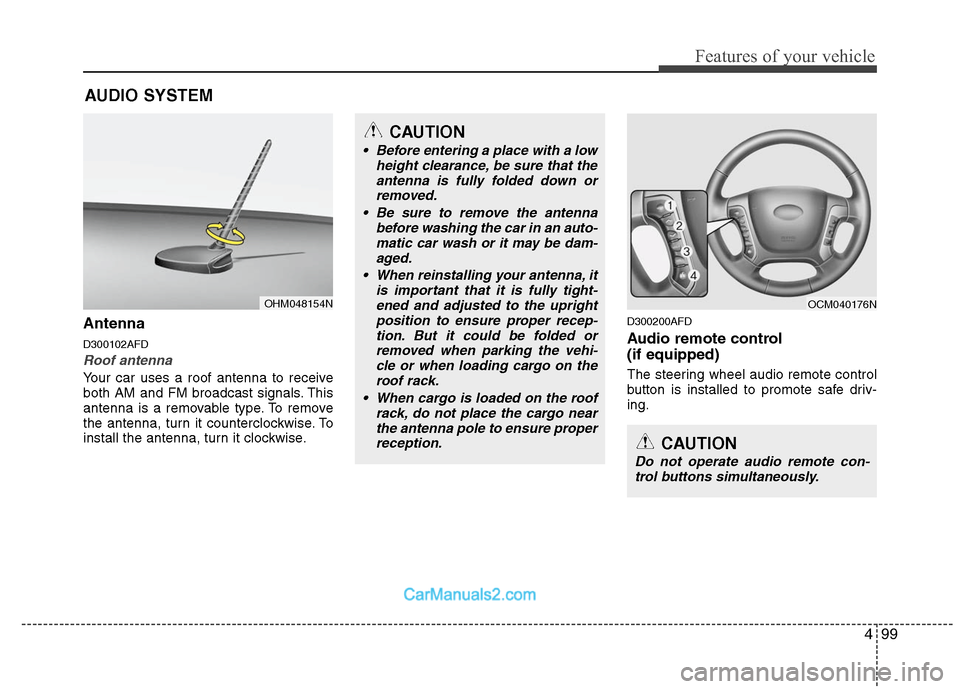
Antenna
D300102AFD
Roof antenna
Your car uses a roof antenna to receive
both AM and FM broadcast signals. This
antenna is a removable type. To remove
the antenna, turn it counterclockwise. To
install the antenna, turn it clockwise.
D300200AFD
Audio remote control
(if equipped)
The steering wheel audio remote control
button is installed to promote safe driv-
ing.
AUDIO SYSTEM
CAUTION
• Before entering a place with a lowheight clearance, be sure that theantenna is fully folded down orremoved.
Be sure to remove the antenna before washing the car in an auto-matic car wash or it may be dam- aged.
When reinstalling your antenna, it is important that it is fully tight-ened and adjusted to the uprightposition to ensure proper recep-tion. But it could be folded orremoved when parking the vehi-cle or when loading cargo on theroof rack.
When cargo is loaded on the roof rack, do not place the cargo nearthe antenna pole to ensure properreception.
OHM048154N
CAUTION
Do not operate audio remote con-trol buttons simultaneously.
OCM040176N
Page 179 of 408
Features of your vehicle
100
4
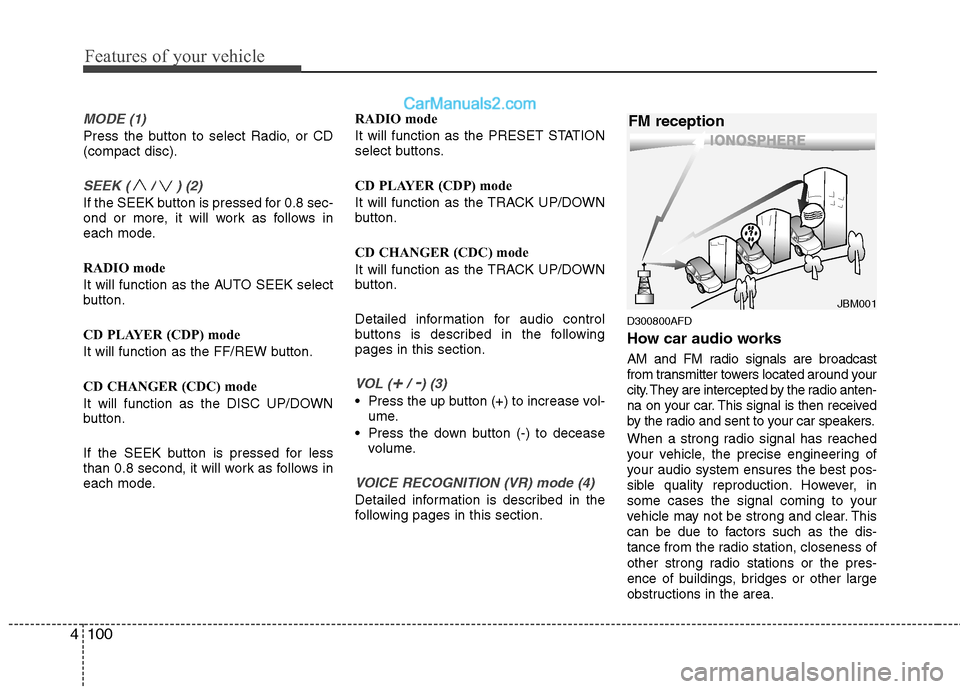
MODE (1)
Press the button to select Radio, or CD
(compact disc).
SEEK ( / ) (2)
If the SEEK button is pressed for 0.8 sec-
ond or more, it will work as follows in
each mode.
RADIO mode
It will function as the AUTO SEEK select
button.
CD PLAYER (CDP) mode
It will function as the FF/REW button.
CD CHANGER (CDC) mode
It will function as the DISC UP/DOWN
button.
If the SEEK button is pressed for less
than 0.8 second, it will work as follows in
each mode. RADIO mode
It will function as the PRESET STATION
select buttons.
CD PLAYER (CDP) mode
It will function as the TRACK UP/DOWN
button.
CD CHANGER (CDC) mode
It will function as the TRACK UP/DOWN
button.
Detailed information for audio control
buttons is described in the following
pages in this section.
VOL (+/ -) (3)
• Press the up button (+) to increase vol-
ume.
Press the down button (-) to decease volume.
VOICE RECOGNITION (VR) mode (4)
Detailed information is described in the
following pages in this section.
D300800AFD
How car audio works
AM and FM radio signals are broadcast
from transmitter towers located around your
city. They are intercepted by the radio anten-
na on your car. This signal is then received
by the radio and sent to your car speakers.
When a strong radio signal has reached
your vehicle, the precise engineering of
your audio system ensures the best pos-
sible quality reproduction. However, in
some cases the signal coming to your
vehicle may not be strong and clear. This
can be due to factors such as the dis-
tance from the radio station, closeness of
other strong radio stations or the pres-
ence of buildings, bridges or other large
obstructions in the area.
¢¢¢
JBM001
FM reception
Page 185 of 408
![Hyundai Santa Fe 2010 Owners Manual
Features of your vehicle
106
4
5. Preset Button
Push [1]~[6] buttons less than 0.8 sec-
ond to play the channel saved in each
button. Push Preset button for 0.8 sec-
ond or longer to save current cha Hyundai Santa Fe 2010 Owners Manual
Features of your vehicle
106
4
5. Preset Button
Push [1]~[6] buttons less than 0.8 sec-
ond to play the channel saved in each
button. Push Preset button for 0.8 sec-
ond or longer to save current cha](/manual-img/35/16393/w960_16393-184.png)
Features of your vehicle
106
4
5. Preset Button
Push [1]~[6] buttons less than 0.8 sec-
ond to play the channel saved in each
button. Push Preset button for 0.8 sec-
ond or longer to save current channel to
the respective button with a beep.
6. SCAN Button
If this button is pressed, the frequencies
will become increased and receive the
corresponding broadcasts. This function
will play the frequencies for 5 seconds
(XM MODE:10 seconds) each and find
other broadcasts as the frequency
increases.
Press the button again when desiring to
continue listening to the currently playing
broadcast.
7. SETUP Button
Press this button to turn to the XM option
and the other adjustment mode.
If no action is taken for 5 seconds after
pressing the button, it will return to the
play mode.(After entering SEPUP mode,
move between items using the left, right
and PUSH funtions of the [TUNE] knob.)
■ ■
PA910
The setup change in the order of
SCROLL
➟SDVC➟PHONE➟RETURN
➟P.BASS➟XM...
■ ■
PA960/PA965
The setup changes in the order of
SCROLL
➟SURROUND➟XM➟PHONE...
This function is used to display charac-
ters longer than the LCD text display and
can be turned ON/OFF through the vol-
ume controller.
This function displays the previous
MODE screen.
This function automatically adjusts the
volume level according to the speed of
the vehicle and can be turned ON/OFF
through the volume controller.
Based on psychoacoustic technology, this
technology overcomes BASS limitations
which may occur due to the limited number
and size of speakers to offer dynamic
BASS sound quality. It is possible to
adjust in 3 levels of LOW/MID/HIGH.
OFF ➟LOW ➟MID ➟HIGH
Modes: CD/FM/AUX/IPOD/USB (exclud-
ing MW, LW Mode)
8. Manual Channel Selector
& Sound Quality Control Knob
Turn this control while listening to a radio
channel to manually adjust frequency.
Turn clockwise to increase frequency and
counterclockwise to reduce frequency.
Pressing the button changes the BASS,
MIDDLE, TREBLE, FADER and BAL-
ANCE TUNE mode. The mode selected
is shown on the display. After selecting
each mode, rotate the Audio control knob
clockwise or counterclockwise.
BASS Control
To increase the BASS, rotate the knob
clockwise, while to decrease the BASS,
rotate the knob counterclockwise.
Page 199 of 408
Features of your vehicle
120
4
✽
✽
NOTICE FOR USING iPod
DEVICE
• Some iPod models might not sup- port the communication protocol
and the files will not be played.
(iPod models supported: Mini, 4G,
Photo, Nano, 5G)
• The order of search or playback of songs in the iPod can be different
from the order searched in the
audio system.
• If the iPod crashes due to its own trouble, reset iPod. (Reset: Refer to
iPod manual)
• iPod may not operate normally on low battery.
(Continued)
When the iPod cable is connected, the system can be switched to theAUX mode even without the iPoddevice and can cause noise.Disconnect iPod cable when youare not using the iPod device.
When the iPod is not used at audio system, iPod cable has tobe separate from iPod device.Origin display of iPod may not bedisplayed.CAUTION IN USING
iPod DEVICE
You need the power cable exclu-
sive for iPod in order to operateiPod with the buttons on the audiosystem. The PC cable provided byApple may cause malfunction anddo not use it for vehicle use.
When connecting the device with iPod cable, push in the jack fullynot to interfere with communica-tion.
When adjusting the sound effects of iPod and the audio system, thesound effects of both devices willoverlap each and might causereduce or distort the quality of thesound.
Deactivate (turn off) the equalizer function of iPod when adjustingthe audio system’s volume, andturn off the equalizer of the audiosystem when using the equalizerof iPod.
(Continued)
Page 202 of 408
4123
Features of your vehicle
Radio ID : Seek or Tune to XM channel0 to display the Radio ID.
4. SCAN Button
Press to hear a brief sampling of all
channel. To cancel the scan mode, press
the button once again.
5. CATEGORY Search Button
Push [FOLDER ] button to searchprevious category.
Push [CAT ] button to search next category. To listen to the displayed cat-
egory, press the TUNE/SETUP button.
To scan channel in displayed category,
press the scan button. To search chan-
nel in displayed category, press seek
buttons or turn the tune button clock-
wise/counterclockwise.(CATEGORY
icon is will be turned on in Category
mode)
6. Manual Channel Selection Button
While listening to XM broadcast, rotate
this control to the right or left to search
other channels while listening to current
channel. (Turn to the right to searchhigh-
er channels and left, lower channels)
7. Preset Button
Push [1]~[6] buttons less than 0.8 sec-
ond to play the channel saved in each
button. Push Preset button for 0.8 sec-
ond or longer to save current channel to
the respective button with a beep.
Page 214 of 408
4135
Features of your vehicle
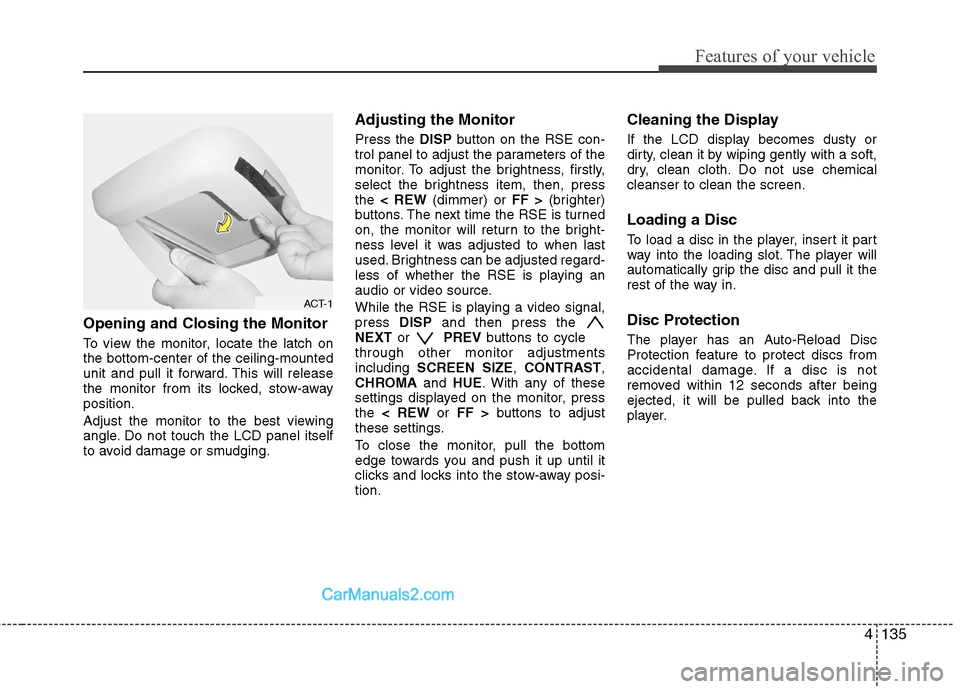
Opening and Closing the Monitor
To view the monitor, locate the latch on
the bottom-center of the ceiling-mounted
unit and pull it forward. This will release
the monitor from its locked, stow-away
position.
Adjust the monitor to the best viewing
angle. Do not touch the LCD panel itself
to avoid damage or smudging.
Adjusting the Monitor
Press the DISPbutton on the RSE con-
trol panel to adjust the parameters of the
monitor. To adjust the brightness, firstly,
select the brightness item, then, press
the < REW (dimmer) or FF >(brighter)
buttons. The next time the RSE is turned
on, the monitor will return to the bright-
ness level it was adjusted to when last
used. Brightness can be adjusted regard-
less of whether the RSE is playing an
audio or video source.
While the RSE is playing a video signal,
press DISPand then press the
NEXT or PREVbuttons to cycle
through other monitor adjustments
including SCREEN SIZE ,CONTRAST ,
CHROMA and HUE. With any of these
settings displayed on the monitor, press
the < REW or FF > buttons to adjust
these settings.
To close the monitor, pull the bottom
edge towards you and push it up until it
clicks and locks into the stow-away posi-
tion.
Cleaning the Display
If the LCD display becomes dusty or
dirty, clean it by wiping gently with a soft,
dry, clean cloth. Do not use chemical
cleanser to clean the screen.
Loading a Disc
To load a disc in the player, insert it part
way into the loading slot. The player will
automatically grip the disc and pull it the
rest of the way in.
Disc Protection
The player has an Auto-Reload Disc
Protection feature to protect discs from
accidental damage. If a disc is not
removed within 12 seconds after being
ejected, it will be pulled back into the
player.
ACT-1
Page 217 of 408
Features of your vehicle
138
4
RSE Lock Function
Front seat passengers can use the RSE
Lock function to prevent rear seat pas-
sengers from operating the RSE. To lock
the RSE, press and hold the CD/AUX
button on the vehicle radio for more than
2 seconds.
"Lock" will appear on the RSE LCD dis-
play, as well as on the RSE control panel.
None of the RSE control panel or remote
controller buttons will function while the
RSE is locked. Rear seat passengers will
still be able to eject or insert a disc in the
player, as well as power on/off the sys-
tem.
Press and hold the CD/AUX button again
to turn off the RSE lock.
Battery Discharge Warning
To prevent inadvertent vehicle battery
discharge when the ignition switch is
turned to the ignition ON position or ACC
mode, a battery drain warning message
will flash on the RSE monitor screen.
RSE-AUDIO-10
Page 218 of 408
4139
Features of your vehicle
1. ON/OFF and Speaker Volume
2. RSE Display
3. MENU Button
4. DISP (Display) Button
5. SRC (Source) Button
6. Play/Pause Button
7 - 11 Next / Prev (Next/Previous)and < REW/FF > (Rewind/Fast
Forward) and ENTER Buttons
Most RSE functions are available through the RSE control panel.
RSE-EN001
RSE Control Panel Operation