2010 Hyundai H-100 Truck parking brake
[x] Cancel search: parking brakePage 129 of 207
3
WHAT TO DO IN AN EMERGENCY
7
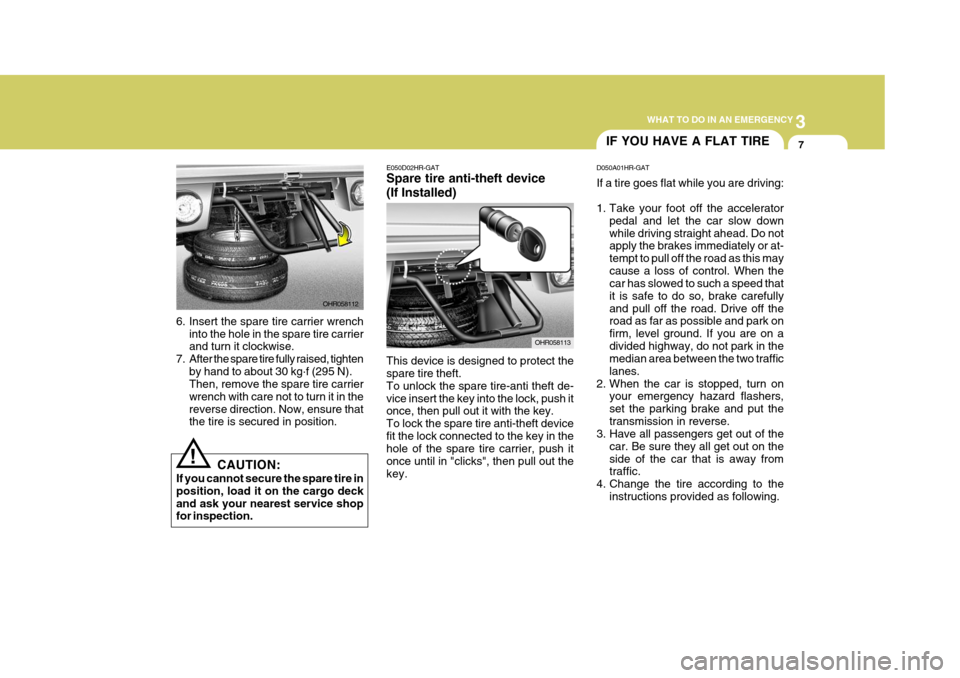
6. Insert the spare tire carrier wrench
into the hole in the spare tire carrier and turn it clockwise.
7. After the spare tire fully raised, tighten by hand to about 30 kg .
f (295 N).
Then, remove the spare tire carrier wrench with care not to turn it in thereverse direction. Now, ensure that the tire is secured in position.
! CAUTION:
If you cannot secure the spare tire in position, load it on the cargo deckand ask your nearest service shop for inspection. E050D02HR-GAT Spare tire anti-theft device (If Installed) This device is designed to protect the spare tire theft. To unlock the spare tire-anti theft de-vice insert the key into the lock, push it once, then pull out it with the key. To lock the spare tire anti-theft devicefit the lock connected to the key in the hole of the spare tire carrier, push it once until in "clicks", then pull out thekey.
OHR058113
OHR058112
IF YOU HAVE A FLAT TIRE
D050A01HR-GAT If a tire goes flat while you are driving:
1. Take your foot off the accelerator pedal and let the car slow down while driving straight ahead. Do not apply the brakes immediately or at- tempt to pull off the road as this maycause a loss of control. When the car has slowed to such a speed that it is safe to do so, brake carefullyand pull off the road. Drive off the road as far as possible and park on firm, level ground. If you are on adivided highway, do not park in the median area between the two traffic lanes.
2. When the car is stopped, turn on your emergency hazard flashers,set the parking brake and put thetransmission in reverse.
3. Have all passengers get out of the
car. Be sure they all get out on theside of the car that is away from traffic.
4. Change the tire according to the instructions provided as following.
Page 130 of 207
3 WHAT TO DO IN AN EMERGENCY
8CHANGING A FLAT TIRE
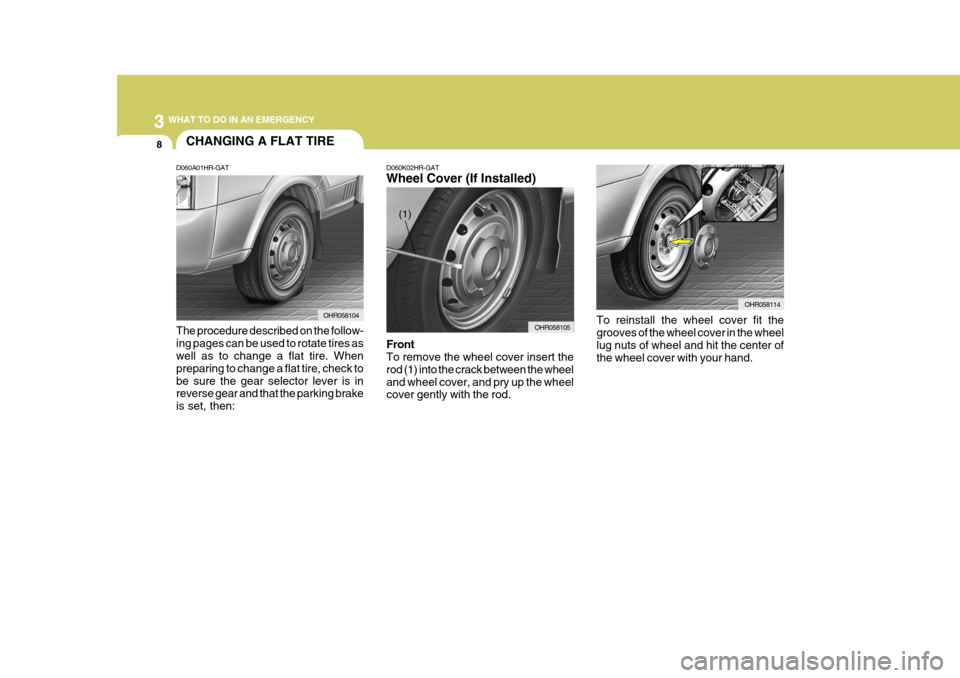
D060A01HR-GAT The procedure described on the follow- ing pages can be used to rotate tires as well as to change a flat tire. When preparing to change a flat tire, check tobe sure the gear selector lever is in reverse gear and that the parking brake is set, then: OHR058104D060K02HR-GAT
Wheel Cover (If Installed) Front To remove the wheel cover insert the rod (1) into the crack between the wheeland wheel cover, and pry up the wheel cover gently with the rod.
OHR058105
OHR058114
To reinstall the wheel cover fit the grooves of the wheel cover in the wheel lug nuts of wheel and hit the center of the wheel cover with your hand.
(1)
Page 133 of 207
3
WHAT TO DO IN AN EMERGENCY
11
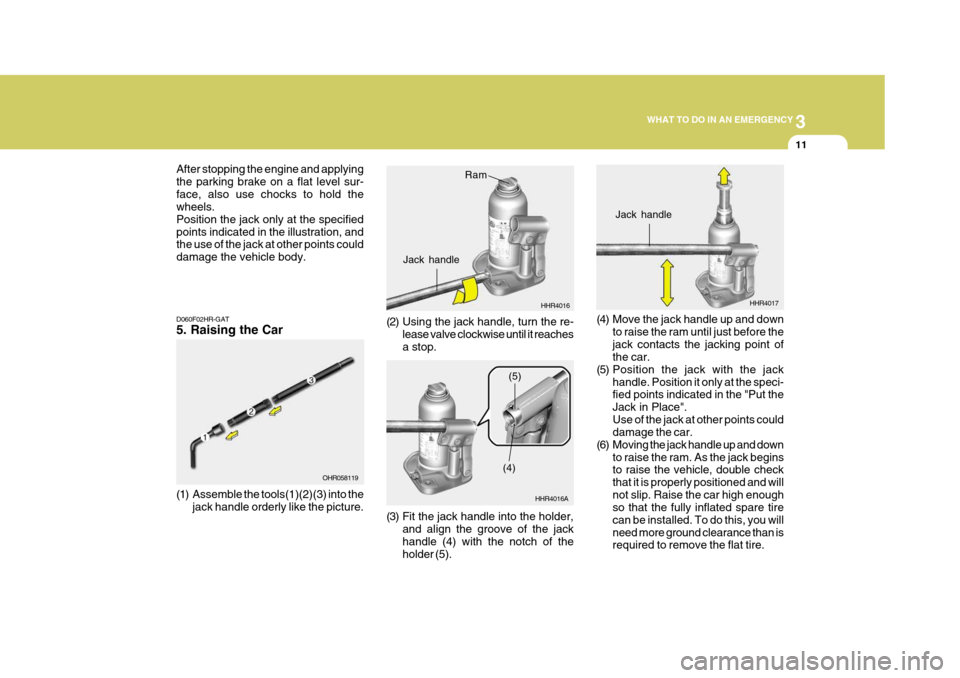
After stopping the engine and applying the parking brake on a flat level sur-face, also use chocks to hold the wheels. Position the jack only at the specifiedpoints indicated in the illustration, and the use of the jack at other points could damage the vehicle body.
D060F02HR-GAT 5. Raising the Car
(1) Assemble the tools(1)(2)(3) into the jack handle orderly like the picture. OHR058119
HHR4016
Ram
Jack handle
(2) Using the jack handle, turn the re- lease valve clockwise until it reaches a stop.
(3) Fit the jack handle into the holder,and align the groove of the jack handle (4) with the notch of the holder (5). HHR4016A
(4)(5)
HHR4017
Jack handle
(4) Move the jack handle up and down to raise the ram until just before the jack contacts the jacking point of the car.
(5) Position the jack with the jack handle. Position it only at the speci-fied points indicated in the "Put the Jack in Place".Use of the jack at other points could damage the car.
(6) Moving the jack handle up and down to raise the ram. As the jack beginsto raise the vehicle, double check that it is properly positioned and will
not slip. Raise the car high enough so that the fully inflated spare tire can be installed. To do this, you willneed more ground clearance than is required to remove the flat tire.
Page 139 of 207
3
WHAT TO DO IN AN EMERGENCY
17
!
D080B02HR-GAT Towing the vehicle
HHR4060
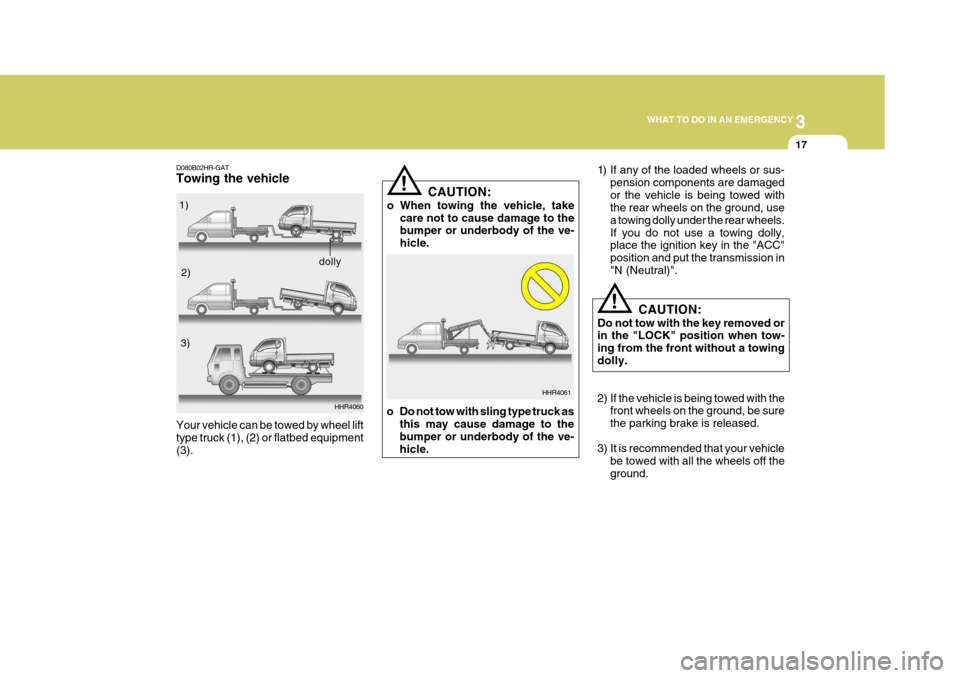
Your vehicle can be towed by wheel lift type truck (1), (2) or flatbed equipment(3).
!
1) If any of the loaded wheels or sus-
pension components are damaged or the vehicle is being towed with the rear wheels on the ground, use a towing dolly under the rear wheels.If you do not use a towing dolly, place the ignition key in the "ACC" position and put the transmission in"N (Neutral)".
HHR4061
1)
2)
3)
dolly CAUTION:
Do not tow with the key removed or in the "LOCK" position when tow- ing from the front without a towingdolly.
2) If the vehicle is being towed with the front wheels on the ground, be sure the parking brake is released.
3) It is recommended that your vehicle be towed with all the wheels off theground.
CAUTION:
o When towing the vehicle, take care not to cause damage to the bumper or underbody of the ve- hicle.
o Do not tow with sling type truck as this may cause damage to thebumper or underbody of the ve-hicle.
Page 151 of 207
5
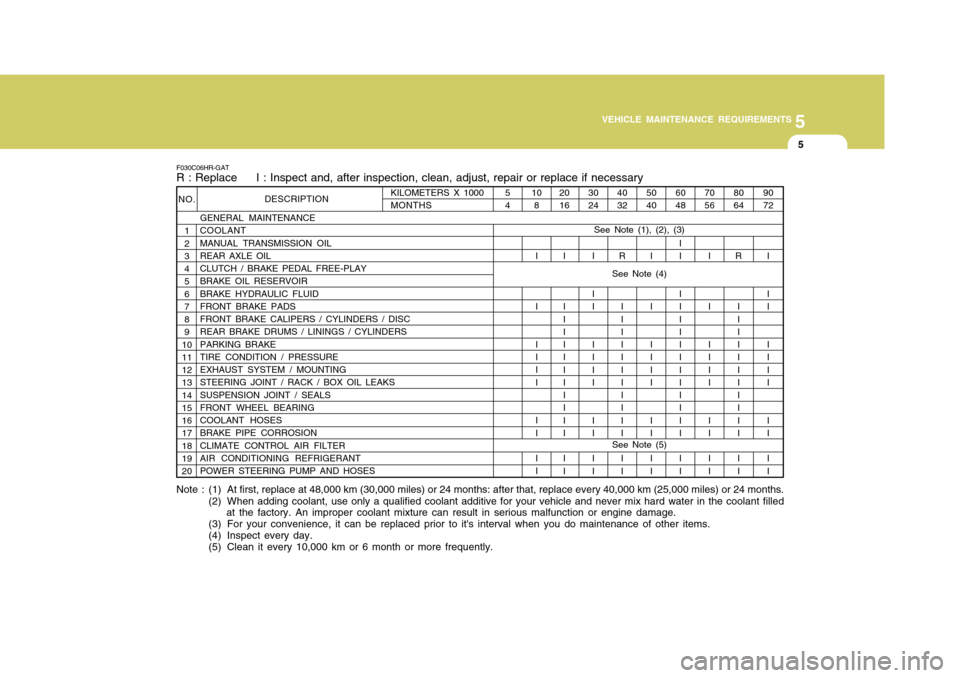
VEHICLE MAINTENANCE REQUIREMENTS
5
50 40
I I I I I I I I I I
See Note (5)
KILOMETERS X 1000 MONTHS
NO.
1 2 3 4 5 6 7 8 9
1011 12 13 14 15 16 17 18 19 20 DESCRIPTION
GENERAL MAINTENANCE COOLANT MANUAL TRANSMISSION OIL REAR AXLE OIL CLUTCH / BRAKE PEDAL FREE-PLAY BRAKE OIL RESERVOIR BRAKE HYDRAULIC FLUID FRONT BRAKE PADS FRONT BRAKE CALIPERS / CYLINDERS / DISC REAR BRAKE DRUMS / LININGS / CYLINDERS PARKING BRAKE TIRE CONDITION / PRESSURE EXHAUST SYSTEM / MOUNTING STEERING JOINT / RACK / BOX OIL LEAKS SUSPENSION JOINT / SEALS FRONT WHEEL BEARING COOLANT HOSES BRAKE PIPE CORROSION CLIMATE CONTROL AIR FILTER AIR CONDITIONING REFRIGERANT POWER STEERING PUMP AND HOSES
F030C06HR-GAT R : Replace I : Inspect and, after inspection, clean, adjust, repair or replace if necessary
80 64
R I I I I I I I I I I I I I 90 72
I I I I I I I I I I I
70 56
I I I I I I I I I I
60 48
II I I I I I I I I I I I I I I
40 32
R I I I I I I I I I I I I I
30 24
I I I I I I I I I I I
20 16
I I I I I I I I I I I I I I108
I I I I I I I I I I
54
See Note (1), (2), (3)
Note : (1) At first, replace at 48,000 km (30,000 miles) or 24 months: after that, replace every 40,000 km (25,000 miles) or 24 m onths.
(2) When adding coolant, use only a qualified coolant additive for your vehicle and never mix hard water in the coolant filled at the factory. An improper coolant mixture can result in serious malfunction or engine damage.
(3) For your convenience, it can be replaced prior to it's interval when you do maintenance of other items.
(4) Inspect every day.
(5) Clean it every 10,000 km or 6 month or more frequently.
See Note (4)
Page 153 of 207

5
VEHICLE MAINTENANCE REQUIREMENTS
7
45 36
R I I I I I I I I
15 12
I I I I I I I I I
F040C06HR-GAT R : Replace I : Inspect and, after inspection, clean, adjust, repair or replace if necessary
KILOMETERS X 1000 MONTHS
NO.
1 2 3 4 5 6 7 8 9
1011 12 13 14 15 16 17 18 19 20 DESCRIPTION
GENERAL MAINTENANCE COOLANT MANUAL TRANSMISSION OIL REAR AXLE OIL CLUTCH / BRAKE PEDAL FREE-PLAY BRAKE OIL RESERVOIR BRAKE HYDRAULIC FLUID FRONT BRAKE PAD FRONT BRAKE CALIPERS/CYLINDERS/DISC REAR BRAKE DRUMS/LININGS/CYLINDERS PARKING BRAKE TIRE CONDITION/PRESSURE EXHAUST SYSTEM/MOUNTING STEERING JOINT/RACK/BOX/OIL LEAKS SUSPENSION JOINT/SEALS FRONT WHEEL BEARING COOLANT HOSES BRAKE PIPE CORROSION CLIMATE CONTROL AIR FILTER AIR CONDITIONING REFRIGERANT POWER STEERING PUMP AND HOSES
75 60
I I I I I I I I I 90 72
R II I I I I I I I I I I I I
60 48
II I I I I I I I I I I I I I I
30 24
I I I I I I I I I I I I I I I
7.5
6
See Note (1), (2), (3)
Note: (1) At first, replace at 100,000 km (62,500 miles) or 60 months: after that, replace every 40,000 km (25,000 miles) or 24 months.
(2) When adding coolant, use only a qualified coolant additive for your vehicle and never mix hard water in the coolant filled at the factory. An improper coolant mixture can result in serious malfunction or engine damage.
(3) For your convenience, it can be replaced prior to it's interval when you do maintenance of other items. (4) Inspect every day. (5) Clean it every 10,000 KM or 6 month, or more frequently.
See Note (4) See Note (5)
Page 157 of 207

5
VEHICLE MAINTENANCE REQUIREMENTS
11
F070F01A-AAT
o Brake Hoses and Lines
Visually check for proper installation, chafing, cracks, deterioration and any leakage. Replace any deteriorated or damaged parts immediately. F070G02A-GAT
o Brake Fluid
Check brake fluid level in the brake fluid reservoir. The level should be between "MIN" and "MAX" marks on the side of the reservoir. Use only hydraulic brake fluid conforming to DOT3 or DOT 4.
F070L01A-AAT
o Suspension Mounting Bolts
Check the suspension connections for
looseness or damage. Retighten to thespecified torque. F070M01A-AAT
o Steering Gear Box, Linkage &
Boots/Lower arm Ball Joint
With the vehicle stopped and engine off, check for excessive free-play in the steering wheel. Check the linkage for bends or damage. Check the dustboots and ball joints for deterioration, cracks, or damage. Replace any dam- aged parts. F070N01A-AAT
o Power Steering Pump, Belt and Hoses
Check the power steering pump and hoses for leakage and damage. Re-place any damaged or leaking parts immediately. Inspect the power steer- ing belt for evidence of cuts, cracks,excessive wear, oiliness and proper tension. Replace or adjust it if neces- sary.
F070J01A-AAT
o Brake Pads, Calipers and
Rotors
Check the pads for excessive wear,
discs for run out and wear, and cali- pers for fluid leakage.
F070K01A-AAT
o Exhaust Pipe and Muffler
Visually inspect the exhaust pipes,
muffler and hangers for cracks, dete-rioration, or damage. Start the engine and listen carefully for any exhaustgas leakage. Tighten connections or replace parts as necessary.
F070H01A-AAT
o Rear Brake Drums/Linings
Parking Brake
Check the rear brake drums and lin-
ings for scoring, burning, leaking fluid, broken parts, and excessive wear. Inspect the parking brake system in- cluding the parking brake lever andcables. For detailed service proce- dures, refer to the Shop Manual.
Page 163 of 207
6
DO-IT-YOURSELF MAINTENANCE
5
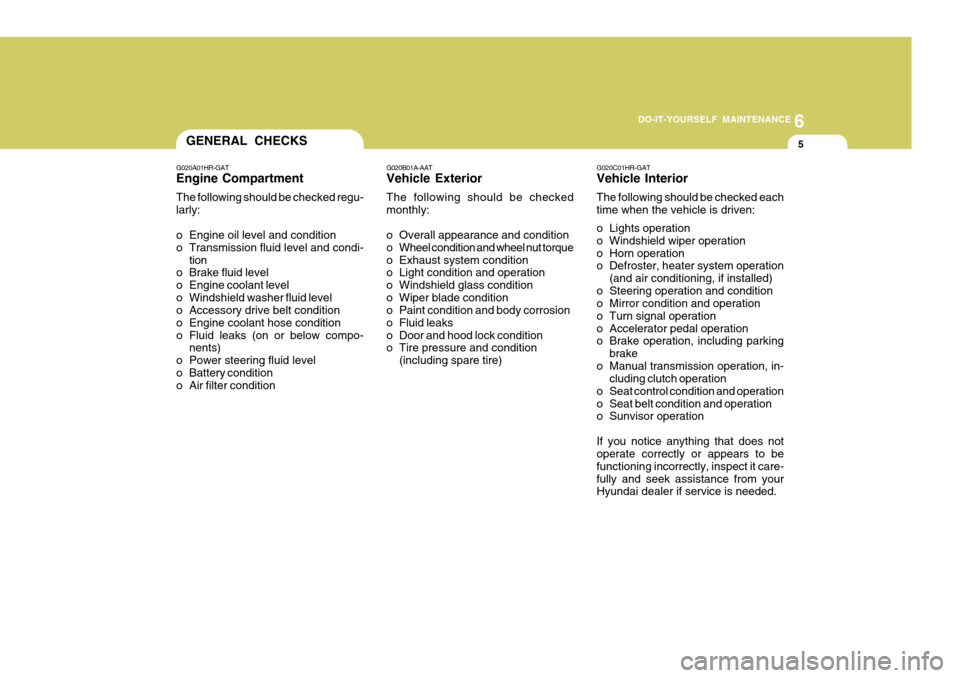
G020A01HR-GAT Engine Compartment The following should be checked regu- larly:
o Engine oil level and condition
o Transmission fluid level and condi-
tion
o Brake fluid level
o Engine coolant level
o Windshield washer fluid level
o Accessory drive belt condition
o Engine coolant hose condition
o Fluid leaks (on or below compo- nents)
o Power steering fluid level
o Battery condition
o Air filter condition G020C01HR-GAT Vehicle Interior The following should be checked each time when the vehicle is driven:
o Lights operation
o Windshield wiper operation
o Horn operation
o Defroster, heater system operation
(and air conditioning, if installed)
o Steering operation and condition
o Mirror condition and operation
o Turn signal operation
o Accelerator pedal operation
o Brake operation, including parking
brake
o Manual transmission operation, in- cluding clutch operation
o Seat control condition and operation
o Seat belt condition and operation
o Sunvisor operation If you notice anything that does not operate correctly or appears to be functioning incorrectly, inspect it care-fully and seek assistance from your Hyundai dealer if service is needed.
G020B01A-AAT Vehicle Exterior The following should be checked monthly:
o Overall appearance and condition
o Wheel condition and wheel nut torque
o Exhaust system condition
o Light condition and operation
o Windshield glass condition
o Wiper blade condition
o Paint condition and body corrosion
o Fluid leaks
o Door and hood lock condition
o Tire pressure and condition
(including spare tire)
GENERAL CHECKS