2010 Hyundai Accent Neutral
[x] Cancel search: NeutralPage 203 of 284

3
WHAT TO DO IN AN EMERGENCY
13
First Aid Kit The first aid kit is located in the trunk. There are some items such as scis- sors, bandage and adhesive tape and etc. in the kit to give first aid to aninjured person. Tire Pressure Gauge (If Installed) You can easily check the tire pressure with a tire pressure gauge that is found in OVM tool bag. Tires normally lose some air in day-to-day use, and youmay have to add a few pounds of air periodically and it is not usually a sign of a leaking tire, but of normal wear.Always check tire pressure when the tires are cold because tire pressure increases with temperature. To check the tire pressure, take the following steps; 1. Unscrew the inflation valve cap that
is located on the rim of the tire.
2. Press and hold the gauge against the tire valve. Some air will escape asyou begin and more will escape if youdon't press the gauge in firmly.
3. A firm non-leaking push will activate
the gauge.
4. Read the tire pressure on the gauge to know whether the tire pressure islow or high.
5. Adjust the tire pressures to the speci- fied pressure. See page 3-5.
6. Reinstall the inflation valve cap.IF YOUR VEHICLE MUST BE TOWED
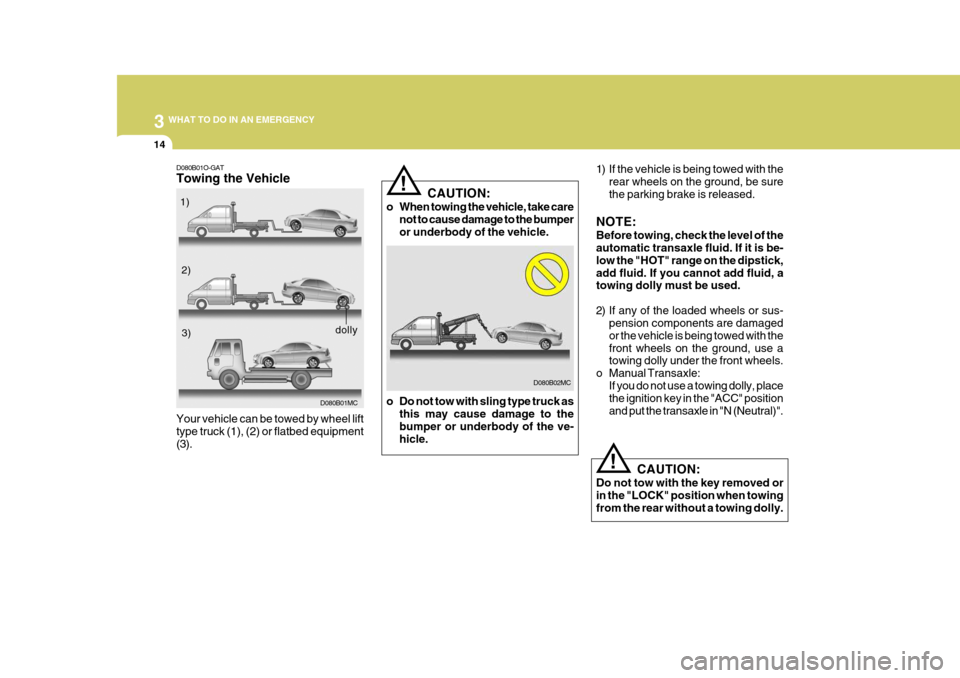
D080A01O-GAT If your vehicle has to be towed, it should be done by your Hyundai dealer or a commercial tow truck service. This will help assure that your vehicle is notdamaged in towing. Also, professionals are generally aware of local laws gov- erning towing. In any case, rather thanrisk damage to your car, it is suggested that you show this information to the tow truck operator. Be sure that a safetychain system is used and that all local laws are observed. It is recommended that your vehicle betowed with a wheel lift and dollies or flatbed equipment with all the wheels off the ground.
! CAUTION:
o Your vehicle can be damaged if towed incorrectly!
o Be sure the transaxle is in neutral.
o When the engine will not start, be sure the steering is unlocked byplacing the key in the "ACC" posi-tion.
Page 204 of 284

3 WHAT TO DO IN AN EMERGENCY
14
!
1) If the vehicle is being towed with the
rear wheels on the ground, be sure the parking brake is released.
NOTE: Before towing, check the level of the automatic transaxle fluid. If it is be- low the "HOT" range on the dipstick,add fluid. If you cannot add fluid, a towing dolly must be used.
2) If any of the loaded wheels or sus- pension components are damaged or the vehicle is being towed with thefront wheels on the ground, use a towing dolly under the front wheels.
o Manual Transaxle: If you do not use a towing dolly, placethe ignition key in the "ACC" position and put the transaxle in "N (Neutral)".
CAUTION:
Do not tow with the key removed orin the "LOCK" position when towing from the rear without a towing dolly.
D080B01O-GAT Towing the Vehicle
D080B01MC
Your vehicle can be towed by wheel lift type truck (1), (2) or flatbed equipment(3). 1)
2)3)
dolly
D080B02MC
CAUTION:
o When towing the vehicle, take care not to cause damage to the bumper or underbody of the vehicle.
o Do not tow with sling type truck as this may cause damage to thebumper or underbody of the ve- hicle.
!
Page 205 of 284

3
WHAT TO DO IN AN EMERGENCY
15
!
D080B03MC
o Automatic Transaxle:
Be sure to use a towing dolly under the front wheels.
CAUTION:
A vehicle with an automatic transaxleshould never be towed from the rearwith the front wheels on the ground. This can cause serious damage to the transaxle.
3) It is recommended that your vehicle be towed with all the wheels off the ground.
D080D01MC-GAT EMERGENCY TOWING
For emergency towing when no com- mercial tow vehicle is available. Do not attempt to tow your vehicle in this manner on any unpaved surface. Thiscould result in serious damage to your car.
OMC045016
OMC045015
Front (If Installed)
Rear Nor should towing be attempted if the wheels, drive train, axles, steering orbrakes are damaged. Before towing, be sure the transaxle is in neutral and the key is in "ACC" (with the engine off) orin the "ON" position (with the engine running). A driver must be in the towed car to steer it and operate the brakes. NOTE: Before towing, check the level of the automatic transaxle fluid. If it is be- low the "HOT" range on the dipstick,add fluid. If you cannot add fluid, a towing dolly must be used.
Page 211 of 284

44CORROSION PREVENTION AND APPEARANCE CARE
4WASHING AND WAXING
E030A02A-AAT Washing Your Hyundai Never wash your car when the surface is hot from being in the sun. Alwayswash your car in the shade. Wash your car frequently. Dirt is abra- sive and can scratch the paint if it is not removed. Air pollution or acid rain may damage the paint and trim throughchemical action if pollutants are al- lowed to remain in contact with the surface. If you live near the ocean or inan area where road salts or dust con- trol chemicals are used, you should pay particular attention to the under-side of the car. Start by rinsing the car to remove dust and loose dirt. In win- ter, or if you have driven through mudor muddy water, be sure to thoroughly clean the underside as well. Use a hard direct stream of water to removeaccumulations of mud or corrosive materials. Use a good quality car-washing solu-tion and follow the manufacturer's di- rections on the package. These are available at your Hyundai dealer orauto parts outlet. Don't use strong household detergents,gasoline, strong solvents or abrasivecleaning powders as these may dam- age the finish. Use a clean sponge or cloth, rinse itfrequently and don't damage the finish by rubbing too hard. For stubborn spots, dampen them frequently and removethem a little at a time. To clean whitewall tires, use a stiff brush or soapy steel-wool scouringpad. To clean plastic wheel covers, use a clean sponge or soft cloth and water. To clean cast aluminum alloy wheels, use a mild soap or neutral detergent.Do not use abrasive cleaners. Protect the bare-metal surfaces by cleaning, polishing and waxing. Because alumi-num is subject to corrosion, be sure to give aluminum alloy wheels special attention in winter. If you drive onsalted roads, clean the wheels thor- oughly afterwards. After washing, be sure to rinse thor- oughly. If soapy water dries on the finish, streaking will result.
When the weather is warm and thehumidity low, you may find it necessaryto rinse each section immediately after washing to avoid streaking. After rinsing, dry the car using a damp chamois or soft, absorbent cloth. The reason for drying the car is to removewater from the car so it will dry without water spots. Don't rub, this can dam- age the finish. If you find any nicks or scratches in the paint, use touch-up paint to cover themto prevent corrosion. To protect the paintwork of the car against corrosion, you must clean your Hyundai (at leastonce a month). Give special attention to the removal of salt, mud and other substances on the underside of thesplashboards of the car. Make sure that the outlets and the underside of the doors are open. Paint damage canbe caused by small accumulation of tar, industrial precipitation, tree resin, insects and bird droppings, when notremoved immediately. If water alone is not strong enough to remove the accu- mulated dirt, use a mild car washingsolution.
Page 225 of 284

5VEHICLE MAINTENANCE REQUIREMENTS
10
F070L01A-AAT
o Suspension Mounting Bolts
Check the suspension connections for
looseness or damage. Retighten to the specified torque. F070J01A-AAT
o Brake Pads, Calipers and
Rotors
Check the pads for excessive wear,
discs for run out and wear, and cali- pers for fluid leakage.
F070K01A-AAT
o Exhaust Pipe and Muffler
Visually inspect the exhaust pipes,
muffler and hangers for cracks, dete-rioration, or damage. Start the engine and listen carefully for any exhaustgas leakage. Tighten connections or replace parts as necessary.
F070F01A-AAT
o Brake Hoses and Lines
Visually check for proper installation, chafing, cracks, deterioration and any leakage. Replace any deteriorated or damaged parts immediately. F070G02A-AAT
o Brake Fluid
Check brake fluid level in the brake fluid reservoir. The level should be between "MIN" and "MAX" marks on the side of the reservoir. Use onlyhydraulic brake fluid conforming to DOT 3 or DOT 4. F070H01A-AAT
o Rear Brake Drums/Linings
Parking Brake
Check the rear brake drums and lin- ings for scoring, burning, leaking fluid, broken parts, and excessive wear. Inspect the parking brake system in-cluding the parking brake lever and cables. For detailed service proce- dures, refer to the Shop Manual.
F070D01A-AAT
o Manual Transaxle Oil Inspect the manual transaxle oil ac- cording to the maintenance schedule. NOTE: If the oil level is low, check for possible leaks before adding oil. Do not overfill. F070E05A-AAT
o Automatic Transaxle Fluid The fluid level should be in the "HOT" range of the dipstick, after the engine and transaxle are at normal operating temperature. Check the automatictransaxle fluid level with the engine running and the transaxle in neutral, with the parking brake properly ap-plied. Use Hyundai Genuine ATF SP- III, DIAMOND ATF SP-III, SK ATF SP-III or other brands approved byHyundai Motor Co., when adding or changing fluid.
Page 241 of 284

6
DO-IT-YOURSELF MAINTENANCE
15CHECKING THE TRANSAXLE FLUID (AUTOMATIC)
G110A01MC-AAT Transaxle fluid in the automatic transaxle should be checked at those intervals specified in the vehicle main- tenance schedule in Section 5. NOTE: Automatic transaxle fluid is basi- cally a red color. As driving distance increases, the fluid color turns dark-ish red gradually. It is normal condi- tion and you should not judge the need to replace based upon thechanging color. You must replace the automatic transaxle fluid in accordance withintervals specified in the vehicle maintenance schedule in section 5.
!WARNING:
The transaxle fluid level should be checked when the engine is at nor- mal operating temperature. This means that the engine, radiator,exhaust system etc., are very hot. Exercise great care not to burn your- self during this procedure. G110D03A-GAT To Check the Transaxle Fluid Level
The automatic transaxle fluid level should be checked regularly. Keep the vehicle on level ground withthe parking brake applied and check the fluid level according to the following procedure. OMC0590061. Place the shift lever in N(neutral)
position and confirm the engine isrunning at normal idle speed.
2. After the transaxle is warmed up
sufficiently [fluid temperature70~80°C (158~176°F)], for example by 10 minutes usual driving, move the shift lever through all positionsthen place the shift lever in N(neutral) or P(park) position.