2010 HUMMER H3 scheduled maintenance
[x] Cancel search: scheduled maintenancePage 2 of 410

2010 HUMMER H3/H3T Owner ManualM
Service and Maintenance. . . 11-1
General Information . . . . . . . . . . 11-1
Scheduled Maintenance . . . . . . 11-2
Recommended Fluids,
Lubricants, and Parts . . . . . . . 11-8
Maintenance Records . . . . . . . 11-11
Technical Data . . . . . . . . . . . . . . . 12-1
Vehicle Identification . . . . . . . . . 12-1
Vehicle Data . . . . . . . . . . . . . . . . . . 12-2
Customer Information . . . . . . . 13-1
Customer Information . . . . . . . . 13-1
Reporting Safety Defects . . . . 13-13
Vehicle Data Recording and
Privacy . . . . . . . . . . . . . . . . . . . . 13-15
Index . . . . . . . . . . . . . . . . . . . . . i-1
Page 22 of 410

1-18 In Brief
Engine Oil Life System
The engine oil life system calculates
engine oil life based on vehicle use
and displays a DIC message when
it is necessary to change the engine
oil and filter.
Resetting the Oil Life System
1. Turn the ignition to ON/RUN,with the engine off.
2. Press and release the stem in the lower center of the
instrument cluster until the
“Oil Life” message is displayed.
3. Once the alternating “Oil Life”
and “Reset” messages appear,
press and hold the stem
until several beeps sound.
This confirms that the oil life
system has been reset.
4. Turn the key to LOCK/OFF.
See Engine Oil Life System
on
page 10‑11.
Fuel E85 (85% Ethanol)
Vehicles that have the
5.3L V8 engine (Code P) have
a yellow fuel cap and can use either
unleaded gasoline or ethanol fuel
containing up to 85% ethanol (E85).
See Fuel E85 (85% Ethanol)
on
page 9‑66. In all other engines,
use only the unleaded gasoline
described under Recommended
Fuel on page 9‑64.
Driving for Better Fuel
Economy
Driving habits can affect fuel
mileage. Here are some driving
tips to get the best fuel economy
possible.
.Avoid fast starts and accelerate
smoothly.
.Brake gradually and avoid
abrupt stops.
.Avoid idling the engine for long
periods of time.
.When road and weather
conditions are appropriate, use
cruise control, if equipped.
.Always follow posted speed
limits or drive more slowly when
conditions require.
.Keep vehicle tires properly
inflated.
.Combine several trips into a
single trip.
.Replace the vehicle's tires with
the same TPC Spec number
molded into the tire's sidewall
near the size.
.Follow recommended scheduled
maintenance.
Page 85 of 410

Seats and Restraints 3-41
on top of the seat fabric, could
also interfere with the operation
of the passenger sensing
system. This could either
prevent proper deployment of
the passenger airbag(s) or
prevent the passenger sensing
system from properly turning
off the passenger airbag(s).
SeePassenger Sensing System
on page 3‑35.
If you have questions, call
Customer Assistance. The
phone numbers and addresses
for Customer Assistance are
in Step Two of the Customer
Satisfaction Procedure in this
manual.
If the vehicle has rollover
roof-rail airbags, see Different
Size Tires and Wheels
on
page 10‑60for additional
important information. Q: Because I have a disability,
I have to get my vehicle
modified. How can I find out
whether this will affect my
airbag system?
A: If you have questions, call
Customer Assistance. The
phone numbers and addresses
for Customer Assistance are
in Step Two of the Customer
Satisfaction Procedure in this
manual.
In addition, your dealer and the
service manual have information
about the location of the airbag
sensors, sensing and diagnostic
module and airbag wiring.
Airbag System Check
The airbag system does not need
regularly scheduled maintenance
or replacement. Make sure the
airbag readiness light is working.
See Airbag Readiness Light
on
page 5‑10for more information.
Notice: If an airbag covering is
damaged, opened, or broken, the
airbag may not work properly.
Do not open or break the airbag
coverings. If there are any
opened or broken airbag covers,
have the airbag covering and/or
airbag module replaced. For the
location of the airbag modules,
see What Makes an Airbag
Inflate?
on page 3‑32. See your
dealer for service.
Page 133 of 410
Instruments and Controls 5-19
Engine Oil Life System
With the engine off, turn the key
to ON/RUN and then press the
reset stem until OIL LIFE RESET
appears—alternating between
OIL LIFE and RESET —on the DIC
display. The CHANGE OIL message
alerts you to change the oil on a
schedule consistent with your
driving conditions. Always reset
the OIL LIFE message after an
oil change. To reset the message,
see Engine Oil Life System
on
page 10‑11.
In addition to the engine oil life
system monitoring the oil life,
additional maintenance is
recommended in the Maintenance
Schedule in this manual. See
Engine Oil
on page 10‑9and
Scheduled Maintenanceon
page 11‑2for more information.
Language
This feature allows you to choose
the language in which the DIC
display shows information.
To set your choice for this feature:
1. With the engine off, turn the key to ON/RUN, but do not start the
engine.
2. Close all doors so the DOORS message does not display in
the DIC.
3. Momentarily press and release the reset stem until the current
language is displayed: English
(default), Spanish, or French.
4. To select a different language, press and hold the reset stem
until the next language appears. 5. Repeat Step 4 until the desired
language is displayed. Once the
desired language is shown on
the DIC display, the language
is set.
6. To exit the language selection, momentarily press and release
the reset stem. All DIC
messages will now display in
the language selected.
Automatic Door Locks
This feature allows you to program
the door locks to a preferred setting.
To set your choice for this feature:
1. With the engine off, turn the keyto LOCK/OFF. Do not remove
the key from the ignition.
2. Press and hold the power door lock button until the DIC display
shows the current door
lock mode.
Page 137 of 410

Instruments and Controls 5-23
Engine Cooling System
Messages
AC (Air Conditioning) OFF
This message displays when the
engine coolant temperature is too
high and the air conditioning in
the vehicle needs to be turned off.
SeeEngine Overheating
on
page 10‑22and Climate Control
Systemson page 8‑1for more
information. This message displays
along with the ENG HOT message.
ENG (Engine) HOT
This message displays when the
engine coolant temperature is
hot. Check the engine coolant
temperature gauge. See Engine
Coolant Temperature Gauge
on
page 5‑9. Have the vehicle
serviced by your dealer as soon
as possible if you suspect the
engine is overheating. See Engine
Overheating
on page 10‑22for more
information.
Engine Oil Messages
CHANGE OIL
This message displays when the
oil needs to be changed. Check
the oil in the vehicle as soon as
possible and have the vehicle
serviced by your dealer. See Engine
Oil
on page 10‑9and Scheduled
Maintenanceon page 11‑2for
more information. Press and release
the reset stem to acknowledge the
message and clear it from the
display.
OIL
This message displays when the oil
pressure is low. See Engine Oil
Pressure Light
on page 5‑17and
Engine Oilon page 10‑9for more
information.
Engine Power Messages
REDUCED POWER
This message displays when the
vehicle's engine power is reduced.
Reduced engine power can affect
the vehicle's ability to accelerate.
If this message is on, but there
is no reduction in performance,
proceed to your destination.
The performance may be reduced
the next time the vehicle is driven.
The vehicle may be driven at a
reduced speed while this message
is on, but acceleration and speed
may be reduced. Anytime this
message stays on, the vehicle
should be taken to your dealer
for service as soon as possible.
Press and release the reset stem
to acknowledge the message and
clear it from the display.
Page 278 of 410

10-12 Vehicle Care
After changing the engine oil, reset
the system:
1. Turn the ignition key to ON/RUNwith the engine off.
2. Press and release the stem in the lower center of the
instrument cluster until the OIL
LIFE message is displayed.
3. Once the alternating “Oil Life”
and “Reset” messages appear,
press and hold the stem until
several beeps sound. This
confirms that the oil life system
has been reset.
4. Turn the key to LOCK/OFF.
If the “Change Oil” message
comes on again and stays on for
30 seconds at the next ignition
cycle, it did not reset. The system
needs to be reset again.What to Do with Used Oil
Used engine oil contains certain
elements that can be unhealthy for
your skin and could even cause
cancer. Do not let used oil stay on
your skin for very long. Clean your
skin and nails with soap and water,
or a good hand cleaner. Wash or
properly dispose of clothing or rags
containing used engine oil. See the
manufacturer's warnings about the
use and disposal of oil products.
Used oil can be a threat to the
environment. If you change your
own oil, be sure to drain all the oil
from the filter before disposal. Never
dispose of oil by putting it in the
trash, pouring it on the ground, into
sewers, or into streams or bodies of
water. Recycle it by taking it to a
place that collects used oil.
Automatic Transmission
Fluid
When to Check and Change
Automatic Transmission Fluid
A good time to check the automatic
transmission fluid level is when the
engine oil is changed.
Change the fluid and filter at the
intervals listed in Scheduled
Maintenance
on page 11‑2, and be
sure to use the transmission fluid
listed in Recommended Fluids and
Lubricants on page 11‑8.
How to Check Automatic
Transmission Fluid
Because this operation can be a
little difficult, you may choose to
have this done at the dealer service
department.
If adding it yourself, be sure to
follow all the instructions here,
or there could be a false reading on
the dipstick.
Page 283 of 410

Vehicle Care 10-17
Engine Air Cleaner/Filter
3.7 L shown (5.3 L similar)
The engine air cleaner/filter is
located in the engine compartment
on the passenger side of the
vehicle. See Engine Compartment
Overview
on page 10‑6for more
information on location.
When to Inspect the Engine Air
Cleaner/Filter
Inspect the air cleaner/filter at the
Maintenance IIintervals and replace
it at the first oil change after each
80 000 km (50,000 mile) interval.
See Scheduled Maintenance
on
page 11‑2for more information.
If you are driving in dusty/dirty
conditions, inspect the filter at each
engine oil change.
How to Inspect the Engine Air
Cleaner/Filter
To inspect or replace the engine air
cleaner/filter:
1. Unfasten the clips that hold the cover on and remove the cover.
2. Lift out the engine air cleaner/filter. 3. Inspect or replace the air filter.
See Maintenance Replacement
Parts
on page 11‑10to determine
which filter to use.
4. Reinstall the engine air cleaner/filter cover. Fasten the
clips to hold the cover in place.
{WARNING
Operating the engine with the air
cleaner/filter off can cause you
or others to be burned. The air
cleaner not only cleans the air; it
helps to stop flames if the engine
backfires. Use caution when
working on the engine and do not
drive with the air cleaner/filter off.
Notice: If the air cleaner/filter is
off, dirt can easily get into the
engine, which could damage it.
Always have the air cleaner/filter
in place when you are driving.
Page 298 of 410
10-32 Vehicle Care
Wiper Blade Replacement
Windshield wiper blades should be
inspected for wear and cracking.
SeeScheduled Maintenance
on
page 11‑2for more information.
Replacement blades come in
different types and are removed
in different ways. For proper type
and length, see Maintenance
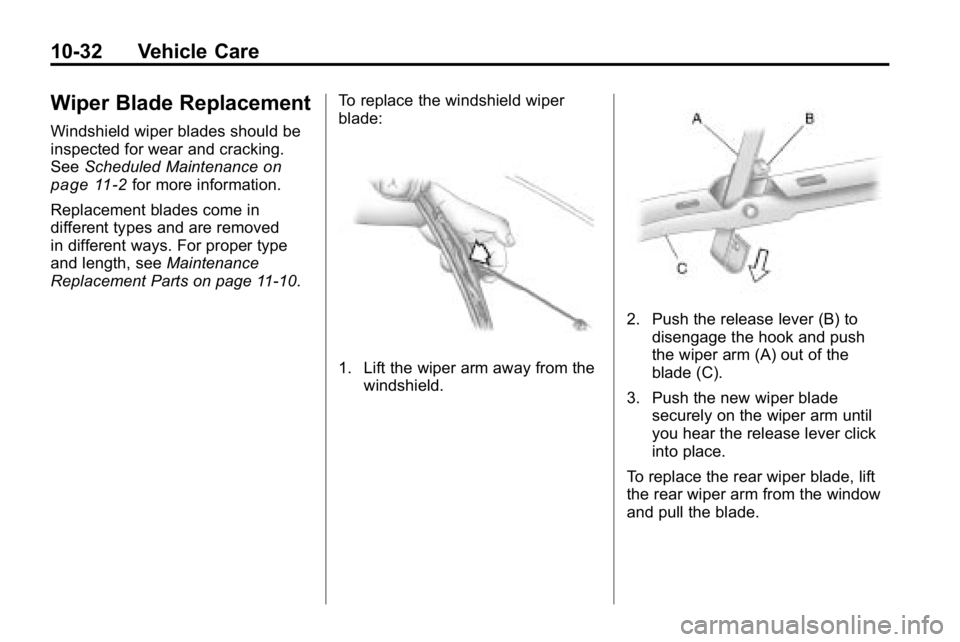
Replacement Parts on page 11‑10. To replace the windshield wiper
blade:
1. Lift the wiper arm away from the
windshield.
2. Push the release lever (B) to
disengage the hook and push
the wiper arm (A) out of the
blade (C).
3. Push the new wiper blade securely on the wiper arm until
you hear the release lever click
into place.
To replace the rear wiper blade, lift
the rear wiper arm from the window
and pull the blade.