2010 HUMMER H3 fuse
[x] Cancel search: fusePage 4 of 410

iv Introduction
{WARNING
These mean there is something
that could hurt you or other
people.
Notice: This means there is
something that could result in
property or vehicle damage.
This would not be covered by
the vehicle's warranty.
A circle with a slash through it
is a safety symbol which means
“Do Not,” “Do not do this” or
“Do not let this happen.”
Symbols
The vehicle has components and
labels that use symbols instead of
text. Symbols are shown along with the text describing the operation or
information relating to a specific
component, control, message,
gauge, or indicator.
M:
This symbol is shown when
you need to see your owner manual
for additional instructions or
information.
*: This symbol is shown when
you need to see a service manual
for additional instructions or
information.
Vehicle Symbol Chart
Here are some additional symbols
that may be found on the vehicle
and what they mean. For more
information on the symbol, refer to
the index.
9: Airbag Readiness Light
#:Air Conditioning
!:Antilock Brake System (ABS)
g:Audio Steering Wheel Controls
or OnStar®
$: Brake System Warning Light
":Charging System
I:Cruise Control
B: Engine Coolant Temperature
O:Exterior Lamps
#:Fog Lamps
.: Fuel Gauge
+:Fuses
i: Headlamp High/Low-Beam
Changer
j: LATCH System Child
Restraints
*: Malfunction Indicator Lamp
::Oil Pressure
}:Power
/:Remote Vehicle Start
>:Safety Belt Reminders
7:Tire Pressure Monitor
F:Traction Control/StabiliTrak
M:Windshield Washer Fluid
Page 36 of 410

2-10 Keys, Doors and Windows
To avoid setting off the alarm by
accident:
.Lock the vehicle with the manual
door lock lever, the power door
lock switch, or the key, after the
doors are closed.
.Unlock the doors by pressing
the unlock button on the RKE
transmitter or by contacting
OnStar. Unlocking a door any
other way activates the alarm.
Press unlock on the RKE
transmitter, start the vehicle with
the correct key, or have OnStar
unlock the doors to turn the alarm
off. The alarm does not stop if a
door is unlocked any other way.
Testing the Alarm
To test the alarm:
1. From inside the vehicle, lock the doors with the RKE transmitter.
2. Unlock the door with the manual door lock and open the door.
The pre-alarm should sound
followed by the full alarm about
10 seconds later.
3. Press the unlock button on the RKE transmitter or start the
engine to turn the alarm off.
If the alarm does not sound but the
lights flash, check to see if the horn
works. The horn fuse could be
blown. To replace the fuse, see
Fuses and Circuit Breakers
on
page 10‑39.
If the alarm does not sound or the
front turn signal lamps do not flash,
see your dealer for service.
Immobilizer
See Radio Frequency Statementon
page 13‑16for information
regarding Part 15 of the Federal
Communications Commission (FCC)
Rules and RSS-210/211 of Industry
Canada.
Immobilizer
Operation (U.S.)
Passlock®is a passive
theft-deterrent system that enables
fuel if the vehicle is started with a
valid key. If an incorrect key is used
or the ignition lock cylinder is
tampered with, the fuel system is
disabled and the vehicle does not
start.
The security light turns off
approximately five seconds after
the engine is started. See Security
Light on page 5‑17.
Page 38 of 410

2-12 Keys, Doors and Windows
If the engine still does not start, and
the key appears to be undamaged,
try another ignition key. Check the
fuse. SeeFuses and Circuit
Breakers
on page 10‑39. If the
engine still does not start with the
other key, the vehicle needs service.
If the vehicle does start, the first key
may be faulty. See your dealer who
can service the theft-deterrent
system and have a new key made.
It is possible for the theft-deterrent
system decoder to learn the
transponder value of a new or
replacement key. Up to 10 keys
can be programmed for the vehicle.
The following procedure is for
programming additional keys only.
If the keys are lost or damaged,
only a dealer can service the
theft-deterrent system to have new
ones made. Two current driver's
keys are required to program
additional keys. To program a new key:
1. Verify that the new key has
PK3+ stamped on it.
2. Insert the current driver's key in the ignition and start the engine.
If the engine does not start see
your dealer for service.
3. After the engine has started, turn the key to LOCK/OFF, and
remove the key.
4. Insert the second current driver's key in the ignition and start the
engine within ten seconds of
removing the previous key. If the
engine does not start see your
dealer for service. 5. After the engine has started,
turn the key to LOCK/OFF, and
remove the key. Insert the key to
be programmed and turn it to
ON/RUN within ten seconds of
removing the previous key.
The security light turns off once
the key has been programmed.
6. Repeat the Steps 1 through 5 if additional keys are to be
programmed.
If the security light comes on
and stays on while driving, the
engine will restart if you turn it off.
However, the theft-deterrent
system is not working properly and
must be serviced by your dealer.
The vehicle is not protected by the
theft-deterrent system at this time.
In an emergency, contact Roadside
Assistance. See Roadside Service
on page 13‑5.
Do not leave the key or device that
disarms or deactivates the theft
deterrent system in the vehicle.
Page 47 of 410

Seats and Restraints 3-3
Front Seats
Seat Adjustment
{WARNING
You can lose control of the
vehicle if you try to adjust a
manual driver's seat while the
vehicle is moving. The sudden
movement could startle and
confuse you, or make you push a
pedal when you do not want to.
Adjust the driver's seat only when
the vehicle is not moving.To move a manual seat forward or
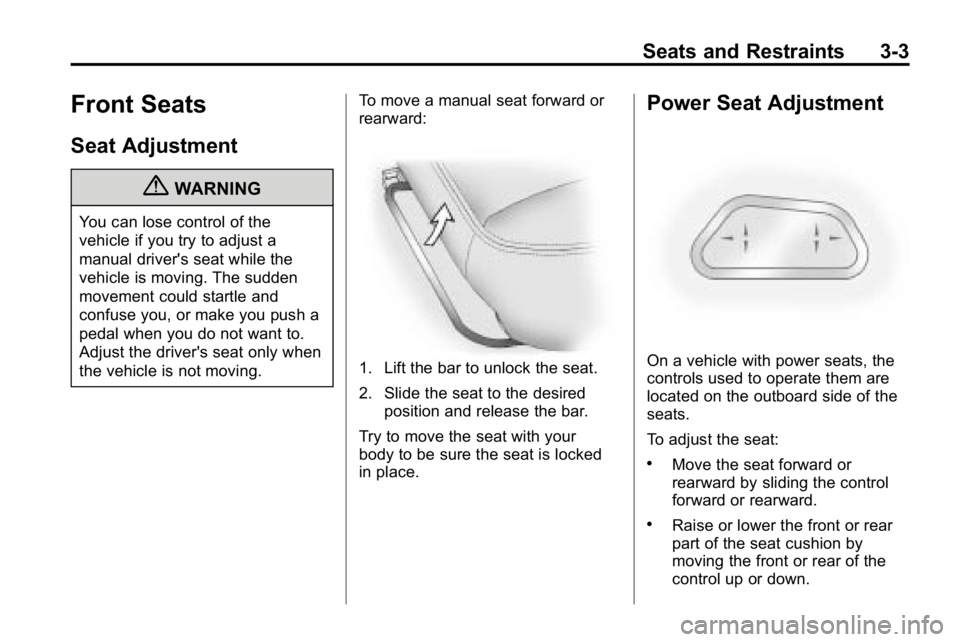
rearward:
1. Lift the bar to unlock the seat.
2. Slide the seat to the desired
position and release the bar.
Try to move the seat with your
body to be sure the seat is locked
in place.
Power Seat Adjustment
On a vehicle with power seats, the
controls used to operate them are
located on the outboard side of the
seats.
To adjust the seat:
.Move the seat forward or
rearward by sliding the control
forward or rearward.
.Raise or lower the front or rear
part of the seat cushion by
moving the front or rear of the
control up or down.
Page 48 of 410

3-4 Seats and Restraints
.Raise or lower the entire seat
cushion by moving the control
up or down.
Lumbar Adjustment
Manual Lumbar
On vehicles with this feature, the
knob is located on the outboard side
of the seat.
Turn the knob clockwise or
counterclockwise to increase or
decrease the lumbar support.
Power Lumbar
On vehicles with this feature, the
control is located on the outboard
side of the seat(s).
To increase or decrease lumbar
support, press and hold the front or
rear of the control.
Reclining Seatbacks
{WARNING
You can lose control of the
vehicle if you try to adjust a
manual driver's seat while the
vehicle is moving. The sudden
movement could startle and
confuse you, or make you push a
pedal when you do not want to.
Adjust the driver's seat only when
the vehicle is not moving.
{WARNING
If either seatback is not locked, it
could move forward in a sudden
stop or crash. That could cause
injury to the person sitting there.
Always push and pull on the
seatbacks to be sure they are
locked.
Page 119 of 410

Instruments and Controls 5-5
Power Outlets
The accessory power outlets can be
used to connect auxiliary electrical
equipment, such as a cellular
phone.
There are two accessory power
outlets located under the climate
control system. There is also one
accessory power outlet located in
the rear cargo area (H3 model only).
Pull down the small cover to access
the accessory power outlet.
Notice:Leaving electrical
equipment on for extended
periods will drain the battery.
Always unplug electrical
equipment when not in use
and do not plug in equipment
that exceeds the maximum
amperage rating of 20 amperes. Certain electrical accessories
may not be compatible with the
accessory power outlet and could
result in blown vehicle or adapter
fuses. If you experience a problem,
see your dealer for additional
information on accessory power
outlets.
Notice:
Adding any electrical
equipment to the vehicle
can damage it or keep other
components from working as
they should. The repairs would
not be covered by the vehicle
warranty. Do not use equipment
exceeding maximum amperage
rating of 20 amperes. Check
with your dealer before adding
electrical equipment.
When adding electrical equipment,
be sure to follow the proper
installation instructions included
with the equipment. Notice:
Improper use of the
power outlet can cause damage
not covered by the vehicle
warranty. Do not hang any type
of accessory or accessory
bracket from the plug because
the power outlets are designed
for accessory power plugs only.
Cigarette Lighter
For vehicles with a lighter, push the
lighter down and it will pop up when
it is ready to be used.
Notice: Holding a cigarette lighter
in while it is heating does not let
the lighter back away from the
heating element when it is hot.
Damage from overheating can
occur to the lighter or heating
element, or a fuse could be
blown. Do not hold a cigarette
lighter in while it is heating.
Page 149 of 410

Lighting 6-5
During that delay, the instrument
panel cluster may not be as bright
as usual. Make sure the instrument
panel brightness control is in the
full bright position. SeeInstrument
Panel Illumination Control
on
page 6‑7.
Hazard Warning Flashers
|
(Hazard Warning Flasher):
Press this button located on the
instrument panel, to make the front
and rear turn signal lamps flash on
and off. This warns others that you
are having trouble.
Press
|again to turn the
flashers off.
Turn and Lane-Change
Signals
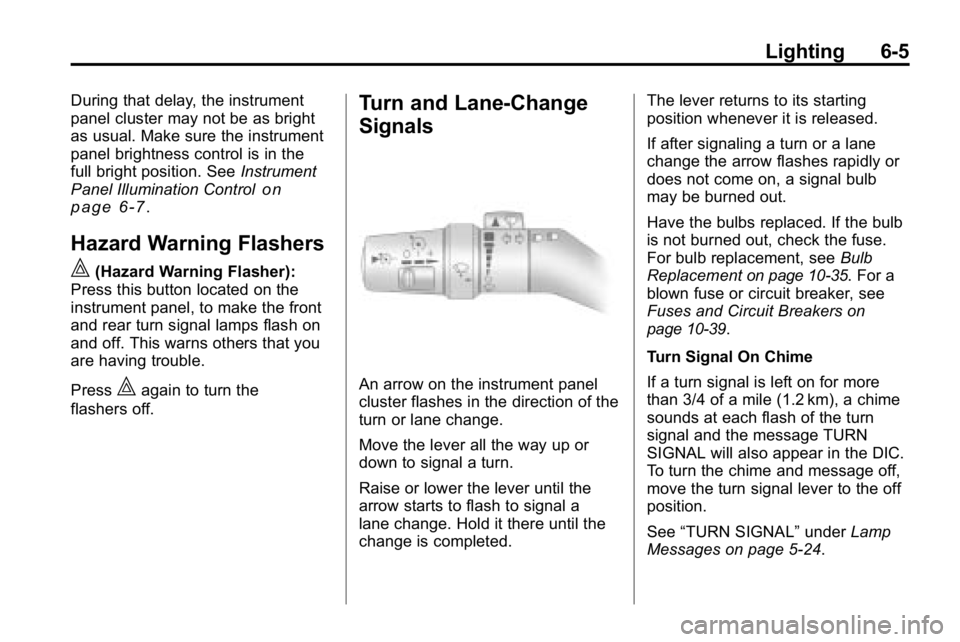
An arrow on the instrument panel
cluster flashes in the direction of the
turn or lane change.
Move the lever all the way up or
down to signal a turn.
Raise or lower the lever until the
arrow starts to flash to signal a
lane change. Hold it there until the
change is completed. The lever returns to its starting
position whenever it is released.
If after signaling a turn or a lane
change the arrow flashes rapidly or
does not come on, a signal bulb
may be burned out.
Have the bulbs replaced. If the bulb
is not burned out, check the fuse.
For bulb replacement, see
Bulb
Replacement
on page 10‑35. For a
blown fuse or circuit breaker, see
Fuses and Circuit Breakers
on
page 10‑39.
Turn Signal On Chime
If a turn signal is left on for more
than 3/4 of a mile (1.2 km), a chime
sounds at each flash of the turn
signal and the message TURN
SIGNAL will also appear in the DIC.
To turn the chime and message off,
move the turn signal lever to the off
position.
See “TURN SIGNAL” underLamp
Messages on page 5‑24.
Page 193 of 410

Driving and Operating 9-9
.Always carry a litter bag and
make sure all refuse is removed
from any campsite before
leaving.
.Take extreme care with open
fires (where permitted), camp
stoves, and lanterns.
.Never park your vehicle over
dry grass or other combustible
materials that could catch fire
from the heat of the vehicle's
exhaust system.
Traveling to Remote Areas
It makes sense to plan your trip,
especially when going to a remote
area. Know the terrain and plan
your route. Get accurate maps of
trails and terrain. Check to see if
there are any blocked or closed
roads.It is also a good idea to travel with
at least one other vehicle in case
something happens to one of them.
For vehicles with a winch, be sure
to read the winch instructions. In a
remote area, a winch can be handy
if you get stuck but you will want to
know how to use it properly.
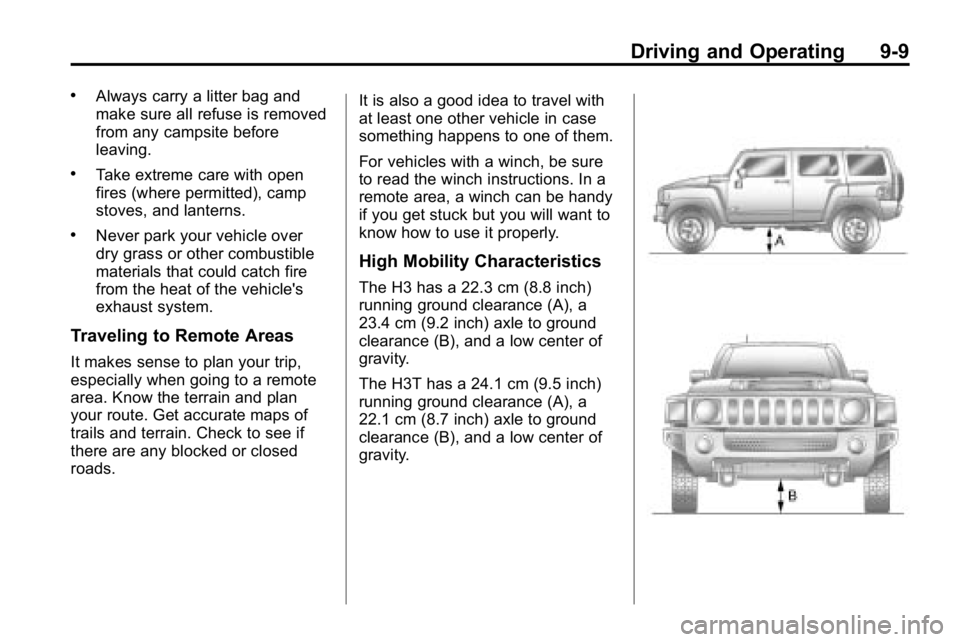
High Mobility Characteristics
The H3 has a 22.3 cm (8.8 inch)
running ground clearance (A), a
23.4 cm (9.2 inch) axle to ground
clearance (B), and a low center of
gravity.
The H3T has a 24.1 cm (9.5 inch)
running ground clearance (A), a
22.1 cm (8.7 inch) axle to ground
clearance (B), and a low center of
gravity.