Page 106 of 410

3-62 Seats and Restraints
Securing Child Restraints
(Right Front Seat
Position)
The vehicle has airbags. A rear
seat is a safer place to secure
a forward-facing child restraint.
SeeWhere to Put the Restraint
on
page 3‑49.
In addition, the vehicle has a
passenger sensing system which is
designed to turn off the right front
passenger frontal airbag under
certain conditions. See Passenger
Sensing System
on page 3‑35and Passenger Airbag Status
Indicatoron page 5‑11for more
information, including important
safety information.
A label on the sun visor says,
“Never put a rear-facing child seat
in the front.” This is because the risk
to the rear-facing child is so great,
if the airbag deploys.
{WARNING
A child in a rear-facing child
restraint can be seriously
injured or killed if the right
front passenger airbag inflates.
This is because the back of the
rear-facing child restraint would
be very close to the inflating
airbag. A child in a forward-facing
child restraint can be seriously
injured or killed if the right front
passenger airbag inflates and the
passenger seat is in a forward
position.
Even if the passenger sensing
system has turned off the right
front passenger frontal airbag, no
system is fail-safe. No one can
guarantee that an airbag will not
deploy under some unusual
circumstance, even though it is
turned off.
(Continued)
WARNING (Continued)
Secure rear-facing child
restraints in a rear seat, even if
the airbag is off. If you secure a
forward-facing child restraint in
the right front seat, always move
the front passenger seat as far
back as it will go. It is better to
secure the child restraint in a
rear seat.
SeePassenger Sensing System
on page 3‑35for additional
information.
If the child restraint has the LATCH
system, see Lower Anchors and
Tethers for Children (LATCH
System)
on page 3‑51for how and
where to install the child restraint
using LATCH. If a child restraint is
secured using a safety belt and it
uses a top tether, see Lower
Anchors and Tethers for Children
(LATCH System)
on page 3‑51for
top tether anchor locations.
Page 107 of 410

Seats and Restraints 3-63
Do not secure a child seat in a
position without a top tether anchor
if a national or local law requires
that the top tether be anchored, or if
the instructions that come with the
child restraint say that the top strap
must be anchored.
In Canada, the law requires that
forward-facing child restraints have
a top tether, and that the tether be
attached.
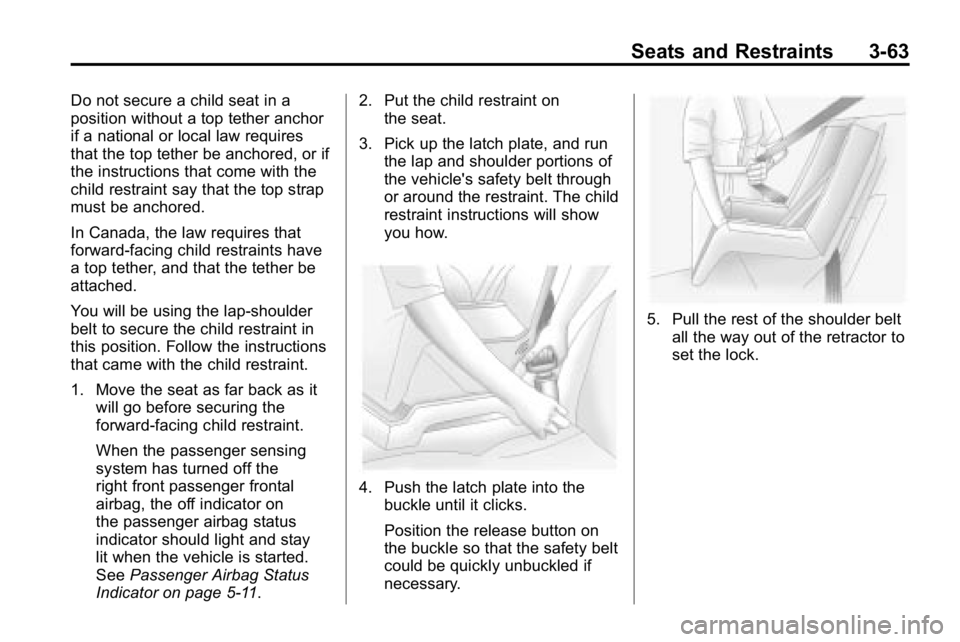
You will be using the lap-shoulder
belt to secure the child restraint in
this position. Follow the instructions
that came with the child restraint.
1. Move the seat as far back as itwill go before securing the
forward-facing child restraint.
When the passenger sensing
system has turned off the
right front passenger frontal
airbag, the off indicator on
the passenger airbag status
indicator should light and stay
lit when the vehicle is started.
See Passenger Airbag Status
Indicator on page 5‑11. 2. Put the child restraint on
the seat.
3. Pick up the latch plate, and run the lap and shoulder portions of
the vehicle's safety belt through
or around the restraint. The child
restraint instructions will show
you how.
4. Push the latch plate into thebuckle until it clicks.
Position the release button on
the buckle so that the safety belt
could be quickly unbuckled if
necessary.
5. Pull the rest of the shoulder beltall the way out of the retractor to
set the lock.
Page 108 of 410
3-64 Seats and Restraints
6. To tighten the belt, push downon the child restraint, pull the
shoulder portion of the belt to
tighten the lap portion of the belt
and feed the shoulder belt back
into the retractor. When installing
a forward-facing child restraint, it
may be helpful to use your knee
to push down on the child
restraint as you tighten the belt.
7. Push and pull the child restraint in different directions to be sure
it is secure. If the airbag is off, the off indicator
in the passenger airbag status
indicator will come on and stay on
when the vehicle is started.
If a child restraint has been
installed and the on indicator is lit,
see
“If the On Indicator is Lit for a
Child Restraint ”under Passenger
Sensing System
on page 3‑35for
more information.
To remove the child restraint,
unbuckle the vehicle safety belt and
let it return to the stowed position.
Page 153 of 410

Lighting 6-9
A high electrical load occurs when
several of the following are on, such
as: headlamps, high beams, fog
lamps, rear window defogger,
climate control fan at high speed,
heated seats, engine cooling fans,
trailer loads, and loads plugged into
accessory power outlets.
EPM works to prevent excessive
discharge of the battery. It does this
by balancing the generator's output
and the vehicle's electrical needs.
It can increase engine idle speed to
generate more power, whenever
needed. It can temporarily reduce
the power demands of some
accessories.Normally, these actions occur in
steps or levels, without being
noticeable. In rare cases at the
highest levels of corrective action,
this action may be noticeable to the
driver. If so, a Driver Information
Center (DIC) message might be
displayed, such as BATTERY
SAVER ACTIVE, BATTERY
VOLTAGE LOW, or LOW BATTERY.
If one of these messages displays,
it is recommended that the driver
reduce the electrical loads as much
as possible. See
Driver Information
Center (DIC) on page 5‑18.Battery Power Protection
The dome lamp is shut off if it is left
on for more than 20 minutes when
the ignition is in LOCK/OFF. This
helps to prevent the battery from
being drained.
Page 184 of 410
8-4 Climate Controls
Air Vents
Use the air outlets located in the
center and on the side of the
instrument panel to direct the
airflow.
Move the louvers up or down to
change the direction of the airflow.
Use the thumbwheel under the
outlets to change the direction of
the airflow from left to right.Operation Tips.Use the recirculation mode for
maximum air conditioning
performance.
.Clear away any ice, snow or
leaves from the air inlets at the
base of the windshield that may
block the flow of air into the
vehicle.
.Use of non-HUMMER approved
hood deflectors may adversely
affect the performance of the
system.
.Keep the path under the front
seats clear of objects to help
circulate the air inside of the
vehicle more effectively.
Page 216 of 410

9-32 Driving and Operating
Similar appearing vehicles may
have different GVWRs and
capacity weights. Please note
the vehicle's Certification/Tire
label or consult your dealer for
additional details.
{WARNING
Do not load the vehicle any
heavier than the Gross
Vehicle Weight Rating
(GVWR), or either the
maximum front or rear Gross
Axle Weight Rating (GAWR).
If you do, parts on the vehicle
can break, and it can change
the way the vehicle handles.
These could cause you to
lose control and crash. Also,
overloading can shorten the
life of the vehicle. Using heavier suspension
components to get added
durability might not change
the weight ratings. Ask your
dealer to help you load the
vehicle the right way.Notice :Overloading the
vehicle may cause damage.
Repairs would not be covered
by the vehicle warranty. Do
not overload the vehicle.
If you put things inside your
vehicle –like suitcases,
tools, packages, or anything
else –they will go as fast as the
vehicle goes. If you have to stop
or turn quickly, or if there is a
crash, they will keep going.
{WARNING
Things you put inside your
vehicle can strike and injure
people in a sudden stop or
turn, or in a crash.
.Put things in the cargo
area of your vehicle. Try to
spread the weight evenly.
.Never stack heavier
things, like suitcases,
inside the vehicle so that
some of them are above
the tops of the seats.
.Do not leave an
unsecured child restraint
in your vehicle.
.When you carry something
inside the vehicle, secure
it whenever you can.
.Do not leave a seat folded
down unless you need to.
Page 307 of 410

Vehicle Care 10-41
FuseUsage
1 Heated Seats
2 Grille Guard
3 Stop Lamp
(H3T Only)
4 Roof Rack Lamps
5 Battery Ignition
Switch
6 Front Wiper
7 Regulated Voltage
Control Power
8 Power Locks
9 Sunroof, Front
Washer Pump
10 Accessories (SPO) 11 Not Used
12 Transfer Case
Control Module
13 Radio
14 Body Control
Module Fuse
Usage
15 Rear Wiper Motor
(H3 Only)
16 Rear Wiper Pump
Switch (H3 Only)
17 Air Injection Reactor
(AIR) Pump Relay/
Transmission
Control Module
(TCM) (V8 Only)
18 Rear Vision Camera
19 Cluster
20 Rear Turn Lamp,
Hazard Lamp
21 Powertrain Control
Module 1
22 Mass Air Flow
Sensor, Canister
Vent Purge Solenoid
23 Injector/V8 Coil
24 Fog Lamp
25 Powertrain Control
Module B Fuse
Usage
26 Transmission
Control
Module (TCM)
27 Airbags
28 Not Used
29 Antilock Brake
System, StabiliTrak
®
30Rear Window
Defogger
31 Canister Vent
32 Regulated Voltage
Control Sensor
33 Ignition 1
34 Transmission
35 Cruise Control,
Miscellaneous
36 Horn
37 Driver Side Rear
Park Lamp
38 Amplifier
Page 308 of 410

10-42 Vehicle Care
FuseUsage
39 Daytime Running
Lamps
40 Passenger Side
Headlamp
41 Driver Side
Headlamp
42 Trailer
Back-Up Lamp
43 Front Park Lamps
44 Air Injection Reactor
(AIR) Solenoid
45 Auxiliary Power 2/
Cigarette Lighter
46 Electronic Throttle
Control
47 Oxygen Sensor
48 Air Conditioning
Clutch
49 Rear Park Lamp
50 Stop Lamp Fuse
Usage
51 Auxiliary Power 1/
Cigarette Lighter
52 StabiliTrak
®,
Antilock Brake
System
53 Power Heated Seat,
Belt Switch
54 Fuel System Control
Module (FSCM)
55 Trailer Parking
Lamps
56 Front Turn Signal,
Hazard Signal,
Courtesy Mirror
57 Power Sunroof
58 Transfer Case
Control Module
Switch
59 Climate Controls
Control Head
60 Back‐Up Lamp
61 Power Seats Fuse Usage
62 Air Injection Reactor
(AIR) Pump
63 Passenger Side
Power Window
64 Antilock Brake
System,
StabiliTrak
®2
Solenoid
67 Antilock Brake
System,
StabiliTrak
®1 Motor
68 Driver Side Power
Window
82 Climate Control Fan
83 Electronic Brake
Controller
84 Trailer B+ Fuse
85 Starter
91 Generator Megafuse