2010 HUMMER H3 lock
[x] Cancel search: lockPage 238 of 410

9-54 Driving and Operating
When the vehicle is started and
begins to move, the system
performs several diagnostic checks
to insure there are no problems.
The system may be heard or felt
while it is working. This is normal
and does not mean there is a
problem with the vehicle.
If cruise control is being used when
StabiliTrak activates, the cruise
control automatically disengages.
The cruise control can be
re-engaged when road conditions
allow. SeeCruise Control
on
page 9‑57.
If there is a problem detected with
StabiliTrak, a SERVICE STAB SYS
message displays on the Driver
Information Center (DIC). See
Driver Information Center (DIC)
on
page 5‑18for more information.
When this message is displayed,
the system is not working. Adjust
your driving accordingly. StabiliTrak comes on automatically
whenever the vehicle is started and
resets itself at each ignition cycle.
However, when the transfer case is
placed in Four‐Wheel‐Low Lock
mode, StabiliTrak is automatically
disabled. See
Four-Wheel Drive
on
page 9‑46for more information.
It is recommended to leave the
system on for normal driving
conditions, but it may be necessary
to turn the system off if the vehicle
is stuck in sand, mud, ice, or snow,
and it is necessary to “rock”the
vehicle to attempt to free it. See If
the Vehicle is Stuck
on page 9‑26.
This light comes on steady when
TCS has been turned off. This light
flashes when StabiliTrak is active. To Turn off TCS and StabiliTrak,
press and hold the TCS/StabiliTrak
button until STAB SYS OFF
displays on the DIC. Press and
release the TCS/StabiliTrak button
again to turn StabiliTrak back on.
Locking Rear Axle
For vehicles with this feature,
additional traction can be obtained
from the rear wheels when traveling
in off-road situations such as mud,
snow, sand, steep hills and uneven
terrain.
The button used to turn this
feature on or off is located on the
instrument panel.
Page 239 of 410

Driving and Operating 9-55
To lock the rear axle, do the
following:
1. Place the transfer case in the4LO Lock mode. This is the
only mode which will allow
the rear axle to lock. See
Four-Wheel Drive
on page 9‑46for more information regarding
the transfer case and
4LO Lock mode.
2. Press the rear axle locking button with the vehicle moving
less than 26 km/h (16 mph).
The light in the button stops flashing
and remains illuminated when the
rear axle is locked.
Notice: If you try to lock the axle
while the vehicle is stuck and the
tires are spinning, the vehicle's
drivetrain could be damaged. The repairs would not be covered
by the vehicle warranty. Always
lock the axle before attempting
situations and/or navigating
terrain which could possibly
cause the vehicle to become
stuck.
The locking rear axle will be
disengaged when the wheel speed
is greater than 64 km/h (40 mph),
if the vehicle's battery is low and/or
the transfer case is shifted out of
4LO Lock mode.
Notice:
If the vehicle's axle
is locked while driving on
pavement, the drivetrain could be
damaged. Repairs would not be
covered by the vehicle warranty.
Do not use the locking axle on
pavement. If four-wheel drive is
needed when traveling on
pavement, use only 4HI.
Locking Front Axle
For vehicles with this feature, the
locking front axle, used with the
locking rear axle, can give the
vehicle additional traction when
traveling in off-road situations such
as mud, snow, sand, steep hills and
uneven terrain.
The button used to turn the locking
front axle on or off is located on the
instrument panel.
Before the front axle can be locked,
the rear axle must be locked.
Page 240 of 410

9-56 Driving and Operating
To lock the front and rear axles:
1. Place the transfer case in the4LO Lock mode. This is the
only mode which allows the
front and rear axles to lock.
See Four-Wheel Drive
on
page 9‑46for more information
regarding the transfer case and
4LO Lock mode.
2. Press the rear axle locking button with the vehicle moving
less than 16 mph (26 km/h).
3. Wait for the light in the button to stop flashing and remain
illuminated to show that the rear
axle is locked.
4. Press the front axle locking button with the vehicle stopped
or moving less than 26 km/h
(16 mph). 5. Wait for the light in the button
to stop flashing and remain
illuminated to show that the front
axle is locked.
Notice: If you try to lock the axle
while the vehicle is stuck and the
tires are spinning, the vehicle's
drivetrain could be damaged.
The repairs would not be covered
by the vehicle warranty. Always
lock the axle before attempting
situations and/or navigating
terrain which could possibly
cause the vehicle to become
stuck. Locking axles will be disengaged
when the wheel speed is greater
than 64 km/h (40 mph), if the
vehicle's battery is low and/or the
transfer case is shifted out of
4LO Lock mode.
Notice:
If the vehicle's axle
is locked while driving on
pavement, the drivetrain could be
damaged. Repairs would not be
covered by the vehicle warranty.
Do not use the locking axle on
pavement. If four-wheel drive is
needed when traveling on
pavement, use only 4HI.
Page 252 of 410

9-68 Driving and Operating
Filling the Tank
{WARNING
Fuel vapor burns violently and a
fuel fire can cause bad injuries.
To help avoid injuries to you and
others, read and follow all the
instructions on the fuel pump
island. Turn off the engine when
refueling. Do not smoke near fuel
or when refueling the vehicle. Do
not use cellular phones. Keep
sparks, flames, and smoking
materials away from fuel. Do not
leave the fuel pump unattended
when refueling the vehicle. This is
against the law in some places.
Do not re-enter the vehicle while
pumping fuel. Keep children away
from the fuel pump; never let
children pump fuel.
The fuel cap is located on the driver
side of the vehicle.
To remove the fuel cap, turn it
slowly counterclockwise. While
refueling, let the fuel cap hang by
the tether, if it has one.
When reinstalling the cap, turn
it clockwise until three clicks,
otherwise the Malfunction
Indicator Lamp could turn on.
SeeMalfunction Indicator Lamp
on
page 5‑12.
{WARNING
Fuel can spray out on you if you
open the fuel cap too quickly.
If you spill fuel and then
something ignites it, you could
be badly burned. This spray can
happen if the tank is nearly full,
and is more likely in hot weather.
Open the fuel cap slowly and wait
for any hiss noise to stop. Then
unscrew the cap all the way.
Be careful not to spill fuel. Do not
top off or overfill the tank and wait
a few seconds after you have
finished pumping before removing
the nozzle. Clean fuel from painted
surfaces as soon as possible. See
Exterior Care on page 10‑92.
When replacing the fuel cap,
turn it clockwise until three clicks.
Make sure the cap is fully installed.
The diagnostic system can
determine if the fuel cap has been
left off or improperly installed.
Page 264 of 410

9-80 Driving and Operating
The trailer towing harness contains
the following seven trailer circuits:
.Yellow: Left Stop/Turn Signal
.Dark Green: Right Stop/Turn
Signal
.Brown: Taillamps
.White: Ground
.Light Green: Back-up Lamps
.Red: Battery Feed
.Dark Blue: Trailer Brake
If charging a remote (non‐vehicle)
battery, turn on the headlamps to
boost the vehicle system voltage to
properly charge the battery. Four-Wire Harness Adapter
If towing a light-duty trailer with
a standard four-way, flat pin
connector, an adapter is available
from your dealer.
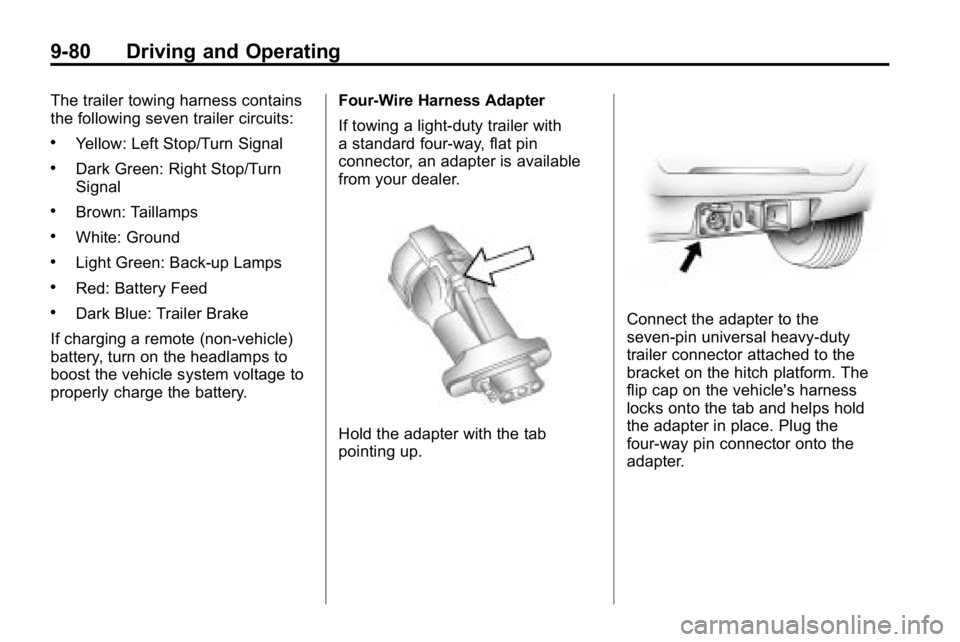
Hold the adapter with the tab
pointing up.
Connect the adapter to the
seven‐pin universal heavy‐duty
trailer connector attached to the
bracket on the hitch platform. The
flip cap on the vehicle's harness
locks onto the tab and helps hold
the adapter in place. Plug the
four-way pin connector onto the
adapter.
Page 267 of 410

Vehicle Care 10-1
Vehicle Care
General Information
General Information . . . . . . . . . . 10-2
California Proposition65 Warning . . . . . . . . . . . . . . . . . 10-2
California Perchlorate Materials Requirements . . . . 10-3
Accessories and Modifications . . . . . . . . . . . . . . . 10-3
Vehicle Checks
Doing Your OwnService Work . . . . . . . . . . . . . . . 10-4
Hood . . . . . . . . . . . . . . . . . . . . . . . . 10-5
Engine Compartment Overview . . . . . . . . . . . . . . . . . . . 10-6
Engine Oil . . . . . . . . . . . . . . . . . . . 10-9
Engine Oil Life System . . . . . 10-11
Automatic Transmission Fluid . . . . . . . . . . . . . . . . . . . . . . 10-12
Manual Transmission Fluid . . . . . . . . . . . . . . . . . . . . . . 10-15 Hydraulic Clutch . . . . . . . . . . . . 10-16
Engine Air Cleaner/Filter . . . . 10-17
Cooling System . . . . . . . . . . . . 10-18
Engine Coolant . . . . . . . . . . . . . 10-19
Engine Overheating . . . . . . . . 10-22
Engine Fan . . . . . . . . . . . . . . . . . 10-24
Power Steering Fluid . . . . . . . 10-24
Washer Fluid . . . . . . . . . . . . . . . 10-25
Brakes . . . . . . . . . . . . . . . . . . . . . 10-26
Brake Fluid . . . . . . . . . . . . . . . . . 10-27
Battery . . . . . . . . . . . . . . . . . . . . . 10-28
Four-Wheel Drive . . . . . . . . . . . 10-29
Front Axle . . . . . . . . . . . . . . . . . . 10-29
Rear Axle . . . . . . . . . . . . . . . . . . 10-29
Starter Switch Check . . . . . . . 10-30
Automatic Transmission Shift
Lock Control System
Check . . . . . . . . . . . . . . . . . . . . . 10-30
Ignition Transmission Lock Check . . . . . . . . . . . . . . . . . . . . . 10-31
Park Brake and P (Park) Mechanism Check . . . . . . . . 10-31
Wiper Blade Replacement . . . . . . . . . . . . . . 10-32
Headlamp Aiming
Headlamp Aiming . . . . . . . . . . 10-33
Bulb Replacement
Bulb Replacement . . . . . . . . . . 10-35
Halogen Bulbs . . . . . . . . . . . . . . 10-35
Headlamps . . . . . . . . . . . . . . . . . 10-35
Taillamps, Turn Signal,Stoplamps, and Back-Up
Lamps (H3) . . . . . . . . . . . . . . . 10-35
Taillamps, Turn Signal, Stoplamps, and Back-Up
Lamps (H3T) . . . . . . . . . . . . . . 10-36
License Plate Lamp . . . . . . . . 10-37
Replacement Bulbs . . . . . . . . . 10-37
Electrical System
Electrical System Overload . . . . . . . . . . . . . . . . . . 10-38
Fuses and Circuit Breakers . . . . . . . . . . . . . . . . . . 10-39
Engine Compartment Fuse Block . . . . . . . . . . . . . . . . . . . . . 10-39
Page 269 of 410

Vehicle Care 10-3
California Perchlorate
Materials Requirements
Certain types of automotive
applications, such as airbag
initiators, seat belt pretensioners,
and lithium batteries contained in
remote keyless transmitters, may
contain perchlorate materials.
Special handling may be necessary.
For additional information, see
www.dtsc.ca.gov/hazardouswaste/
perchlorate.
Accessories and
Modifications
Adding non‐dealer/non‐retailer
accessories to the vehicle can affect
vehicle performance and safety,
including such things as airbags,
braking, stability, ride and handling,
emissions systems, aerodynamics,
durability, and electronic systems
like antilock brakes, traction control,
and stability control. Some of these
accessories could even cause
malfunction or damage not covered
by the vehicle warranty.
Damage to vehicle components
resulting from the installation or
use of non‐certified parts, including
control module modifications, isnot covered under the terms of the
vehicle warranty and may affect
remaining warranty coverage for
affected parts.
HUMMER Accessories are
designed to complement and
function with other systems on
the vehicle. Your HUMMER
dealer/retailer can accessorize the
vehicle using genuine HUMMER
Accessories. When you go to your
HUMMER dealer/retailer and ask
for HUMMER Accessories, you will
know that HUMMER-trained and
supported service technicians will
perform the work using genuine
HUMMER Accessories.
Also, see
Adding Equipment to the
Airbag-Equipped Vehicle
on
page 3‑40.
Page 273 of 410

Vehicle Care 10-7
A. Windshield Washer FluidReservoir. See “Adding Washer
Fluid” under Washer Fluid
on
page 10‑25.
B. Engine Coolant Recovery Tank. See Engine Coolant
on
page 10‑19.
C. Engine Air Cleaner/Filter
on
page 10‑17.
D. Power Steering Fluid Reservoir. See Power Steering Fluid
on
page 10‑24.
E. Automatic Transmission Fluid Dipstick (If Equipped). See
“Checking the Fluid Level” under
Automatic Transmission Fluid
on
page 10‑12.
F. Engine Oil Fill Cap. See “When
to Add Engine Oil” underEngine
Oil on page 10‑9. G. Radiator Pressure Cap. See
Cooling System on page 10‑18.
H. Remote Negative (−) Terminal (GND). See Jump Starting
on
page 10‑86.
I. Engine Oil Dipstick. See “Checking Engine Oil” under
Engine Oil on page 10‑9.
J. Positive (+) Battery Terminal. See Jump Starting
on
page 10‑86.
K. Brake Fluid Reservoir. See “Brake Fluid” under
Brakes on page 10‑26.
L. Engine Compartment Fuse
Block on page 10‑39.
M. Battery on page 10‑28.
N. Hydraulic Clutch Fluid Reservoir (If Equipped). See Hydraulic
Clutch on page 10‑16.