Page 422 of 526
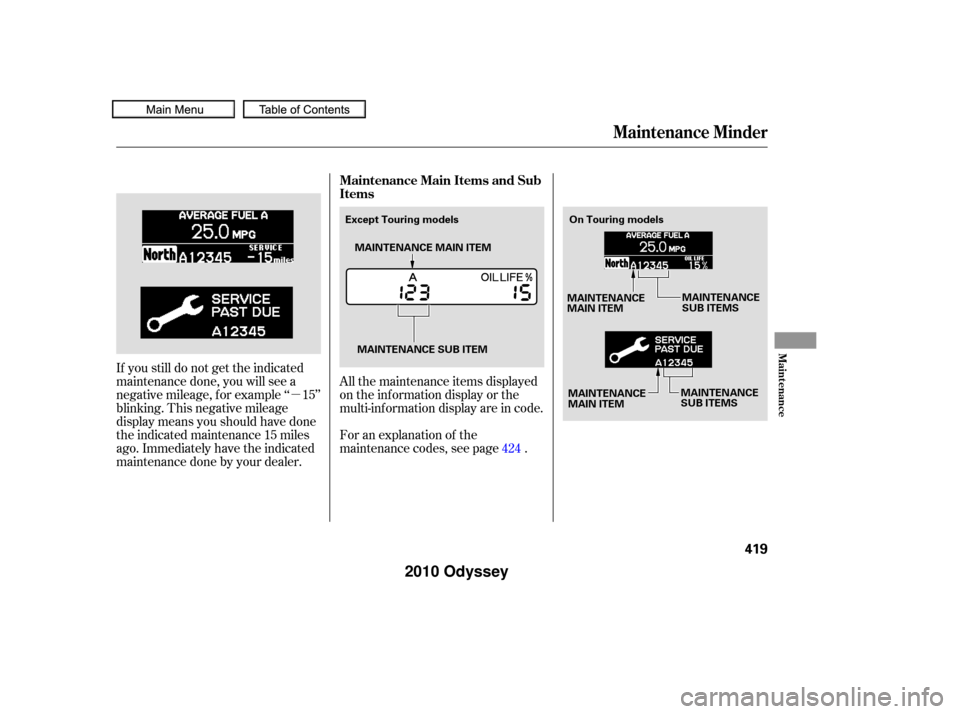
�µAll the maintenance items displayed
on the inf ormation display or the
multi-inf ormation display are in code.
For an explanation of the
maintenance codes, see page .
If you still do not get the indicated
maintenance done, you will see a
negative mileage, f or example ‘‘ 15’’
blinking. This negative mileage
display means you should have done
the indicated maintenance 15 miles
ago. Immediately have the indicated
maintenancedonebyyourdealer.
424
Maintenance Minder
Maintenance Main Items and Sub
Items
Maint enance
419
MAINTENANCE SUB ITEMMAINTENANCE
MAIN ITEM
MAINTENANCE
MAIN ITEM MAINTENANCE
SUB ITEMS
MAINTENANCE
SUB ITEMS
MAINTENANCE MAIN ITEM
Except Touring models
On Touring models
�����—�����—�
���y�
�������������y���
�(�����������y���������y
2010 Odyssey
Page 423 of 526
Press the select/reset knob f or
about 10 seconds. The engine oil
lif e indicator and the maintenance
item code(s) will blink.Press the select/reset knob f or
more than 5 seconds. The
maintenance items code(s) will
disappear, and the engine oil lif e
indicator will reset to ‘‘100.’’
Press the select/reset knob until
the engine oil lif e indicator is
displayed. Turn the ignition switch to the ON
(II) position.
If maintenance service is done by
someone other than your dealer,
reset the maintenance minder as
f ollows: Your dealer will reset the display
af ter completing the required
maintenance service. You will see
‘‘OIL LIFE 100%’’ on the inf ormation
display the next time you turn the
ignition switch to the ON (II)
position.
3.4.
1.
2.
On LX, EX, EX-L and Canadian DX models
Maintenance Minder
Resetting the Engine Oil Lif e
Indicator
420
�����—�����—�
���y�
�������������y���
�(�����������y���������y
2010 Odyssey
Page 424 of 526
Press the SEL/RESET button on
the steering wheel. The
maintenance item code(s) will
disappear, and the engine oil lif e
will reset to ‘‘100.’’If you want to cancel resetting,
presstheINFObuttononthe
steering wheel. The display
changesasshown.PresstheSEL/
RESET button. This cancels the
resetting procedure, and the
screen returns to the normal
display mode.
Press the SEL/RESET button on
the steering wheel f or about 10
seconds. The display will change
to the ‘‘CUSTOM SETUP’’ mode.
Turn the ignition switch to the ON
(II) position.
Press the SEL/RESET button on
the steering wheel until you see
the engine oil lif e display.
3.
1.
2.
4.5.
CONT INUED
On Touring models
Maintenance Minder
Maint enance
421
�����—�����—�
���y�
���������
���y���
�(�����������y���������y
2010 Odyssey
Page 425 of 526

If you have the required service
done but do not reset the display, or
reset the display without doing the
service, the system will not show the
correct maintenance intervals. This
canleadtoseriousmechanical
problems because you will no longer
have an accurate record of when
maintenance is needed.
Your authorized Honda dealer
knows your vehicle best and can
provide competent, ef f icient service.
When you select ‘‘RESET’’ and
press the SEL/RESET button, the
multi-inf ormation display resets as
shown above. However, service at a dealer is not
mandatory to keep your warranties
in effect. Maintenance may be done
by any qualif ied service f acility or
person who is skilled in this type of
automotive service. Make sure to
have the service f acility or person
reset the display as previously
described. Keep all receipts as proof
of completion, and have the person
who does the work f ill out your
Honda Service History or Canadian
Maintenance Log. Check your
warranty booklet f or more
inf ormation.
We recommend the use of Honda
parts and f luids whenever you have
maintenance done. These are
manuf actured to the same high-
quality standards as the original
components, so you can be conf ident
of their performance and durability.
6.
Maintenance Minder
Important Maintenance
Precautions
422
�����—�����—�
���y�
���������
���y���
�(�����������y���������y
2010 Odyssey
Page 426 of 526

�µ
�µ
�µ
�µ
�µ
�µ
�Ì
U.S. Vehicles:
Youshouldcheckthefollowing
items at the specif ied intervals. If
you are unsure of how to perf orm
any check, turn to the appropriate
page listed. Lights Check the operation of
the headlights, parking lights,
taillights, high-mount brake light,
and license plate lights monthly.
See page .
Engine coolant level Check the
radiator reserve tank every time
you f ill the f uel tank. See page . Engine oil level Check every
time you fill the fuel tank. See
page .
Automatic transmission Check
the f luid level monthly. See page .
Brakes Check the f luid level
monthly. See page .
Tires Check the tire pressure
monthly. Examine the tread f or
wear and foreign objects. See page .
According to state and federal
regulations, f ailure to perf orm
maintenance on the items marked
with will not void your emissions
warranties. However, all
maintenance services should be
perf ormed in accordance with the
intervals indicated by the odometer/
trip meter display or the multi-
inf ormation display.
371
372
433 435 437
451
CONT INUED
Maintenance, replacement, or
repair of emissions control
devices and systems may be done
by any automotive repair
establishment or individual using
parts that are ‘‘certif ied’’ to EPA
standards. Owner’s Maintenance Checks
Maintenance Minder
Maint enance
423
�����—�����—�
���y�
�������������y���
�(�����������y���������y
2010 Odyssey
Page 427 of 526

�µ
�µ
�Ì
�Î
�Î
�Ì �Ì
�Î
Maintenance Minder
424
:
If the message ‘‘SERVICE DUE NOW’’ does not appear more than 12 months
after the display is reset, change the engine oil every year.
See information on maintenance and emissions warranty on page .
Inspect idle speed every 160,000 miles (256,000 km).
Adjust the valves during services A, B, 1, 2, or 3 only if they are noisy. Independent of the maintenance messages in the information display,
replace the brake fluid every 3 years.
NOTE: 1:
423
Maintenance Sub Items
Rotate tires
Replace air cleaner element If you drive in dusty conditions, replace
every 15,000 miles (24,000 km).
Replace dust and pollen filter If you drive primarily in urban areas that have high
concentrations of soot in the air from industry and
from diesel-powered vehicles, replace every 15,000
miles (24,000 km).
Inspect drive belt
Replace transmission fluid
Replace spark plugs
Replace timing belt and inspect water pump If you drive regularly in very high temperatures (over
110°F, 43°C), in very low temperatures (under 20°F,29°C), replace every 60,000 miles (U.S.)/100,000 km
(Canada).
Inspect valve clearance
Replace engine coolant
Maintenance Main Items
Replace engine oil
Replace engine oil and oil filter
Inspect front and rear brakes
Check parking brake adjustment
Inspect these items: Tie rod ends, steering gear box, and boots
Suspension components
Driveshaft boots
Brake hoses and lines (including ABS/VSA)
All fluid levels and condition of fluids
Exhaust system
Fuel lines and connections
A
B
Symbol
Symbol
1
2
3
4
51
1
Maintenance Minder
�����—�����—�
���y�
�������������y���
�(�����������y���������y
2010 Odyssey
Page 431 of 526

Always change the oil and f ilter
according to the maintenance
messages shown on the odometer/
trip meter display or on the multi-
inf ormation display. The oil and f ilter
collect contaminants that can dam-
age your engine if they are not
removed regularly.
Changing the oil and f ilter requires
special tools and access f rom
underneath the vehicle. The vehicle
should be raised on a service station-
type hydraulic lif t f or this service.
Unless you have the knowledge and
proper equipment, you should have
this maintenance done by a skilled
technician.Run the engine until it reaches
normal operating temperature,
then shut it off.
Open the hood, and remove the
engine oil f ill cap. Remove the oil
drain bolt and washer f rom the
bottom of the engine. Drain the oil
into an appropriate container.Remove the oil f ilter, and let the
remaining oil drain. A special
wrench (available from your
dealer) is required.
Make sure the oil f ilter gasket is
not stuck to the contacting surface
of the engine. If it is, remove it
bef ore installing a new oil f ilter.
1.
2.
3.
Changing the Engine Oil and Filter
428
WASHER
DRAIN BOLT
OIL FILTER
�����—�����—�
���y�
�������������y���
�(�����������y���������y
2010 Odyssey
Page 437 of 526

Pour the f luid slowly and caref ully so
you do not spill any. Clean up any
spill immediately; it could damage
components in the engine
compartment.
If the level is below the lower
mark, add f luid into the dipstick
tube to bring it to the level
between the upper and lower
marks on the dipstick.
Always use Honda Genuine ATF-Z1
(automatic transmission f luid). Insert the dipstick all the way back
into the transmission securely as
shown in the illustration.
Make sure the rubber cap on the
dipstick fits in the dipstick guide
and that you push the dipstick in
all the way.
The transmission should be drained
and ref illed with new f luid when this
service is indicated on a maintenance
message on the inf ormation display
or on the multi-inf ormation display
(depending on models).
If you are not sure how to add f luid,
contact your dealer.
5.
6.
Automatic Transmission Fluid
434
Use only Honda Genuine ATF-Z1
(automatic transmission f luid). Do not
mix with other transmission f luids.
Using transmission f luid other than
Honda Genuine ATF-Z1 may cause
deterioration in transmission operation
and durability, and could result in
damage to the transmission.
Damage resulting f rom the use of
transmission f luid other than Honda
Genuine ATF-Z1 is not covered by the
Honda new vehicle warranty.
�����—�����—�
���y�
�������������y���
�(�����������y���������y
2010 Odyssey
 will blink.Press the select/reset knob f or
more than 5 seconds. The
maintenance item")
 will
disappear, and the engine oil lif e
will reset to ‘‘100.’’If you want to cancel resetting,
presstheINFObutto")