Page 95 of 526
 or
ACCESSORY (I) position and open
the driver’s door, you will see
‘‘REMOVE KEY’’ on the display and
hear a reminder beeper.
If th")
If you leave the key in the ignition
switch in the LOCK (0) or
ACCESSORY (I) position and open
the driver’s door, you will see
‘‘REMOVE KEY’’ on the display and
hear a reminder beeper.
If the tailgate or any door(s) is not
closed tightly, the display reminds
you to close the tailgate or the
door(s) bef ore you start driving.
This display continues until you
close the door(s) or the tailgate.
Pressing the INFO button on the
steering wheel momentarily changes
the display to the normal display, but
it will come back af ter 5 seconds. If you start driving without releasing
the parking brake, the multi-
inf ormation display interrupts the
current display and shows
‘‘RELEASE PARKING BRAKE.’’
This message continues, and a
chime sounds, until you release the
parking brake, or the vehicle speed
slows down to less than 0.5 mph (0.8
km/h).
Multi-Inf ormation Display
Remove Key
Door and Tailgate Open Release Parking Brake
92
Canada
U.S.
�����—�����—�
���y�
����
��������y���
�(�����������y���������y
2010 Odyssey
Page 99 of 526

When the engine oil lif e reaches 15%,
the display shows ‘‘SERVICE DUE
SOON’’ and the code f or the
maintenance items to be perf ormed.
When the engine oil lif e reaches 5%,
the display shows ‘‘SERVICE DUE
NOW’’ along with the same
maintenance items.If there is a problem in the tire
pressure monitoring system (TPMS),
you will see ‘‘CHECK TPMS
SYSTEM’’ on the multi-inf ormation
display. If you see this message, the
TPMS is not monitoring tire
pressures. Have the TPMS checked
by your dealer as soon as possible
(see page ).
Have your dealer do the indicated
maintenance as soon as you see this
message, and have them reset the
display af ter completing the service.
If you do not perf orm the indicated
maintenance or do not reset the
display, the message changes to
‘‘SERVICE PAST DUE’’ when the
engine oil lif e becomes 0%.
These messages appear on the multi-
inf ormation display each time you
turn the ignition switch to the ON
(II) position.
For details on engine oil lif e and
maintenance messages, ref er to page
.
Also ref er to page f or important
maintenance saf ety precautions. 417
414 402
Maint enance Messages Check T PMS Syst em
Multi-Inf ormation Display
96
�����—�����—�
���y�
����
��������y���
�(�����������y���
���
�y
2010 Odyssey
Page 104 of 526
 position, press and hold the
INFO button for more than 3
seconds. ‘‘CUSTOMIZE ENTRY’’
appears on the multi-inf ormation
display.
You can customize some")
With the ignition switch in the ON
(II) position, press and hold the
INFO button for more than 3
seconds. ‘‘CUSTOMIZE ENTRY’’
appears on the multi-inf ormation
display.
You can customize some vehicle
control settings f or ‘‘DRIVER 1’’ and
‘‘DRIVER 2’’ separately.
To have the driver’s ID detected,
make sure you use your transmitter
to unlock the driver’s door.
If you use the key to unlock the
driver’s door, the system cannot
recognize either ‘‘DRIVER 1’’ or
‘‘DRIVER 2.’’ In this case, when you
try to enter the customizing mode,
‘‘DRIVER UNKNOWN
CUSTOMIZE IMPOSSIBLE’’ will be
displayed, and you cannot customize
the settings.Ref er to the table on the f ollowing
pages about the settings you want to
customize. UsetheINFObuttononthesteering
wheel to see the settings, and the
SEL/RESET button to enter your
selections. If you want the settings as they were
when the vehicle lef t the f actory,
select ‘‘DEFAULT ALL,’’ as
described on page . If you want to change any vehicle
control settings, select ‘‘CHANGE
SETTING,’’ and f ollow the
instructions on page . The f irst customizing menu is:
CHANGE SETTING
DEFAULT ALL
You cannot customize the settings
under these conditions:
If you turn the ignition switch to
the ACCESSORY (I) or the LOCK
(0) position.
If you move the shif t lever out of
Park.
You can cancel each custom setting
(Driver 1, Driver 2). Press and hold
the LOCK and SLIDING DOOR
button (passenger’s side) at the
same time until the LED in the
remote transmitter blinks twice. At
this time, the custom setting is
changed to the def ault setting. To
activate each custom setting (Driver
1, Driver 2), repeat this procedure.
The LED will blink f or 1 second to
indicate the custom setting has been
activated. 106
104
CONT INUED
Customized Settings
Multi-Inf ormation Display
Inst rument s and Cont rols
101
�����—�����—�
���y�
����
��������y���
�(�����������y���
�����y
2010 Odyssey
Page 117 of 526
While the multi-information display
shows ‘‘METER SETUP’’ of the
‘‘CUSTOMIZE GROUP,’’ press the
SEL/RESET button on the steering
wheel. The display changes to
‘‘CUSTOMIZE MENU.’’ Press the
INFO button repeatedly until you see
‘‘ELAPSED TIME RESET’’ in the
lower segment as shown above.Press the SEL/RESET button. The
display changes as shown above.
Press the INFO button repeatedly
until the desired condition appears,
then press the SEL/RESET button
to enter your selection.
Therearethreepossiblesettings:
IGN RESET: The elapsed time
resets each time the ignition switch
is turned to the ON (II) position.
TRIP A RESET: The elapsed time
resets each time the TRIP A is reset.
TRIP B RESET: The elapsed time
resets each time the TRIP B is reset.
Elapsed T ime Reset
Multi-Inf ormation Display
114
�����—�����—�
���y�
����
��������y���
�(�����������y���
�
���y
2010 Odyssey
Page 123 of 526
The headlights, parking lights,
taillights, and license plate light turn
of f af ter the selected time when you
remove the key from the ignition
switch and close the driver’s door.While the multi-information display
shows ‘‘LIGHTING SETUP,’’ press
the SEL/RESET button on the
steering wheel. Then press the
INFO button to display
‘‘HEADLIGHT AUTO OFF TIMER’’
as shown above.Press the SEL/RESET button. The
display changes as shown above.
Each time you press the INFO
button, the highlighted number
changes f rom ‘‘0 sec,’’ to ‘‘15 sec,’’ to
‘‘30 sec,’’ and then to ‘‘60 sec.’’
Press the INFO button repeatedly
until the desired time appears, then
press the SEL/RESET button to
enter your selection.
Headlight A uto Of f T imer
Multi-Inf ormation Display
120
�����—�����—�
���y�
����
��������y���
�(�����������y���
�����y
2010 Odyssey
Page 128 of 526
�µ
�µ
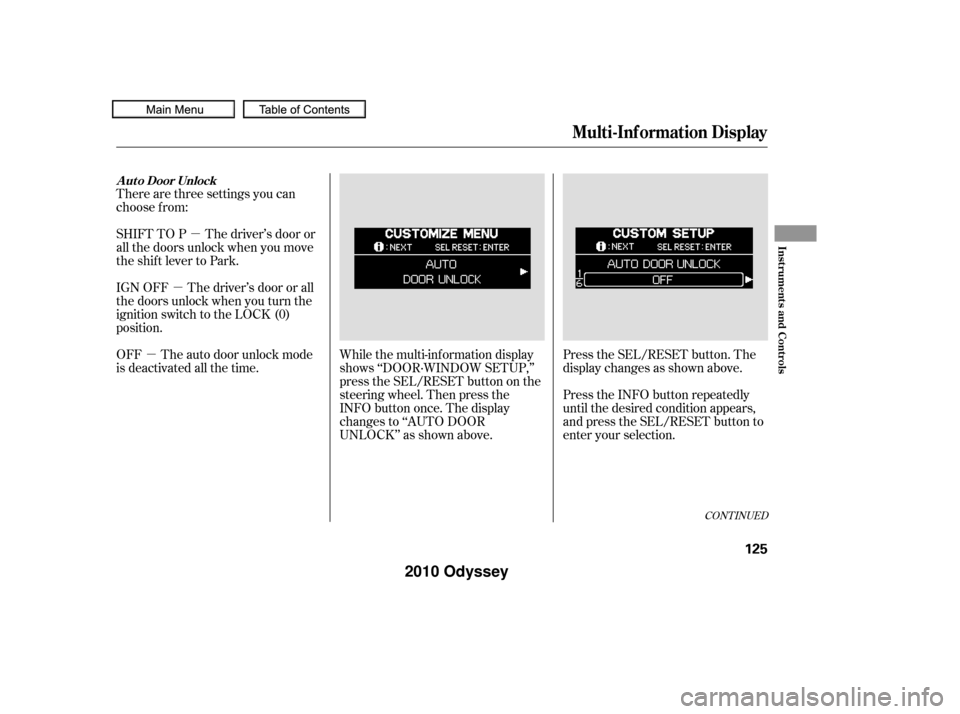
�µ While the multi-information display
shows ‘‘DOOR·WINDOW SETUP,’’
press the SEL/RESET button on the
steering wheel. Then press the
INFO button once. The display
changes to ‘‘AUTO DOOR
UNLOCK’’ as shown above.
There are three settings you can
choose f rom:
SHIFT TO P The driver’s door or
all the doors unlock when you move
the shift lever to Park.
IGN OFF The driver’s door or all
the doors unlock when you turn the
ignition switch to the LOCK (0)
position.
OFF The auto door unlock mode
is deactivated all the time.
Press the SEL/RESET button. The
display changes as shown above.
Press the INFO button repeatedly
until the desired condition appears,
and press the SEL/RESET button to
enter your selection.
CONT INUED
A ut o Door Unlock
Multi-Inf ormation Display
Inst rument s and Cont rols
125
�����—�����—�
���y�
����
��������y���
�(�����������y���
�����y
2010 Odyssey
Page 139 of 526

�µ�µ�µ
Push down on the
lever to signal a lef t turn and up to
signal a right turn. To signal a lane
change, push lightly on the lever,
and hold it. The lever will return to
center when you release it or
complete a turn. The rotating switch
on the lef t lever controls the lights.
Turning this switch to the ‘‘ ’’
position turns on the parking lights,
taillights, instrument panel lights,
side-marker lights, and rear license
plate lights.
Turning the switch to the ‘‘ ’’
position turns on the headlights. If you leave the lights on with the
key removed f rom the ignition
switch, you will hear a reminder
chime when you open the driver’s
door.
When the light switch is in the
‘‘ ’’ or ‘‘ ’’ position, the
lights on indicator comes on as a
reminder. This indicator stays on if
you leave the light switch on and
turn the ignition switch to the
ACCESSORY (I) or the LOCK (0)
position. To switch f rom low
beams to high beams, push the lef t
lever f orward until you hear a click.
The high beam indicator will come
on (see page ). Pull it back to
return to low beams. To flash the
high beams, pull the lever back
lightly, then release it. The high
beams will stay on as long as you
hold the lever back. 73
Turn Signal
Headlights
High Beams
Turn Signal, Headlights
136
�����—�����—�
���y�
����
��������y���
�(�����������y���
���
�y
2010 Odyssey
Page 140 of 526
 position. To turn them
on again, either turn the ignition
switch to the ON (II) position, or
turn the light swit")
�µThe lights turn of f automatically
when you turn the ignition switch to
the LOCK (0) position. To turn them
on again, either turn the ignition
switch to the ON (II) position, or
turn the light switch to the
position.
The automatic lighting f eature is
controlledbyasensorlocatedontop
of the dashboard. Do not cover this
sensor or spill liquids on it.
The automatic lighting
f eature turns on the headlights, all
other exterior lights, and the
instrument panel lights when it
senses low ambient light.
To turn on the automatic lighting,
turn the light switch to the AUTO
position at any time. The lights will
come on automatically when the
outside light level becomes low (at
dusk, f or example). The lights on
indicator comes on as a reminder.
The lights and indicator turn of f
automatically when the system
senses high ambient light. Even with the automatic lighting
f eature turned on, we recommend
thatyouturnonthelightsmanually
when driving at night or in a dense
f og, or when you enter dark areas
such as long tunnels or parking
f acilities.
On Touring models
Headlights
AUTO
Inst rument s and Cont rols
137
SENSOR
�����—�����—�
���y�
����
��������y���
�(�����������y���
�����y
2010 Odyssey