Page 49 of 155

Navigation System49
Driving to Your Destination
Changing the Routing Method
The system lets you select the way you
want to drive to your destination. Before
selecting OK to calculate a route, you
can change the routing method by using
the CHANGE METHOD scroll bar
back ( ) or forward ( ) buttons. The
route choices will appear in the address
box.
NOTE:
When you are en route and want to
change the routing method, press the
MENU button, and select Change
Routing Method on the Change
route by screen. • “Direct Route” (the factory default) is
the route that is the quickest (least
time) and is usually the best choice. If
you choose any other method, it
becomes the new default for all future
routing. Make sure to check the
routing method if the displayed route
is not what you expected to see.
• “Easy Route” produces a route with the least turns.
• “Maximize Freeways,” “Minimize Freeways,” and “Minimize Toll
Roads” are also available.
NOTE:
If the trip is greater than 100 miles, then
“Minimize Freeways” and “Minimize
Toll Roads” may be grayed out. This is
normal. The generated route may not be the
route you would choose. For safety
reasons, the system generally applies the
following rules to your route:
• It tries to avoid shortcuts through
residential areas.
• Right turns are favored over left turns or U-turns.
• Restricted turns (turns that cannot be made during certain hours) are not
used for routing.
2010 Odyssey
Page 50 of 155
 to y")
50Navigation System
Viewing the Routes
Touching View Routes on the
Calculate route to screen allows you to
scroll through and view the various
routes (Direct, Easy, Maximize
Freeways, etc.) to your destination. If
you select View Routes , the display
changes to:
NOTE:
The selected route method is shown at the top of the screen.
It may take several minutes (the system displays an hourglass while it
is calculating) to show all route
methods, and it is not unusual for the
different methods to pick the same
route. Voice commands cannot be
used while the system is calculating. If the trip is greater than 100 miles,
then “Minimize Freeways” and
“Minimize Toll Roads” may be
grayed out. This is normal.
Zoom IN/OUT to view route details is not available on this screen. After you
choose a route method, you can then
zoom in or out on the map screen to
view your route in details.
Say or select Summary to display the
distance and time to go for each route.
Based on the route data, you can change
the routing by using the Next and Prev.
buttons. Once you confirm your
selection, say or select OK on the
screen.
NOTE:
Distances and times shown for each
method in the Summary are
approximate. After calculating the route with the new
method, the system displays a map of
your current locatio
n. The calculated
route will be highlighted as a blue line,
and a voice prompt will tell you how to
proceed along the highlighted route.
Touch Voice to have the guidance
repeated.
Driving to Your Destination
2010 Odyssey
Page 51 of 155

Navigation System51
Driving to Your Destination
Viewing the Destination Map
Touching View Dest. Map displays a
map of the destination vicinity. Press the
CANCEL or NAVI BACK button to
return. You can view the destination
map anytime while en route by saying,
“Display destination map.”
Map Screen
When you select OK on the Calculate
route to screen, the map screen
appears, showing your highlighted route
in real time.
Route Line
When driving to a destination on
verified roads in a metropolitan area, the
route line is displayed as a blue line.
When driving in rural areas on
unverified streets (light brown color),
the route line changes to either a blue
dotted “vector line” pointing to your
destination, or a blue-pink line. See
Unverified Area Routing on page87 for
a detailed explanatio n of how to enable
unverified routing, and the related
cautions and disclaimers.
NOTE:
You can always view the entire route by
simply saying, “Display entire route.” “Vector line” (unverified routing off)
Blue-pink unverified route line
(unverified routing on)
2010 Odyssey
Page 52 of 155

52Navigation System
Guidance Prompts
As you get near the maneuver, you will
hear a voice reminder and see a pop-up
window showing you the maneuver.
The number of reminders that you will
hear before a maneuver is determined
by Guidance Prompts in Setup on
page 79.
With the factory default (Max),
typically you will hear two prompts:
• The first is about 1/4 mile from the maneuver.
• The final maneuver is close to your actual turn.
If the distance between the next two
driving maneuvers is very small, both
maneuvers are displayed on the screen
in a single window, and the voice will
remind you of both of them at the same
time. NOTE:
You can say “Voice” or select
Voice
on the screen at any time to be
reminded of the next maneuver.
Typically, a pop-up guidance window shows your next turn, and a voice
guidance prompt is heard. The timing
of these prompts varies, depending on
the type of road you are on, and the
distance to your next maneuver.
When given guidance in unverified
areas, the words “if possible” are
inserted before each guidance prompt.
See Unverified Area Routing on page87
for more details about unverified
routing.
Driving to Your Destination
2010 Odyssey
Page 53 of 155

Navigation System53
Driving to Your Destination
Acura Dealer
School
Restaurant
AT M
Parking Lot
Post OfficeHonda Dealer
Hospital
Grocery Store
Gas Station
Hotel/Lodging
Parking Garage
Freeway Exit Information
Map Screen Legend
Map Orientation
(see page58)
Map Scale Adjustment
(Mile or km per half-inch
appears only when you
ZOOM IN or OUT.)
(see page 57)
Current Map Scale
(see page 57)
ICON Button
(see page 61)
Breadcrumbs
(see Off-road Tracking on page 63)
Direction of Destination
(When en route)
(see page
55)
Voice (see page 52)
(Announces next driving
instruction) Distance to Destination
(see page
55) Time to Destination
(see page
55)
Waypoint
(When en route)
(see page 66)
Current Street
(see page 6)
Vehicle Position (see page64)
(Use voice command, “Dis play current location,”
or touch the icon to show the current location.) Direction List
(see page 55)
Blue Line
Calculated route
(see page 51)Map Features
NOTE:
If you move the joystick over an area (map features
shown above), the name is displayed on the screen.
: Par k
: Hospital
: Shopping Mall
: Golf Course
: Water Area
: Cemetery
: University
: Indian Reservation
: Airport/Stadium/Business
One-Way Traffic Icon
(1/20 mile scale only)
(see page 59)
Streets
(see Map Overview on page6)
Interstates or Freeways
Verified Streets
Unverified Streets
Landmark Icon - Generic (see page59)
“North Up”
“Heading Up”
NOTE:
See Map Legend from the Information screen for further explanation (see page 75). Destination Icon
(see page
58)
No Entry Icon
2010 Odyssey
Page 54 of 155

54Navigation System
Guidance Screen
The guidance screen offers an alternative
way to view your route information.
Many of the icons and screen features are
similar to those on the
map screen. While
driving to your destination, press the
MAP/GUIDE button to switch between
the map and guidance screens. The guidance screen shows you:
Milestone to Destination – The
position of the small circular icon shows
your trip progress. As you get closer to
your destination, the indicator will
approach “DEST.”
Vehicle Heading – The black portion of
the compass symbol indicates north.
NOTE:
The map and voice guidance in unverified areas differ from those in
verified areas.
Current maneuvers and those within 1000 feet will show on the
Countdown bar, indicating the
distance until the next maneuver.
Guidance Screen Legend
Vehicle Heading (bla ck indicates north) ( see page 54 )
Distance to Next Driving Maneuver
Street Name of Next
Driving Maneuver
Distance to Destination
(see page 55)
Direction List
(see page 55)
Current Street (see page6)
Voice Button
(announces ne xt driving instruction)
(see page
52)
Milestone to Destination
(see page 54) Scroll: to view guidance maneuvers
Freeway Exit Information
(see page56)
Direction of Destinatio n, “as the crow flies” (see page55)
Time to Destination
(see page 55)
Driving to Your Destination
2010 Odyssey
Page 55 of 155

Navigation System55
Driving to Your Destination
Distance and Time to
Destination
When you select a destination, the
distance to the destination is the actual
road distance of the calculated route,
and not “as the crow flies.” When
viewing a list of destinations (points of
interest), such as restaurants, the
distance is “as the crow flies” (see Sort
by Distance to Travel on page37).
The displayed time to the destination
may differ from the actual travel time
because the time is calculated based on
the posted road speed data and your
current speed. If part of your route
includes unverified roads, the “distance”
and “time to go” for that portion is
estimated using 25 mph as an average
speed.
Direction List
If you select Directions on the map or
guidance screen, the display changes
to:
NOTE:
The map and voice guidance in unverified areas differ from those in
verified areas. See Unverified Area
Routing on page 87.
Only maneuvers that occur at freeway exits or contain freeway exit
information will show the exit info
icon ( ) on the right end of the items
in the Direction list. If no exit info
icon is shown on the list, the Exit
Info. is grayed out. You can see the Direction list and the
distance to each maneuver. Touch the
Return
button or press the CANCEL
button to return to the previous screen.
You can scroll through the Direction list
screen by screen using the scroll bar, or
one instruction at a time using the
joystick.
2010 Odyssey
Page 56 of 155

You can search freeway exit
information and add new destinations or
waypoints to the calculated route as a
new destination or waypoint. Th")
56Navigation System
Exit Info. (Freeway Exit
Information)
You can search freeway exit
information and add new destinations or
waypoints to the calculated route as a
new destination or waypoint. The exit
info icon ( ) on the right end of the
items in the direction list indicates that
there is freeway exit information
available. Say or select Exit Info., and
choose the exit and place to set as a new
destination or waypoint.
On the map screen, you can display
freeway exit information using the
joystick. The exit info icon will only be
displayed on the map screen if there is
any freeway exit information available.
Choose the 1/4, 1/2, or 1 mile scale, then
move the crosshairs to the desired exit
info icon and click on it. Choose a place
from the list and set it as a new
destination or waypoint.
NOTE:
To turn on “Freeway exit information”
on the map screen, display the icon bar
and select the icon (see page 61).
Guidance Mode
When en route to a destination, you
have two display options: single-screen
mode (the factory default) and split-
screen mode.
Single-screen mode – A map is
displayed with occasional guidance
pop-up windows as you approach a
maneuver.
Split-screen mode – The map is always
displayed on the left of the screen, and
the maneuver or direction list is
displayed on the right-hand side of the
screen.
Guidance mode can be changed in either
Setup (see Guidance Mode on page 94),
or by accessing the icon bar
(see Guidance Mode on page 61) . When you get near the maneuver, the
map
screen changes to:
On the map screen, the location of the
maneuver is marked with a small yellow
square. The guidance window is simply
an enlargement of th e area indicated by
the yellow square. After you complete
the maneuver, the display returns to a
full map screen when the single-screen
mode is set, or to a map and direction
list screen when the split-screen mode is
set.
Driving to Your Destination
2010 Odyssey
 1
1 2
2 3
3 4
4 5
5 6
6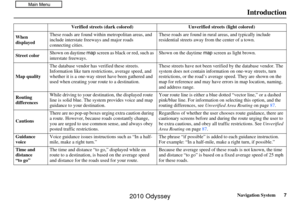 7
7 8
8 9
9 10
10 11
11 12
12 13
13 14
14 15
15 16
16 17
17 18
18 19
19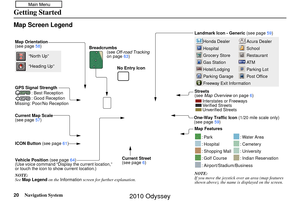 20
20 21
21 22
22 23
23 24
24 25
25 26
26 27
27 28
28 29
29 30
30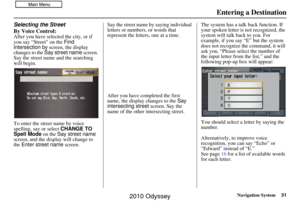 31
31 32
32 33
33 34
34 35
35 36
36 37
37 38
38 39
39 40
40 41
41 42
42 43
43 44
44 45
45 46
46 47
47 48
48 49
49 50
50 51
51 52
52 53
53 54
54 55
55 56
56 57
57 58
58 59
59 60
60 61
61 62
62 63
63 64
64 65
65 66
66 67
67 68
68 69
69 70
70 71
71 72
72 73
73 74
74 75
75 76
76 77
77 78
78 79
79 80
80 81
81 82
82 83
83 84
84 85
85 86
86 87
87 88
88 89
89 90
90 91
91 92
92 93
93 94
94 95
95 96
96 97
97 98
98 99
99 100
100 101
101 102
102 103
103 104
104 105
105 106
106 107
107 108
108 109
109 110
110 111
111 112
112 113
113 114
114 115
115 116
116 117
117 118
118 119
119 120
120 121
121 122
122 123
123 124
124 125
125 126
126 127
127 128
128 129
129 130
130 131
131 132
132 133
133 134
134 135
135 136
136 137
137 138
138 139
139 140
140 141
141 142
142 143
143 144
144 145
145 146
146 147
147 148
148 149
149 150
150 151
151 152
152 153
153 154
154